HTML5+JavaScript制作坦克大战游戏——学习笔记二
1.在JavaScript通过对象冒充来实现集成。
示例代码:
html>
lang="en">
charset="UTF-8">
</span><span style="font-family:SimSun;">对象冒充练习</span><span style="color:#e84f6b;">
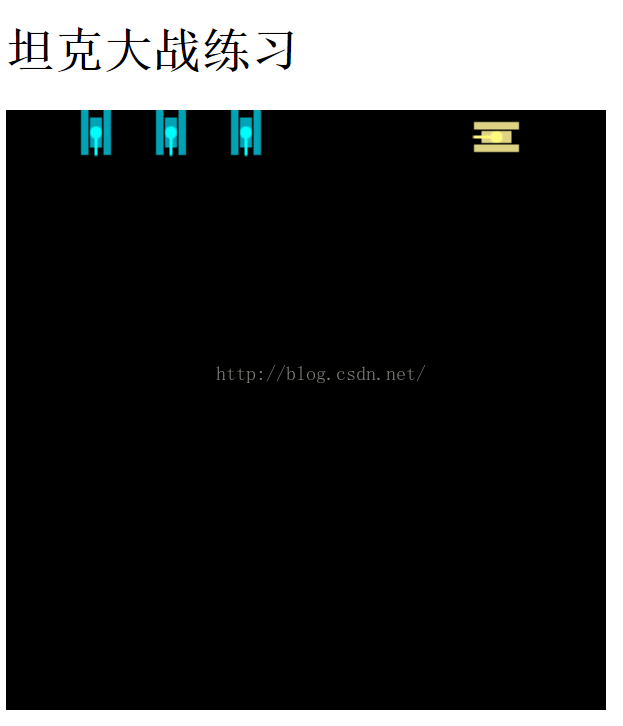
2.画出敌人的坦克,通过代码整合
实现敌人的坦克颜色跟用户的不一样;用户移动位置敌人的坦克不会消失等功能。
示例代码:(TankBattle.js)
//用数组的方式定义坦克上面两种不同的颜色
var myColor=new Array("#DED284","#FFFA7E");
var enemyColor=new Array("#00A2B5","#00FEFE");

//x表示坦克的横坐标,y表示坦克的纵坐标,dirc表示移动方向
function Tank(x,y,direc,color){
    this.x=x;
    this.y=y;
    this.speed=1;
    this.direc=direc;
    this.color=color;
    //向上移动
    this.moveUp=function(){
        this.y-=this.speed;
        this.direc=0
    }
    //向右移动
    this.moveRight=function(){
        this.x+=this.speed;
        this.direc=1;
    }
    //向下移动
    this.moveDown=function(){
        this.y+=this.speed;
        this.direc=2;
    }
    //向左移动
    this.moveLeft=function(){
        this.x-=this.speed;
        this.direc=3;
    }
}
function MyTank(x,y,direc,color){
    //下面两句话实现对象冒充效果
    this.tank=Tank;
    this.tank(x,y,direc,color);

}
//敌人的坦克也是通过对象冒充继承Tank类
function EnemyTank(x,y,direc,color){
    this.tank=Tank;
    this.tank(x,y,direc,color);
}
//      画坦克
function drawTank(tank){
    //考虑方向
    switch (tank.direc){
        case 0:
        case 2:

            ctx.fillStyle=tank.color[0];   //给定矩形的颜色
            ctx.fillRect(tank.x,tank.y,5,30);        //画出左边的矩形
            ctx.fillRect(tank.x+15,tank.y,5,30);       //画出右侧的矩形
            //画出中间的矩形(中间的矩形宽高为10*20,为了让中间的矩形和两侧的矩形之间有空隙,将左右两边都空出一个像素,所以x轴的位置
            // 向右移动了一个像素,左边就空出1px,宽度减少了2px,这样右边就又空出了1px)

            ctx.fillRect(tank.x+6,tank.y+5,8,20);
            ctx.fillStyle=tank.color[1];       //圆的填充颜色
            ctx.arc(tank.x+10,tank.y+15,4,0,360);  //画出坦克的盖(30+10=30+5+1+8/2)(30+15=30+5+20/2)
            ctx.fill();      //填充圆
//      画出炮筒的线条
            ctx.beginPath();
            ctx.moveTo(tank.x+10,tank.y+15);       //线条的起始位置为圆心的位置
            if(tank.direc==0){
                ctx.lineTo(tank.x+10,tank.y);         //线条的结束位置
            }else if(tank.direc==2){
                ctx.lineTo(tank.x+10,tank.y+30);
            }

            ctx.strokeStyle=tank.color[1];
            ctx.lineWidth=2;       //设置线条的宽度(粗细)
            ctx.closePath();
            ctx.stroke();
            break;
        case 1:   //右
        case 3:    //左
            //      画出自己的坦克
            ctx.fillStyle=tank.color[0];   //给定矩形的颜色
            ctx.fillRect(tank.x,tank.y,30,5);       //画出左边的矩形

            ctx.fillRect(tank.x,tank.y+15,30,5);       //画出右侧的矩形
            //画出中间的矩形(中间的矩形宽高为10*20,为了让中间的矩形和两侧的矩形之间有空隙,将左右两边都空出一个像素,所以x轴的位置
            // 向右移动了一个像素,左边就空出1px,宽度减少了2px,这样右边就又空出了1px)

            ctx.fillRect(tank.x+5,tank.y+6,20,8);
            ctx.fillStyle=tank.color[1];       //圆的填充颜色
            ctx.arc(tank.x+15,tank.y+10,4,0,360); //画出坦克的盖(30+10=30+5+1+8/2)(30+15=30+5+20/2)
            ctx.fill();      //填充圆
//      画出炮筒的线条
            ctx.beginPath();
            ctx.moveTo(tank.x+15,tank.y+10);
            //向右
            if(tank.direc==1){
                ctx.lineTo(tank.x+30,tank.y+10);
            }else if(tank.direc==3){ //向左
                ctx.lineTo(tank.x,tank.y+10);
            }
            ctx.strokeStyle=tank.color[1];
            ctx.lineWidth=2;       //设置线条的宽度(粗细)
            ctx.closePath();
            ctx.stroke();
            break;
    }

}
HTML5代码(TankBattle.html)
html>
lang="en">
charset="UTF-8">
</span><span style="font-family:SimSun;">坦克大战游戏</span><span style="color:#e84f6b;">
οnkeydοwn="getCommand();">
坦克大战练习
运行效果:
3.对象是引用传递,非面向对象的是值传递
4. 1)在上面版本的基础上实现发子弹
2)子弹不会飞出画布
3)子弹到达画布之后就不再再边缘处画子弹了
示例代码: (TankBattle.html)
html>
lang="en">
charset="UTF-8">
</span><span style="font-family:SimSun;">坦克大战游戏</span><span style="color:#e84f6b;">
οnkeydοwn="getCommand();">
坦克大战练习
TankBattle.js
//用数组的方式定义坦克上面两种不同的颜色
var myColor=new Array("#DED284","#FFFA7E");
var enemyColor=new Array("#00A2B5","#00FEFE");
//定义子弹类
function Bullet(x,y,direc,speed){
    this.x=x;
    this.y=y;
    this.direc=direc;
    this.speed=speed;
    this.timer=null;
    this.isLive=true;     //子弹刚刚创建的时候,它是活的
    //定义一个让子弹飞的方法
    this.bulletFly= function(){
        //这行代码的意思是:如果子弹飞出画布canvas的边界了,我们就要clear timer 了
        if(this.x<=0||this.x>=400||this.y<=0||this.y>=400){
            window.clearInterval(this.timer);   //子弹停止
            this.isLive=false;
        }else {
            switch (this.direc){
                case 0:   //子弹方向朝上的时候
                    this.y-=this.speed;    //子弹不断朝上,y坐标不断--
                    break;
                case 1:
                    this.x+=this.speed;
                    break;
                case 2:
                    this.y+=this.speed;
                    break;
                case 3:
                    this.x-=this.speed;
                    break;
            }
        }

    }

}
//x表示坦克的横坐标,y表示坦克的纵坐标,dirc表示移动方向
function Tank(x,y,direc,color){
    this.x=x;
    this.y=y;
    this.speed=1;
    this.direc=direc;
    this.color=color;
    //向上移动
    this.moveUp=function(){
        this.y-=this.speed;
        this.direc=0
    }
    //向右移动
    this.moveRight=function(){
        this.x+=this.speed;
        this.direc=1;
    }
    //向下移动
    this.moveDown=function(){
        this.y+=this.speed;
        this.direc=2;
    }
    //向左移动
    this.moveLeft=function(){
        this.x-=this.speed;
        this.direc=3;
    }
}
function MyTank(x,y,direc,color){
    //下面两句话实现对象冒充效果
    this.tank=Tank;
    this.tank(x,y,direc,color);
    //添加一个射击敌人的方法(射击这个行为是坦克的行为,所以放在这个函数里面)
    this.shotEnemy=function(){
        //这里用坦克的方向来switch,因为this下hi先弄个当前的坦克,而子弹的方向是跟坦克的方向保持一致的
        switch (this.direc){
            case 0:
                //创建一颗子弹
                myBullet=new Bullet(this.x+9,this.y,this.direc,1);   //此处的1代表的是Bullet类中的speed参数
                break;
            case 1:   //向右
                myBullet=new Bullet(this.x+30,this.y+9,this.direc,1);   //在方向direc处不要漏写了this
                break;
            case 2:
                //之所以+9,是因为子弹给了2px的大小,如果+10,子弹就会相对于炮筒稍稍有点跑偏了
                myBullet=new Bullet(this.x+9,this.y+30,this.direc,1);
                break;
            case 3:    //向左
                myBullet=new Bullet(this.x,this.y+9,this.direc,1);
                break;
        }
        //每隔50ms,调用myBullet对象的bulletFly()方法
       var timer= window.setInterval("myBullet.bulletFly()",50);   //此处的50ms是根据老师多次试验得来的结果直接拿来用的
       myBullet.timer=timer;
    }

}
//敌人的坦克也是通过对象冒充继承Tank类
function EnemyTank(x,y,direc,color){
    this.tank=Tank;
    this.tank(x,y,direc,color);
}
//画出当前用户的子弹
function drawMyBullet(){
    //如果这个子弹的timer还没有被清空,也就是这个子弹isLive=ture(默认就为true)是活的,就执行画自带的操作
    if(myBullet!=null&&myBullet.isLive){    //如果子弹不为空,也就是Bullet这个类创建了,就画出子弹
        ctx.fillStyle="#FFFA7E";
        ctx.fillRect(myBullet.x,myBullet.y,2,2);
    }

}

//      画坦克
function drawTank(tank){
    //考虑方向
    switch (tank.direc){
        case 0:
        case 2:

            ctx.fillStyle=tank.color[0];   //给定矩形的颜色
            ctx.fillRect(tank.x,tank.y,5,30);        //画出左边的矩形
            ctx.fillRect(tank.x+15,tank.y,5,30);       //画出右侧的矩形
            //画出中间的矩形(中间的矩形宽高为10*20,为了让中间的矩形和两侧的矩形之间有空隙,将左右两边都空出一个像素,所以x轴的位置
            // 向右移动了一个像素,左边就空出1px,宽度减少了2px,这样右边就又空出了1px)

            ctx.fillRect(tank.x+6,tank.y+5,8,20);
            ctx.fillStyle=tank.color[1];       //圆的填充颜色
            ctx.arc(tank.x+10,tank.y+15,4,0,360);  //画出坦克的盖(30+10=30+5+1+8/2)(30+15=30+5+20/2)
            ctx.fill();      //填充圆
//      画出炮筒的线条
            ctx.beginPath();
            ctx.moveTo(tank.x+10,tank.y+15);       //线条的起始位置为圆心的位置
            if(tank.direc==0){
                ctx.lineTo(tank.x+10,tank.y);         //线条的结束位置
            }else if(tank.direc==2){
                ctx.lineTo(tank.x+10,tank.y+30);
            }

            ctx.strokeStyle=tank.color[1];
            ctx.lineWidth=2;       //设置线条的宽度(粗细)
            ctx.closePath();
            ctx.stroke();
            break;
        case 1:   //右
        case 3:    //左
            //      画出自己的坦克
            ctx.fillStyle=tank.color[0];   //给定矩形的颜色
            ctx.fillRect(tank.x,tank.y,30,5);       //画出左边的矩形

            ctx.fillRect(tank.x,tank.y+15,30,5);       //画出右侧的矩形
            //画出中间的矩形(中间的矩形宽高为10*20,为了让中间的矩形和两侧的矩形之间有空隙,将左右两边都空出一个像素,所以x轴的位置
            // 向右移动了一个像素,左边就空出1px,宽度减少了2px,这样右边就又空出了1px)

            ctx.fillRect(tank.x+5,tank.y+6,20,8);
            ctx.fillStyle=tank.color[1];       //圆的填充颜色
            ctx.arc(tank.x+15,tank.y+10,4,0,360); //画出坦克的盖(30+10=30+5+1+8/2)(30+15=30+5+20/2)
            ctx.fill();      //填充圆
//      画出炮筒的线条
            ctx.beginPath();
            ctx.moveTo(tank.x+15,tank.y+10);
            //向右
            if(tank.direc==1){
                ctx.lineTo(tank.x+30,tank.y+10);
            }else if(tank.direc==3){ //向左
                ctx.lineTo(tank.x,tank.y+10);
            }
            ctx.strokeStyle=tank.color[1];
            ctx.lineWidth=2;       //设置线条的宽度(粗细)
            ctx.closePath();
            ctx.stroke();
            break;
    }

}
运行效果:

