使用模版方法模式模拟不同计算机的启动流程.
public abstract class AbstractComputer {
    protected void powerOn(){
        System.out.println("开启电源");
    }
    protected void checkHardware(){
        System.out.println("硬件检查");
    }
    protected void loadOS(){
        System.out.println("载入操作系统");
    }
    protected void login(){
        System.out.println("小白的计算机无验证,直接进入系统");
    }
    /***
     *
     */
    public final void startUp(){
        System.out.println("------ 开机 START ------");
        powerOn();
        checkHardware();
        loadOS();
        login();
        System.out.println("------ 关机 START ------");
    }
}
public class CoderComputer extends AbstractComputer {
    @Override
    protected void login() {
        System.out.println("程序员只需要进行用户和密码的验证就可以了");
    }
}
public class MilitaryComputer extends AbstractComputer{
    @Override
    protected void checkHardware() {
        super.checkHardware();
        System.out.println("检查硬件和防火墙");
    }

    @Override
    protected void login() {
        super.login();
        System.out.println("进行指纹和复杂的用户验证");
    }
}
public static void main(String[] args){
        AbstractComputer comp = new CoderComputer();
        comp.startUp();
        comp = new MilitaryComputer();
        comp.startUp();
}
通过上面的例子可以看到,在startUp方法中有一些固定的步骤,依次为开启电源,检查硬件,加载系统,用户登录4个步骤,这四个步骤是开机过程不会变动
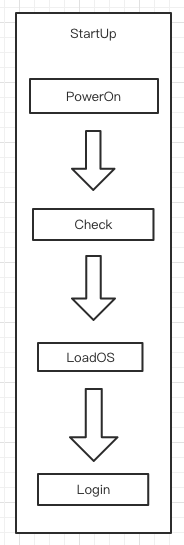
但是,不同用户的这几个步骤的实现可能各不相同,因此,子类需要复写相应的方法来进行自定义处理,这里要注意startUp为final方法,这样就保证了逻辑流程不能背子类修改,子类只能够改变某一步骤中的具体实现,这样保证了这个逻辑流程的稳定性。
Android中的模版方法模式
AsyncTask
@MainThread
public final AsyncTask execute(Params... params) {
        return executeOnExecutor(sDefaultExecutor, params);
}
public final AsyncTask executeOnExecutor(Executor exec,
            Params... params) {
        if (mStatus != Status.PENDING) {
            switch (mStatus) {
                case RUNNING:
                    throw new IllegalStateException("Cannot execute task:"
                            + " the task is already running.");
                case FINISHED:
                    throw new IllegalStateException("Cannot execute task:"
                            + " the task has already been executed "
                            + "(a task can be executed only once)");
            }
        }

        mStatus = Status.RUNNING;

        onPreExecute();

        mWorker.mParams = params;
        exec.execute(mFuture);

        return this;
}
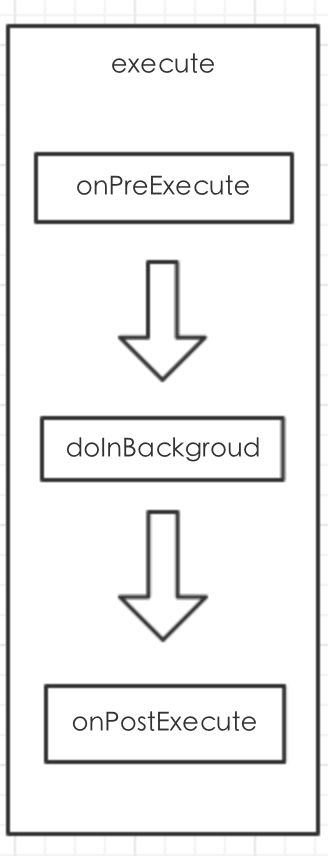
execute是一个final方法,这样防止了子类充血,在executeOnExecutor中判断了状态,如果不是PENDING状态就会抛出异常,这也是为什么AsyncTask中execute只能调用一次的原因,继续往下看,会调用到onPreExecute(),那随后的mWorker和mFuture是什么?在构造函数中初始化了这两个对象
public AsyncTask(@Nullable Looper callbackLooper) {
        mHandler = callbackLooper == null || callbackLooper == Looper.getMainLooper()
            ? getMainHandler()
            : new Handler(callbackLooper);

        mWorker = new WorkerRunnable() {
            public Result call() throws Exception {
                mTaskInvoked.set(true);
                Result result = null;
                try {
                    Process.setThreadPriority(Process.THREAD_PRIORITY_BACKGROUND);
                    //noinspection unchecked
                    result = doInBackground(mParams);
                    Binder.flushPendingCommands();
                } catch (Throwable tr) {
                    mCancelled.set(true);
                    throw tr;
                } finally {
                    postResult(result);
                }
                return result;
            }
        };

        mFuture = new FutureTask(mWorker) {
            @Override
            protected void done() {
                try {
                    postResultIfNotInvoked(get());
                } catch (InterruptedException e) {
                    android.util.Log.w(LOG_TAG, e);
                } catch (ExecutionException e) {
                    throw new RuntimeException("An error occurred while executing doInBackground()",
                            e.getCause());
                } catch (CancellationException e) {
                    postResultIfNotInvoked(null);
                }
            }
        };
    }
mWorker其实是一个Callable,FutureTask对它进行了封装,FutureTask的run函数又会调用call方法
public void run() {
        if (state != NEW ||
            !U.compareAndSwapObject(this, RUNNER, null, Thread.currentThread()))
            return;
        try {
            Callable c = callable;
            if (c != null && state == NEW) {
                V result;
                boolean ran;
                try {
                    //调用call方法
                    result = c.call();
                    ran = true;
                } catch (Throwable ex) {
                    result = null;
                    ran = false;
                    setException(ex);
                }
                if (ran)
                    set(result);
            }
        } finally {
            // runner must be non-null until state is settled to
            // prevent concurrent calls to run()
            runner = null;
            // state must be re-read after nulling runner to prevent
            // leaked interrupts
            int s = state;
            if (s >= INTERRUPTING)
                handlePossibleCancellationInterrupt(s);
        }
    }
在call方法中执行了AsyncTask的doInBackground方法,这里是在线程池里执行的.执行完过后调用到postResult(result)
private void postResultIfNotInvoked(Result result) {
        final boolean wasTaskInvoked = mTaskInvoked.get();
        if (!wasTaskInvoked) {
            postResult(result);
        }
    }
postResult会发送一个消息回调到主线程
 private Result postResult(Result result) {
        @SuppressWarnings("unchecked")
        Message message = getHandler().obtainMessage(MESSAGE_POST_RESULT,
                new AsyncTaskResult(this, result));
        message.sendToTarget();
        return result;
    }
上面的getHandler()实际上是InternalHandler
 private static class InternalHandler extends Handler {
        public InternalHandler(Looper looper) {
            super(looper);
        }

        @SuppressWarnings({"unchecked", "RawUseOfParameterizedType"})
        @Override
        public void handleMessage(Message msg) {
            AsyncTaskResult result = (AsyncTaskResult) msg.obj;
            switch (msg.what) {
                case MESSAGE_POST_RESULT:
                    // There is only one result
                    result.mTask.finish(result.mData[0]);
                    break;
                case MESSAGE_POST_PROGRESS:
                    result.mTask.onProgressUpdate(result.mData);
                    break;
            }
        }
    }
InternalHandler,接收到MESSAGE_POST_RESULT消息过后会调用result.mTask.finish(result.mData[0]),result是AsyncTaskResult类型
 private static class AsyncTaskResult {
        final AsyncTask mTask;
        final Data[] mData;

        AsyncTaskResult(AsyncTask task, Data... data) {
            mTask = task;
            mData = data;
        }
    }
AsyncTaskResult里面的mTask就是AsyncTask,通过调用result.mTask.finish(result.mData[0])把结果通过finish返回到了AsyncTask的onPostExecute中.
这个过程整体上是用到模版方法模式
Activity的启动流程
Activity的启动流程实际上也是使用了模版方法,例如它的onCreate,onStart,onResume等生命周期方法. 具体的执行流程不再描述.