Python3爬虫之requests库
一、实例引入
import requests

r = requests.get('http://www.baidu.com/')
print(type(r))
print(r.status_code)
print(type(r.text))
print(r.text)
print(r.cookies)
运行结果:

urllib库中的urlopen()方法实际上是以Get方式请求网页,而request中相应的方法就是get()方法。我们通过调用get()方法实现与urlopen()相同的操作得到了一个r对象,然后分别输出了r的类型、状态码、响应体的类型、内容、以及Cookies。通过运行可以发现,它的返回类型是requests.models.Response,响应体的类型是str(字符串),Cookies的类型是RequestsCookieJar。requests更方便之处在与其他的请求类型依旧可以用一句话完成。
实例:
import requests

r = requests.post('http://httpbin.org/post')
r = requests.put('http://httpbin.org/put')
r = requests.delete('http://httpbin.org/delete')
r = requests.head('http://httpbin.org/put')
r = requests.options('http://httpbin.org/put')
二、get请求
1.基本写法:
import requests

r = requests.get('http://httpbin.org/get')
print(r.text)
运行结果:我们成功发起了Get请求,返回结果中包含请求头、URL、IP等信息

2.带参数的Get请求
对于Get请求如果要附加额外的信息。如:现在要添加两个参数,其中Name是germey,age是22.
实例1:
import requests

r = requests.get('http://httpbin.org/get?name=germy&age=22')
print(r.text)
运行结果:

但是一般情况下,这种信息会用字典来存储,因此我们也可以用params这个参数来构造
import requests
data = {
    'name':"germey",
    'age':22
}
response = requests.get("http://httpbin.org/get", params=data)
print(response.text)
运行结果:

另外,网页的返回类型实际上是str类型,但是它很特殊,是JSON格式的.所以,若要直接解析返回结果,得到一个字典格式的话可以直接调用Json()方法
实例:
import requests

r = requests.get("http://httpbin.org/get")
print(type(r.text))
print(r.json())
print(type(r.json()))
运行结果:可以发现,调用Json()方法,就可以将返回结果是json格式的字符串转化为字典。但是如果返回结果不是JSON格式的时候便会出现解析错误,如:json.decoder.JSONDecodeError异常
![]()
3.抓取二进制数据:
实例:
import requests

r = requests.get("https://github.com/favicon.ico")
# Response对象的两个属性
print(type(r.text),type(r.content))
print(r.text)
print(r.content)
# 它的第一个参数是文件名称,第二个参数代表以二进制写的形式打开,可以向文件里写入二进制数据。
运行结果:可以注意到前者出现了乱码,后者结果前带有一个b,这代表是bytes类型的数据。由于图片是二进制数据,所以前者在打印时转化为str(字符串)类型,也就是图片直接转化为字符串,这理所当然会出现乱码。

接着我们将提取的图片保存下来:
import requests

r = requests.get("https://github.com/favicon.ico")
with open('favicon.ico','wb')as f:
#利用了Open()方法,它的第一个参数是文件名称,第二个参数代表以二进制写的形式打开
#可以向文件里写入二进制数据
	f.write(r.content)
	f.close()
运行结束可以发现项目文件夹出现了名为favicon.ico的图标。同样的我们可以保存视频和音频。
4.添加headers
知乎对网站有着特殊的限制,我们如果不传递headers就不能正常的请求。
实例:
import requests

r = requests.get("https://www.zhihu.com/explore")
print(r.text)
运行结果:

我们可以加上headers并加上User-Agent信息
import requests
headers = {
	'User-Agent':'Mozilla/5.0 (Windows NT 10.0; WOW64) AppleWebKit/537.36 (KHTML, like Gecko) Chrome/80.0.3987.106 Safari/537.36'
}
r = requests.get("https://www.zhihu.com/explore",headers=headers)
print(r.text)
运行结果:成功爬取了。

三、基本的Post请求
实例:
import requests
data = {'name':'germey','age':'22'}
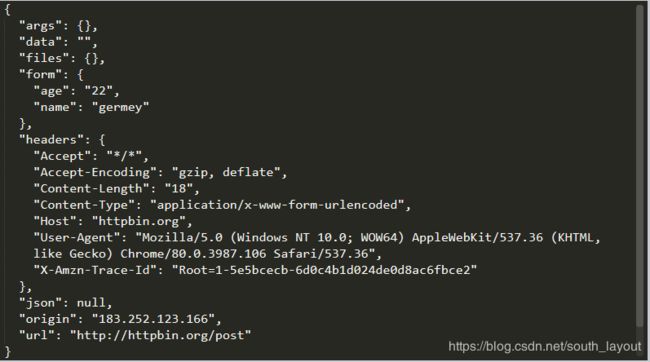
r = requests.post("http://httpbin.org/post",data=data)
print(r.text)
运行结果:成功获取了返回结果,其中form部分就是提交的数据

Post请求加headers也十分的简单
实例:
import requests
data = {'name':'germey','age':'22'}
headers = {
	'User-Agent':'Mozilla/5.0 (Windows NT 10.0; WOW64) AppleWebKit/537.36 (KHTML, like Gecko) Chrome/80.0.3987.106 Safari/537.36'
}
r = requests.post("http://httpbin.org/post",data=data,headers=headers)
print(r.text)
输出结果:
四、响应
发送请求后,得到的自然就是响应。在上面的实例中我们使用了text和content获取响应的内容。此外还有很多属性和方法可以用来获取其他信息,比如状态码、响应头、Cookies等。
实例:
import requests

r = requests.get('http://www.jianshu.com')
print(type(r.status_code),r.status_code)
print(type(r.headers),r.headers)
print(type(r.cookies),r.cookies)
print(type(r.url),r.url)
print(type(r.history),r.history)
#这里分别打印输出status_code得到状态码,输出headers得到响应头
#输出cookies得到Cookies,输出url得到URL,输出history得到历史
运行结果:

状态码常用来判断请求是否成功,而requests还提供了一个内置的状态码查询对象request.codes
实例:
import requests

r = requests.get('http://www.jianshu.com/hello.html')
exit() if not r.status_code == requests.codes.not_found else print('404 Not Found')
import requests
r = requests.get('http://www.jianshu.com')
exit() if not r.status_code == requests.codes.ok else print('Request Successfully')import requests
r = requests.get('http://www.jianshu.com')
exit() if not r.status_code == 200 else print('Request Successfully')说明:
返回码和相应的查询条件
# 信息性状态码
100: ('continue',),
101: ('switching_protocols',),
102: ('processing',),
103: ('checkpoint',),
122: ('uri_too_long', 'request_uri_too_long'),
# 成功状态码
200: ('ok', 'okay', 'all_ok', 'all_okay', 'all_good', '\\o/', '✓'),
201: ('created',),
202: ('accepted',),
203: ('non_authoritative_info', 'non_authoritative_information'),
204: ('no_content',),
205: ('reset_content', 'reset'),
206: ('partial_content', 'partial'),
207: ('multi_status', 'multiple_status', 'multi_stati', 'multiple_stati'),
208: ('already_reported',),
226: ('im_used',),
# 重定向状态码
300: ('multiple_choices',),
301: ('moved_permanently', 'moved', '\\o-'),
302: ('found',),
303: ('see_other', 'other'),
304: ('not_modified',),
305: ('use_proxy',),
306: ('switch_proxy',),
307: ('temporary_redirect', 'temporary_moved', 'temporary'),
308: ('permanent_redirect',
      'resume_incomplete', 'resume',), # These 2 to be removed in 3.0
# 客户端错误状态码
400: ('bad_request', 'bad'),
401: ('unauthorized',),
402: ('payment_required', 'payment'),
403: ('forbidden',),
404: ('not_found', '-o-'),
405: ('method_not_allowed', 'not_allowed'),
406: ('not_acceptable',),
407: ('proxy_authentication_required', 'proxy_auth', 'proxy_authentication'),
408: ('request_timeout', 'timeout'),
409: ('conflict',),
410: ('gone',),
411: ('length_required',),
412: ('precondition_failed', 'precondition'),
413: ('request_entity_too_large',),
414: ('request_uri_too_large',),
415: ('unsupported_media_type', 'unsupported_media', 'media_type'),
416: ('requested_range_not_satisfiable', 'requested_range', 'range_not_satisfiable'),
417: ('expectation_failed',),
418: ('im_a_teapot', 'teapot', 'i_am_a_teapot'),
421: ('misdirected_request',),
422: ('unprocessable_entity', 'unprocessable'),
423: ('locked',),
424: ('failed_dependency', 'dependency'),
425: ('unordered_collection', 'unordered'),
426: ('upgrade_required', 'upgrade'),
428: ('precondition_required', 'precondition'),
429: ('too_many_requests', 'too_many'),
431: ('header_fields_too_large', 'fields_too_large'),
444: ('no_response', 'none'),
449: ('retry_with', 'retry'),
450: ('blocked_by_windows_parental_controls', 'parental_controls'),
451: ('unavailable_for_legal_reasons', 'legal_reasons'),
499: ('client_closed_request',),
# 服务端错误状态码
500: ('internal_server_error', 'server_error', '/o\\', '✗'),
501: ('not_implemented',),
502: ('bad_gateway',),
503: ('service_unavailable', 'unavailable'),
504: ('gateway_timeout',),
505: ('http_version_not_supported', 'http_version'),
506: ('variant_also_negotiates',),
507: ('insufficient_storage',),
509: ('bandwidth_limit_exceeded', 'bandwidth'),
510: ('not_extended',),
511: ('network_authentication_required', 'network_auth', 'network_authentication')
五、高级操作
1.文件上传
注:favicon.ico需要和脚本在同一目录下
import requests

files = {'file':open('favicon.ico','rb')}

r = requests.post("http://httpbin.org/post",files=files)
print(r.text)
运行结果:这个网站会返回响应,里面包含files这个字段,而form字段是空的,这验证了文件上传部分会有一个单独的files字段来标识


2.Cookies
前面我们用urllib处理Cookies,写法比较复杂,而有了request获取和设置Cookies只需一步即可完成
import requests

r = requests.get("http://www.baidu.com")
print(r.cookies)
#调用cookies属性即可得到Cookies,可以发现它是RequestCookieJar类型
for key,value in r.cookies.items():
#然后用items()方法将其转化为元组组成的列表,遍历输出每一个Cookie的名称和值
#从而实现Cookie的便利解析
    print(key+'='+value)
运行结果:

我们也可以直接用Cookie来维持登录状态。下面以知乎为例说明。首先登录知乎,将Headers中的Cookie内容复制下来
实例:
import requests

headers ={
	'Cookie':'_zap=6d10c530-2923-457d-acff-53e027029514; d_c0="AHBbipaa4RCPTk6cZNQ_zc-chy3rVYmT3DQ=|1582797925"; _ga=GA1.2.149659481.1582797926; _xsrf=83ab2b1e-ffa0-408c-807b-9f9d2cda88e5; _gid=GA1.2.1569933041.1583074402; Hm_lvt_98beee57fd2ef70ccdd5ca52b9740c49=1582797926,1583074401,1583077296; capsion_ticket="2|1:0|10:1583077295|14:capsion_ticket|44:YWYwMWY2OWJjMzllNDA4MmJlOGNkZTA4NDFiNmI5YWI=|5d75e8a574f447055b4174cc389c6f537c0da3d0d0f54b0ee5fac45c312a40af"; z_c0="2|1:0|10:1583077316|4:z_c0|92:Mi4xZlZyMkNnQUFBQUFBY0Z1S2xwcmhFQ1lBQUFCZ0FsVk54Q1ZKWHdCdTdIYm1BbnQ3azRCM3VRdVI4UEJVTXJtblFn|093dd9f083031b4301c9b29c4c94320b97361c2dfa328ba7851eb8feeec507a4"; unlock_ticket="APCmPi6i4w0mAAAAYAJVTczeW17Es9D7cFVQprzCFpW7W3wg12Uyfw=="; tst=r; Hm_lpvt_98beee57fd2ef70ccdd5ca52b9740c49=1583077319; KLBRSID=d6f775bb0765885473b0cba3a5fa9c12|1583077319|1583074399',
	'Host':'www.zhihu.com',
	'User-Agent':'Mozilla/5.0 (Windows NT 10.0; WOW64) AppleWebKit/537.36 (KHTML, like Gecko) Chrome/80.0.3987.106 Safari/537.36',
}
r = requests.get('https://www.zhihu.com',headers=headers)
print(r.text)
运行结果:包含了登录后的结果,证明登录成功

我们还可以通过cookies参数来设置,不过这样需要构造RequestsCookieJar对象,且需要分割一下cookies这样就相对繁琐了
import requests

cookies = '_zap=6d10c530-2923-457d-acff-53e027029514; d_c0="AHBbipaa4RCPTk6cZNQ_zc-chy3rVYmT3DQ=|1582797925"; _ga=GA1.2.149659481.1582797926; _xsrf=83ab2b1e-ffa0-408c-807b-9f9d2cda88e5; _gid=GA1.2.1569933041.1583074402; Hm_lvt_98beee57fd2ef70ccdd5ca52b9740c49=1582797926,1583074401,1583077296; capsion_ticket="2|1:0|10:1583077295|14:capsion_ticket|44:YWYwMWY2OWJjMzllNDA4MmJlOGNkZTA4NDFiNmI5YWI=|5d75e8a574f447055b4174cc389c6f537c0da3d0d0f54b0ee5fac45c312a40af"; z_c0="2|1:0|10:1583077316|4:z_c0|92:Mi4xZlZyMkNnQUFBQUFBY0Z1S2xwcmhFQ1lBQUFCZ0FsVk54Q1ZKWHdCdTdIYm1BbnQ3azRCM3VRdVI4UEJVTXJtblFn|093dd9f083031b4301c9b29c4c94320b97361c2dfa328ba7851eb8feeec507a4"; unlock_ticket="APCmPi6i4w0mAAAAYAJVTczeW17Es9D7cFVQprzCFpW7W3wg12Uyfw=="; tst=r; Hm_lpvt_98beee57fd2ef70ccdd5ca52b9740c49=1583077319; KLBRSID=d6f775bb0765885473b0cba3a5fa9c12|1583077319|1583074399'
jar = requests.cookies.RequestsCookieJar()
#新建了一个RequestCookieJar对象,然后将复制下来的cookies利用split()方法分割
headers ={
	'Host':'www.zhihu.com',
	'User-Agent':'Mozilla/5.0 (Windows NT 10.0; WOW64) AppleWebKit/537.36 (KHTML, like Gecko) Chrome/80.0.3987.106 Safari/537.36',
}
for cookie in cookies.split(';'):
	key,value = cookie.split('=',1)
	jar.set(key,value)
#接着利用set()方法设置好每个Cookie的key和value,然后调用requests的get()方法传递给cookies
r = requests.get('https://www.zhihu.com',cookies=jar,headers=headers)
print(r.text)
运行结果:同样可以正常登陆知乎
3.会话维持
在requests中,如果直接利用get()或post()等方法的确可以做到模拟网页的请求,但是实际上相当于不同的会话,也就是说你用了两个浏览器打开了不同的页面。倘若有这样一个场景,第一个请求利用post()方法登陆了某个网站,第二次想获取成功登录后的自己的信息,你又用了一次get()方法去请求个人信息页面。实际上这相当于打开了两个浏览器是两个完全不相同的会话,这样不能够成功获取个人信息。我们当然可以两次请求设置一样的cookies,但是这样显得很繁琐。为了解决上面的问题,其解决问题的主要方法就是维持同一个会话,这就要用到session对象。
import requests
requests.get('http://httpbin.org/cookies/set/number/123456789')
r = requests.get('http://httpbin.org/cookies')
#请求了一个测试网站http://httpbin.org/cookies/set/number/123456789。
#请求这个网址时,可以设置一个cookie,名称叫做number,内容是123456789
#随后又请求了http://httpbin.org/cookies 此网站可以获取当前的Cookies
print(r.text)
运行结果:无法获取cookies

利用Session()后
import requests
s = requests.Session()
s.get('http://httpbin.org/cookies/set/number/123456789')
response = s.get('http://httpbin.org/cookies')

print(r.text)
运行结果:利用Session可以做到模拟同一个会话而不用担心Cookies的问题

4.SSL证书验证
12306的证书没有被官方CA机构认证,会出现证书验证的错误。

如果请求一个HTTPS站点,但是证书验证错误的页面时,就会报这样的错误。解决方案也很简单就是把verify参数设置为False即可
实例:
import requests

response = requests.get('http://www.12306.cn',verify=False)
print(response.status_code)
运行结果:

请求成功了但是报了一个警告,建议我们给它指定证书。我们还可以通过设置忽略警告的方式来屏蔽这个警告
实例:
import requests
from requests.packages import urllib3

urllib3.disable_warnings()
response = requests.get('http://www.12306.cn',verify=False)
print(response.status_code)
或者通过捕获警告到日志的方式忽略警告:
import requests
import logging

logging.captureWarnings(True)
response = requests.get('http://www.12306.cn',verify=False)
print(response.status_code)
运行结果均为:

5.设置代理
实例一:
import requests

proxies = {
	"http":"http://10.10.1.10:3128",
	"https":"http://10.10.1.10:1080",
}
requests.get("http://www.taobao.com",proxies=proxies)
实例二:(带有用户名和密码的代理)
import requests

proxies = {
	"http":"http://user:[email protected]:3128/"
	#user和password填入账号和密码
}
requests.get("http://www.taobao.com",proxies=proxies)
实例三:(SOCKS协议代理)
import requests

proxies = {
	'http':'socks5://user:password@host:port',
	'https':'socks5://user:password@host:port',
}
requests.get("http://www.taobao.com",proxies=proxies)
6.超时设置
import requests

r = requests.get("http://www.taobao.com",timeout = 1)
#timeout将用做连接和读取这二者的timeout的总和
q = requests.get("http://www.taobao.com",timeout = (5,11))
#我们还可以传入一个元组用于分别指定连接和读取的时间
w = requests.get("http://www.taobao.com",timeout = None)
v = requests.get("http://www.taobao.com")
#w和v这两种方法可以实现永久等待
print(r.status_code)
print(q.status_code)
print(w.status_code)
print(v.status_code)
运行结果:

7.身份认证
import requests
from requests.auth import HTTPBasicAuth

r = requests.get('http://localhost:5000',auth=HTTPBasicAuth('username','password'))
#username和password分别传入用户名和密码 都正确就会返回200状态码 认证失败返回401状态码
#我们还可以通过直接传入元组的形式来实现
#r = requests.get('http://localhost:5000',auth=('username','password'))
print(r.status_code)
8.Prepared Request
前面学习urllib时,我们可以将请求表示为数据结构,其中各个参数都可以通过一个Request对象来表示。这在requests里同样可以做到。
实例:
from requests import Request, Session

url = 'http://httpbin.org/post'
data = {
	'name':'germey'
}
headers = {
	'User-Agent':'Mozilla/5.0 (Windows NT 10.0; WOW64) AppleWebKit/537.36 (KHTML, like Gecko) Chrome/80.0.3987.106 Safari/537.36'
}
s = Session()
req = Request('POST',url,data=data,headers=headers)
prepped = s.prepare_request(req)
r = s.send(prepped)
print(r.text)
#这里引入了Request,然后用url、data、headers参数构造了一个Request对象
#这时需要再调用Session的prepare_request()方法将其转化为Prepared Request对象
#再调用send()方法发送即可
运行结果:同样达到了Post请求
