SpringBoot框架:thymeleaf+mysql+MyBatis+Druid+Redis+Gradle详细配置
目录
一.创建SpringBoot项目
二.配置热部署
三.目录结构
四.build.gradle配置(这里我使用的是war的方式部署的):
五.application.properties配置:
六.部分测试代码
七.SpringBoot导出war包方法:
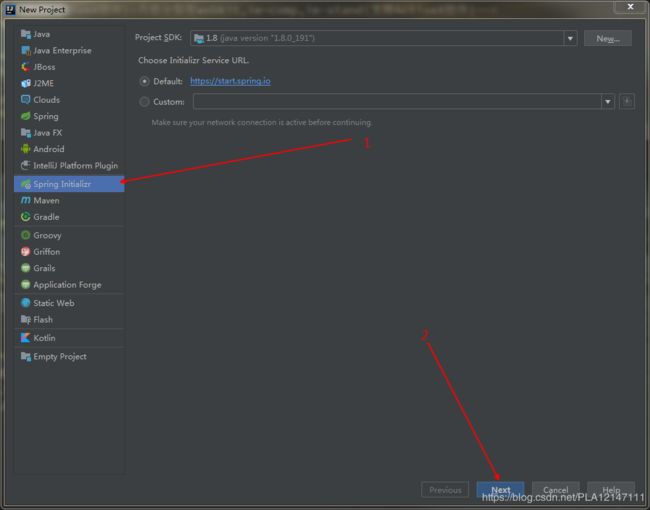
一.创建项目
build.gradle文件提示:
二.配置热部署
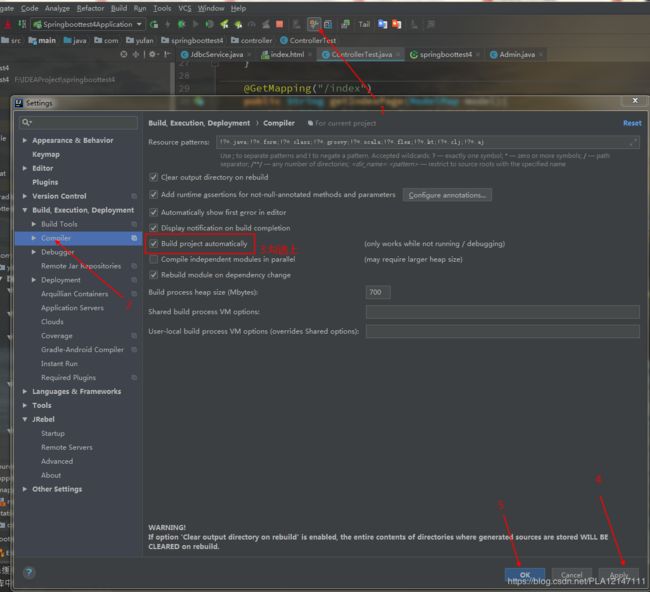
热部署意思就是你改了代码不用重启工程,就能看到改变后的效果,具体步骤:
1.如图:
2.build.gradle导入devtools包(参考build.gradle代码,后面有)
3.application.properties配置devtools(参考application.properties代码,后面有)
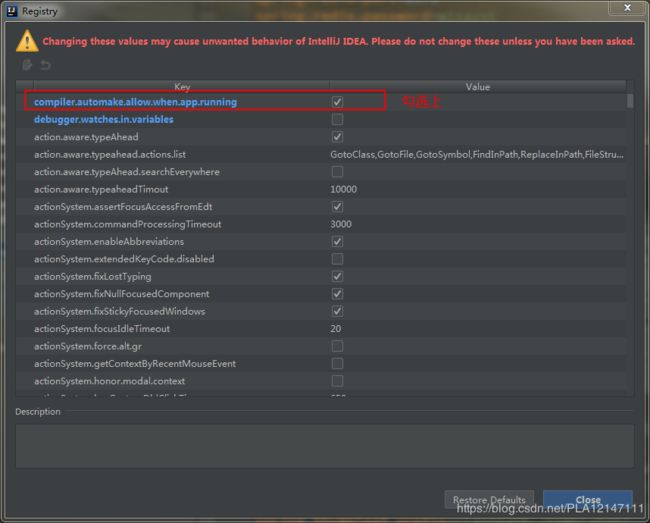
4.如果还是不行继续如下设置:
按下:Ctrl+Shift+Ait+/
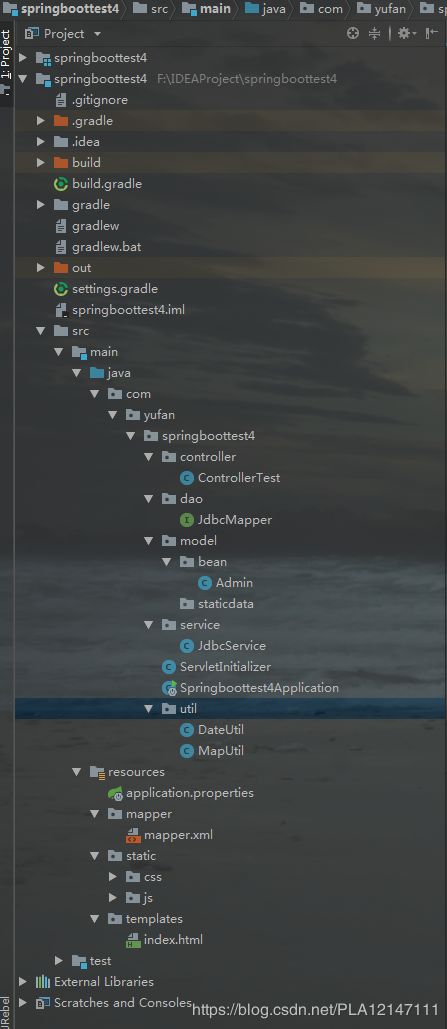
三.目录结构
因为使用的Druid连接池,所以mybatis-config.xml就不要了
四.build.gradle配置(这里我使用的是war的方式部署的):
buildscript {
    ext {
        springBootVersion = '2.1.3.RELEASE'
    }
    // 使用了 Maven 的中央仓库(你也可以指定其他仓库)
    repositories {
        mavenLocal()
        mavenCentral()
        maven {
            url 'https://maven.aliyun.com/repository/public'
        }
        maven {
            url 'https://maven.aliyun.com/repository/spring-plugin'
        }
    }
    // 依赖关系
    dependencies {
        // classpath 声明说明了在执行其余的脚本时,ClassLoader 可以使用这些依赖项
        classpath("org.springframework.boot:spring-boot-gradle-plugin:${springBootVersion}")
    }
}

apply plugin: 'java'
apply plugin: 'eclipse-wtp'
apply plugin: 'org.springframework.boot'
apply plugin: 'io.spring.dependency-management'
apply plugin: 'war'

group = 'com.yufan'
version = '0.0.1-SNAPSHOT'
sourceCompatibility = 1.8

repositories {
    mavenLocal()
    mavenCentral()
}

configurations {
    providedRuntime
}

dependencies {
    implementation('org.springframework.boot:spring-boot-starter-data-redis')
    implementation('org.springframework.boot:spring-boot-starter-thymeleaf')
    implementation('org.springframework.boot:spring-boot-starter-web')
    implementation('org.mybatis.spring.boot:mybatis-spring-boot-starter:1.3.2')
    runtimeOnly('mysql:mysql-connector-java')
    providedRuntime('org.springframework.boot:spring-boot-starter-tomcat')
    testImplementation('org.springframework.boot:spring-boot-starter-test')
    //热部署包
    compile("org.springframework.boot:spring-boot-devtools")
    //gradle mysql默认位最新版本8.0.13,我服务器mysql版本是8.0.12,此处引入8.0.12覆盖自动导入的包
    compile "mysql:mysql-connector-java:8.0.12"
    //Druid,阿里的连接池
    compile group: 'com.alibaba', name: 'druid-spring-boot-starter', version: '1.1.10'
}
五.application.properties配置:
#------数据库连接参数,因为使用了Druid所以注释掉了-----------------------------------------------------------
#spring.datasource.url=jdbc:mysql://localhost:3306/mydatabase?useUnicode=true&characterEncoding=UTF-8&allowMultiQueries=true&useSSL=false&serverTimezone=GMT%2B8&allowPublicKeyRetrieval=true
#spring.datasource.driver-class-name=com.mysql.cj.jdbc.Driver
#spring.datasource.username=数据库账号
#spring.datasource.password=数据库密码
#spring.datasource.username=id
#spring.datasource.password=pwd

#------Druid连接池配置-------------------------------------------------------------
spring.datasource.type=com.alibaba.druid.pool.DruidDataSource
spring.datasource.druid.url=jdbc:mysql://localhost:3306/mydatabase?useUnicode=true&characterEncoding=UTF-8&allowMultiQueries=true&useSSL=false&serverTimezone=GMT%2B8&allowPublicKeyRetrieval=true
spring.datasource.druid.driver-class-name=com.mysql.cj.jdbc.Driver
spring.datasource.druid.username=数据库账号
spring.datasource.druid.password=数据库密码
spring.datasource.druid.initial-size=5
spring.datasource.druid.min-idle=1
spring.datasource.druid.max-active=20
#连接超时超时配置 1000*60 1min
spring.datasource.druid.max-wait=60000
#配置多久检测一次需要关闭空闲连接 1min
spring.datasource.druid.time-between-eviction-runs-millis=60000
#配置连接最小的生存时间 10min
spring.datasource.druid.min-evictable-idle-time-millis=600000
#对于数据库连接的检测
spring.datasource.druid.validation-query=SELECT 1
#如果空闲时间大于time-between-eviction-runs-millis 使用validation-query检测连接是否有效
spring.datasource.druid.test-while-idle=true
#申请连接时检测连接是否有效 影响性能关闭
spring.datasource.druid.test-on-borrow=false
#归还连接时检测连接是否有效 影响性能关闭
spring.datasource.dbcp2.test-on-return=false

spring.datasource.druid.stat-view-servlet.login-username=druidid
spring.datasource.druid.stat-view-servlet.login-password=druidpwd

#------redis配置-------------------------------------------------------------
spring.redis.database=0
spring.redis.host=127.0.0.1
spring.redis.port=6379
spring.redis.password=redis密码
# 连接池最大连接数(使用负值表示没有限制)
spring.redis.jedis.pool.max-active=20
# 连接池最大阻塞等待时间(使用负值表示没有限制)
spring.redis.jedis.pool.max-wait=-1ms
# 连接池中的最大空闲连接
spring.redis.jedis.pool.max-idle=8
# 连接池中的最小空闲连接
spring.redis.jedis.pool.min-idle=1
# 连接超时时间(毫秒)
spring.redis.timeout=2000ms

#------mybatis配置-------------------------------------------------------------
#mybatis配置文件位置,使用了Druid的配置,MyBatis的就注释掉了
#mybatis.config-location=classpath:mybatis-config.xml
#mapper文件位置
mybatis.mapper-locations=classpath:mapper/*.xml

#------thymeleaf设置-----------------------------------------------------------
#开发时关闭缓存,不然没法看到实时页面
spring.thymeleaf.cache=false
#在渲染之前检查模板是否存在。
spring.thymeleaf.check-template=true
#检查模板位置是否正确(默认值:true)
spring.thymeleaf.check-template-location=true
#Content-Type的值(默认值:text/html)
#spring.thymeleaf.servlet.content-type=text/html
#开启MVC Thymeleaf视图解析(默认值:true)
#spring.thymeleaf.enabled=true
spring.thymeleaf.prefix=classpath:/templates/
spring.thymeleaf.suffix=.html
spring.thymeleaf.mode=HTML
spring.thymeleaf.encoding=UTF-8

#------devtools设置-----------------------------------------------------------
# 热部署生效
spring.devtools.remote.restart.enabled=true
spring.devtools.restart.additional-paths=src/main/java
spring.devtools.restart.exclude=WEB-INF/**
六.部分测试代码
特别注意,在使用Redis缓存的所有bean类必须实现Serializable接口,否则无法正确存储
1.Admin对象:
package com.yufan.springboottest4.model.bean;

import java.io.Serializable;

/**
 * Created by QQ:5071246 on 2018/12/18.
 */
public class Admin implements Serializable {
    private Integer id;
    private String a_id;
    private String a_pwd;

    public Admin() {
    }

    public Admin(Integer id, String a_id, String a_pwd) {
        this.id = id;
        this.a_id = a_id;
        this.a_pwd = a_pwd;
    }

    public Integer getId() {
        return id;
    }

    public void setId(Integer id) {
        this.id = id;
    }

    public String getA_id() {
        return a_id;
    }

    public void setA_id(String a_id) {
        this.a_id = a_id;
    }

    public String getA_pwd() {
        return a_pwd;
    }

    public void setA_pwd(String a_pwd) {
        this.a_pwd = a_pwd;
    }

    @Override
    public String toString() {
        return "Admin{" +
                "id=" + id +
                ", a_id='" + a_id + '\'' +
                ", a_pwd='" + a_pwd + '\'' +
                '}';
    }
}
2.ControllerTest控制类:
package com.yufan.springboottest4.controller;

import com.yufan.springboottest4.model.bean.Admin;
import com.yufan.springboottest4.service.JdbcService;
import org.springframework.beans.factory.annotation.Autowired;
import org.springframework.stereotype.Controller;
import org.springframework.ui.ModelMap;
import org.springframework.web.bind.annotation.GetMapping;
import org.springframework.web.bind.annotation.RequestMapping;
import org.springframework.web.bind.annotation.ResponseBody;

import java.util.ArrayList;
import java.util.List;

/**
 * Created by QQ:5071246 on 2018/12/26.
 */
@RequestMapping("/test")
@Controller
public class ControllerTest {

    private JdbcService jdbcService;

    @Autowired
    public ControllerTest(JdbcService jdbcService) {
        this.jdbcService = jdbcService;
    }

    @GetMapping("/index")
    public String getIndexPage(ModelMap model){
        List list=new ArrayList<>();
        list.add(new Admin(20,"张三","北京"));
        list.add(new Admin(30,"李四","上海"));
        list.add(new Admin(40,"王五","河北"));
        list.add(new Admin(50,"赵六","山西"));
        model.put("list", list);
        return "index";
    }

    @GetMapping("/login")
    @ResponseBody
    private String login(String a_id,String a_pwd){
        StringBuilder msg = new StringBuilder();
        msg.append((a_id == null || a_id.trim().length()==0) ? "a_id" : "");
        msg.append((a_pwd == null || a_pwd.trim().length()==0) ? " a_pwd" : "");
        if(msg.toString().length()>0){
            return msg.insert(0,"参数错误:").toString();
        }
        Admin admin = jdbcService.getAdmin(a_id,a_pwd);
        if(admin!=null){
            return "登录成功";
        }else {
            return "登录失败,请检查账号密码是否正确!";
        }
    }
}
3.JdbcService类:
package com.yufan.springboottest4.service;

import com.yufan.springboottest4.dao.JdbcMapper;
import com.yufan.springboottest4.model.bean.Admin;
import com.yufan.springboottest4.util.MapUtil;
import org.springframework.beans.factory.annotation.Autowired;
import org.springframework.data.redis.core.RedisTemplate;
import org.springframework.data.redis.serializer.RedisSerializer;
import org.springframework.data.redis.serializer.StringRedisSerializer;
import org.springframework.stereotype.Service;

/**
 * Created by QQ:5071246 on 2018/12/26.
 */
@Service
public class JdbcService {
    private final JdbcMapper jdbcMapper;
    private final RedisTemplate redisTemplate;

    @Autowired
    public JdbcService(JdbcMapper jdbcMapper, RedisTemplate redisTemplate) {
        this.jdbcMapper = jdbcMapper;
        this.redisTemplate = redisTemplate;
        //序列化
        RedisSerializer redisSerializer = new StringRedisSerializer();
        //对key进行序列化,否则使用第三方Redis查看软件,key全是我们看不懂的字符
        redisTemplate.setKeySerializer(redisSerializer);
    }

    public Admin getAdmin(String a_id, String a_pwd){
        //查询缓存是否存在key为a_id的Admin对象
        Admin admin = (Admin) redisTemplate.opsForValue().get(a_id);
        //noinspection ConstantConditions
        if(admin == null){
            //Redis缓存中没有admin,查询数据库
            System.out.println("Redis缓存中没有admin,查询数据库");
            admin = jdbcMapper.findAdmin(new MapUtil().getMap(a_id,a_pwd));
            if(admin!=null){
                //将admin存入缓存中
                System.out.println("将admin存入缓存中");
                redisTemplate.opsForValue().set(a_id,admin);
                return admin;
            }else{
                //数据库中未查询到
                System.out.println("数据库中未查询到");
                return null;
            }
        }else{
            String pwd = admin.getA_pwd();
            if(a_pwd.equals(pwd)){
                //验证成功
                System.out.println("验证成功!");
                return admin;
            }else{
                //密码错误
                System.out.println("密码错误!");
                return null;
            }
        }

    }
}
4.thymeleaf引入js/css文件404问题
 在jsp中,通常我们使用以下方法为页面上的所有链接规定默认地址或默认目标:
<%
    String path = request.getContextPath();
    String basePath = request.getScheme() + "://" + request.getServerName() + ":" + request.getServerPort()
            + path + "/";
%>
在thymeleaf中,应该是这样的:
5.login.html:
    index


    配置Thymeleaf模板


            姓名
            年龄
            地址
访问index页面测试:
登录测试:
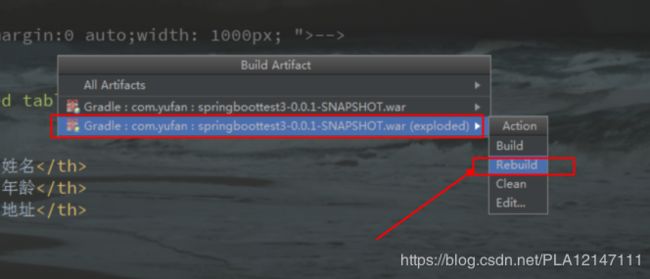
七.SpringBoot导出war包方法:
1.
2.
本文为纯原创,转载请注明出处,不足之处恳请批评指正!
