Mac上安装 Appium 详细步骤
更多原创文章,请访问:https://takioo.cn
一、appium配置
1. AppStore下载Xcode直接安装即可;
2. Android版下载与配置
<1> 下载地址:https://developer.android.com/studio/index.html#downloads
选择:android-sdk_r24.4.1-macosx.zip(写本文时的最新版)如图: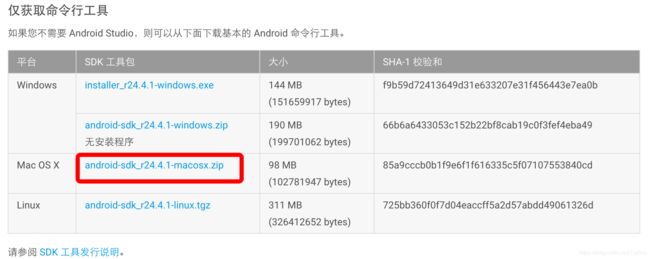
解压缩到任意位置,比如/usr/local/android-sdk-macosx,
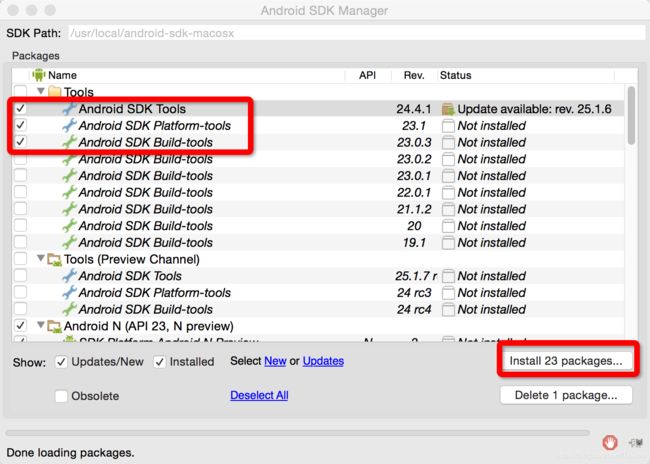
运行/usr/local/android-sdk-macosx/tools/android,即可启动Android SDK Manager,如图:
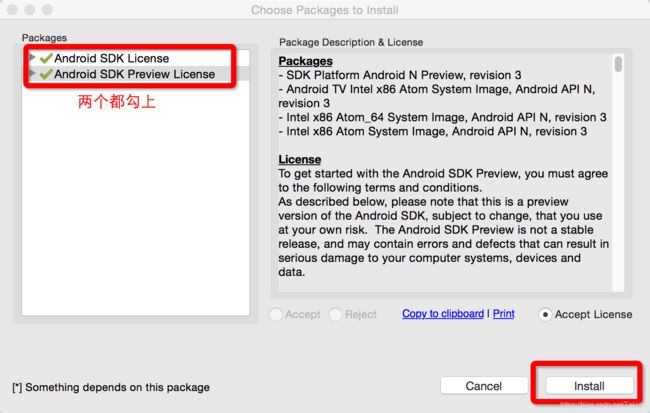
保持默认的选项即可,点击Install 23 packages…,进入到下图:
选择Accept License,然后Install就可以了。这个过程根据网速不同,可能需要10-20分钟,耐心等待。
<2> 设置Android环境变量:
方法 1:点击桌面空白位置然后使用快捷键shift+cmd+G,输入~/.bash_profile,找到.bash_profile文件,打开后在该文件中添加:
export JAVA_HOME=$(/usr/libexec/java_home)

export ANDROID_HOME=/usr/local/android-sdk-macosx
终端执行 source ~/.bash_profile 使环境变量生效。
方法 2:终端输入
vi .bash_profile 按 i 键进入bash_profile文件编辑模式,完成之后esc键退出编辑,:wq结束。
同样执行 source ~/.bash_profile 使环境变量生效。
至此,为了安装Appium所需要的Mac平台已经配置完毕了。接下来开始安装Appium。
3. Appium安装
Appium官网下载:https://bitbucket.org/appium/appium.app/downloads/, 直接安装即可。
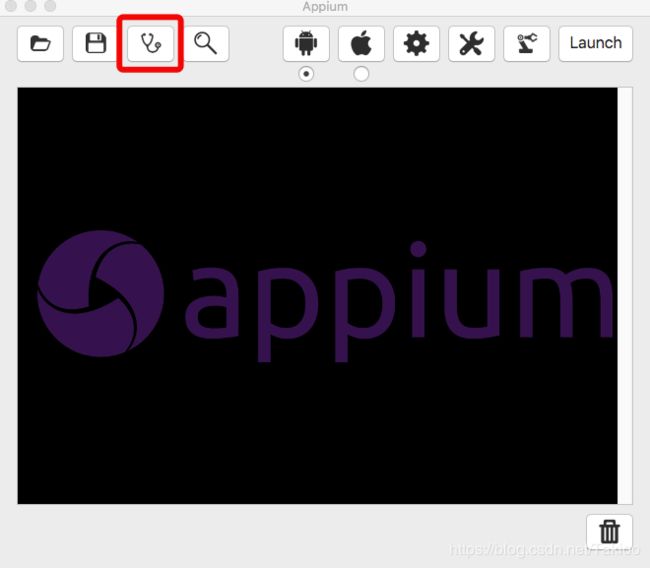
appium doctor用来appium的是否成功安装,即点击下图按钮:
终端输出信息像下面这样全是对号,则表示环境安装成功了。
Last login: Tue Nov  1 14:55:59 on ttys002
wldeMacBook-Pro:~ wl$ '/Applications/Appium.app/Contents/Resources/node/bin/node' '/Applications/Appium.app/Contents/Resources/node_modules/appium-doctor/appium-doctor.js'
info AppiumDoctor ### Diagnostic starting ###
info AppiumDoctor  ✔ Xcode is installed at: /Applications/Xcode7.3.1.app/Contents/Developer
info AppiumDoctor  ✔ Xcode Command Line Tools are installed.
info AppiumDoctor  ✔ DevToolsSecurity is enabled.
info AppiumDoctor  ✔ The Authorization DB is set up properly.
info AppiumDoctor  ✔ The Node.js binary was found at: /usr/local/bin/node
info AppiumDoctor  ✔ HOME is set to: /Users/wl
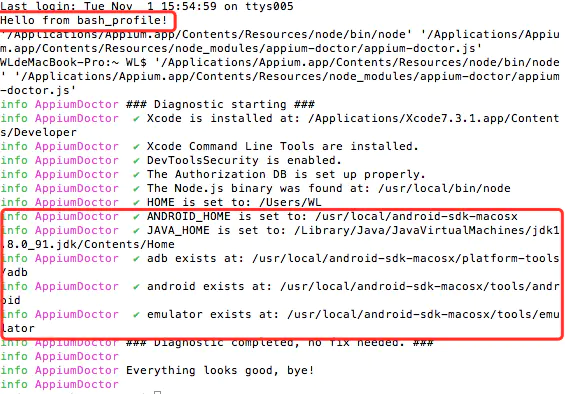
info AppiumDoctor  ✔ ANDROID_HOME is set to: /usr/local/android-sdk-macosx
info AppiumDoctor  ✔ JAVA_HOME is set to: /Library/Java/JavaVirtualMachines/jdk1.8.0_91.jdk/Contents/Home
info AppiumDoctor  ✔ adb exists at: /usr/local/android-sdk-macosx/platform-tools/adb
info AppiumDoctor  ✔ android exists at: /usr/local/android-sdk-macosx/tools/android
info AppiumDoctor  ✔ emulator exists at: /usr/local/android-sdk-macosx/tools/emulator
info AppiumDoctor ### Diagnostic completed, no fix needed. ###
info AppiumDoctor
info AppiumDoctor Everything looks good, bye!
info AppiumDoctor
至此,Mac上安装Appium完成!
注:Android设置环境变量遇到的问题:
在.bash_profile文件中配置的环境变量路径都没有问题,但是使用appium-doctor检查后一直是 :
➜  ~ '/Applications/Appium.app/Contents/Resources/node/bin/node' '/Applications/Appium.app/Contents/Resources/node_modules/appium-doctor/appium-doctor.js'
info AppiumDoctor ### Diagnostic starting ###
info AppiumDoctor  ✔ Xcode is installed at: /Applications/Xcode7.3.1.app/Contents/Developer
info AppiumDoctor  ✔ Xcode Command Line Tools are installed.
info AppiumDoctor  ✔ DevToolsSecurity is enabled.
info AppiumDoctor  ✔ The Authorization DB is set up properly.
info AppiumDoctor  ✔ The Node.js binary was found at: /usr/local/bin/node
info AppiumDoctor  ✔ HOME is set to: /Users/WL
WARN AppiumDoctor  ✖ ANDROID_HOME is NOT set!
WARN AppiumDoctor  ✖ JAVA_HOME is NOT set!
WARN AppiumDoctor  ✖ adb could not be found because ANDROID_HOME is NOT set!
WARN AppiumDoctor  ✖ android could not be found because ANDROID_HOME is NOT set!
WARN AppiumDoctor  ✖ emulator could not be found because ANDROID_HOME is NOT set!
info AppiumDoctor ### Diagnostic completed, 5 fixes needed. ###
info AppiumDoctor
info AppiumDoctor ### Manual Fixes Needed ###
info AppiumDoctor The configuration cannot be automatically fixed, please do the following first:
WARN AppiumDoctor - Manually configure ANDROID_HOME.
WARN AppiumDoctor - Manually configure JAVA_HOME.
WARN AppiumDoctor - Manually configure ANDROID_HOME and run appium-doctor again.
info AppiumDoctor ###
info AppiumDoctor
info AppiumDoctor Bye, run appium-doctor again when the all the manual fixes have been applied!
info AppiumDoctor
排查原因:
(1) 打开.bash_profile文件,输入 echo hello from bash_profile!
(2) 打开Mac自带的终端Terminal(不是iTerm2),发现并没有输出我刚刚在.bash_profile中输入的那句Hello from bash_profile!,所以可以判定打开终端时并没有加载.bash_profile文件读取到ANDROID_PATH和JAVA_PATH。
解决方法:
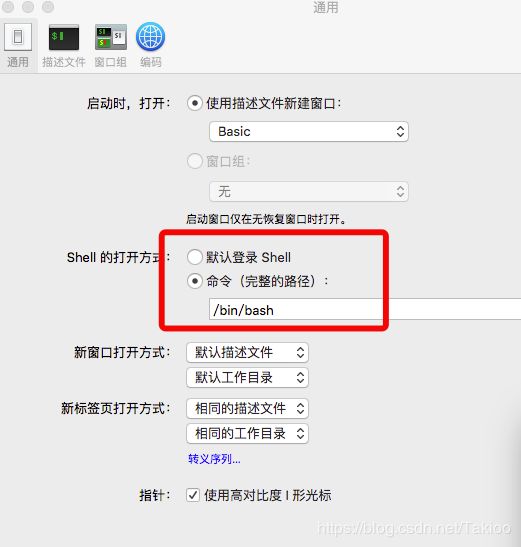
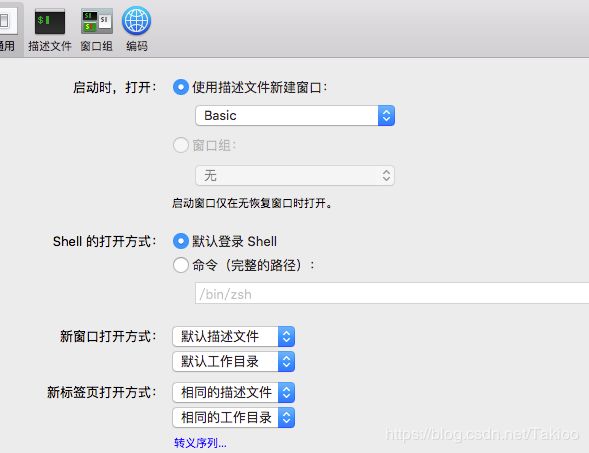
方法1: 打开Terminal,终端->偏好设置,发现目前的设置如图所示:
修改之后如下图即可(即 使用bash shell去载入.bash_profile文件, Linux使用Bash作为默认Shell) :
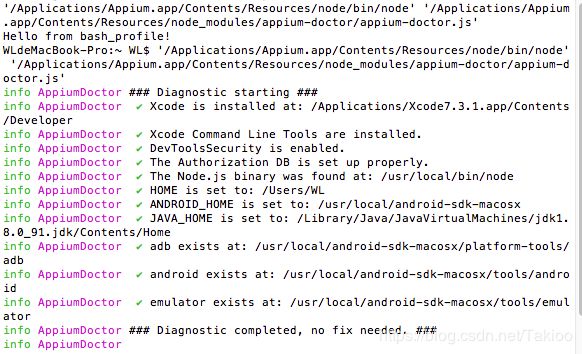
验证一下,再次点击Appium界面的appium-doctor按钮,终端显示如图:
打印出刚刚在.bash_profile中输入的Hello from bash_profile!
并且Android环境配置成功!
上面的这种修改方式并没有更改此时默认的shell,终端输入:
echo $SHELL输出如下:
/bin/zsh发现使用的shell默认还是zsh,这样在iTerm2中可以继续使用zsh。
方法2:修改方式会更改默认使用的shell
(1)Mac自带的Terminal的偏好设置不做更改,还是如下图:
(2)除了默认的Bash以外的Shell,查看一下系统上安装了哪些Shell。系统将安装的Shell程序列表放在/etc/shells文件中,终端输入以下命令行查看该文件获取Shell列表:
cat /etc/shells 终端输出:
# List of acceptable shells for chpass(1).
# Ftpd will not allow users to connect who are not using
# one of these shells.
/bin/bash
/bin/csh
/bin/ksh
/bin/sh
/bin/tcsh
/bin/zsh
(/bin/zsh即zsh的安装目录)
(3)修改默认shell为bash
chsh -s /bin/bash(4)点击appium-doctor检验:
同样显示安装成功。以上两种方法,酌情自选。
