树莓派3B+ 零基础驱动开发
1、安装linux 我安装了Ubuntu 18.04.2 LTS
- 官方下载地址https://www.ubuntu.com/download/desktop
- 官方安装教程 https://tutorials.ubuntu.com/tutorial/tutorial-create-a-usb-stick-on-windows
- 官方安装教程 https://tutorials.ubuntu.com/tutorial/tutorial-burn-a-dvd-on-windows#0
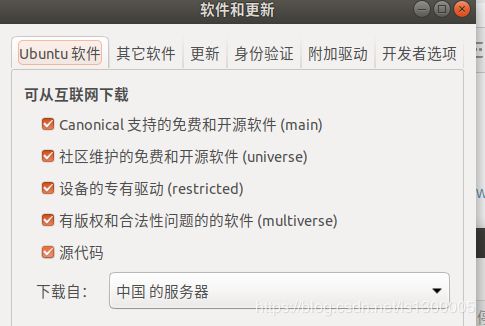
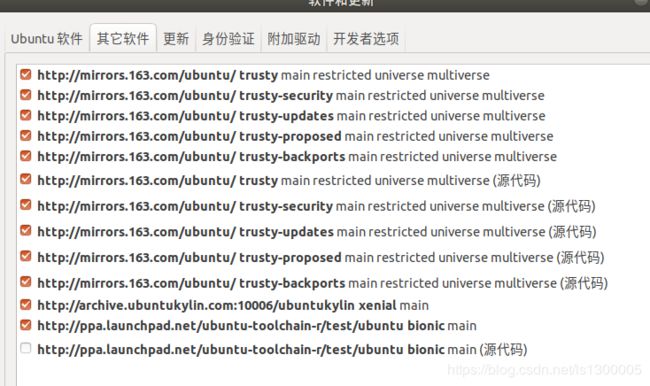
2、更改软件源 我用了163的源,下载还是很快的。
打开源配置文件,全部替换为文章中提供的地址
sudo gedit /etc/apt/sources.listdeb http://mirrors.163.com/ubuntu/ trusty main restricted universe multiverse
deb http://mirrors.163.com/ubuntu/ trusty-security main restricted universe multiverse
deb http://mirrors.163.com/ubuntu/ trusty-updates main restricted universe multiverse
deb http://mirrors.163.com/ubuntu/ trusty-proposed main restricted universe multiverse
deb http://mirrors.163.com/ubuntu/ trusty-backports main restricted universe multiverse
deb-src http://mirrors.163.com/ubuntu/ trusty main restricted universe multiverse
deb-src http://mirrors.163.com/ubuntu/ trusty-security main restricted universe multiverse
deb-src http://mirrors.163.com/ubuntu/ trusty-updates main restricted universe multiverse
deb-src http://mirrors.163.com/ubuntu/ trusty-proposed main restricted universe multiverse
deb-src http://mirrors.163.com/ubuntu/ trusty-backports main restricted universe multiverse
deb http://cn.archive.ubuntu.com/ubuntu/ bionic main universe restricted multiverse
deb-src http://cn.archive.ubuntu.com/ubuntu/ bionic main universe restricted multiverse #Added by software-properties
deb http://security.ubuntu.com/ubuntu/ bionic-security multiverse universe main restricted
deb http://cn.archive.ubuntu.com/ubuntu/ bionic-updates multiverse universe main restricted3、下载内核源码和交叉编译工具
提示没有安装git 则根据提示安装git
git clone https://github.com/raspberrypi/tools

git clone --depth=1 https://github.com/raspberrypi/linux
官方教程 地址
如果打开慢:火狐浏览器安装插件 Decentraleyes
4、编译内核源码——设置环境变量
32位
echo PATH=\$PATH:~/tools/arm-bcm2708/gcc-linaro-arm-linux-gnueabihf-raspbian/bin >> ~/.bashrc
source ~/.bashrc
64位
echo PATH=\$PATH:~/tools/arm-bcm2708/gcc-linaro-arm-linux-gnueabihf-raspbian-x64/bin >> ~/.bashrc
source ~/.bashrc
5、编译内核源码——make
linux为 git clone后的路径
cd linux
KERNEL=kernel7
make bcm2709_defconfig
5、编译内核源码——make 错误
错误1: 提示 某某软件没有直接安装
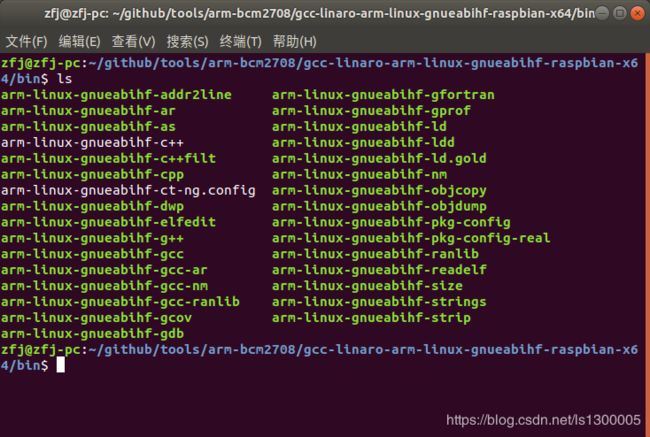
错误2: 提示 arm-linux-gnueabihf-ld 非执行文件,找到这个文本文件 打开,里面有个软件名字,将同一目录下的该软件重命名成这个文本文件名。下图中白色是文本文件,执行了下面的指令
mv arm-linux-gnueabihf-ld.bfd arm-linux-gnueabihf-ld同理,如果提示 arm-linux-gnueabihf-gcc 非执行文件 则执行
mv arm-linux-gnueabihf-gcc-4.8.3 arm-linux-gnueabihf-gcc类似错误貌似还有一处,忘记路径了。
编译完成生成 .config文件就可以编译内核驱动了。
6、编译驱动
在linux源码目录内(顶层makefile文件)新建自己的工作目录 新建mkefile文件
键入:
ifneq ($(KERNELRELEASE),)
obj-m += hello.o
else
PWD := $(shell pwd)
KDIR := /home/zfj/github/linux
all:
	make  -C  $(KDIR) M=$(PWD) modules ARCH=arm CROSS_COMPILE=arm-linux-gnueabihf-
clean:
	rm -rf *.o *.mod.c *.ko *.symvers *.order *.makers
endif
新建 hello.c文件
#include
#include

//初始化函数
static int __init hello_init(void)
{
    printk(KERN_ALERT"Hello carl!\n");
    return 0;
}

//退出函数
static void __exit hello_exit(void)
{
    printk(KERN_ALERT"Goodbye carl,nice to see you.\n");
}

//对模块函数进行绑定
module_init(hello_init);
module_exit(hello_exit);

//许可协议及作者信息、可以不设置
MODULE_LICENSE("Dual BSD/GPL");
MODULE_AUTHOR("sai.ls");
保存,使用make编译,生成驱动文件 hello.ko
7、加载驱动
hello.ko拷贝到树莓派 使用root账户登录
加载: insmod hello.ko
查看printf的输出 dmesg
模块信息 modinfo hello.ko
卸载 模块 rmmod hello
清空内核日志 dmesg -C


