引言
在前面讲过一遍Python接口自动化之ExtentHTMLTestRunner测试报告的文章,这篇分享另一种报告:BeautifulReport。此报告已经在Github上,地址:BeautifulReport。
应用背景,比如执行很多条用例,多线程跑测试用例,不可能每个线程生成一个测试报告,那所有线程生成一个测试报告,岂不完美? 有了BeautifulReport,就可以解决这个问题。
环境配置
python3.6 : BeautifulReport不支持2.7
tomorrow : pip install tomorrow安装
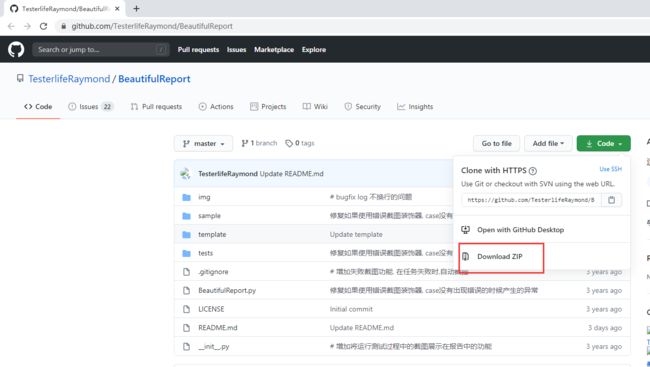
BeautifulReport : github下载后放到/Lib/site-packages/目录下
安装方式1:
# 会使用git的直接用git下载到本地
git clone https://github.com/TesterlifeRaymond/BeautifulReport
安装方式2:
使用案例
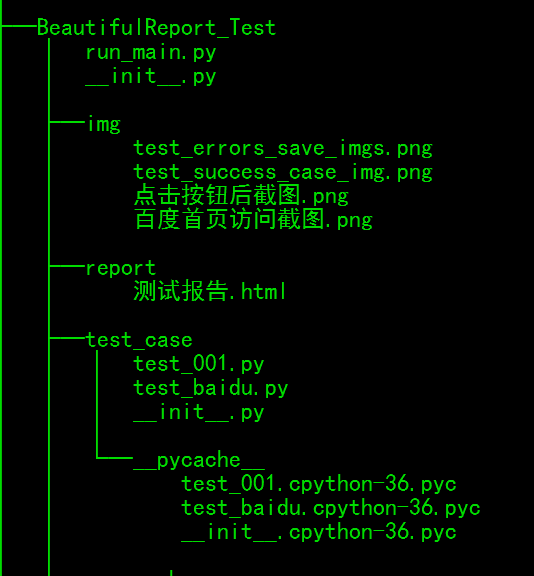
先看一下项目结构:
测试用例代码:
# -*- coding: utf-8 -*-
'''
@author: Leo

@software: pycharm

@file:  test_baidu.py

@time: 2020/7/26 0026 21:33

@Desc:

'''
__author__ = 'Leo'

import os,unittest,time
from selenium import webdriver
from BeautifulReport import BeautifulReport
from lxml import etree


class TestBaidu(unittest.TestCase):
    """测试报告"""
    dr = None
    if not os.path.exists('img'):
        os.makedirs('img')
    img_path = r'img'

    @staticmethod
    def parse(html,xpath):
        """
                    解析页面中的元素并返回一个对象
                :param xpath: 需要获取页面中的元素对应的xpath
                :param html: 页面的html元素
                :return:
                """
        return etree.HTML(html).xpath(xpath)

    def save_img(self,img_name):
        """
                  传入一个img_name, 并存储到默认的文件路径下
              :param img_name:
              :return:
              """
        self.dr.get_screenshot_as_file('{}/{}.png'.format(os.path.abspath(self.img_path),img_name))
        print("图片存放路径:{}".format(os.path.abspath(self.img_path)))

    @classmethod
    def setUpClass(cls) -> None:
        cls.dr = webdriver.Firefox()
        cls.url = 'https://www.baidu.com'
    @classmethod
    def tearDownClass(cls) -> None:
        cls.dr.close()

    def test_baidu_index(self):
        """
        测试访问首页正常, 并使用title进行断言
        """
        self.dr.get(self.url)
        print('打开浏览器, 访问: {}'.format(self.url))
        title = TestBaidu.parse(self.dr.page_source,'//title/text()')[0]
        print("获取对应的title: {}".format(title))
        self.assertEqual(title,"百度一下,你就知道")

    # 测试之前->截图,测试之后->截图
    @BeautifulReport.add_test_img('百度首页访问截图','点击按钮后截图')
    def test_save_img(self):
        """
        打开首页, 截图, 在截图后点击第一篇文章连接, 跳转页面完成后再次截图
        """
        self.dr.get(self.url)
        self.save_img('百度首页访问截图')
        self.dr.find_element_by_id('su').click()
        self.save_img('点击按钮后截图')
        title = TestBaidu.parse(self.dr.page_source, '//title/text()')[0]
        self.assertEqual(title,'百度一下,你就知道')


    # 测试出错->截图,名称与方法名一致
    @BeautifulReport.add_test_img('test_errors_save_imgs')
    def test_errors_save_imgs(self):
        """
                  如果在测试过程中, 出现不确定的错误, 程序会自动截图, 并返回失败, 如果你需要程序自动截图, 则需要咋测试类中定义 save_img方法
              """
        self.dr.get(self.url)
        self.dr.find_element_by_id('kw22').send_keys('selenium')

    # 测试成功->截图,名称与方法名一致
    @BeautifulReport.add_test_img('test_success_case_img')
    def test_success_case_img(self):
        """
                   如果case没有出现错误, 即使使用了错误截图装饰器, 也不会影响case的使用
        """
        self.dr.get(self.url)
        self.dr.find_element_by_xpath('//title/text()')
        # title = TestBaidu.parse(self.dr.page_source, '//title/text()')[0]
        # print(title)
主程序代码:
# -*- coding: utf-8 -*-
'''
@author: Leo

@software: pycharm

@file:  run_main.py

@time: 2020/7/26 0026 21:33

@Desc:

'''
__author__ = 'Leo'


import unittest,os,time
from BeautifulReport import BeautifulReport
from tomorrow import threads
import sys
sys.stdout.flush()

if not os.path.exists('report'):
    os.makedirs('report')

def add_case(case_path='./test_case', rule="test*.py"):
    '''加载所有的测试用例'''

    discover = unittest.defaultTestLoader.discover(case_path,
                                                  pattern=rule,
                                                  top_level_dir=None)
    return discover


@threads(10)
def run_case(test_suite):
    t1 = time.time()
    result = BeautifulReport(test_suite)
    result.report(filename='测试报告', description='访问百度', log_path='./report')
    t2 = time.time()
    print("运行时间:%s" % (t2 - t1))

if __name__ == '__main__':
    cases = add_case()
    run_case(cases)


# 启动线程 运行时间:20.49521040916443

# 非多线程:运行时间:22.228379249572754
报告效果图
截图:
代码都有注释,看不懂的可以看我的代码注释或者看源码:https://github.com/TesterlifeRaymond/BeautifulReport,需要注意的是如果只有一个用例模块,tomorrow效果是不明显的,所以我弄了两个,得出来的结论是:
# 启动线程 运行时间:20.49521040916443

# 非多线程:运行时间:22.228379249572754
多线程和单线程的时候,用例数少的情况下,tomorrow的速度并不明显。
总结
多线程执行测试用例,输出测试报告的案例已经讲完,需要进一步学习,可以集成到平台上。另外,对测试开发及自动化测试感兴趣的伙伴可以加入我们学习交流QQ群,见右下角。


