广告牌效果2-绕任意轴的朝向相机
广告牌效果2-绕任意轴的朝向相机
基本思路:
- 根据广告牌的法线确定与相机的夹角
- 然后重新生成广告牌对应的几何体坐标
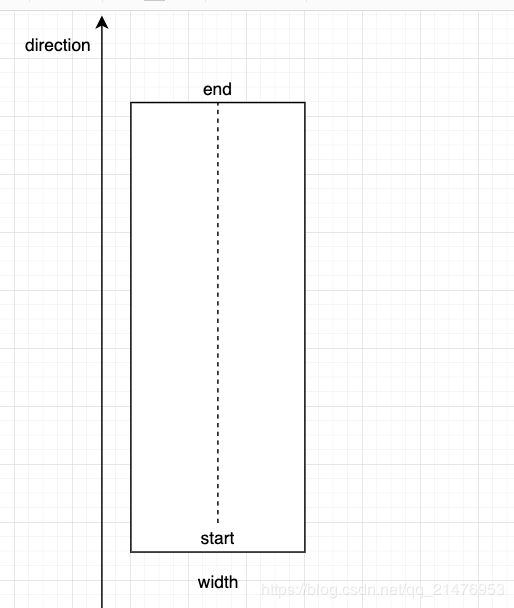
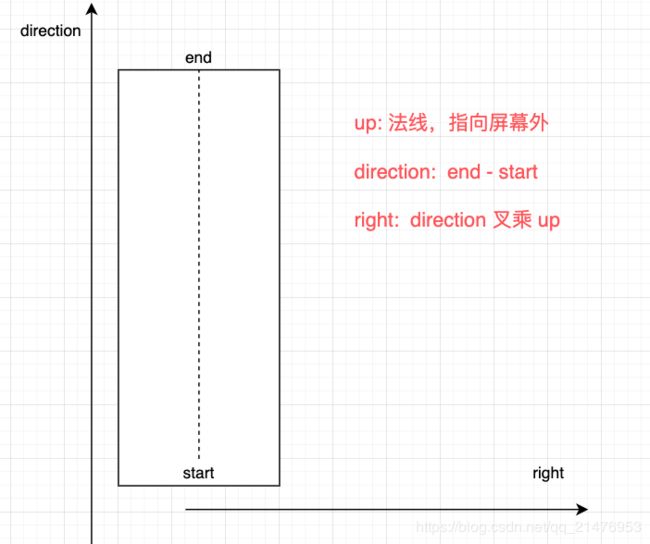
1、明确一些名词
  //
  //       ^ up
  //       |
  //       |
  // start --------->  end
  direction = end - start
- 这是一个平面几何体
- 包含起点坐标start和终点坐标end
- 平面的宽度是width
- 平面的方向是direction = end-start
- 平面的法线是up
2、生成几何体
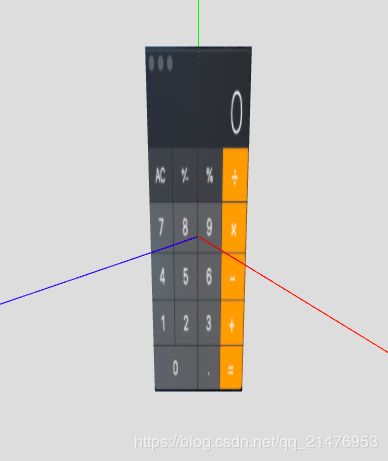
根据上面的参数,我们生成这样的几何体。
关键代码摘选:
// 指定参数创建几何体
this.mesh = this.initGeometry({
  s: { x: 0, y: -40, z: 0 },
  e: { x: 0, y: 40, z: 0 },
  u: { x: 0, y: 0, z: 1 },
  width: 40,
})
// 创建几何体
initGeometry({ s, e, width, u }) {
  let start = new THREE.Vector3(s.x, s.y, s.z)
  let end = new THREE.Vector3(e.x, e.y, e.z)
  this.info = {
    start,
    end,
    width
  }

  let geometry = this.genGeometry()
  this.calcGeometryVertex(geometry, u)
  this.calcGeometryUv(geometry)

  var material = new THREE.MeshBasicMaterial({
    side: THREE.DoubleSide,
    map: new THREE.TextureLoader().load("./bg.png")
  })

  var mesh = new THREE.Mesh(geometry, material)
  mesh.name = "LookAtCameraPlane"
  window.mesh = mesh
  this.stage.scene.add(mesh)
  return mesh
}
生成顶点和uv
genGeometry() {
    let geometry = new THREE.BufferGeometry();
    return geometry
}

calcGeometryVertex(geometry, u) {
  let { start, end, width } = this.info
  let up = new THREE.Vector3(u.x, u.y, u.z)

  let direction = end.clone().sub(start)
  let right = direction.clone().cross(up).normalize()
  let haltWidth = right.clone().multiplyScalar(width / 2)

  this.info.up = up.normalize()
  this.info.right = right.normalize()
  this.info.direction = direction.normalize()

  // 顶点
  let vertices = []
  const va = end.clone().sub(haltWidth)
  const vb = start.clone().sub(haltWidth)
  const vc = start.clone().add(haltWidth)
  const vd = end.clone().add(haltWidth)
  this.abcdVertex(va, vb, vc, vd, vertices)

  const verticesT = new Float32Array(vertices);
  geometry.setAttribute('position', new THREE.BufferAttribute(verticesT, 3));
}

calcGeometryUv(geometry) {
  // uv
  let uv = []
  const ua = {
    x: 0,
    y: 1
  }
  const ub = {
    x: 0,
    y: 0
  }
  const uc = {
    x: 1,
    y: 0
  }
  const ud = {
    x: 1,
    y: 1
  }
  this.abcdUV(ua, ub, uc, ud, uv)
  const uvT = new Float32Array(uv);
  geometry.setAttribute('uv', new THREE.BufferAttribute(uvT, 2));
}

// a    d
// b    c
abcdVertex(a, b, c, d, arr) {
  arr.push(
    b.x,
    b.y,
    b.z
  )
  arr.push(
    d.x,
    d.y,
    d.z
  )
  arr.push(
    a.x,
    a.y,
    a.z
  )

  arr.push(
    b.x,
    b.y,
    b.z
  )
  arr.push(
    c.x,
    c.y,
    c.z
  )
  arr.push(
    d.x,
    d.y,
    d.z
  )
}

abcdUV(a, b, c, d, arr) {
  arr.push(
    b.x,
    b.y,
  )
  arr.push(
    d.x,
    d.y,
  )
  arr.push(
    a.x,
    a.y,
  )

  arr.push(
    b.x,
    b.y,
  )
  arr.push(
    c.x,
    c.y,
  )
  arr.push(
    d.x,
    d.y,
  )
}
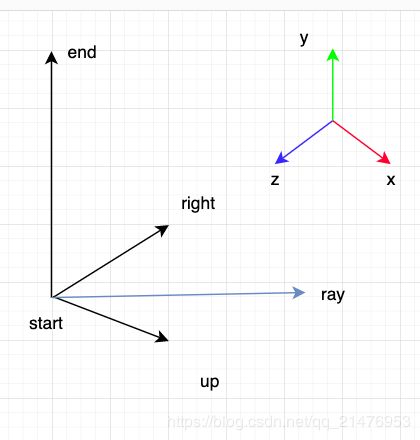
上面都是很常规的基本操作,值的说的是这里除了生成几何体,还记录了几个信息: up(法线,这里设置的是指向屏幕外), direction, right。
3、得到相机射线
let camPos = lm.stage.camera.position
let camTar = lm.stage.control.target
let ray = camPos.clone().sub(camTar.clone()).normalize()
4、计算角度
let { up, right, direction } = this.info
let a = up.clone().dot(ray)
let b = right.clone().dot(ray)
let angle = Math.atan(b / a)
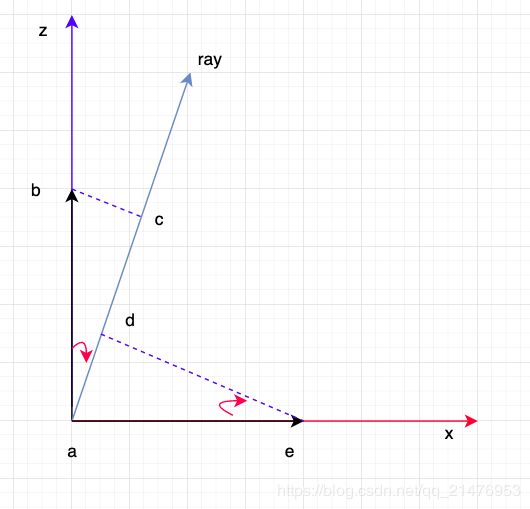
然后将right和up向ray做投影,这里考虑简单情况,相机射线在z轴上,那么问题就可以放倒xoz平面处理:
- ab = |up| = 1
- ae = |right| = 1
- up在ray的投影为ac
- right在ray的投影为ad
- 根据
角边角, 三角形abc 全等于 三角形aed - 那么 ad = bc
- 所以有: tan(angle) = bc / ac
综上所述,法线up和相机ray的夹角 = arctan(angle)
5、旋转法线重新生成顶点
绕 direction轴旋转 angle就得到了新的法线。
let finalUp = up.clone()
finalUp.applyAxisAngle(direction, angle);
finalUp.normalize();
let { geometry } = this.mesh
this.calcGeometryVertex(geometry, finalUp)
6、结束(附代码)
该功能代码完整, 其他代码都是three.js 常规代码。
// 广告牌2, 绕绕任意轴的朝向相机

export default class LookAtCameraPlane {
  constructor(stage) {
    this.info = {}
    window.lcp = this

    this.stage = stage
    this.stage.camera.position.set(0, 0, 200)

    var axesHelper = new THREE.AxesHelper(500);
    this.stage.scene.add(axesHelper);

    this.mesh = this.initGeometry({
      s: { x: 0, y: -80, z: 0 },
      e: { x: 0, y: 80, z: 0 },
      u: { x: 0, y: 0, z: 1 },
      width: 40,
    })

    this.stage.onUpdate(() => {
      this.setMeshLook()
    })
  }

  setMeshLook() {
    let camPos = lm.stage.camera.position
    let camTar = lm.stage.control.target
    let ray = camPos.clone().sub(camTar.clone()).normalize()

    let { up, right, direction } = this.info
    let a = up.clone().dot(ray)
    let b = right.clone().dot(ray)
    let angle = Math.atan(b / a)

    let final = up.clone()
    final.applyAxisAngle(direction, angle);
    final.normalize();
    let { geometry } = this.mesh
    this.calcGeometryVertex(geometry, final)
  }

  //
  //       ^ up
  //       |
  //       |
  // start --------->  end
  initGeometry({ s, e, width, u }) {
    let start = new THREE.Vector3(s.x, s.y, s.z)
    let end = new THREE.Vector3(e.x, e.y, e.z)
    this.info = {
      start,
      end,
      width
    }

    let geometry = this.genGeometry()
    this.calcGeometryVertex(geometry, u)
    this.calcGeometryUv(geometry)

    var material = new THREE.MeshBasicMaterial({
      side: THREE.DoubleSide,
      map: new THREE.TextureLoader().load("./bg.png")
    })

    var mesh = new THREE.Mesh(geometry, material)
    mesh.name = "LookAtCameraPlane"
    window.mesh = mesh
    this.stage.scene.add(mesh)
    return mesh
  }

  genGeometry() {
    let geometry = new THREE.BufferGeometry();
    return geometry
  }

  calcGeometryVertex(geometry, u) {
    let { start, end, width } = this.info
    let up = new THREE.Vector3(u.x, u.y, u.z)

    let direction = end.clone().sub(start)
    let right = direction.clone().cross(up).normalize()
    let haltWidth = right.clone().multiplyScalar(width / 2)

    this.info.up = up.normalize()
    this.info.right = right.normalize()
    this.info.direction = direction.normalize()

    // 顶点
    let vertices = []
    const va = end.clone().sub(haltWidth)
    const vb = start.clone().sub(haltWidth)
    const vc = start.clone().add(haltWidth)
    const vd = end.clone().add(haltWidth)
    this.abcdVertex(va, vb, vc, vd, vertices)

    const verticesT = new Float32Array(vertices);
    geometry.setAttribute('position', new THREE.BufferAttribute(verticesT, 3));
  }

  calcGeometryUv(geometry) {
    // uv
    let uv = []
    const ua = {
      x: 0,
      y: 1
    }
    const ub = {
      x: 0,
      y: 0
    }
    const uc = {
      x: 1,
      y: 0
    }
    const ud = {
      x: 1,
      y: 1
    }
    this.abcdUV(ua, ub, uc, ud, uv)
    const uvT = new Float32Array(uv);
    geometry.setAttribute('uv', new THREE.BufferAttribute(uvT, 2));
  }

  abcdVertex(a, b, c, d, arr) {
    arr.push(
      b.x,
      b.y,
      b.z
    )
    arr.push(
      d.x,
      d.y,
      d.z
    )
    arr.push(
      a.x,
      a.y,
      a.z
    )

    arr.push(
      b.x,
      b.y,
      b.z
    )
    arr.push(
      c.x,
      c.y,
      c.z
    )
    arr.push(
      d.x,
      d.y,
      d.z
    )
  }

  abcdUV(a, b, c, d, arr) {
    arr.push(
      b.x,
      b.y,
    )
    arr.push(
      d.x,
      d.y,
    )
    arr.push(
      a.x,
      a.y,
    )

    arr.push(
      b.x,
      b.y,
    )
    arr.push(
      c.x,
      c.y,
    )
    arr.push(
      d.x,
      d.y,
    )
  }
}
<全文结束>
