分布式文件系统fastDfs集群搭建及springboot整合fastdfs客户端
*服务器规划
   跟踪服务器1【主机】(Tracker Server):10.10.77.165
   存储服务器2(Storage Server):10.10.77.166
   存储服务器3(Storage Server):10.10.77.167
数据存储目录
| 应用 | 安装目录 |
|---|---|
| 安装包 | /usr/local/src |
| Tracker_data | /fastdfs/tracker |
| Storage_data | /fastdfs/storage |
| nginx | /opt/nginx |
安装包:
FastDFS_v5.08.tar.gz:FastDFS源码
libfastcommon-master.zip:(从 FastDFS 和 FastDHT 中提取出来的公共 C 函数库)
fastdfs-nginx-module-master.zip:storage节点http服务nginx模块
nginx-1.10.0.tar.gz:Nginx安装包
下载完成后,将压缩包解压到/usr/local/src目录下
正式开始前需要确认gcc、g++开发库已经预先安装好,检查gcc是否安装,gcc --version
检查g++是否安装,g++ --version。
如果是离线安装,还需要以下包,,下面的三个包主要是编译nginx所需要的包:
zlib-1.2.11.tar.gz
pcre-8.12.tar.gz
openssl-1.1.0g.tar.gz
将包上传到服务器后,依次安装,安装命令如下:
pcre安装
执行如下命令:
tar -zxvf pcre-8.42.tar.gz
cd pcre-8.42/
./configure
make
make install
zlib安装
执行如下命令:
tar -zxvf zlib-1.2.11.tar.gz
cd zlib-1.2.11/
./configure
make
make install
openssl安装
执行如下命令:
tar -zxvf openssl-1.1.0h.tar.gz
cd openssl-1.1.0h/
./config
make
make install
正式开始:
**
步骤一:所有tracker和storage节点都执行如下操作**
1、安装所需的依赖包
yum install make cmake gcc gcc-c++
2、安装libfatscommon依次执行下列命令
	cd /usr/local/src
	unzip libfastcommon-master.zip
	cd libfastcommon-master
	./make.sh
	./make.sh install
3、安装FastDFS 依次执行下列命令
	   cd /usr/local/src
	   tar -xzvf FastDFS_v5.08.tar.gz
	   cd FastDFS
	  ./make.sh
	  ./make.sh install
采用默认安装方式,相应的文件与目录检查如下:
1> 服务脚本:
	/etc/init.d/fdfs_storaged
	/etc/init.d/fdfs_trackerd
2> 配置文件(示例配置文件):
ll /etc/fdfs/
出现下列内容
-rw-r–r-- 1 root root 1461 1月 4 14:34 client.conf.sample
-rw-r–r-- 1 root root 7927 1月 4 14:34 storage.conf.sample
-rw-r–r-- 1 root root 7200 1月 4 14:34 tracker.conf.sample
3> 命令行工具(/usr/bin目录下)
ll /usr/bin/fdfs_*
出现下列内容
-rwxr-xr-x 1 root root 260584 1月 4 14:34 fdfs_appender_test
-rwxr-xr-x 1 root root 260281 1月 4 14:34 fdfs_appender_test1
-rwxr-xr-x 1 root root 250625 1月 4 14:34 fdfs_append_file
-rwxr-xr-x 1 root root 250045 1月 4 14:34 fdfs_crc32
-rwxr-xr-x 1 root root 250708 1月 4 14:34 fdfs_delete_file
-rwxr-xr-x 1 root root 251515 1月 4 14:34 fdfs_download_file
-rwxr-xr-x 1 root root 251273 1月 4 14:34 fdfs_file_info
-rwxr-xr-x 1 root root 266401 1月 4 14:34 fdfs_monitor
-rwxr-xr-x 1 root root 873233 1月 4 14:34 fdfs_storaged
-rwxr-xr-x 1 root root 266952 1月 4 14:34 fdfs_test
-rwxr-xr-x 1 root root 266153 1月 4 14:34 fdfs_test1
-rwxr-xr-x 1 root root 371336 1月 4 14:34 fdfs_trackerd
-rwxr-xr-x 1 root root 251651 1月 4 14:34 fdfs_upload_appender
-rwxr-xr-x 1 root root 252781 1月 4 14:34 fdfs_upload_file
**
步骤二:配置tracker服务器
**
1、复制tracker样例配置文件,并重命名
cp /etc/fdfs/tracker.conf.sample /etc/fdfs/tracker.conf
2、修改tracker配置文件
vim /etc/fdfs/tracker.conf
主要修改以下内容
disabled=false              # 启用配置文件
port=22122                  # tracker服务器端口(默认22122)
base_path=/fastdfs/tracker  # 存储日志和数据的根目录
store_group=group1
其它参数保留默认配置, 具体配置解释可参考官方文档说明:http://bbs.chinaunix.net/thread-1941456-1-1.html
3、创建base_path指定的目录
mkdir -p /fastdfs/tracker
4、防火墙中打开tracker服务器端口( 默认为 22122)
防火墙如果是iptables
vi /etc/sysconfig/iptables
添加如下端口行:
-A INPUT -m state --state NEW -m tcp -p tcp --dport 22122 -j ACCEPT
重启防火墙
service iptables restart
防火墙人如果是firewall
新开端口
firewall-cmd --zone=public --add-port=端口/tcp --permanent
重启
firewall-cmd --reload
5、启动tracker服务器
/etc/init.d/fdfs_trackerd start
初次启动,会在/fastdfs/tracker目录下生成logs、data两个目录。
drwxr-xr-x 2 root root 4096 1月 4 15:00 data
drwxr-xr-x 2 root root 4096 1月 4 14:38 logs
检查FastDFS Tracker Server是否启动成功:
ps -ef | grep fdfs_trackerd
tracker启动与停止
停止:
killall fdfs_trackerd
启动:
	 /etc/init.d/fdfs_trackerd start
	或者
	 /usr/bin/fdfs_trackerd /etc/fdfs/tracker.conf(确定一下/usr/local/bin还是/usr/bin)
重启:
/usr/bin/fdfs_trackerd /etc/fdfs/tracker.conf restart
三、配置storage服务器
1、复制storage样例配置文件,并重命名
cp /etc/fdfs/storage.conf.sample /etc/fdfs/storage.conf
2、编辑配置文件
vi /etc/fdfs/storage.conf
修改的内容如下:
disabled=false                      # 启用配置文件
port=23000                          # storage服务端口
base_path=/fastdfs/storage          # 数据和日志文件存储根目录
store_path_count=3
store_path0=/fastdfs/storage0
store_path1=/fastdfs/storage1
store_path2=/fastdfs/storage2       # 存储目录
tracker_server=10.10.77.165:22122  # tracker服务器IP和端口
http.server_port=8888               # http访问文件的端口
3、创建基础数据目录
	mkdir -p /fastdfs/storage     #这个存储目录只是为了让Storage启动的时候存放信息,storage0、storage1、storage2可以分类存放不同种类的数据类型
	mkdir -p /fastdfs/storage0
	mkdir -p /fastdfs/storage1
	mkdir -p /fastdfs/storage2
4、防火墙中打开storage服务器端口( 默认为 23000) 如果是firerwall上面有命令,记得修改端口
vi /etc/sysconfig/iptables
#添加如下端口行:
-A INPUT -m state --state NEW -m tcp -p tcp --dport 23000 -j ACCEPT
重启防火墙
service iptables restart
5、启动storage服务器
/etc/init.d/fdfs_storaged start
初次启动,会在/fastdfs/storage目录下生成logs、data两个目录。
drwxr-xr-x 259 root root 4096 Mar 31 06:22 data
drwxr-xr-x 2 root root 4096 Mar 31 06:22 logs
检查FastDFS Tracker Server是否启动成功:
ps -ef | grep fdfs_storaged
会出现如下内容
root 1336 1 3 06:22 ? 00:00:01 /usr/bin/fdfs_storaged /etc/fdfs/storage.conf
root 1347 369 0 06:23 pts/0 00:00:00 grep fdfs_storaged
**
storage的启动与 停止
启动:
/etc/init.d/fdfs_storaged start
或者
/usr/bin/fdfs_storaged /etc/fdfs/storage.conf (确定一下是/usr/local/bin还是/usr/local/bin,楼主调试的时候killall fdfs_storaged,发现上面那个启动命令启动不了storage,改用这个命令)
停止:
killall fdfs_storaged
四、文件上传测试(ip01)
**
1、修改Tracker服务器客户端配置文件
	cp /etc/fdfs/client.conf.sample /etc/fdfs/client.conf
	vim /etc/fdfs/client.conf
修改以下配置,其它保持默认
	base_path=/fastdfs/tracker
	tracker_server=10.10.77.165:22122  # tracker服务器IP和端口
2、执行文件上传命令
	#/usr/local/src/test.png 是需要上传文件路径

/usr/bin/fdfs_upload_file /etc/fdfs/client.conf /usr/local/src/test.png
返回文件ID号:group1/M00/00/00/tlxkwlhttsGAU2ZXAAC07quU0oE095.png
(能返回以上文件ID,说明文件已经上传成功)
或者 执行下列命令:
/usr/bin/fdfs_test /etc/fdfs/client.conf upload client.conf
五、在所有storage节点安装fastdfs-nginx-module
1、fastdfs-nginx-module 作用说明
FastDFS 通过 Tracker 服务器,将文件放在 Storage 服务器存储,但是同组存储服务器之间需要进入文件复制,有同步延迟的问题。假设 Tracker 服务器将文件上传到了 ip01,上传成功后文件 ID 已经返回给客户端。此时 FastDFS 存储集群机制会将这个文件同步到同组存储 ip02,在文件还没有复制完成的情况下,客户端如果用这个文件 ID 在 ip02 上取文件,就会出现文件无法访问的错误。而 fastdfs-nginx-module 可以重定向文件连接到源服务器取文件,避免客户端由于复制延迟导致的文件无法访问错误。(解压后的 fastdfs-nginx-module 在 nginx 安装时使用)
2、解压 fastdfs-nginx-module_v1.16.tar.gz
	cd /usr/local/src
	tar -xzvf fastdfs-nginx-module_v1.16.tar.gz
3、修改 fastdfs-nginx-module 的 config 配置文件
	cd fastdfs-nginx-module/src
	vim config
把
CORE_INCS="$CORE_INCS /usr/local/include/fastdfs /usr/local/include/fastcommon/"
修改为:
CORE_INCS="$CORE_INCS /usr/include/fastdfs /usr/include/fastcommon/"
4、安装编译 Nginx 所需的依赖包
yum install gcc gcc-c++ make automake autoconf libtool pcre* zlib openssl openssl-devel
5、编译安装 Nginx (添加 fastdfs-nginx-module 模块)
依次执行一下命令
	cd /usr/local/src/

	tar -zxvf nginx-1.10.0.tar.gz

	tar –zxvf ngx_cache_purge_2.3.tar.gz

	cd nginx-1.10.0

	./configure --prefix=/opt/nginx --add-module=/usr/local/src/fastdfs-nginx-module/src
	make && make install
6、复制 fastdfs-nginx-module 源码中的配置文件到/etc/fdfs 目录,并修改
	cp /usr/local/src/fastdfs-nginx-module/src/mod_fastdfs.conf      /etc/fdfs/

	vi /etc/fdfs/mod_fastdfs.conf
修改以下配置:
	connect_timeout=10
	base_path=/tmp
	tracker_server=10.10.77.165:22122  # tracker服务器IP和端口
	url_have_group_name=true   #url中包含group名称
	#在最后添加 [group1]
	group_name=group1
	storage_server_port=23000
	store_path_count=3
	store_path0=/fastdfs/storage0
	store_path1=/fastdfs/storage1
	store_path2=/fastdfs/storage2
7、复制 FastDFS 的部分配置文件到/etc/fdfs 目录
cd /usr/local/src/FastDFS/conf
cp http.conf mime.types /etc/fdfs/
ln -s /fastdfs/storage/data/ /fastdfs/storage/data/M00
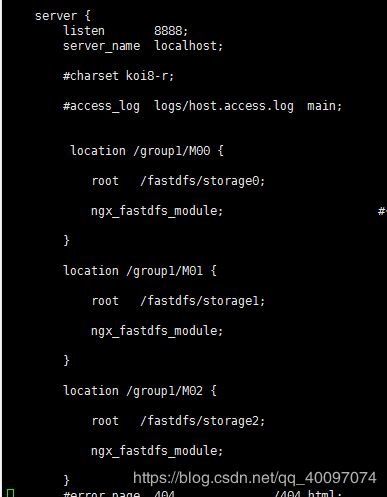
9、两台Storage服务器配置的 Nginx信息

10、防火墙中打开tracker和srotage的Nginx 的 8888 端口(楼主血泪教训啊,tracker的nginx的端口忘记打开,nginx怎么也访问不到,如果是fireWall,上面有命令)
vi /etc/sysconfig/iptables
添加:
-A INPUT -m state --state NEW -m tcp -p tcp --dport 8888 -j ACCEPT
#重启防火墙
service iptables restart
启动nginx :
/opt/nginx/sbin/nginx
(重启 Nginx 的命令为:/opt/nginx/sbin/nginx -s reload)
说明:
A、8888 端口值是要与/etc/fdfs/storage.conf 中的 http.server_port=8888 相对应, 因为 http.server_port 默认为 8888,如果想改成 80,则要对应修改过来。
B、Storage 对应有多个 group 的情况下,访问路径带 group 名,如/group1/M00/00/00/xxx, 对应的 Nginx 配置为:
 location ~/group([0-9])/M00 {

     ngx_fastdfs_module;
}
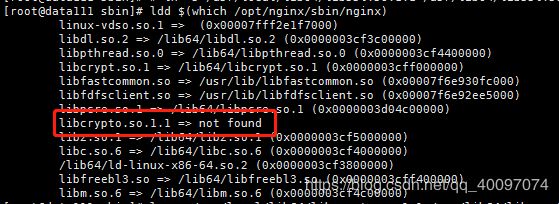
启动nginx时,有时会报错,执行ldd $(which /opt/nginx/sbin/nginx)查看软连接,结果如下:

会发现此软连接没有找到。
如果启动nginx报错:
error while loading shared libraries: libpcre.so.1: cannot open shared object file: No such file or directory
执行该命令: ln -s /usr/local/lib/libpcre.so.1 /lib64
如果报错:
error while loading shared libraries: libcrypto.so.1.1: cannot open shared object file: No such file or directory
执行该命令:
ln -s /usr/local/lib64/libcrypto.so.1.1 /usr/lib64/libcrypto.so.1.1
再次执行ldd $(which /opt/nginx/sbin/nginx),结果如下:

可在tracker机器上执行fdfs_monitor /etc/fdfs/client.conf查看集群状态
11、测试一下
测试一下都可以访问到文件:
http://10.10.77.165:8888/group1/M00/00/00/CmSKtFj13gyAen4oAAH0yXi-HW8296.png
六:springboot集成fastdfs,支持分路径存储
**
1、引入pom包
		com.github.tobato
		fastdfs-client
		1.26.2
2、新建文件类
public class FastDFSFile {

    private String name;

    private byte[] content;

    private String ext;

    private String md5;

    private String author;
}
3、Rource目录下新建fdfs_client.conf文件
connect_timeout = 60
network_timeout = 60
charset = UTF-8
http.tracker_http_port = 8888 //这个是storage.conf配置的http端口
http.anti_steal_token = no
http.secret_key = FastDFS1234567890 //这个要和服务器storage的http.client的配置上的一样
tracker_server = 10.10.77.165:22122
4、导入fastdfs的客户端util
package com.supconit.data.algorithm.platform.util;
import com.supconit.data.algorithm.platform.common.entity.FastDfs.FastDFSFile;
import org.apache.commons.io.IOUtils;
import org.apache.commons.lang.StringUtils;
import org.csource.common.NameValuePair;
import org.csource.fastdfs.*;
import org.slf4j.LoggerFactory;
import org.springframework.beans.factory.annotation.Autowired;
import org.springframework.core.io.ClassPathResource;
import java.io.File;
import java.io.FileOutputStream;
import java.io.IOException;
/**
-
Created by dell on 2019/4/25.
/
public class FastDFSClientUtil {
@Autowired
private static String STORAGE_SERVER_GROUP = “group1”;
@Autowired
private static String STORAGE_SERVER_PORT = “23000”;
private static TrackerClient trackerClient;
private static TrackerServer trackerServer;
private static StorageClient storageClient;
private static StorageServer storageServer;
private static org.slf4j.Logger logger = LoggerFactory.getLogger(FastDFSClientUtil.class);
// /*
// * 上传文件
// * @param
// * @return 文件访问地址
// * @throws IOException
// /
// public String uploadFile(byte[] bytes, long fileSize, String extension) throws IOException {
// ByteArrayInputStream byteArrayInputStream = new ByteArrayInputStream(bytes);
// StorePath storePath = storageClient.uploadFile(byteArrayInputStream, fileSize, extension, null);
// return storePath.getFullPath();
// }
//
// // 封装图片完整URL地址
// private String getResAccessUrl(StorePath storePath) {
// String fileUrl = “http://” +fastUrl+ “/” + storePath.getFullPath();
// return fileUrl;
// }
//
// /*
// * 删除文件
// * @param fileUrl 文件访问地址
// * @return
// /
// public void deleteFile(String fileUrl) {
// if(null == fileUrl || “”.equals(fileUrl)){
// return;
// }
// try {
// StorePath storePath = StorePath.praseFromUrl(fileUrl);
// storageClient.deleteFile(storePath.getGroup(), storePath.getPath());
// } catch (FdfsUnsupportStorePathException e) {
// logger.warn(e.getMessage());
// }
// }
// /*
// * 下载文件
// * 返回文件字节流大小
// * @param fileUrl 文件URL
// * @return 文件字节
// * @throws IOException
// */
// public byte[] downloadFile(String fileUrl) throws IOException {
// String group = fileUrl.substring(0, fileUrl.indexOf("/"));
// String path = fileUrl.substring(fileUrl.indexOf("/") + 1);
// DownloadByteArray downloadByteArray = new DownloadByteArray();
// byte[] bytes = storageClient.downloadFile(group, path, downloadByteArray);
// return bytes;
// }static {
try {
ClassPathResource classPathResource = new ClassPathResource(“fdfs_client.conf”);
//创建临时文件,将fdfs_client.conf的值赋值到临时文件中,创建这个临时文件的原因是springboot打成jar后无法获取classpath下文件
String tempPath =System.getProperty(“java.io.tmpdir”) + System.currentTimeMillis()+".conf";
File f = new File(tempPath);
IOUtils.copy(classPathResource.getInputStream(),new FileOutputStream(f));
ClientGlobal.init(f.getAbsolutePath());
trackerClient = new TrackerClient();
trackerServer = trackerClient.getConnection();
} catch (Exception e) {
logger.error(“FastDFS Client Init Fail!”,e);
}
}
/** -
上传文件
-
storepath 0代表input,1代表算法,2代表output
*/
public static String[] upload(FastDFSFile file,String storepath) {
logger.info("File Name: " + file.getName() + “File Length:” + file.getContent().length);NameValuePair[] meta_list = new NameValuePair[1]; meta_list[0] = new NameValuePair("author", file.getAuthor()); long startTime = System.currentTimeMillis(); String[] uploadResults = null; try { String storageIp = getStorageServerIp(trackerClient,trackerServer); if (StringUtils.isBlank(storageIp)){ logger.error("stroageIp is null, error code:" + storageClient.getErrorCode()); } storageServer =getStorageServer(storageIp,storepath); storageClient = new StorageClient(trackerServer, storageServer); uploadResults = storageClient.upload_file(file.getContent(), file.getExt(), meta_list); } catch (IOException e) { logger.error("IO Exception when uploadind the file:" + file.getName(), e); } catch (Exception e) { logger.error("Non IO Exception when uploadind the file:" + file.getName(), e); } logger.info("upload_file time used:" + (System.currentTimeMillis() - startTime) + " ms"); if (uploadResults == null) { logger.error("upload file fail, error code:" + storageClient.getErrorCode()); } String groupName = uploadResults[0]; String remoteFileName = uploadResults[1]; logger.info("upload file successfully!!!" + "group_name:" + groupName + ", remoteFileName:" + " " + remoteFileName); return uploadResults;}
/**
- 下载
- @param groupName
- @param remoteFileName
- @return
*/
public static byte[] downFile(String groupName, String remoteFileName) {
try {
storageServer = trackerClient.getStoreStorage(trackerServer);
storageClient = new StorageClient(trackerServer, storageServer);
byte[] fileByte = storageClient.download_file(groupName, remoteFileName);
return fileByte;
} catch (IOException e) {
logger.error(“IO Exception: Get File from Fast DFS failed”, e);
} catch (Exception e) {
logger.error(“Non IO Exception: Get File from Fast DFS failed”, e);
}
return null;
}
/**
- 删除文件
- @param groupName
- @param remoteFileName
- @throws Exception
*/
public static void deleteFile(String groupName, String remoteFileName)
throws Exception {
storageClient = new StorageClient(trackerServer, storageServer);
int i = storageClient.delete_file(groupName, remoteFileName);
logger.info(“delete file successfully!!!” + i);
}
/**- 获得可用的storage IP
- @param trackerClient
- @param trackerServer
- @return 返回storage IP
*/
private static String getStorageServerIp(TrackerClient trackerClient, TrackerServer trackerServer) {
String storageIp = null;
if (trackerClient != null && trackerServer != null) {
try {
StorageServer storageServer = trackerClient.getStoreStorage(trackerServer, STORAGE_SERVER_GROUP);
storageIp = storageServer.getSocket().getInetAddress().getHostAddress();
} catch (IOException e) {
e.printStackTrace();
}
}
return storageIp;
}
/**
- 得到Storage服务
- @param storageIp
- @param storepath 0代表input服务的jar包,1代表算法服务的jar包,2代表output服务的jar包,因为我是分模块存储的,所以storepath传入不同的值,那么该数据就会存到该模块上,例如storepath传入0,那么数据就会存入到storepath0
- @return 返回Storage服务
*/
private static StorageServer getStorageServer(String storageIp,String storepath) {
StorageServer storageServer = null;
if (storageIp != null && !("").equals(storageIp) &&null != storepath && !("").equals(storepath)) {
try {
storageServer = new StorageServer(storageIp, Integer.parseInt(STORAGE_SERVER_PORT), Integer.parseInt(storepath));
} catch (IOException e) {
e.printStackTrace();
}
}
return storageServer;
}
}```
5、写上传下载的service
package com.supconit.data.algorithm.platform.service.FileSystem.impl;

import com.supconit.data.algorithm.platform.common.entity.FastDfs.FastDFSFile;
import com.supconit.data.algorithm.platform.service.FileSystem.DRFdfsUpAndDowService;
import com.supconit.data.algorithm.platform.util.FastDFSClientUtil;
import org.slf4j.Logger;
import org.slf4j.LoggerFactory;
import org.springframework.stereotype.Service;
import org.springframework.web.multipart.MultipartFile;

import javax.servlet.ServletOutputStream;
import javax.servlet.http.HttpServletResponse;
import java.io.IOException;
import java.io.InputStream;
import java.net.URLEncoder;

/**
 * Created by dell on 2019/4/25.
 */
@Service
public class DRFdfsUpAndDowServiceImpl implements DRFdfsUpAndDowService{

    private final Logger logger = LoggerFactory.getLogger(DRFdfsUpAndDowServiceImpl.class);

    /**
     *  文件上传
     *  最后返回fastDFS中的文件名称;group1/M00/01/04/CgMKrVvS0geAQ0pzAACAAJxmBeM793.doc
     * @param multipartFile 页面提交时文件 storepath 0是input的jar包,1是算法的jar包 2是output的jar包
     *
     * @return
     */
    public String uploadFile(MultipartFile multipartFile,String storepath){
        String[] fileAbsolutePath={};
        String fileName=multipartFile.getOriginalFilename();
        String ext = fileName.substring(fileName.lastIndexOf(".") + 1);
        byte[] file_buff = null;
        InputStream inputStream= null;
        try {
            inputStream = multipartFile.getInputStream();
        } catch (IOException e) {
            e.printStackTrace();
        }
        if(inputStream!=null){
            int len1 = 0;
            try {
                len1 = inputStream.available();
            } catch (IOException e) {
                e.printStackTrace();
            }
            file_buff = new byte[len1];
            try {
                inputStream.read(file_buff);
            } catch (IOException e) {
                e.printStackTrace();
            }
        }
        try {
            inputStream.close();
        } catch (IOException e) {
            e.printStackTrace();
        }
        FastDFSFile file = new FastDFSFile(fileName, file_buff, ext);
        try {
            fileAbsolutePath = FastDFSClientUtil.upload(file,storepath);  //upload to fastdfs
        } catch (Exception e) {
            logger.error("upload file Exception!",e);
        }
        if (fileAbsolutePath==null) {
            logger.error("upload file failed,please upload again!");
        }
        return fileAbsolutePath[0]+ "/"+fileAbsolutePath[1];
    }
    /**
     *  文件下载
     * @param fileUrl 当前对象文件名称
     * @param response   HttpServletResponse 内置对象
     * @throws IOException
     */
    public void downloadFile(String fileUrl, HttpServletResponse response) throws IOException {
        String groupName =fileUrl.substring(0, fileUrl.indexOf("/"));
        String routeFileName =fileUrl.substring( fileUrl.indexOf("/")+1);
        byte[] fileByte  =  FastDFSClientUtil.downFile(groupName,routeFileName);
        // 这里只是为了整合fastdfs,所以写死了文件格式。需要在上传的时候保存文件名。下载的时候使用对应的格式
        response.setHeader("Content-disposition", "attachment;filename=" + URLEncoder.encode(routeFileName, "UTF-8"));
        response.setCharacterEncoding("UTF-8");
        ServletOutputStream outputStream = null;
        try {
            outputStream = response.getOutputStream();
            outputStream.write(fileByte);
        } catch (IOException e) {
            e.printStackTrace();
        } finally {
            try {
                outputStream.flush();
                outputStream.close();
            } catch (IOException e) {
                e.printStackTrace();
            }
        }
    }

    @Override
    public void deleteFile(String fileUrl) {
        String groupName =fileUrl.substring(0, fileUrl.indexOf("/"));
        String routeFileName =fileUrl.substring( fileUrl.indexOf("/")+1);
        try {
            FastDFSClientUtil.deleteFile(groupName,routeFileName);
        } catch (Exception e) {
            e.printStackTrace();
        }
    }


}
7.学个controller进行测试
package com.supconit.data.algorithm.platform.controller.output;

import com.supconit.data.algorithm.platform.service.FileSystem.impl.DRFdfsUpAndDowServiceImpl;
import com.supconit.data.algorithm.platform.service.output.OutputSchemeInfoService;
import org.springframework.beans.factory.annotation.Autowired;
import org.springframework.web.bind.annotation.PostMapping;
import org.springframework.web.bind.annotation.RequestMapping;
import org.springframework.web.bind.annotation.RestController;
import org.springframework.web.multipart.MultipartFile;

import javax.servlet.http.HttpServletResponse;
import java.io.IOException;

/**
 * Created by dell on 2019/4/23.
 */
@RestController
public class OutputController {
    @Autowired
    private DRFdfsUpAndDowServiceImpl drFdfsUpAndDowService;
   @RequestMapping("uploadfile")
    public String file(MultipartFile file){
       return drFdfsUpAndDowService.uploadFile(file);
    }
    @RequestMapping("downloadfile")
    public void downloadfile(String fileUrl, HttpServletResponse response){
        try {
             drFdfsUpAndDowService.downloadFile(fileUrl,response);
        } catch (IOException e) {
            e.printStackTrace();
        }}
}
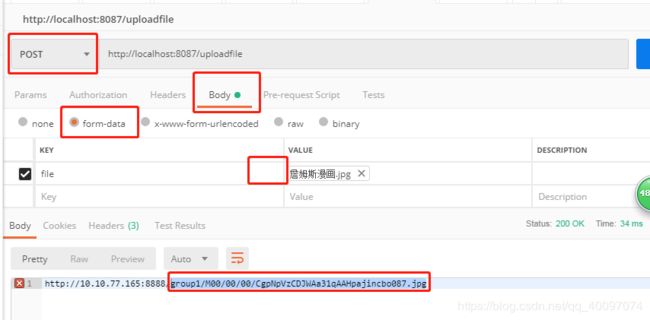
利用postman进行上传测试

key的类型选择file,上传一张图片,发送请求后可看到下面返回完整的地址,用红框内的地址选择下载即可!!!
利用postman进行下载测试

