在ReactNative中使用Redux简述
写在前面:在ReactNative中,常常会有下面这样的需求。就是像登录一样,登陆成功,我需要做很多事情,存储用户信息、把别的页面(或上一级页面)存在的头像昵称给显示出来。有可能还需要修改离登录页有两个层级页面上的数据。基于我现在使用的ReactNative0.51.0版本和react-navigtion1.5.+版本。虽然可以修改navigtion的goBack方法来回参。但是层级一深,将变得难以处理。所以建议使用优秀的框架来处理这种业务逻辑。在这里我选用的是Redux。
先说一下我所使用的库有哪些:
1.redux
2.react-redux
3.redux-thunk
4.(可选,这是常用的页面路由,和redux无关)react-navigtion
先说一下我接下来要讲的顺序:
1.介绍redux以及基础用法。

2.通过结合项目的方式从外向里直接介绍如何在react-native中使用redux、其中会带着讲解react-redux和redux-think。

3.用法举例。

4.注意事项以及开发技巧。
一:什么是redux?为什么会出现redux?redux和react的关系?
我在这里借鉴阮一峰老师的话简述一下:
react只是DOM的一个抽象层,并不是Web应用的完整解决方案。有很关键的两个方面,他没有涉及到
1.代码结构
2.组件交互
所以说react没办法开发大型项目的,因为大型项目业务逻辑复杂,这两个方面恰恰是最需要的。
理所当然,FaceBook在14年提出了Flux架构的概念,redux在15年就应景而生。用来解决react存在的这两个问题。
redux是干什么的?用两句话总结,也就是redux的设计理念:
(1)Web 应用是一个状态机,视图与状态是一一对应的。
(2)所有的状态,保存在一个对象里面。
理解了这两句话你就懂了redux。
用大白话说,react配合redux实现的功能就是把state封装到一个对象里面,让所有视图都能拿到state来改变自己的视图内容。
在这里大家可以参考阮一峰老师讲解的Redux:
http://www.ruanyifeng.com/blog/2016/09/redux_tutorial_part_one_basic_usages.html
这是我的转载地址:
https://blog.csdn.net/sinat_30949835/article/details/79923631
因为本节教程主要讲解的是在项目中实战、使用redux的。所以就不在赘述redux使用教程。接下来直接讲解使用方法。
二:在ReactNative中使用redux。
首先要讲一下:
1.有人说“如果你不知道是否需要redux,那就是不需要他”。
2.Redux的创造者Dan Abramov又补充了一句“只有遇到React实在解决不了的问题,你才需要Redux”。
因为redux的用法十分复杂,但他解决的也是react解决不了或者十分复杂的问题。
所以如果你打算在项目中使用Redux、那么你的项目一定是存在下面两种场景的。
1.多交互。
2.多数据源。
举个例子:
我有一个用户总页面user_page。
在user_page这个页面上又两个按钮,他们分别登录login_page和个人信息user_info_page页面
而且在另一个tab页面上又存在一个用户头像的图标。
那么你需要在登录成功的同时,修改user页面和tab页面用户头像。
你需要在user_info页面上点击退出登录的同时再次修改user页面和tab页面用户头像。
而且要在没登录是现实登录按钮,登录时现实个人信息。
又或者另一个例子:
在一个商城中,几乎是存在商品的地方,都有加入购物车的功能。而你的购物车页面又存在于tab的分支中。那么你每在不同的页面选中了商品加入购物车,都需要刷新这个购物车。
这就是多交互和多数据源的简单例子。
我的同事使用了react中的DeviceEventEmitter,类似于原生开发中使用的广播。这样虽然也能实现,但是不够优雅,管理广播也存在局限性。所以在这个时候redux就派上用场了。
扯跑偏了,马上拉回来:
2.1 在react-native中使用redux之react-redux
在react-native中使用redux直接使用是不大方便的,毕竟react-native和react还是有些许变化的,所以react的作者专门针对于react-native分装了一个库react-redux。
在react-native项目中,将会同时使用redux和react-redux并使用中间件redux-thunk让使用更灵活化。
1.redux
2.react-redux
3.redux-thunk
在使用之前,大家必须要了解redux的几个基础知识点。
1.action
2.reducer
3.store
简述action:
简述reducer:
简述store:
2.2 在react-native中使用redux之“上代码”
新建ReactNative项目,如果你还不会创建项目请移步我的另一篇基础博文:ReactNative创建项目:
创建指定版本的项目
react-native init ReduxDemo --version 0.51.0并依次引入redux,因为我用了navigation做导航路由所以引入了react-navigation
npm install --save redux
npm install --save react-redux
npm install --save redux-thunk
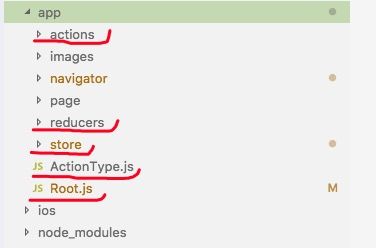
npm install --save react-navigation创建好项目并引入库后,在根目录下创建app文件夹用来存放编写的项目代码。

在app目录下分别创建actions、reducers、store文件夹。选择创建page文件夹用来存放普通页面。
并创建Root.js、ActionType.js文件。
首先介绍ActionType.js就是所有action的type的合集。代码如下。
这里全部都是自定义的,你想起什么名字就起什么名字,做type判断用的。
ActionType.js
/**
 * create by AbyssKitty on 2018/01/18
 * 所有的Action的type的集合
 */

//export const LOGIN_DENGLU = 'login_denglu'; //初始化状态
export const ACTION_GETWEATHER_INIT = 'action_getweather_init'; //
export const ACTION_GETWEATHER_SUCCESS = 'action_getweather_success'; //
然后我们在actions文件夹下,新建一个GetWeatherAction.js文件。
GetWeatherAction.js
/**
 * create by AbyssKitty on 2017/12/06
 * 获取天气预报的action
 */
import * as TYPES from '../ActionType';
/**
 * 获取天气预报的action
 */
export function actionGetWeather(list){
    return (dispatch) => {
        //开始获取,发送一个dispatch
        dispatch(init(list));
        /**
         * 在这里假装做了一个类似于调接口的操作
         */
        //获取成功,发送一个dispatch
        dispatch(success(list));
    }
}

/**
 * 这里会通过dispatch把action送给reducer,TYPE是判断拿到的是哪个action。
 */
function init(list){
    return{
        type : TYPES.ACTION_GETWEATHER_INIT,
        message : '开始获取',
        bean : list,
    }
}

function success(list){
    return{
        type : TYPES.ACTION_GETWEATHER_SUCCESS,
        message : '获取成功',
        bean : list,
    }
}
然后我们在reducers文件夹下新建一个item文件夹和一个IndexReducers.js文件
在item文件夹下创建一个reducer文件(注item下存放所有的reducer文件,并必须在IndexReducers.js中全部配置)
创建GetWeatherReducer.js文件
/**
 * create by AbyssKitty on 2017/12/06
 * reducers
 */
import * as TYPES from '../../ActionType';

/**
 * 这里可以初始化一个默认的实体类
 */
const initialState = {
  status: 'init',
  isSuccess: false,
  bean:null,
  message : '',
}
/**
 * 在这里可以拿到action并return给IndexReducers.js进行分发。
 *
 * 根据type判断了是从哪个action过来的数据,并进行选择性return。
 */
export default function getWeather(state = initialState, action) {
    switch (action.type) {
        case TYPES.ACTION_GETWEATHER_INIT: // 初始状态
            return Object.assign({}, state, {
                status: 'init',
                isSuccess: false,
                bean : action.bean,
                message : action.message,
            });
            break;
        case TYPES.ACTION_GETWEATHER_SUCCESS: // 初始状态
            return Object.assign({}, state, {
                status: 'success',
                isSuccess: true,
                bean : action.bean,
                message : action.message,
            });
            break;
        default:
            return state;
  }
}
我们需要通过IndexReducers.js来绑定所有的reducer。这里只有一个GetWeatherReducer所以就先绑定一个。
IndexReducers.js
/**
 * create by AbyssKitty on 2017/09/22
 * 事件分发 总模块
 */

import { combineReducers } from 'redux';
import GetWeatherReducer from './item/GetWeatherReducer';

//这里面必须要有初始数据 - 否则报错
const rootReducer = combineReducers({
    //GetWeatherReducer : GetWeatherReducer,
    GetWeatherReducer,
});

export default rootReducer;
然后在store文件夹中创建Store.js文件。通过thunk进行分发。
Store.js
/**
 * create by AbyssKitty on 2017/12/06
 * store 的配置文件
 */

import {createStore, applyMiddleware} from 'redux';
import thunkMiddleware from 'redux-thunk';
import rootReducer from '../reducers/IndexReducers';

/**
 *
 *
 *
 */

const createStoreWithMiddleware = applyMiddleware(thunkMiddleware)(createStore);

export default function configureStore(initialState) {
  const store = createStoreWithMiddleware(rootReducer, initialState);
  return store;
}
最后编写Root.js文件。用react-redux的Provide包裹住整个项目,并使用store属性。
Root.js
/**
 * create by AbyssKitty on 2017/12/06
 * 程序入口 通过包裹初始化
 */
import React, { Component } from 'react';
import { Provider } from 'react-redux';
import configureStore from './store/Store';
import { AppNavigator } from './navigator/navigator';

const store = configureStore();

/**
 * react-redux介绍
 * 阮一峰博客:http://www.ruanyifeng.com/blog/2016/09/redux_tutorial_part_three_react-redux.html
 * React-Redux 将所有组件分成两大类:UI 组件(presentational component)和容器组件(container component)。
 * UI:
 * 只负责 UI 的呈现,不带有任何业务逻辑
 * 没有状态(即不使用this.state这个变量)
 * 所有数据都由参数(this.props)提供
 * 不使用任何 Redux 的 API
 * 容器:
 * 负责管理数据和业务逻辑,不负责 UI 的呈现
 * 带有内部状态
 * 使用 Redux 的 API
 */
/**
 * Provider详解。
 * 他是react-redux提供的,用来让子组件可以通过props直接拿到state了。
 * (注:如果不用react-redux,就需要一层一层的传值,十分繁琐。)
 * Provider用法。用他包裹住整个app组件,他的子组件就全部可以通过props拿到state了。
 */
export default class Root extends Component {
  render() {
    return (


    );
  }
}
这里的AppNavigator是react-navigation的StackNavigator不做赘述。
navigator.js
import React from 'react'
import { StackNavigator } from 'react-navigation'

import Main from '../page/Main';
import Redux1 from '../page/Redux1';

export const AppNavigator = StackNavigator({

    Main : {screen : Main},
    Redux1 : {screen : Redux1},
});
main和redux1是我的两个页面。
然后使用App.js包裹住Root.js
react-native 0.50以上 只有index.js和App.js
react-native 0.50以下 有index.android.js和index.ios.js
App.js
/**
* Sample React Native App
* https://github.com/facebook/react-native
* @flow
*
* create by AbyssKitty on 2018-04-11
*/
import React, { Component } from 'react';
import {
Platform,
StyleSheet,
Text,
View
} from 'react-native';
import Root from './app/Root';
export default class App extends Component {
render() {
return (
ok这样就已经继承好了,接下来就是使用详情的讲解了。
2.3 在react-native中使用redux之如何使用
上面的代码大家已经知道我已经创建好了两个页面
用法呢很简单。我这里简述一下:
1.引入import { connect } from 'react-redux';
2.在末尾加入
function select(store) {
    return {
        GetWeatherReducer : store.GetWeatherReducer,
    }
}

export default connect(select)(Main);

就是把这个组件用connect包裹住就能拿到store。
注意export default已经拿到下面来了,上面的class前面的导出要删掉,Main是就是class的名字。
GetWeatherReducer就是reducer集合里的名字。
然后再生命周期中拿到props
/**
     * 生命周期 - props发生变动时的操作,建议将回调代码在这里处理
     * @param {*} nextProps
     */
    componentWillReceiveProps(nextProps){
        if(nextProps.GetWeatherReducer != null){
            if(nextProps.GetWeatherReducer.status == 'success'){
                this.setState({
                    image : 2,
                })
            }else{
                this.setState({
                    image : 1,
                })
            }
            this.setState({
                text : nextProps.GetWeatherReducer.status,
            })
        }
    }

    /**
     * 生命周期 - 因为state变动频繁,不建议将redux的回调代码在这里处理,而且这里面是不能进行setState的操作的。
     * @param {*} nextProps
     * @param {*} nextState
     */
    shouldComponentUpdate(nextProps,nextState){
        console.log("执行了shouldComponentUpdate");
    }
发送的话:
1.引入
import { connect } from 'react-redux';
import { actionGetWeather } from '../actions/GetWeatherAction';
2.代码中使用:let s = '123456';
this.props.dispatch(actionGetWeather(s));进行发送action。
下面是两个类的详细用法。
下面是两个类的详细用法。
Main.js
import React, { Component } from 'react';
import {
StyleSheet,
Text,
View,
Image,
TouchableHighlight,
} from 'react-native';
import { connect } from 'react-redux';
class Main extends Component {
static navigationOptions = ({ navigation, screenProps }) => ({
header:null,
})
constructor(props) {
super(props);
//设置状态
this.state = {
image : 1,
text : '',
}
}
goReduxPage = () => {
this.props.navigation.navigate("Redux1");
}
goPropsPage = () => {
}
componentDidMount(){
this.setState({
text : '',
})
}
quit = () => {
this.setState({
text:'',
image : 1,
})
}
/**
* 生命周期 - props发生变动时的操作,建议将回调代码在这里处理
* @param {*} nextProps
*/
componentWillReceiveProps(nextProps){
if(nextProps.GetWeatherReducer != null){
if(nextProps.GetWeatherReducer.status == 'success'){
this.setState({
image : 2,
})
}else{
this.setState({
image : 1,
})
}
this.setState({
text : nextProps.GetWeatherReducer.status,
})
}
}
/**
* 生命周期 - 因为state变动频繁,不建议将redux的回调代码在这里处理,而且这里面是不能进行setState的操作的。
* @param {*} nextProps
* @param {*} nextState
*/
shouldComponentUpdate(nextProps,nextState){
console.log("执行了shouldComponentUpdate");
}
render() {
return (
{
"本Demo主要功能:\n"+
"1.redux在本页面或者跨页面修改全局组件内容\n"+
"2.通过props,state父子组件交互"
}
this.goReduxPage()}>
{ 'redux' }
this.goPropsPage()}>
{ 'props' }
{/* 动态区域 */}
{
this.state.image == 1 ?
{ this.state.text }
this.quit()}>
{ 'clear' }
);
}
}
const styles = StyleSheet.create({
bgView : {
flex : 1,
justifyContent : 'center',
alignItems : 'center',
backgroundColor : '#FFFFFF',
},
touchableView : {
margin : 6,
},
buttonView : {
width : 100,
height : 40,
backgroundColor : "#0000FF",
borderRadius : 5,
flexDirection : 'row',
justifyContent : 'center',
alignItems : 'center',
},
});
function select(store) {
return {
GetWeatherReducer : store.GetWeatherReducer,
}
}
export default connect(select)(Main);Redux1.js
import React, { Component } from 'react';
import {
    StyleSheet,
    Text,
    View,
    TouchableHighlight,
} from 'react-native';

import { connect } from 'react-redux';
import { actionGetWeather } from '../actions/GetWeatherAction';

class Redux1 extends Component {
    static navigationOptions = ({ navigation, screenProps }) => ({
        header:null,
    })

    constructor(props) {
        super(props);
        //设置状态
        this.state = {

        }
    }

    quit = () => {
        this.props.navigation.goBack();
    }

    stateRedux = () => {
        let s = '123456';
        this.props.dispatch(actionGetWeather(s));
    }

    render() {
        return (

                  this.stateRedux()}>


                            { '发送' }


                    {
                        this.props.GetWeatherReducer == null ?
                        ""
                        :
                        this.props.GetWeatherReducer.status
                    }


                 this.quit()}>


                            { 'quit' }


        );
    }
}

const styles = StyleSheet.create({
    bgView : {
        flex : 1,
        justifyContent : 'center',
        alignItems : 'center',
        backgroundColor : '#FFFFFF',
    },
    touchableView : {
        margin : 6,
    },
    buttonView : {
        width : 100,
        height : 40,
        backgroundColor : "#0000FF",
        borderRadius : 5,
        flexDirection : 'row',
        justifyContent : 'center',
        alignItems : 'center',
    },
});

function select(store) {
    return {
        GetWeatherReducer : store.GetWeatherReducer,
    }
}

export default connect(select)(Redux1);
三:注意事项和技巧
未完待续......