Android属性动画完全解析(下),Interpolator和ViewPropertyAnimator的用法
转载请注明出处:http://blog.csdn.net/guolin_blog/article/details/44171115
大家好,欢迎继续回到Android属性动画完全解析。在上一篇文章当中我们学习了属性动画的一些进阶技巧,包括ValueAnimator和ObjectAnimator的高级用法,那么除了这些之外,当然还有一些其它的高级技巧在等着我们学习,因此本篇文章就对整个属性动画完全解析系列收个尾,来学习一下剩下的非常重要的高级技巧。
另外,本篇文章中使用的代码是建立在上篇文章基础之上的,如果你还没有阅读过前面的文章,建议先去参考阅读一下 Android属性动画完全解析(中),ValueAnimator和ObjectAnimator的高级用法 。
Interpolator的用法
Interpolator这个东西很难进行翻译,直译过来的话是补间器的意思,它的主要作用是可以控制动画的变化速率,比如去实现一种非线性运动的动画效果。那么什么叫做非线性运动的动画效果呢?就是说动画改变的速率不是一成不变的,像加速运动以及减速运动都属于非线性运动。
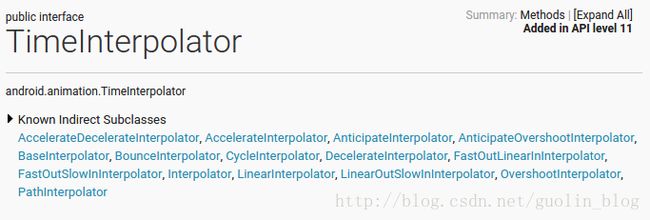
不过Interpolator并不是属性动画中新增的技术,实际上从Android 1.0版本开始就一直存在Interpolator接口了,而之前的补间动画当然也是支持这个功能的。只不过在属性动画中新增了一个TimeInterpolator接口,这个接口是用于兼容之前的Interpolator的,这使得所有过去的Interpolator实现类都可以直接拿过来放到属性动画当中使用,那么我们来看一下现在TimeInterpolator接口的所有实现类,如下图所示:
可以看到,TimeInterpolator接口已经有非常多的实现类了,这些都是Android系统内置好的并且我们可以直接使用的Interpolator。每个Interpolator都有它各自的实现效果,比如说AccelerateInterpolator就是一个加速运动的Interpolator,而DecelerateInterpolator就是一个减速运动的Interpolator。
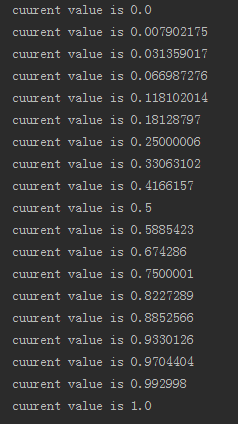
我觉得细心的朋友应该早已经发现了,在前面两篇文章当中我们所学到的所有属性动画,其实都不是在进行一种线程运动。比如说在“上”篇文章中使用ValueAnimator所打印的值如下所示:
可以看到,一开始的值变化速度明显比较慢,仅0.0开头的就打印了4次,之后开始加速,最后阶段又开始减速,因此我们可以很明显地看出这一个先加速后减速的Interpolator。
那么再来看一下在“中”篇文章中完成的小球移动加变色的功能,如下图所示:
![]()
从上图中我们明显可以看出,小球一开始运动速度比较慢,然后逐渐加速,中间的部分运动速度就比较快,接下来开始减速,最后缓缓停住。另外颜色变化也是这种规律,一开始颜色变化的比较慢,中间颜色变化的很快,最后阶段颜色变化的又比较慢。
从以上几点我们就可以总结出一个结论了,使用属性动画时,系统默认的Interpolator其实就是一个先加速后减速的Interpolator,对应的实现类就是AccelerateDecelerateInterpolator。
当然,我们也可以很轻松地修改这一默认属性,将它替换成任意一个系统内置好的Interpolator。就拿“中”篇文章中的代码来举例吧,MyAnimView中的startAnimation()方法是开启动画效果的入口,这里我们对Point对象的坐标稍做一下修改,让它变成一种垂直掉落的效果,代码如下所示:
private void startAnimation() {
    Point startPoint = new Point(getWidth() / 2, RADIUS);
    Point endPoint = new Point(getWidth() / 2, getHeight() - RADIUS);
    ValueAnimator anim = ValueAnimator.ofObject(new PointEvaluator(), startPoint, endPoint);
    anim.addUpdateListener(new ValueAnimator.AnimatorUpdateListener() {
        @Override
        public void onAnimationUpdate(ValueAnimator animation) {
            currentPoint = (Point) animation.getAnimatedValue();
            invalidate();
        }
    });
    anim.setDuration(2000);
    anim.start();
}private void startAnimation() {
Point startPoint = new Point(getWidth() / 2, RADIUS);
Point endPoint = new Point(getWidth() / 2, getHeight() - RADIUS);
ValueAnimator anim = ValueAnimator.ofObject(new PointEvaluator(), startPoint, endPoint);
anim.addUpdateListener(new ValueAnimator.AnimatorUpdateListener() {
@Override
public void onAnimationUpdate(ValueAnimator animation) {
currentPoint = (Point) animation.getAnimatedValue();
invalidate();
}
});
anim.setInterpolator(new AccelerateInterpolator(2f));
anim.setDuration(2500);
anim.start();
}代码很简单,这里调用了setInterpolator()方法,然后传入了一个AccelerateInterpolator的实例,注意AccelerateInterpolator的构建函数可以接收一个float类型的参数,这个参数是用于控制加速度的。现在运行一下代码,效果如下图所示:
OK,效果非常明显,说明我们已经成功替换掉了默认的Interpolator,AccelerateInterpolator确实是生效了。但是现在的动画效果看上去仍然是怪怪的,因为一个小球从很高的地方掉落到地面上直接就静止了,这也是不符合物理规律的,小球撞击到地面之后应该要反弹起来,然后再次落下,接着再反弹起来,又再次落下,以此反复,最后静止。这个功能我们当然可以自己去写,只不过比较复杂,所幸的是,Android系统中已经提供好了这样一种Interpolator,我们只需要简单地替换一下就可以完成上面的描述的效果,代码如下所示:
private void startAnimation() {
    Point startPoint = new Point(getWidth() / 2, RADIUS);
    Point endPoint = new Point(getWidth() / 2, getHeight() - RADIUS);
    ValueAnimator anim = ValueAnimator.ofObject(new PointEvaluator(), startPoint, endPoint);
    anim.addUpdateListener(new ValueAnimator.AnimatorUpdateListener() {
        @Override
        public void onAnimationUpdate(ValueAnimator animation) {
            currentPoint = (Point) animation.getAnimatedValue();
            invalidate();
        }
    });
    anim.setInterpolator(new BounceInterpolator());
    anim.setDuration(3000);
    anim.start();
}
可以看到,我们只是将设置的Interpolator换成了BounceInterpolator的实例,而BounceInterpolator就是一种可以模拟物理规律,实现反复弹起效果的Interpolator。另外还将整体的动画时间稍微延长了一点,因为小球反复弹起需要比之前更长的时间。现在重新运行一下代码,效果如下图所示:
![]()
OK!效果还是非常不错的。那么这里我们只是选了几个系统实现好的Interpolator,由于内置Interpolator非常多,就不一一进行讲解了,大家可以自己去使用一下其它的几种Interpolator来看一看效果。
但是,只会用一下系统提供好的Interpolator,我们显然对自己的要求就太低了,既然是学习属性动画的高级用法,那么自然要将它研究透了。下面我们就来看一下Interpolator的内部实现机制是什么样的,并且来尝试写一个自定义的Interpolator。
首先看一下TimeInterpolator的接口定义,代码如下所示:
/**
 * A time interpolator defines the rate of change of an animation. This allows animations
 * to have non-linear motion, such as acceleration and deceleration.
 */
public interface TimeInterpolator {

    /**
     * Maps a value representing the elapsed fraction of an animation to a value that represents
     * the interpolated fraction. This interpolated value is then multiplied by the change in
     * value of an animation to derive the animated value at the current elapsed animation time.
     *
     * @param input A value between 0 and 1.0 indicating our current point
     *        in the animation where 0 represents the start and 1.0 represents
     *        the end
     * @return The interpolation value. This value can be more than 1.0 for
     *         interpolators which overshoot their targets, or less than 0 for
     *         interpolators that undershoot their targets.
     */
    float getInterpolation(float input);
}
OK,接口还是非常简单的,只有一个getInterpolation()方法。大家有兴趣可以通过注释来对这个接口进行详解的了解,这里我就简单解释一下,getInterpolation()方法中接收一个input参数,这个参数的值会随着动画的运行而不断变化,不过它的变化是非常有规律的,就是根据设定的动画时长匀速增加,变化范围是0到1。也就是说当动画一开始的时候input的值是0,到动画结束的时候input的值是1,而中间的值则是随着动画运行的时长在0到1之间变化的。
说到这个input的值,我觉得有不少朋友可能会联想到我们在“中”篇文章中使用过的fraction值。那么这里的input和fraction有什么关系或者区别呢?答案很简单,input的值决定了fraction的值。input的值是由系统经过计算后传入到getInterpolation()方法中的,然后我们可以自己实现getInterpolation()方法中的算法,根据input的值来计算出一个返回值,而这个返回值就是fraction了。
因此,最简单的情况就是input值和fraction值是相同的,这种情况由于input值是匀速增加的,因而fraction的值也是匀速增加的,所以动画的运动情况也是匀速的。系统中内置的LinearInterpolator就是一种匀速运动的Interpolator,那么我们来看一下它的源码是怎么实现的:
/**
 * An interpolator where the rate of change is constant
 */
@HasNativeInterpolator
public class LinearInterpolator extends BaseInterpolator implements NativeInterpolatorFactory {

    public LinearInterpolator() {
    }

    public LinearInterpolator(Context context, AttributeSet attrs) {
    }

    public float getInterpolation(float input) {
        return input;
    }

    /** @hide */
    @Override
    public long createNativeInterpolator() {
        return NativeInterpolatorFactoryHelper.createLinearInterpolator();
    }
}
这里我们只看getInterpolation()方法,这个方法没有任何逻辑,就是把参数中传递的input值直接返回了,因此fraction的值就是等于input的值的,这就是匀速运动的Interpolator的实现方式。
当然这是最简单的一种Interpolator的实现了,我们再来看一个稍微复杂一点的。既然现在大家都知道了系统在默认情况下使用的是AccelerateDecelerateInterpolator,那我们就来看一下它的源码吧,如下所示:
/**
 * An interpolator where the rate of change starts and ends slowly but
 * accelerates through the middle.
 *
 */
@HasNativeInterpolator
public class AccelerateDecelerateInterpolator implements Interpolator, NativeInterpolatorFactory {
    public AccelerateDecelerateInterpolator() {
    }

    @SuppressWarnings({"UnusedDeclaration"})
    public AccelerateDecelerateInterpolator(Context context, AttributeSet attrs) {
    }

    public float getInterpolation(float input) {
        return (float)(Math.cos((input + 1) * Math.PI) / 2.0f) + 0.5f;
    }

    /** @hide */
    @Override
    public long createNativeInterpolator() {
        return NativeInterpolatorFactoryHelper.createAccelerateDecelerateInterpolator();
    }
}
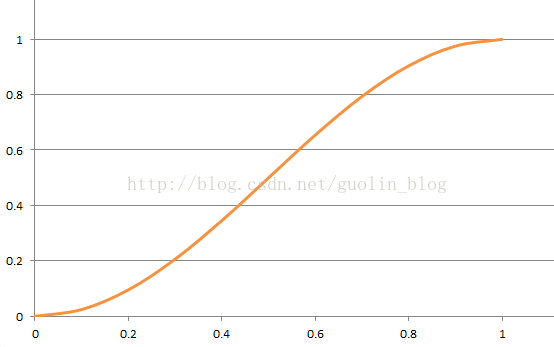
代码虽然没有变长很多,但是getInterpolation()方法中的逻辑已经明显变复杂了,不再是简单地将参数中的input进行返回,而是进行了一个较为复杂的数学运算。那这里我们来分析一下它的算法实现,可以看到,算法中主要使用了余弦函数,由于input的取值范围是0到1,那么cos函数中的取值范围就是π到2π。而cos(π)的结果是-1,cos(2π)的结果是1,那么这个值再除以2加上0.5之后,getInterpolation()方法最终返回的结果值还是在0到1之间。只不过经过了余弦运算之后,最终的结果不再是匀速增加的了,而是经历了一个先加速后减速的过程。我们可以将这个算法的执行情况通过曲线图的方式绘制出来,结果如下图所示:
可以看到,这是一个S型的曲线图,当横坐标从0变化到0.2的时候,纵坐标的变化幅度很小,但是之后就开始明显加速,最后横坐标从0.8变化到1的时候,纵坐标的变化幅度又变得很小。
OK,通过分析LinearInterpolator和AccelerateDecelerateInterpolator的源码,我们已经对Interpolator的内部实现机制有了比较清楚的认识了,那么接下来我们就开始尝试编写一个自定义的Interpolator。
编写自定义Interpolator最主要的难度都是在于数学计算方面的,由于我数学并不是很好,因此这里也就写一个简单点的Interpolator来给大家演示一下。既然属性动画默认的Interpolator是先加速后减速的一种方式,这里我们就对它进行一个简单的修改,让它变成先减速后加速的方式。新建DecelerateAccelerateInterpolator类,让它实现TimeInterpolator接口,代码如下所示:
public class DecelerateAccelerateInterpolator implements TimeInterpolator{

    @Override
    public float getInterpolation(float input) {
        float result;
        if (input <= 0.5) {
            result = (float) (Math.sin(Math.PI * input)) / 2;
        } else {
            result = (float) (2 - Math.sin(Math.PI * input)) / 2;
        }
        return result;
    }

}
这段代码是使用正弦函数来实现先减速后加速的功能的,因为正弦函数初始弧度的变化值非常大,刚好和余弦函数是相反的,而随着弧度的增加,正弦函数的变化值也会逐渐变小,这样也就实现了减速的效果。当弧度大于π/2之后,整个过程相反了过来,现在正弦函数的弧度变化值非常小,渐渐随着弧度继续增加,变化值越来越大,弧度到π时结束,这样从0过度到π,也就实现了先减速后加速的效果。
同样我们可以将这个算法的执行情况通过曲线图的方式绘制出来,结果如下图所示:
可以看到,这也是一个S型的曲线图,只不过曲线的方向和刚才是相反的。从上图中我们可以很清楚地看出来,一开始纵坐标的变化幅度很大,然后逐渐变小,横坐标到0.5的时候纵坐标变化幅度趋近于零,之后随着横坐标继续增加纵坐标的变化幅度又开始变大,的确是先减速后加速的效果。
那么现在我们将DecelerateAccelerateInterpolator在代码中进行替换,如下所示:
private void startAnimation() {
    Point startPoint = new Point(getWidth() / 2, RADIUS);
    Point endPoint = new Point(getWidth() / 2, getHeight() - RADIUS);
    ValueAnimator anim = ValueAnimator.ofObject(new PointEvaluator(), startPoint, endPoint);
    anim.addUpdateListener(new ValueAnimator.AnimatorUpdateListener() {
        @Override
        public void onAnimationUpdate(ValueAnimator animation) {
            currentPoint = (Point) animation.getAnimatedValue();
            invalidate();
        }
    });
    anim.setInterpolator(new DecelerateAccelerateInterpolator());
    anim.setDuration(3000);
    anim.start();
}
非常简单,就是将DecelerateAccelerateInterpolator的实例传入到setInterpolator()方法当中。重新运行一下代码,效果如下图所示:
![]()
OK!小球的运动确实是先减速后加速的效果,说明我们自定义的Interpolator已经可以正常工作了。通过这样一个程度的学习,相信大家对属性动画Interpolator的理解和使用都达到了一个比较深刻的层次了。
ViewPropertyAnimator的用法
ViewPropertyAnimator其实算不上什么高级技巧,它的用法格外的简单,只不过和前面所学的所有属性动画的知识不同,它并不是在3.0系统当中引入的,而是在3.1系统当中附增的一个新的功能,因此这里我们把它作为整个属性动画系列的收尾部分。
我们都知道,属性动画的机制已经不是再针对于View而进行设计的了,而是一种不断地对值进行操作的机制,它可以将值赋值到指定对象的指定属性上。但是,在绝大多数情况下,我相信大家主要都还是对View进行动画操作的。Android开发团队也是意识到了这一点,没有为View的动画操作提供一种更加便捷的用法确实是有点太不人性化了,于是在Android 3.1系统当中补充了ViewPropertyAnimator这个机制。
那我们先来回顾一下之前的用法吧,比如我们想要让一个TextView从常规状态变成透明状态,就可以这样写:
ObjectAnimator animator = ObjectAnimator.ofFloat(textview, "alpha", 0f);
animator.start();那么下面我们就来看一下如何使用ViewPropertyAnimator来实现同样的效果,ViewPropertyAnimator提供了更加易懂、更加面向对象的API,如下所示:
textview.animate().alpha(0f);果然非常简单!不过textview.animate()这个方法是怎么回事呢?animate()方法就是在Android 3.1系统上新增的一个方法,这个方法的返回值是一个ViewPropertyAnimator对象,也就是说拿到这个对象之后我们就可以调用它的各种方法来实现动画效果了,这里我们调用了alpha()方法并转入0,表示将当前的textview变成透明状态。
怎么样?比起使用ObjectAnimator,ViewPropertyAnimator的用法明显更加简单易懂吧。除此之外,ViewPropertyAnimator还可以很轻松地将多个动画组合到一起,比如我们想要让textview运动到500,500这个坐标点上,就可以这样写:
textview.animate().x(500).y(500);那么怎样去设定动画的运行时长呢?很简单,也是通过连缀的方式设定即可,比如我们想要让动画运行5秒钟,就可以这样写:
textview.animate().x(500).y(500).setDuration(5000);textview.animate().x(500).y(500).setDuration(5000)
.setInterpolator(new BounceInterpolator());那么除了用法之外,关于ViewPropertyAnimator有几个细节还是值得大家注意一下的:
- 整个ViewPropertyAnimator的功能都是建立在View类新增的animate()方法之上的,这个方法会创建并返回一个ViewPropertyAnimator的实例,之后的调用的所有方法,设置的所有属性都是通过这个实例完成的。
- 大家注意到,在使用ViewPropertyAnimator时,我们自始至终没有调用过start()方法,这是因为新的接口中使用了隐式启动动画的功能,只要我们将动画定义完成之后,动画就会自动启动。并且这个机制对于组合动画也同样有效,只要我们不断地连缀新的方法,那么动画就不会立刻执行,等到所有在ViewPropertyAnimator上设置的方法都执行完毕后,动画就会自动启动。当然如果不想使用这一默认机制的话,我们也可以显式地调用start()方法来启动动画。
- ViewPropertyAnimator的所有接口都是使用连缀的语法来设计的,每个方法的返回值都是它自身的实例,因此调用完一个方法之后可以直接连缀调用它的另一个方法,这样把所有的功能都串接起来,我们甚至可以仅通过一行代码就完成任意复杂度的动画功能。
好的,那么到这里为止,整个Android属性动画完全解析的系列就全部结束了,感谢大家有耐心看到最后。
关注我的技术公众号,每天都有优质技术文章推送。关注我的娱乐公众号,工作、学习累了的时候放松一下自己。
微信扫一扫下方二维码即可关注:


