apollo代码学习2.1——深度解析(control)
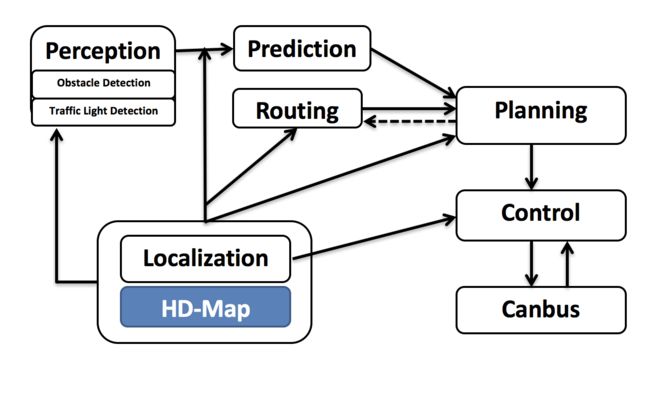
之所以拿这张图看,主要我觉得它能够把复杂的apollo架构简单简明化,途中的箭头表示数据流动的方向,从图中不难发现,定位模块是基础,提供了高精地图,而且重要的是图中其他的模块都需要这个地图数据,因此我们就很清楚其重要性了。canbus是基于can总线通往下层控制器的,而perception是获取车上如lidar,radar,camera等传感器数据的模块,这两个模块都需要直接和相关的硬件配合才能工作。那另外四个(prediction,routing,planning,control)就是中间模块,进行数据处理,相关功能的实现。
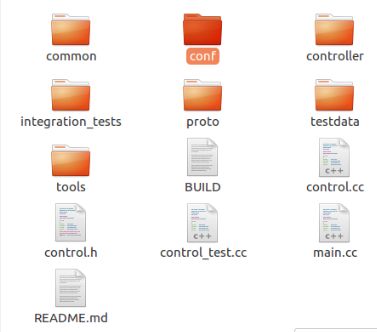
以上是我自己进行的很不严格的分类,主要是因为我在学习过程中,还没有用外部硬件,所以现在就对中间的模块先下手吧。实际上当你多看几个模块后发现,中间的代码流程是及其相似的,几乎如出一辙,今天就从control总结吧。在介绍control前,还有一个需要说明下,apollo的每个模块都会用到common模块,common是一些基本的定义和实现,这里我就不写了,如果没看过的请尽量自己先去学习一下,相关博客已经有人写过了。包括下面所介绍的也默认读者对上一篇博客所提到的工具已经有所掌握了。
好了,言归正传,下面开始control的介绍。我用的apollo1.5版本源码,现在已经公开了2.0版本。control模块的功能代码中也有说明:功能为输入localization,chasiss和pad数据,来计算节气门,刹车和方向盘控制命令。
main.cc——进入模块 control。
#include "modules/common/apollo_app.h"
#include "modules/control/common/control_gflags.h"
#include "modules/control/control.h"

APOLLO_MAIN(apollo::control::Control);
很简单,仅仅调用了一个宏APOLLO_MAIN, 是common下在apollo_app.h文件中定义的,传入了Control类。从下图看到,传入的APP类型将用于后面模块的实例化,可以说是开辟新模块的接口。
#define APOLLO_MAIN(APP)                                       \
  int main(int argc, char **argv) {                            \
    google::InitGoogleLogging(argv[0]);                        \
    google::ParseCommandLineFlags(&argc, &argv, true);         \
    signal(SIGINT, apollo::common::apollo_app_sigint_handler); \
    APP apollo_app_;                                           \      //实例化
    ros::init(argc, argv, apollo_app_.Name());                 \      //注册节点
    apollo_app_.Spin();                                        \
    return 0;                                                  \
  }
由于博客上面一一介绍函数不是很方便,我就只写一些重要的函数了。上面前两行google的log,gfalgs的初始代码,以及signal信号设定(Ctrl+C退出无效)。后三行才是重点,实例化模块类(模块将继承基类ApolloApp,拥有基类的基本功能并根据自身模块需求重写具体功能),ros注册节点,spin函数。那么程序进入到了apollo.spin( ).
int ApolloApp::Spin() {
  ros::AsyncSpinner spinner(callback_thread_num_);         ///开消息线程
  auto status = Init();                                    ///模块初始化(由子类具体重写的)
  if (!status.ok()) {
    AERROR << Name() << " Init failed: " << status;
    return -1;
  }
  status = Start();                                        ///模块开启(由子类具体重写的)
  if (!status.ok()) {
    AERROR << Name() << " Start failed: " << status;
    return -2;
  }
  ExportFlags();                                           ///输出一些flag参数
  spinner.start();                                         ///消息线程开启
  ros::waitForShutdown();                                  ///消息循环处理并检测关闭
  Stop();                                                  ///退出(由子类具体重写的)
  AINFO << Name() << " exited.";
  return 0;
}这个函数就是每个模块主要的函数体了,大体流程都是,开消息线程---->初始化模块---->开启---->输出flag参数---->消息处理开启---->循环处理并检测关闭---->关闭。上面代码基于ros,如果有看不懂的请学习下ros下的编程。
好了,模块的几大接口找到就好了。对于上面的主要函数后面将分别介绍.
1. 模块初始化
status = Init();对于control模块来说,Init()实现在control.cc文件中:
先注释下:control_conf是control类成员,用于读取配置信息作缓存。
* DEFINE_string(control_conf_file, "modules/control/conf/lincoln.pb.txt","default control conf data file");
—————————————保存了很多参数配置数据。
* DEFINE_string(control_adapter_config_filename,"modules/control/conf/adapter.conf", "The adapter config file");
---———————保存了一些模块之间接口信息。具体请大家找到相关文件看一下。
Status Control::Init() {
  AINFO << "Control init, starting ...";
  CHECK(common::util::GetProtoFromFile(FLAGS_control_conf_file, &control_conf_))
      << "Unable to load control conf file: " + FLAGS_control_conf_file;                ///control_conf_中保存了读到的数据

  AINFO << "Conf file: " << FLAGS_control_conf_file << " is loaded.";

///设置接口具体代码可以转到apollo::common::adapter::AdapterManager.c;看,首先我们需要明确的是这是传进来一个配置文件,具体在 control_gflags.h中。
  AdapterManager::Init(FLAGS_control_adapter_config_filename);                                  ///按照接口配置信息进行初始化

  AINFO << "hello control!";

  common::monitor::MonitorBuffer buffer(&monitor_);            ///定义一个日志缓冲。

  // set controller
  if (!controller_agent_.Init(&control_conf_).ok()) {
    std::string error_msg = "Control init controller failed! Stopping...";
    buffer.ERROR(error_msg);
    return Status(ErrorCode::CONTROL_INIT_ERROR, error_msg);
  }                    ///生成一个控制器代理,这个接口实现注册control算法,并传入信号,实现模块功能的入口。

  // lock it in case for after sub, init_vehicle not ready, but msg trigger
  // come
  CHECK(AdapterManager::GetLocalization())
      << "Localization is not initialized.";

  CHECK(AdapterManager::GetChassis()) << "Chassis is not initialized.";

  CHECK(AdapterManager::GetPlanning()) << "Planning is not initialized.";

  CHECK(AdapterManager::GetPad()) << "Pad is not initialized.";

  CHECK(AdapterManager::GetControlCommand())
      << "ControlCommand publisher is not initialized.";
                                                         ///以上五个CHECK为初始获取信息,保证数据通道接通。
  AdapterManager::AddPadCallback(&Control::OnPad, this);                 ///添加Pad信号的回调处理
  AdapterManager::AddMonitorCallback(&Control::OnMonitor, this);         ///添加monitor的回调处理

  return Status::OK();
}
从上面代码可以看到初始化过程中所做的具体事情。
1. control_conf_读到了一些参数数据。
2. 又用control_adapter_config_filename所指代的文件进行初始化。这个初始化过程在AdapterManager中定义。实际上这
个函数就是为control注册一些该有的接口信息,包括接收的信息和发布的信息。
3. 定义了一个MonitorBuffer,缓存多条log的消息日志。
4. 生成一个控制器代理,这个接口实现了注册一个control算法,并传入配置参数,实现模块功能的入口。
5. 检查信号通路,一次检查,使用glog中的CHECK()功能,在实际运行中必须保证所有的信号通路接通才能进后续处理。
6. 添加回调函数。
以上6步才能完成control初始化,而第2步,第3步,第4步还有更加细化的配置。下面细看。
第2步中,调用了下面的函数,具体在common/adapters/adapter_manager.cc中
void AdapterManager::Init(const std::string &adapter_config_filename) {
  // Parse config file
  AdapterManagerConfig configs;
  CHECK(util::GetProtoFromFile(adapter_config_filename, &configs))
      << "Unable to parse adapter config file " << adapter_config_filename;
  AINFO << " InitAdapterManger config:" << configs.DebugString();

  Init(configs);
}
将接口配置信息读到configs中,又调用Init(configs);来加载配置。
void AdapterManager::Init(const AdapterManagerConfig &configs) {
  if (Initialized()) {
    return;
  }
  instance()->initialized_ = true;
    AINFO<<"weather am i in ros?";
  if (configs.is_ros()) {
    instance()->node_handle_.reset(new ros::NodeHandle());
  }
  for (const auto &config : configs.config()) {
    switch (config.type()) {
      case AdapterConfig::POINT_CLOUD:
        EnablePointCloud(FLAGS_pointcloud_topic, config);
        break;

                         ........

      case AdapterConfig::LOCALIZATION_MSF_SINS_PVA:
        EnableLocalizationMsfSinsPva(FLAGS_localization_sins_pva_topic, config);
        break;
      default:
        AERROR << "Unknown adapter config type!";
        break;
    }
  }
}
这个函数将根据具体接口配置进行配置control模块。在函数中首先检查模块是否是ros下的,然后根据config.type来使能相关主题topic。
第3步,定义一个MonitorBuffer用于缓存log消息
第4步中,调用controller_agent_.Init(&control_conf_)来注册具体的控制器。
Status ControllerAgent::Init(const ControlConf *control_conf) {
  RegisterControllers();                                       ///注册控制器(这里使用了软件设计中的工厂模式)
  CHECK(InitializeConf(control_conf).ok()) << "Fail to initialize config."; ///控制器初始化配置。
  for (auto &controller : controller_list_) {
    if (controller == NULL || !controller->Init(control_conf_).ok()) {
      if (controller != NULL) {
        AERROR << "Controller <" << controller->Name() << "> init failed!";
        return Status(ErrorCode::CONTROL_INIT_ERROR,
                      "Failed to init Controller:" + controller->Name());
      } else {
        return Status(ErrorCode::CONTROL_INIT_ERROR,
                      "Failed to init Controller");
      }
    }
    AINFO << "Controller <" << controller->Name() << "> init done!";
  }
  return Status::OK();
}
control模块默认会注册两个控制器:lat_controller和 lon_controller
第5,6步,熟悉ros的只需要知道是回调函数即可,我会在后续在进行详细说明。
至此,初始化流程才算大致结束。回顾一下:开始看到的代码中的Init()才算完成。
int ApolloApp::Spin() {
  ros::AsyncSpinner spinner(callback_thread_num_);         ///开消息线程
  auto status = Init();                                    ///模块初始化(由子类具体重写的)
  if (!status.ok()) {
    AERROR << Name() << " Init failed: " << status;
    return -1;
  }
  status = Start();                                        ///模块开启(由子类具体重写的)
  if (!status.ok()) {
    AERROR << Name() << " Start failed: " << status;
    return -2;
  }
  ExportFlags();                                           ///输出一些flag参数
  spinner.start();                                         ///消息线程开启
  ros::waitForShutdown();                                  ///消息循环处理并检测关闭
  Stop();                                                  ///退出(由子类具体重写的)
  AINFO << Name() << " exited.";
  return 0;
}
另外说明一下:初始化过程中较复杂的代码在模块接口配置部分和具体算法注册部分,这两部分的代码今天就先不总结了,后面的博客中我会陆续补充。
本文仅仅针对模块初始化步骤进行了梳理,下一篇会接着总结。欢迎关注。
刚刚学习apollo,难免写的不准确,欢迎大家指正。

