Android Notification 详解
http://www.oschina.net/question/234345_40111
使用MediaPlayer一直播放系统铃声
前言
- 短信来了需要通知,未接电话需要通知,新邮件需要通知……等等。很多时候都需要Notification
使用场景
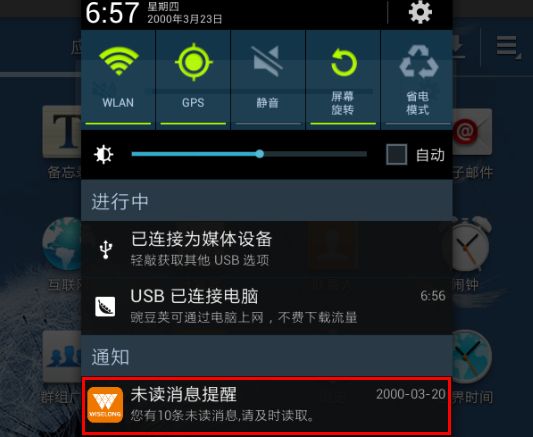
- 最近在做全家APP应用,当有订单未读消息时需要有个通知,而且一直响铃,通知还不能清除这样的需求,以下是我参考网络亲测通过的代码与大家分享,希望帮助更多的人,不懂的可以问我QQ:11745405
背景知识
- 要使用Android通知必须使用到Android通知管理器:NotificationManager管理这个应用程序的通知,每个notify都有唯一标识符即ID。用于管理更新这个通知内容……
- 当然还是需要添加相应的权限滴!比如响铃,震动……
代码解析
1.创建通知管理器
NotificationManager 是一个系统Service,必须通过 getSystemService()方法来获取。
1 |
NotificationManager notificationManager = (NotificationManager) getSystemService(Context.NOTIFICATION_SERVICE); |
2.创建通知
Notification:是可以设置icon、文字、提示声音、振动等等参数。
01 |
int icon = R.drawable.wlicon; |
02 |
long when = System.currentTimeMillis();//时间 |
03 |
// 创建通知栏的显示 |
04 |
CharSequence tickerText = "未读消息提醒"; |
05 |
Notification notification = new Notification(icon, tickerText, when); |
06 |
notification.defaults |= Notification.DEFAULT_LIGHTS; // 通知灯光 |
07 |
notification.defaults |= Notification.DEFAULT_VIBRATE; // 震动 |
08 |
notification.flags |= Notification.FLAG_NO_CLEAR; // 通知不可以清除 |
09 |
// notification.flags = Notification.FLAG_AUTO_CANCEL; // 通知可以清除 |
10 |
// notification.sound = RingtoneManager.getDefaultUri(RingtoneManager.TYPE_NOTIFICATION); // 系统默认铃声 |
11 |
// notification.sound = Uri.parse("file:///sdcard/notification/ringer.mp3");// 播放自定义的铃声 |
12 |
// notification.flags |= Notification.FLAG_INSISTENT; // 声音一直响到用户相应,就是通知会一直响起,直到你触碰通知栏的时间就会停止 |
13 |
// 创建后在状态栏中通知的内容 |
14 |
Context context = droidGap.getApplicationContext(); |
15 |
CharSequence contentTitle = "未读消息提醒"; |
16 |
CharSequence contentText = "您有" + Quantity + "条未读消息,请及时读取。"; |
17 |
// 点击后打开的项目 创建一个Intent |
18 |
Intent notificationIntent = new Intent(droidGap, MainActivity.class); |
19 |
PendingIntent contentIntent = PendingIntent.getActivity(droidGap, 0, notificationIntent, 0); |
20 |
notification.setLatestEventInfo(context, contentTitle, contentText, contentIntent); |
21 |
notificationManager.notify(NOTIFICATION_ID, notification); |
完整例子
这里没有使用通知栏的响铃是因为用户下拉通知栏的时间那个响铃会停止,我需求是需要一直播放。所以使用了MediaPlayer
01 |
/** |
02 |
* 创建通知栏 |
03 |
* @param Quantity 数量 |
04 |
* @param player MediaPlayer 播放声音 |
05 |
*/ |
06 |
public void createNotification(String Quantity, MediaPlayer player) { |
07 |
// 创建通知栏 |
08 |
NotificationManager notificationManager = (NotificationManager) droidGap.getSystemService(Context.NOTIFICATION_SERVICE); |
09 |
int icon = R.drawable.wlicon; |
10 |
long when = System.currentTimeMillis(); |
11 |
// 创建通知栏的显示 |
12 |
CharSequence tickerText = "未读消息提醒"; |
13 |
Notification notification = new Notification(icon, tickerText, when); |
14 |
notification.defaults |= Notification.DEFAULT_LIGHTS; // 通知灯光 |
15 |
notification.defaults |= Notification.DEFAULT_VIBRATE; // 震动 |
16 |
notification.flags |= Notification.FLAG_NO_CLEAR; // 通知不可以清除 |
17 |
// notification.flags = Notification.FLAG_AUTO_CANCEL; // 通知可以清除 |
18 |
// notification.sound = RingtoneManager.getDefaultUri(RingtoneManager.TYPE_NOTIFICATION); // 系统默认铃声 |
19 |
// notification.sound = Uri.parse("file:///sdcard/notification/ringer.mp3");// 播放自定义的铃声 |
20 |
// notification.flags |= Notification.FLAG_INSISTENT; // 声音一直响到用户相应,就是通知会一直响起,直到你触碰通知栏的时间就会停止 |
21 |
// 创建后在状态栏中通知的内容 |
22 |
Context context = droidGap.getApplicationContext(); |
23 |
CharSequence contentTitle = "未读消息提醒"; |
24 |
CharSequence contentText = "您有" + Quantity + "条未读消息,请及时读取。"; |
25 |
// 点击后打开的项目 创建一个Intent |
26 |
Intent notificationIntent = new Intent(droidGap, MainActivity.class); |
27 |
PendingIntent contentIntent = PendingIntent.getActivity(droidGap, 0, notificationIntent, 0); |
28 |
notification.setLatestEventInfo(context, contentTitle, contentText, contentIntent); |
29 |
notificationManager.notify(NOTIFICATION_ID, notification); |
30 |
try { |
31 |
if (Integer.parseInt(Quantity) == 0 && player.isPlaying()) { |
32 |
player.reset(); // 到初始化状态,这里需要判断是否正在响铃,如果直接在开启一次会出现2个铃声一直循环响起,您不信可以尝试 |
33 |
} else if (!player.isPlaying()) { |
34 |
NotificationUtil.ring(player); |
35 |
} |
36 |
} catch (Exception e) { |
37 |
e.printStackTrace(); //To change body of catch statement use File | Settings | File Templates. |
38 |
} |
39 |
} |
40 |
41 |
/** |
42 |
* 一直响铃 |
43 |
* @param droidGap |
44 |
* @param player |
45 |
* @return |
46 |
* @throws Exception |
47 |
* @throws IOException |
48 |
*/ |
49 |
private static MediaPlayer ring(MediaPlayer player) throws Exception, IOException { |
50 |
Uri alert = RingtoneManager.getDefaultUri(RingtoneManager.TYPE_NOTIFICATION); |
51 |
// MediaPlayer player = new MediaPlayer(); |
52 |
player.setDataSource(droidGap, alert); |
53 |
final AudioManager audioManager = (AudioManager) getSystemService(Context.AUDIO_SERVICE); |
54 |
if (audioManager.getStreamVolume(AudioManager.STREAM_NOTIFICATION) != 0) { |
55 |
player.setAudioStreamType(AudioManager.STREAM_NOTIFICATION); |
56 |
player.setLooping(true); |
57 |
player.prepare(); |
58 |
player.start(); |
59 |
} |
60 |
return player; |
61 |
} |
大功告成上图
可以去参考http://www.oschina.net/question/234345_40111写的不错!
作者:郏高阳 原文链接:http://my.oschina.net/jgy/blog/158513
=============================================================================================================
Android 状态栏通知
今天介绍一个Android应用中很使用的一个功能,状态栏通知。相信大家在开发应用中会经常用到这个,当然我们这里讲述的主要是代码实现,没有讲在什么情况下使用状态栏通知,这需要你开发的实际应用决定,遵守一个规则,用户体验。
MainActivity类
package com.example.notification;
import android.app.Activity;
import android.app.Notification;
import android.app.NotificationManager;
import android.app.PendingIntent;
import android.content.Context;
import android.content.Intent;
import android.content.IntentFilter;
import android.net.Uri;
import android.os.Bundle;
import android.view.View;
import android.view.View.OnClickListener;
import android.widget.Button;
import android.widget.EditText;
public class MainActivity extends Activity {
private EditText editText1;
private EditText editText2;
private EditText editText3;
private Button button;
private Listener1 listener = new Listener1();
@Override
public void onCreate(Bundle savedInstanceState) {
super.onCreate(savedInstanceState);
setContentView(R.layout.main);
editText1 = (EditText)this.findViewById(R.id.et1);
editText2 = (EditText)this.findViewById(R.id.et2);
editText3 = (EditText)this.findViewById(R.id.et3);
button= (Button)this.findViewById(R.id.b);
button.setOnClickListener(listener);
}
private final class Listener1 implements OnClickListener {
@Override
public void onClick(View v) {
String ticker = editText1.getText().toString(); //概要
String title = editText2.getText().toString();//标题
String content = editText3.getText().toString();//内容
Notification notification = new Notification(android.R.drawable.stat_notify_chat, ticker, System.currentTimeMillis());//概要
Intent intent = new Intent(Intent.ACTION_CALL, Uri.parse("tel:123456789"));//点击之后的事件为呼叫123456789号码
PendingIntent pendingIntent = PendingIntent.getActivity(MainActivity.this, 100, intent, 0);//1为请求码 0为Flag标志位
notification.setLatestEventInfo(MainActivity.this, title, content, pendingIntent);//点击通知时候进行的活动:用contentIntent传递
notification.defaults = Notification.DEFAULT_SOUND;//发送状态栏的默认铃声
notification.flags = Notification.FLAG_AUTO_CANCEL;//点击通知之后,取消状态栏图标
NotificationManager manager = (NotificationManager)getSystemService(Context.NOTIFICATION_SERVICE);//得到系统通知服务
manager.notify(100, notification);//通知系统我们定义的notification,id为该notification的id;这里定义为100.
}
}
}
布局文件
android:layout_height="match_parent"
android:orientation="vertical" >
android:layout_width="wrap_content"
android:layout_height="wrap_content"
android:text="概要"/>
android:layout_width="wrap_content"
android:layout_height="wrap_content"
android:text="概要"/>
android:layout_width="wrap_content"
android:layout_height="wrap_content"
android:text="标题"/>
android:layout_width="wrap_content"
android:layout_height="wrap_content"
android:text="标题"/>
android:layout_width="wrap_content"
android:layout_height="wrap_content"
android:text="内容"/>
android:layout_width="wrap_content"
android:layout_height="wrap_content"
android:text="内容"/>
android:layout_width="wrap_content"
android:layout_height="wrap_content"
android:text="发送"/>
AndroidManifest文件
android:versionCode="1"
android:versionName="1.0" >
android:targetSdkVersion="15" />
android:label="@string/app_name"
android:theme="@style/AppTheme" >
android:label="@string/title_activity_main" >
代码还是比较简单的,需要注意的地方我都注释了。
核心代码:
Notification notification = new Notification(android.R.drawable.stat_notify_chat, ticker, System.currentTimeMillis());//概要
Intent intent = new Intent(Intent.ACTION_CALL, Uri.parse("tel:123456789"));//点击之后的事件为呼叫123456789号码
PendingIntent pendingIntent = PendingIntent.getActivity(MainActivity.this, 100, intent, 0);//1为请求码 0为Flag标志位
notification.setLatestEventInfo(MainActivity.this, title, content, pendingIntent);//点击通知时候进行的活动:用contentIntent传递
notification.defaults = Notification.DEFAULT_SOUND;//发送状态栏的默认铃声
notification.flags = Notification.FLAG_AUTO_CANCEL;//点击通知之后,取消状态栏图标
NotificationManager manager = (NotificationManager)getSystemService(Context.NOTIFICATION_SERVICE);//得到系统通知服务
manager.notify(100, notification);//通知系统我们定义的notification,id为该notification的id;这里定义为100.
最后两行代码注意下就可以,得到一个通知管理器。
================================================================================================
Android系统中,发一个状态栏通知还是很方便的。下面我们就来看一下,怎么发送状态栏通知,状态栏通知又有哪些参数可以设置?
首先,发送一个状态栏通知必须用到两个类: NotificationManager 、 Notification。
NotificationManager : 是状态栏通知的管理类,负责发通知、清楚通知等。
NotificationManager 是一个系统Service,必须通过 getSystemService()方法来获取。
- NotificationManager nm = (NotificationManager) getSystemService(NOTIFICATION_SERVICE);
Notification:是具体的状态栏通知对象,可以设置icon、文字、提示声音、振动等等参数。
下面是设置一个通知需要的基本参数:
- An icon (通知的图标)
- A title and expanded message (通知的标题和内容)
- A
PendingIntent (点击通知执行页面跳转)
可选的设置:
- A ticker-text message (状态栏顶部提示消息)
- An alert sound (提示音)
- A vibrate setting (振动)
- A flashing LED setting (灯光)
- 等等
一、创建Notification
通过NotificationManager 的 notify(int, Notification) 方法来启动Notification。
第一个参数唯一的标识该Notification,第二个参数就是Notification对象。
二、更新Notification
调用Notification的 setLatestEventInfo方法来更新内容,然后再调用NotificationManager的notify()方法即可。(具体可以看下面的实例)
三、删除Notification
通过NotificationManager 的cancel(int)方法,来清除某个通知。其中参数就是Notification的唯一标识ID。
当然也可以通过 cancelAll() 来清除状态栏所有的通知。
四、Notification设置(振动、铃声等)
1. 基本设置:
- //新建状态栏通知
- baseNF = new Notification();
- //设置通知在状态栏显示的图标
- baseNF.icon = R.drawable.icon;
- //通知时在状态栏显示的内容
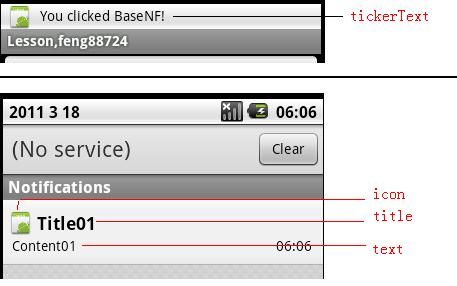
- baseNF.tickerText = "You clicked BaseNF!";
- //通知的默认参数 DEFAULT_SOUND, DEFAULT_VIBRATE, DEFAULT_LIGHTS.
- //如果要全部采用默认值, 用 DEFAULT_ALL.
- //此处采用默认声音
- baseNF.defaults = Notification.DEFAULT_SOUND;
- //第二个参数 :下拉状态栏时显示的消息标题 expanded message title
- //第三个参数:下拉状态栏时显示的消息内容 expanded message text
- //第四个参数:点击该通知时执行页面跳转
- baseNF.setLatestEventInfo(Lesson_10.this, "Title01", "Content01", pd);
- //发出状态栏通知
- //The first parameter is the unique ID for the Notification
- // and the second is the Notification object.
- nm.notify(Notification_ID_BASE, baseNF);
配一张图作说明:
2. 添加声音
如果要采用默认声音,只要使用default就可以了。
- baseNF.defaults = Notification.DEFAULT_SOUND;
如果要使用自定义声音,那么就要用到sound了。如下:
- notification.sound = Uri.parse("file:///sdcard/notification/ringer.mp3");
上面这种方法,使用的是自己的铃声,如果想用系统自带的铃声,可以这样:
- notification.sound = Uri.withAppendedPath(Audio.Media.INTERNAL_CONTENT_URI, "6");
需要注意一点,如果default、sound同时出现,那么sound无效,会使用默认铃声。
默认情况下,通知的声音播放一遍就会结束。 如果你想让声音循环播放,需要为flags参数加上FLAG_INSISTENT。 这样声音会到用户响应才结束,比如下拉状态栏。
- notification.flags |= notification.FLAG_INSISTENT;
3. 添加振动
如果是使用默认的振动方式,那么同样也是使用default。
- notification.defaults |= Notification.DEFAULT_VIBRATE;
当然也可以自己定义振动形式,这边需要用到Long型数组。
- long[] vibrate = {0,100,200,300};
- notification.vibrate = vibrate;
这边的Long型数组中,第一个参数是开始振动前等待的时间,第二个参数是第一次振动的时间,第三个参数是第二次振动的时间,以此类推,随便定义多长的数组。但是采用这种方法,没有办法做到重复振动。
同样,如果default、vibrate同时出现时,会采用默认形式。
另外还需要注意一点:使用振动器时需要权限,如下:
- <uses-permission android:name="android.permission.VIBRATE">uses-permission>
4. 闪光
使用默认的灯光,如下:
- notification.defaults |= Notification.DEFAULT_LIGHTS;
自定义:
- notification.ledARGB = 0xff00ff00;
- notification.ledOnMS = 300;
- notification.ledOffMS = 1000;
- notification.flags |= Notification.FLAG_SHOW_LIGHTS;
其中ledARGB 表示灯光颜色、 ledOnMS 亮持续时间、ledOffMS 暗的时间。
注意:这边的颜色跟设备有关,不是所有的颜色都可以,要看具体设备。
5. 其他有用的设置:
flags:
Notification.FLAG_INSISTENT; //让声音、振动无限循环,直到用户响应
Notification.FLAG_AUTO_CANCEL; //通知被点击后,自动消失
Notification.FLAG_NO_CLEAR; //点击'Clear'时,不清楚该通知(QQ的通知无法清除,就是用的这个)
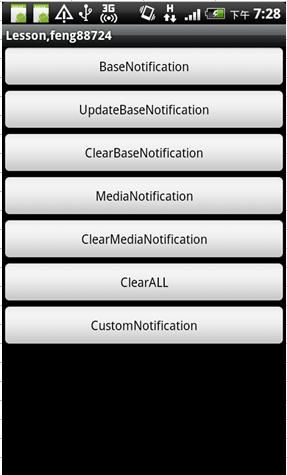
下面附上我做的例子,供大家参考。 里面包括创建通知、更新通知、清除通知、设置自定义铃声、自定义振动、自定义通知视图等。

附上代码:
主类:
- package com.yfz;
- import android.app.Activity;
- import android.app.Notification;
- import android.app.NotificationManager;
- import android.app.PendingIntent;
- import android.content.Intent;
- import android.net.Uri;
- import android.os.Bundle;
- import android.provider.MediaStore.Audio;
- import android.util.Log;
- import android.view.View;
- import android.view.View.OnClickListener;
- import android.widget.Button;
- import android.widget.RemoteViews;
- import android.widget.SeekBar;
- import android.widget.TextView;
- /**
- * Notification
- * @author Administrator
- *
- */
- public class Lesson_10 extends Activity {
- //BaseNotification
- private Button bt01;
- //UpdateBaseNotification
- private Button bt02;
- //ClearBaseNotification
- private Button bt03;
- //MediaNotification
- private Button bt04;
- //ClearMediaNotification
- private Button bt05;
- //ClearALL
- private Button bt06;
- //CustomNotification
- private Button bt07;
- //通知管理器
- private NotificationManager nm;
- //通知显示内容
- private PendingIntent pd;
- @Override
- public void onCreate(Bundle savedInstanceState) {
- super.onCreate(savedInstanceState);
- /*加载页面*/
- setContentView(R.layout.lesson10);
- init();
- }
- private void init() {
- bt01 = (Button)findViewById(R.id.le10bt01);
- bt02 = (Button)findViewById(R.id.le10bt02);
- bt03 = (Button)findViewById(R.id.le10bt03);
- bt04 = (Button)findViewById(R.id.le10bt04);
- bt05 = (Button)findViewById(R.id.le10bt05);
- bt06 = (Button)findViewById(R.id.le10bt06);
- bt07 = (Button)findViewById(R.id.le10bt07);
- bt01.setOnClickListener(onclick);
- bt02.setOnClickListener(onclick);
- bt03.setOnClickListener(onclick);
- bt04.setOnClickListener(onclick);
- bt05.setOnClickListener(onclick);
- bt06.setOnClickListener(onclick);
- bt07.setOnClickListener(onclick);
- nm = (NotificationManager) getSystemService(NOTIFICATION_SERVICE);
- Intent intent = new Intent(this,Lesson_10.class);
- pd = PendingIntent.getActivity(Lesson_10.this, 0, intent, 0);
- }
- OnClickListener onclick = new OnClickListener() {
- //BASE Notification ID
- private int Notification_ID_BASE = 110;
- private Notification baseNF;
- //Notification ID
- private int Notification_ID_MEDIA = 119;
- private Notification mediaNF;
- @Override
- public void onClick(View v) {
- switch(v.getId()) {
- case R.id.le10bt01:
- //新建状态栏通知
- baseNF = new Notification();
- //设置通知在状态栏显示的图标
- baseNF.icon = R.drawable.icon;
- //通知时在状态栏显示的内容
- baseNF.tickerText = "You clicked BaseNF!";
- //通知的默认参数 DEFAULT_SOUND, DEFAULT_VIBRATE, DEFAULT_LIGHTS.
- //如果要全部采用默认值, 用 DEFAULT_ALL.
- //此处采用默认声音
- baseNF.defaults |= Notification.DEFAULT_SOUND;
- baseNF.defaults |= Notification.DEFAULT_VIBRATE;
- baseNF.defaults |= Notification.DEFAULT_LIGHTS;
- //让声音、振动无限循环,直到用户响应
- baseNF.flags |= Notification.FLAG_INSISTENT;
- //通知被点击后,自动消失
- baseNF.flags |= Notification.FLAG_AUTO_CANCEL;
- //点击'Clear'时,不清楚该通知(QQ的通知无法清除,就是用的这个)
- baseNF.flags |= Notification.FLAG_NO_CLEAR;
- //第二个参数 :下拉状态栏时显示的消息标题 expanded message title
- //第三个参数:下拉状态栏时显示的消息内容 expanded message text
- //第四个参数:点击该通知时执行页面跳转
- baseNF.setLatestEventInfo(Lesson_10.this, "Title01", "Content01", pd);
- //发出状态栏通知
- //The first parameter is the unique ID for the Notification
- // and the second is the Notification object.
- nm.notify(Notification_ID_BASE, baseNF);
- break;
- case R.id.le10bt02:
- //更新通知
- //比如状态栏提示有一条新短信,还没来得及查看,又来一条新短信的提示。
- //此时采用更新原来通知的方式比较。
- //(再重新发一个通知也可以,但是这样会造成通知的混乱,而且显示多个通知给用户,对用户也不友好)
- baseNF.setLatestEventInfo(Lesson_10.this, "Title02", "Content02", pd);
- nm.notify(Notification_ID_BASE, baseNF);
- break;
- case R.id.le10bt03:
- //清除 baseNF
- nm.cancel(Notification_ID_BASE);
- break;
- case R.id.le10bt04:
- mediaNF = new Notification();
- mediaNF.icon = R.drawable.icon;
- mediaNF.tickerText = "You clicked MediaNF!";
- //自定义声音
- mediaNF.sound = Uri.withAppendedPath(Audio.Media.INTERNAL_CONTENT_URI, "6");
- //通知时发出的振动
- //第一个参数: 振动前等待的时间
- //第二个参数: 第一次振动的时长、以此类推
- long[] vir = {0,100,200,300};
- mediaNF.vibrate = vir;
- mediaNF.setLatestEventInfo(Lesson_10.this, "Title03", "Content03", pd);
- nm.notify(Notification_ID_MEDIA, mediaNF);
- break;
- case R.id.le10bt05:
- //清除 mediaNF
- nm.cancel(Notification_ID_MEDIA);
- break;
- case R.id.le10bt06:
- nm.cancelAll();
- break;
- case R.id.le10bt07:
- //自定义下拉视图,比如下载软件时,显示的进度条。
- Notification notification = new Notification();
- notification.icon = R.drawable.icon;
- notification.tickerText = "Custom!";
- RemoteViews contentView = new RemoteViews(getPackageName(), R.layout.custom);
- contentView.setImageViewResource(R.id.image, R.drawable.icon);
- contentView.setTextViewText(R.id.text, "Hello, this message is in a custom expanded view");
- notification.contentView = contentView;
- //使用自定义下拉视图时,不需要再调用setLatestEventInfo()方法
- //但是必须定义 contentIntent
- notification.contentIntent = pd;
- nm.notify(3, notification);
- break;
- }
- }
- };
- }
主页面:
- xml version="1.0" encoding="utf-8"?>
- <LinearLayout
- xmlns:android="http://schemas.android.com/apk/res/android"
- android:layout_width="fill_parent"
- android:layout_height="fill_parent"
- android:orientation="vertical">
- <Button
- android:id="@+id/le10bt01"
- android:layout_width="fill_parent"
- android:layout_height="wrap_content"
- android:text="BaseNotification"
- />
- <Button
- android:id="@+id/le10bt02"
- android:layout_width="fill_parent"
- android:layout_height="wrap_content"
- android:text="UpdateBaseNotification"
- />
- <Button
- android:id="@+id/le10bt03"
- android:layout_width="fill_parent"
- android:layout_height="wrap_content"
- android:text="ClearBaseNotification"
- />
- <Button
- android:id="@+id/le10bt04"
- android:layout_width="fill_parent"
- android:layout_height="wrap_content"
- android:text="MediaNotification"
- />
- <Button
- android:id="@+id/le10bt05"
- android:layout_width="fill_parent"
- android:layout_height="wrap_content"
- android:text="ClearMediaNotification"
- />
- <Button
- android:id="@+id/le10bt06"
- android:layout_width="fill_parent"
- android:layout_height="wrap_content"
- android:text="ClearALL"
- />
- <Button
- android:id="@+id/le10bt07"
- android:layout_width="fill_parent"
- android:layout_height="wrap_content"
- android:text="CustomNotification"
- />
- LinearLayout>
自定义视图页面:
- "1.0" encoding="utf-8"?>
- android:orientation="horizontal"
- android:layout_width="fill_parent"
- android:layout_height="fill_parent"
- android:padding="3dp"
- >
-
- android:layout_width="wrap_content"
- android:layout_height="fill_parent"
- android:layout_marginRight="10dp"
- />
-
- android:layout_width="wrap_content"
- android:layout_height="fill_parent"
- android:textColor="#000"
- />
就讲这么多。
原文链接: http://blog.csdn.net/feng88724/article/details/6259071