使用ATSHA204A实现每个设备使用不同的密钥
使用ATSHA204A实现每个设备使用不同的密钥
特性
- 使用Atmel® ATSHA204A独特的序列号和根密钥Root Key创建一个唯一密钥(多样化密钥)
- 为ATSHA204A配置不同的密钥
- 使用包含根密钥的主ATSHA204A对唯一密钥进行身份验证
- 描述如何使用ACES来计算派生密钥
- 使用DeriveKey命令演示主机验证
- 演示主机使用GenDig命令验证
- 伪代码用于主机验证-在系统没有主ATSHA204A时
描述
可以根据每个设备的序列号和根密钥为其创建惟一的密钥,这就是所谓的密钥多元化。
由于每个客户端设备都使用唯一的秘钥进行编程,因此多样化的密钥对攻击者的价值较小。
本演练将使用基于加密的方式将根密钥与保证唯一的ATSHA204A序列号组合的多样化密钥配置ATSHA204A设备。在配置了多样化密钥之后,本演练将继续一步一步地将这个多样化密钥写入客户机设备。
客户端配置完成后,系统如何通过在客户端上执行MAC来验证配置的密钥的说明就变得多样化了,然后将生成的摘要与使用客户端序列号和根密钥的等效加密计算生成的摘要进行比较。
还将总结说明如何让ATSHA204主机设备使用GenDig命令或DeriveKey命令来验证ATSHA204客户机多样化密钥。
1. 多样化密钥描述
如图1-1所示,主机使用用于计算客户多元化的根密钥。多样化密钥的计算结合了客户端序列号和存储在主机上的根密钥。
由于多样化的密钥是基于根密钥的,所以主机只需要知道客户端序列号以验证客户端多样化密钥。
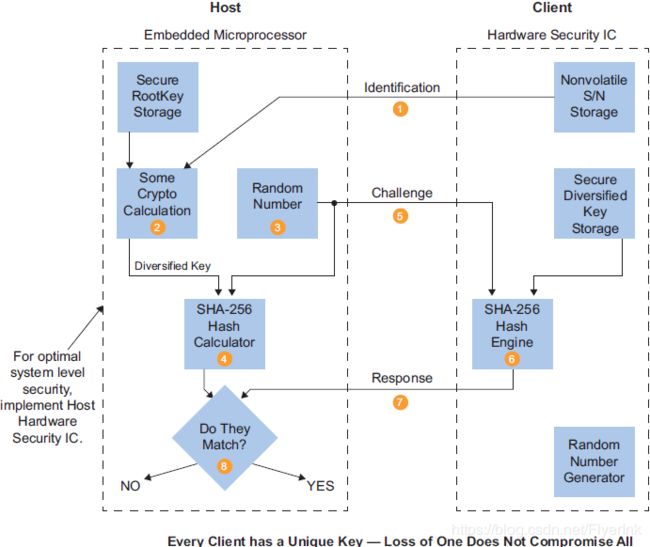 图1 - 1 主机使用根密钥对客户端多样化密钥进行身份验证
2. 介绍步骤
本节中的步骤描述了配置和验证各种密钥的过程。
2.1设备配置
对于本演练,首先在ATSHA204设备中设置配置区域。此配置将同时充当主机和客户机ATSHA204。
这种配置使用单个设备来演示概念;在实际的系统中,主机设备是独立的。
表2-1给出了所使用的每个槽的描述和配置字节。
表2 - 1 槽的配置
| Slot | Title | Description | Slot Configuration |
|---|---|---|---|
| 00 | 客户端多元化密钥 | Client Slot: This slot will be diversified using the Serial Number and the Host Root Key. | Read – Is Secret Write – Never Bytes – 8F 8F |
| 01 | Host Target | Host Slot: This is the target slot defined for the DeriveKey command. | Read – Is Secret, CheckOnly Write – DeriveKey (parent 2) Bytes – 9F 32 |
| 02 | Host Root Key | Root used for key diversification: Use the DeriveKey Command to verify the Client Diversified Key. This key is to be programmed on the Host ATSHA204. | Read – Is Secret Write – Never Bytes – 8F 8F |
| 03 | Host Root Key | Root used for key diversification: Use the GenDig Command to verify the Client Diversified Key. This key is to be programmed on the Host ATSHA204. | Read – Is Secret, CheckOnly Write – Never Bytes – 9F 8F |
- 使用未锁定的ATSHA204设备启动ACES配置环境(使用AT88CK101或AT88CK454开发工具包)。
- 在设备导航器中选择Configuration Zone。
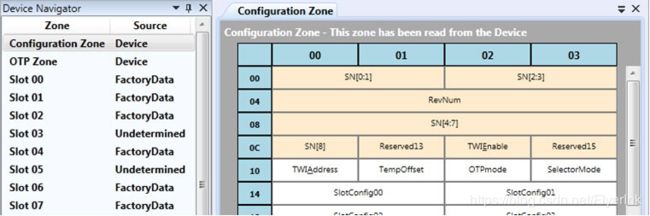
- 单击内存映射中的SlotConfig00内存位置。
- 将显示Write Bytes对话框
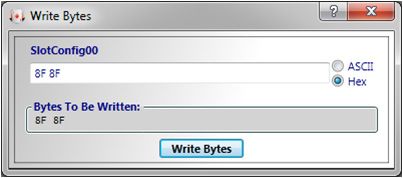
- 从表2-1 (8F 8F)中输入SlotConfig00字段中槽00的配置。
- 重复槽01 (9F 32)。
- 重复槽02 (8F 8F)。
- 重复槽03 (9F 8F)。
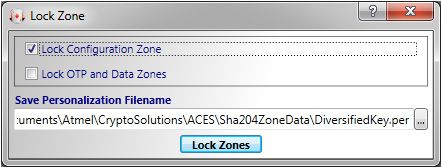
- 锁定配置区域。
- 从菜单中选择工具>锁区。
- 锁区对话框将显示如图2 - 3所示。
- 选择锁配置带复选框并单击锁定区域按钮。
- 锁成功消息将显示出来。
- 启动多样化按键计算对话框。
- 从菜单中选择工具>计算多样化的钥匙。
- 多元化的关键计算对话框将显示如图2 - 4所示。
注:此对话框在输入修改时动态更新计算的多样化密钥。
- 计算用于此对话框由DeriveKey命令定义。
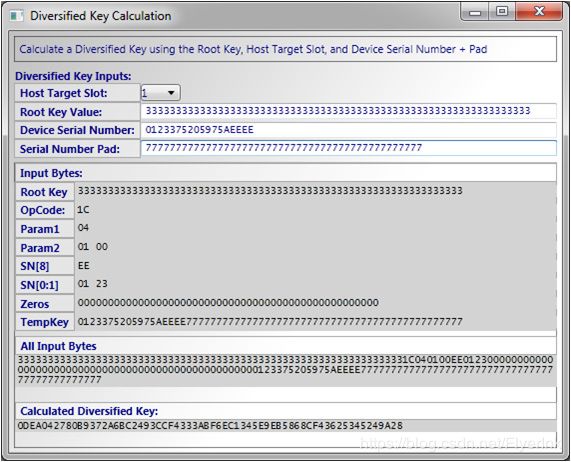
-
根据表2-1的配置设置多样化密钥的输入。
- 设置主机目标位置1。
- 根密钥设置为全3(可以使用你自己的独特的秘钥)。
- 设备序列号将从设备读取和预装。
- 设置序列号Pad为全7(任何序列号都可以了。通常全部为零)。
-
输入字节指的是将传递给Atmel ATSHA256引擎的字节。
- Bytes,字节顺序中定义GenDig命令。
- TempKey是SN + SnPad可以初始化临时的命令。
-
计算的多样化密钥是应该写入客户多样化密钥(槽00)的结果。
注意:此加密计算组合了根密钥和设备序列号。- 离开多元化的关键计算对话框, 不要关闭,供以后使用。
-
在设备导航器中选择Slot 00,如图2-5所示。
图2 - 5 Slot 00显示多样化密钥数据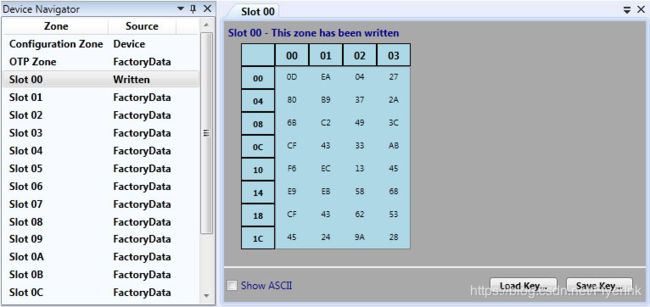
-
客户端配置-将计算得到的多样化密钥写入ATSHA204的Slot 0中。
-
主机配置——将根密钥写入ATSHA204的Slot 02和Slot 03。按照以下步骤写入用于生成多样化密钥的根密钥(全3或特有的密钥)。
-
锁定OTP和数据区域。
- 选择工具>锁区菜单。
- 锁区对话框将显示如图2 - 7所示。
- 选择锁OTP和数据区复选框并单击锁定区域按钮。
- 锁成功消息将显示出来。
2.2 验证多样化密钥
多样化的密钥现在已经配置到客户端(Slot 00)中。
注意: 在生成多样化密钥的加密计算中使用了根密钥,需严格保存(打散或转化处理)— 客户端不需要将RootKey编程到其中。
DiversifiedKey = SHA256(RootKey, SerialNumber, ...)
除了主机知道RootKey之外,只需要SerialNumber就可以生成DiversifiedKey。由于可以从每个ATSHA204客户机读取SerialNumber,所以主机可以按下面几个不同的方式验证多样化的密钥:
- 在已写入根密钥的ATSHA204中使用DeriveKey命令(例如槽02)。
- 在已写入根密钥的ATSHA204中使用GenDig命令(例如槽03)。
- 系统使用代码访问根密钥。对于大多数系统,不推荐使用这种技术。
下面将展示这些多样化密钥的验证方式。
2.2.1 验证伪代码
首先要检查的验证技术是伪代码主机。不推荐使用这种技术,因为大多数系统必须使用明文的根密钥,并且不能安全地存储在固件中。本节对安全微处理器很有用,并演示在ATSHA204中内部执行的计算。
// 多样化的密钥验证伪代码-系统代码与RootKey
------------------------------------------------------------------------------------
// Initialize the communication
sha204p_init();
// Set the Client device
sha204p_set_device_id(CLIENT_ID);
// Wake up the ATSHA204
sha204c_wakeup();
// Function Prototype: resultBuf = sha204m_execute(command, param1, param2,data)
// Read the first 32 bytes from the config zone to get the Client Serial Number
snRead = sha204m_execute(SHA204_READ, 0x80, 0x00, 0x00);
// Parse the Client SerialNumber
serialNumber = snRead[0:3] + snRead[8:12];
// Generate a random number on the Host for the 32 byte challenge
randChal = sha204m_execute(SHA204_RANDOM, 0x00, 0x0000, null);
// Execute a MAC Command on the ATSHA204 & save the digest
param1Mac = 0x00;
param2Mac = [00, 00];
deviceDigest = sha204m_execute(SHA204_MAC, param1Mac, param2Mac, randChal);
// Calculate the Diversified Key using the DeriveKey calculation & a soft SHA-256
rootKey = ... // 32 byte secret here
opCodeDk = 0x1C;
param1 = 0x04;
param2 = ... // 2 byte slot ID here (LSB byte order 0x0X 00)
sn8 = ... // 1 byte SN[8] here
sn01 = ... // 2 bytes SN[0:1] here
zeros = ... // 25 bytes of 0’s here
snPad = ... // 23 bytes of pad here
divKey = sha256(rootKey+opCode+param1+param2+sn8+sn01+zeros+serialNumber+snPad);
// Execute a MAC on the calculated Diversified Key
// using the calculation of ATSHA204 MAC Command & a soft SHA-256
opCodeMac = 0x08;
otpZeros = [00, 00, 00, 00, 00, 00, 00, 00, 00, 00, 00,]; // 11 bytes of zeros
sn23 = [00, 00]; // 2 bytes SN[2:3], use zeros
sn47 = [00, 00, 00, 00]; // 4 bytes SN[4:7], use zeros
macBytes =divKey+randChal+opCodeMac+param1Mac+param2Mac+otpZeros+sn8+sn47+sn01+sn23;
softDigest = sha256(macBytes);
// Compare the resulting digests from the ATSHA204 & the soft MAC
match = deviceDigest == softDigest;
ATSHA204A中执行的Mac指令实现上是包含了下面这些数据的SHA256 Hash值
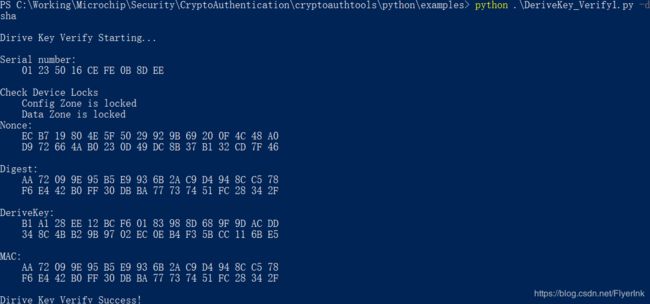
在cryptoauthtools中通过Python 脚本实现代码如下:
"""
Basic Dirive Key Verify Common Use Cases
"""
# (c) 2015-2018 Microchip Technology Inc. and its subsidiaries.
#
# Subject to your compliance with these terms, you may use Microchip software
# and any derivatives exclusively with Microchip products. It is your
# responsibility to comply with third party license terms applicable to your
# use of third party software (including open source software) that may
# accompany Microchip software.
#
# THIS SOFTWARE IS SUPPLIED BY MICROCHIP "AS IS". NO WARRANTIES, WHETHER
# EXPRESS, IMPLIED OR STATUTORY, APPLY TO THIS SOFTWARE, INCLUDING ANY IMPLIED
# WARRANTIES OF NON-INFRINGEMENT, MERCHANTABILITY, AND FITNESS FOR A
# PARTICULAR PURPOSE. IN NO EVENT WILL MICROCHIP BE LIABLE FOR ANY INDIRECT,
# SPECIAL, PUNITIVE, INCIDENTAL OR CONSEQUENTIAL LOSS, DAMAGE, COST OR EXPENSE
# OF ANY KIND WHATSOEVER RELATED TO THE SOFTWARE, HOWEVER CAUSED, EVEN IF
# MICROCHIP HAS BEEN ADVISED OF THE POSSIBILITY OR THE DAMAGES ARE
# FORESEEABLE. TO THE FULLEST EXTENT ALLOWED BY LAW, MICROCHIP'S TOTAL
# LIABILITY ON ALL CLAIMS IN ANY WAY RELATED TO THIS SOFTWARE WILL NOT EXCEED
# THE AMOUNT OF FEES, IF ANY, THAT YOU HAVE PAID DIRECTLY TO MICROCHIP FOR
# THIS SOFTWARE.

from cryptoauthlib import *
from common import *
import time
import hashlib

# Safe input if using python 2
try: input = raw_input
except NameError: pass


def authentication_counter(iface='hid', device='ecc', i2c_addr=None, keygen=True, **kwargs):
    ATCA_SUCCESS = 0x00

    # Loading cryptoauthlib(python specific)
    load_cryptoauthlib()

    # Get the target default config
    cfg = eval('cfg_at{}a_{}_default()'.format(atca_names_map.get(device), atca_names_map.get(iface)))

    # Set interface parameters
    if kwargs is not None:
        for k, v in kwargs.items():
            icfg = getattr(cfg.cfg, 'atca{}'.format(iface))
            setattr(icfg, k, int(v, 16))

    # Basic Raspberry Pi I2C check
    if 'i2c' == iface and check_if_rpi():
        cfg.cfg.atcai2c.bus = 1

    # Initialize the stack
    assert atcab_init(cfg) == ATCA_SUCCESS
    print('')

    # Check device type
    info = bytearray(4)
    assert atcab_info(info) == ATCA_SUCCESS
    dev_name = get_device_name(info)
    dev_type = get_device_type_id(dev_name)

    # Reinitialize if the device type doesn't match the default
    if dev_type != cfg.devtype:
        cfg.dev_type = dev_type
        assert atcab_release() == ATCA_SUCCESS
        time.sleep(1)
        assert atcab_init(cfg) == ATCA_SUCCESS

    # Request the Serial Number
    serial_number = bytearray(9)
    assert atcab_read_serial_number(serial_number) == ATCA_SUCCESS
    print('Serial number: ')
    print(pretty_print_hex(serial_number, indent='    '))

    # Check the device locks
    print('Check Device Locks')
    is_locked = AtcaReference(False)
    assert atcab_is_locked(0, is_locked) == ATCA_SUCCESS
    config_zone_locked = bool(is_locked.value)
    print('    Config Zone is %s' % ('locked' if config_zone_locked else 'unlocked'))

    assert atcab_is_locked(1, is_locked) == ATCA_SUCCESS
    data_zone_locked = bool(is_locked.value)
    print('    Data Zone is %s' % ('locked' if data_zone_locked else 'unlocked'))

    # Run a nonce command to get a random data
    nonce_in = bytearray.fromhex(
          '00 00 00 00 00 00 00 00 00 00 00 00 00 00 00 00'
          '00 00 00 00 00 00 00 00 00 00 00 00 00 00 00 00')
    nonce_out = bytearray(32)
    assert atcab_nonce_rand(nonce_in, nonce_out) == ATCA_SUCCESS
    print('Nonce: ')
    print(pretty_print_hex(nonce_out, indent='    '))

    # Run a MAC command at Slot0, Slot0 have programmed with DeriveKey from RootKey
    digest = bytearray(32)
    assert atcab_mac(0x00, 0x00, nonce_out, digest) == ATCA_SUCCESS
    print('Digest: ')
    print(pretty_print_hex(digest, indent='    '))

    # Get DeriveKey from RootKey + SN + SN Pad + ...
    # Must same with Client Slot0 value
    rootkey = bytearray.fromhex(
          '33 33 33 33 33 33 33 33 33 33 33 33 33 33 33 33'
          '33 33 33 33 33 33 33 33 33 33 33 33 33 33 33 33')
    macbytes = bytearray.fromhex(
          '1C 04 01 00 EE 01 23 '
          '00 00 00 00 00 00 00 00 00 00 00 00 00 00 00 00'
          '00 00 00 00 00 00 00 00 00')
    snpad = bytearray.fromhex(
          '77 77 77 77 77 77 77 77 77 77 77 77 77 77 77 77'
          '77 77 77 77 77 77 77')
    sha256 = hashlib.sha256()
    sha256.update(rootkey+macbytes+serial_number+snpad)
    divKey = sha256.digest()
    print('DeriveKey: ')
    print(pretty_print_hex(divKey, indent='    '))

    # 01 23 50 16 CE FE 0B 8D EE
    opcode = bytearray.fromhex(
          '08 00 00 00'
          '00 00 00 00 00 00 00 00 00 00 00'
          'EE 00 00 00 00 01 23 00 00')
    optbytes = divKey+nonce_out+opcode
    sha256 = hashlib.sha256() #Must init hashlib again here
    sha256.update(optbytes)
    mac = sha256.digest()
    print('MAC: ')
    print(pretty_print_hex(mac, indent='    '))

    if mac == digest:
       print('Dirive Key Verify Success!\n')
    else:
       print('Dirive Key Verify Fail!\n')

    atcab_release()

if __name__ == '__main__':
    parser = setup_example_runner(__file__)
    parser.add_argument('--i2c', help='I2C Address (in hex)')
    parser.add_argument('--gen', default=True, help='Generate new keys')
    args = parser.parse_args()

    if args.i2c is not None:
        args.i2c = int(args.i2c, 16)

    print('\nDirive Key Verify Starting...')
    authentication_counter(args.iface, args.device, args.i2c, args.gen, **parse_interface_params(args.params))
    #print('Authentication Counter Test Success')
Python运行结果如下:
2.2.2 读取客户端序列号并执行MAC命令
接下来的两种方法涉及在步骤1中使用ACES读取序列号和步骤2在多样化的键槽上执行MAC命令。
- 执行读取——读取序列号
- 隔离SerialNumber。
- 9字节序列号是字节[0:3]和[8:12]。
- 对于这个示例:01235016CEEF0B8DEE。
- 执行MAC获取多样化密钥槽的摘要。
- 操作码的下拉列表中,选择MAC命令。
- 设置模式00。
- KeyID设置为0000。
- 设置数据输入挑战(为方便测试,这里设为全1)。
- 单击Execute命令按钮。
- 响应包字段将包含SHA256 Hash值,也称信息摘要。

2.3 使用GenDig命令进行验证
要验证客户机,请使用GenDig命令执行以下步骤。此序列表示将执行以验证客户机的主机序列。
-
使用SerialNumber + SnPad初始化TempKey。
图2 - 10 Nonce -命令生成器
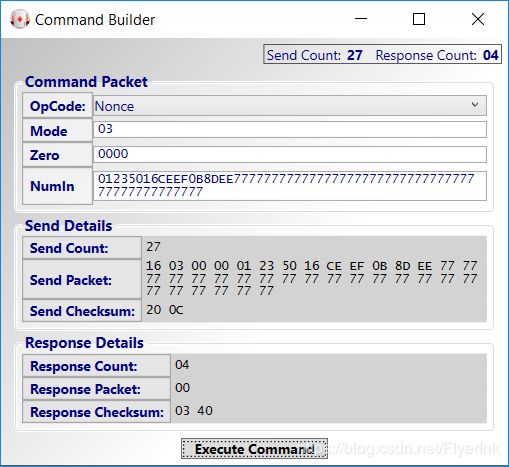
-
执行GenDig -使用多样化的密钥初始化TempKey。
- 操作码的下拉列表中,选择GenDig命令。
- 设置MemZone 02这表明数据区。
- 将KeyID设置为0300(LSB)。这是为GenDig验证多样化密钥而配置的主机槽。
- 设置数据1C040100。这是GenDig的另一个数据,它使得加密计算与实际等效于DeriveKey。
- 单击Execute命令按钮。
- 响应包字段将包含00,表示成功。
-
执行CheckMac—将客户摘要与计算的多样化密钥(现在在TempKey中)的MAC进行比较。
- 在OpCode下拉列表中,选择CheckMac命令。
- 将Mode设置为06(= 04和02)。使用TempKey并匹配TempKey源标志。
- KeyID设置为0100。当使用TempKey时,CheckMac将忽略该值。
- 设置数据为:挑战+响应+ OtherData。
挑战=全1。
响应=来自客户机的MAC命令的结果Digest。
OtherData = 08(MAC操作码)+ 00 00 00 00 00 00 00 00 00 00 00 00 00(12字节)。 - 单击Execute命令按钮。
- 响应包字段将包含00, 表明摘要匹配。
在cryptoauthtools中通过Python 脚本实现代码如下:
"""
Basic Dirive Key Verify Common Use Cases
"""
# (c) 2015-2018 Microchip Technology Inc. and its subsidiaries.
#
# Subject to your compliance with these terms, you may use Microchip software
# and any derivatives exclusively with Microchip products. It is your
# responsibility to comply with third party license terms applicable to your
# use of third party software (including open source software) that may
# accompany Microchip software.
#
# THIS SOFTWARE IS SUPPLIED BY MICROCHIP "AS IS". NO WARRANTIES, WHETHER
# EXPRESS, IMPLIED OR STATUTORY, APPLY TO THIS SOFTWARE, INCLUDING ANY IMPLIED
# WARRANTIES OF NON-INFRINGEMENT, MERCHANTABILITY, AND FITNESS FOR A
# PARTICULAR PURPOSE. IN NO EVENT WILL MICROCHIP BE LIABLE FOR ANY INDIRECT,
# SPECIAL, PUNITIVE, INCIDENTAL OR CONSEQUENTIAL LOSS, DAMAGE, COST OR EXPENSE
# OF ANY KIND WHATSOEVER RELATED TO THE SOFTWARE, HOWEVER CAUSED, EVEN IF
# MICROCHIP HAS BEEN ADVISED OF THE POSSIBILITY OR THE DAMAGES ARE
# FORESEEABLE. TO THE FULLEST EXTENT ALLOWED BY LAW, MICROCHIP'S TOTAL
# LIABILITY ON ALL CLAIMS IN ANY WAY RELATED TO THIS SOFTWARE WILL NOT EXCEED
# THE AMOUNT OF FEES, IF ANY, THAT YOU HAVE PAID DIRECTLY TO MICROCHIP FOR
# THIS SOFTWARE.

from cryptoauthlib import *
from common import *
import time
import hashlib

# Safe input if using python 2
try: input = raw_input
except NameError: pass


def authentication_counter(iface='hid', device='ecc', i2c_addr=None, keygen=True, **kwargs):
    ATCA_SUCCESS = 0x00

    # Loading cryptoauthlib(python specific)
    load_cryptoauthlib()

    # Get the target default config
    cfg = eval('cfg_at{}a_{}_default()'.format(atca_names_map.get(device), atca_names_map.get(iface)))

    # Set interface parameters
    if kwargs is not None:
        for k, v in kwargs.items():
            icfg = getattr(cfg.cfg, 'atca{}'.format(iface))
            setattr(icfg, k, int(v, 16))

    # Basic Raspberry Pi I2C check
    if 'i2c' == iface and check_if_rpi():
        cfg.cfg.atcai2c.bus = 1

    # Initialize the stack
    assert atcab_init(cfg) == ATCA_SUCCESS
    print('')

    # Check device type
    info = bytearray(4)
    assert atcab_info(info) == ATCA_SUCCESS
    dev_name = get_device_name(info)
    dev_type = get_device_type_id(dev_name)

    # Reinitialize if the device type doesn't match the default
    if dev_type != cfg.devtype:
        cfg.dev_type = dev_type
        assert atcab_release() == ATCA_SUCCESS
        time.sleep(1)
        assert atcab_init(cfg) == ATCA_SUCCESS

    # Request the Serial Number
    serial_number = bytearray(9)
    assert atcab_read_serial_number(serial_number) == ATCA_SUCCESS
    print('Serial number: ')
    print(pretty_print_hex(serial_number, indent='    '))

    # Check the device locks
    print('Check Device Locks')
    is_locked = AtcaReference(False)
    assert atcab_is_locked(0, is_locked) == ATCA_SUCCESS
    config_zone_locked = bool(is_locked.value)
    print('    Config Zone is %s' % ('locked' if config_zone_locked else 'unlocked'))

    assert atcab_is_locked(1, is_locked) == ATCA_SUCCESS
    data_zone_locked = bool(is_locked.value)
    print('    Data Zone is %s' % ('locked' if data_zone_locked else 'unlocked'))

    """
    # Run a nonce command to get a random data
    nonce_in = bytearray.fromhex(
          '00 00 00 00 00 00 00 00 00 00 00 00 00 00 00 00'
          '00 00 00 00 00 00 00 00 00 00 00 00 00 00 00 00')
    nonce_out = bytearray(32)
    assert atcab_nonce_rand(nonce_in, nonce_out) == ATCA_SUCCESS
    print('\nNonce: ')
    print(pretty_print_hex(nonce_out, indent='    '))
    """

    nonce_out = bytearray.fromhex(
          '11 11 11 11 11 11 11 11 11 11 11 11 11 11 11 11'
          '11 11 11 11 11 11 11 11 11 11 11 11 11 11 11 11')
    # Run a MAC command at Slot0, Slot0 have programmed with DeriveKey from RootKey
    digest = bytearray(32)
    assert atcab_mac(0x00, 0x00, nonce_out, digest) == ATCA_SUCCESS
    print('\nDigest: ')
    print(pretty_print_hex(digest, indent='    '))

    # Run a nonce command to load TempKey
    snpad = bytearray.fromhex(
          '77 77 77 77 77 77 77 77 77 77 77 77 77 77 77 77'
          '77 77 77 77 77 77 77')
    tempkey = serial_number + snpad
    assert atcab_nonce(tempkey) == ATCA_SUCCESS
    print('Load TempKey: ')
    print(pretty_print_hex(tempkey, indent='    '))

    otherdata = bytearray.fromhex('1C 04 01 00')
    assert atcab_gendig(0x02, 0x03, otherdata, len(otherdata)) == ATCA_SUCCESS
    print('GenDig Success\n')

    checkmac_otherdata = bytearray.fromhex('08 00 00 00 00 00 00 00 00 00 00 00 00')
    assert atcab_checkmac(0x06, 0x01, nonce_out, digest, checkmac_otherdata) == ATCA_SUCCESS
    print('Dirive Key Verify Success!\n')

    atcab_release()

if __name__ == '__main__':
    parser = setup_example_runner(__file__)
    parser.add_argument('--i2c', help='I2C Address (in hex)')
    parser.add_argument('--gen', default=True, help='Generate new keys')
    args = parser.parse_args()

    if args.i2c is not None:
        args.i2c = int(args.i2c, 16)

    print('\nDirive Key Verify Starting...')
    authentication_counter(args.iface, args.device, args.i2c, args.gen, **parse_interface_params(args.params))
    #print('Authentication Counter Test Success')
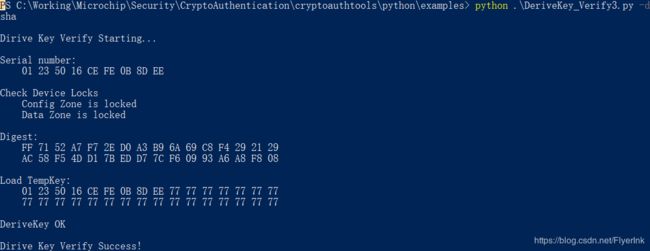
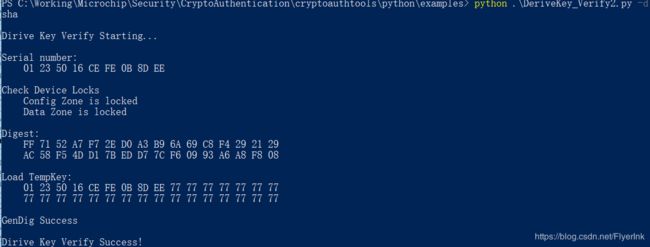
运行结果如下:
2.4使用DeriveKey命令进行验证
- 使用SerialNumber + SnPad初始化TempKey。
- 执行派生密钥——将客户端多样化密钥写入主机上的槽中。
- 执行CheckMac—将客户端摘要与派生的多样化密钥(现在位于槽01中)的MAC进行比较。
在cryptoauthtools中通过Python 脚本实现代码如下:
"""
Basic Dirive Key Verify Common Use Cases
"""
# (c) 2015-2018 Microchip Technology Inc. and its subsidiaries.
#
# Subject to your compliance with these terms, you may use Microchip software
# and any derivatives exclusively with Microchip products. It is your
# responsibility to comply with third party license terms applicable to your
# use of third party software (including open source software) that may
# accompany Microchip software.
#
# THIS SOFTWARE IS SUPPLIED BY MICROCHIP "AS IS". NO WARRANTIES, WHETHER
# EXPRESS, IMPLIED OR STATUTORY, APPLY TO THIS SOFTWARE, INCLUDING ANY IMPLIED
# WARRANTIES OF NON-INFRINGEMENT, MERCHANTABILITY, AND FITNESS FOR A
# PARTICULAR PURPOSE. IN NO EVENT WILL MICROCHIP BE LIABLE FOR ANY INDIRECT,
# SPECIAL, PUNITIVE, INCIDENTAL OR CONSEQUENTIAL LOSS, DAMAGE, COST OR EXPENSE
# OF ANY KIND WHATSOEVER RELATED TO THE SOFTWARE, HOWEVER CAUSED, EVEN IF
# MICROCHIP HAS BEEN ADVISED OF THE POSSIBILITY OR THE DAMAGES ARE
# FORESEEABLE. TO THE FULLEST EXTENT ALLOWED BY LAW, MICROCHIP'S TOTAL
# LIABILITY ON ALL CLAIMS IN ANY WAY RELATED TO THIS SOFTWARE WILL NOT EXCEED
# THE AMOUNT OF FEES, IF ANY, THAT YOU HAVE PAID DIRECTLY TO MICROCHIP FOR
# THIS SOFTWARE.

from cryptoauthlib import *
from common import *
import time

# Safe input if using python 2
try: input = raw_input
except NameError: pass


def authentication_counter(iface='hid', device='ecc', i2c_addr=None, keygen=True, **kwargs):
    ATCA_SUCCESS = 0x00

    # Loading cryptoauthlib(python specific)
    load_cryptoauthlib()

    # Get the target default config
    cfg = eval('cfg_at{}a_{}_default()'.format(atca_names_map.get(device), atca_names_map.get(iface)))

    # Set interface parameters
    if kwargs is not None:
        for k, v in kwargs.items():
            icfg = getattr(cfg.cfg, 'atca{}'.format(iface))
            setattr(icfg, k, int(v, 16))

    # Basic Raspberry Pi I2C check
    if 'i2c' == iface and check_if_rpi():
        cfg.cfg.atcai2c.bus = 1

    # Initialize the stack
    assert atcab_init(cfg) == ATCA_SUCCESS
    print('')

    # Check device type
    info = bytearray(4)
    assert atcab_info(info) == ATCA_SUCCESS
    dev_name = get_device_name(info)
    dev_type = get_device_type_id(dev_name)

    # Reinitialize if the device type doesn't match the default
    if dev_type != cfg.devtype:
        cfg.dev_type = dev_type
        assert atcab_release() == ATCA_SUCCESS
        time.sleep(1)
        assert atcab_init(cfg) == ATCA_SUCCESS

    # Request the Serial Number
    serial_number = bytearray(9)
    assert atcab_read_serial_number(serial_number) == ATCA_SUCCESS
    print('Serial number: ')
    print(pretty_print_hex(serial_number, indent='    '))

    # Check the device locks
    print('Check Device Locks')
    is_locked = AtcaReference(False)
    assert atcab_is_locked(0, is_locked) == ATCA_SUCCESS
    config_zone_locked = bool(is_locked.value)
    print('    Config Zone is %s' % ('locked' if config_zone_locked else 'unlocked'))

    assert atcab_is_locked(1, is_locked) == ATCA_SUCCESS
    data_zone_locked = bool(is_locked.value)
    print('    Data Zone is %s' % ('locked' if data_zone_locked else 'unlocked'))

    """
    # Run a nonce command to get a random data
    nonce_in = bytearray.fromhex(
          '00 00 00 00 00 00 00 00 00 00 00 00 00 00 00 00'
          '00 00 00 00 00 00 00 00 00 00 00 00 00 00 00 00')
    nonce_out = bytearray(32)
    assert atcab_nonce_rand(nonce_in, nonce_out) == ATCA_SUCCESS
    print('\nNonce: ')
    print(pretty_print_hex(nonce_out, indent='    '))
    """

    nonce_out = bytearray.fromhex(
          '11 11 11 11 11 11 11 11 11 11 11 11 11 11 11 11'
          '11 11 11 11 11 11 11 11 11 11 11 11 11 11 11 11')
    # Run a MAC command at Slot0, Slot0 have programmed with DeriveKey from RootKey
    digest = bytearray(32)
    assert atcab_mac(0x00, 0x00, nonce_out, digest) == ATCA_SUCCESS
    print('\nDigest: ')
    print(pretty_print_hex(digest, indent='    '))

    # Run a nonce command to load TempKey
    snpad = bytearray.fromhex(
          '77 77 77 77 77 77 77 77 77 77 77 77 77 77 77 77'
          '77 77 77 77 77 77 77')
    tempkey = serial_number + snpad
    assert atcab_nonce(tempkey) == ATCA_SUCCESS
    print('Load TempKey: ')
    print(pretty_print_hex(tempkey, indent='    '))

    # Run DeriveKey command to generate key to slot1 from RootKey
    dev_other = bytearray(0);
    assert atcab_derivekey(0x04, 0x01, dev_other) == ATCA_SUCCESS
    print('DeriveKey OK\n')

    # Run CheckMac command to verity the challenge & response
    checkmac_otherdata = bytearray.fromhex('08 00 00 00 00 00 00 00 00 00 00 00 00')
    assert atcab_checkmac(0x04, 0x01, nonce_out, digest, checkmac_otherdata) == ATCA_SUCCESS
    print('Dirive Key Verify Success!\n')

    atcab_release()

if __name__ == '__main__':
    parser = setup_example_runner(__file__)
    parser.add_argument('--i2c', help='I2C Address (in hex)')
    parser.add_argument('--gen', default=True, help='Generate new keys')
    args = parser.parse_args()

    if args.i2c is not None:
        args.i2c = int(args.i2c, 16)

    print('\nDirive Key Verify Starting...')
    authentication_counter(args.iface, args.device, args.i2c, args.gen, **parse_interface_params(args.params))
    #print('Authentication Counter Test Success')
运行结果如下: