nodejs的ODBC连接解决方案
nodejs的ODBC连接解决方案
如需转载请标明出处:http://blog.csdn.net/itas109
QQ技术交流群:129518033
文章目录
- nodejs的ODBC连接解决方案
- @[toc]
- 1.windows下odbc
- 1.1 安装node和node-gyp
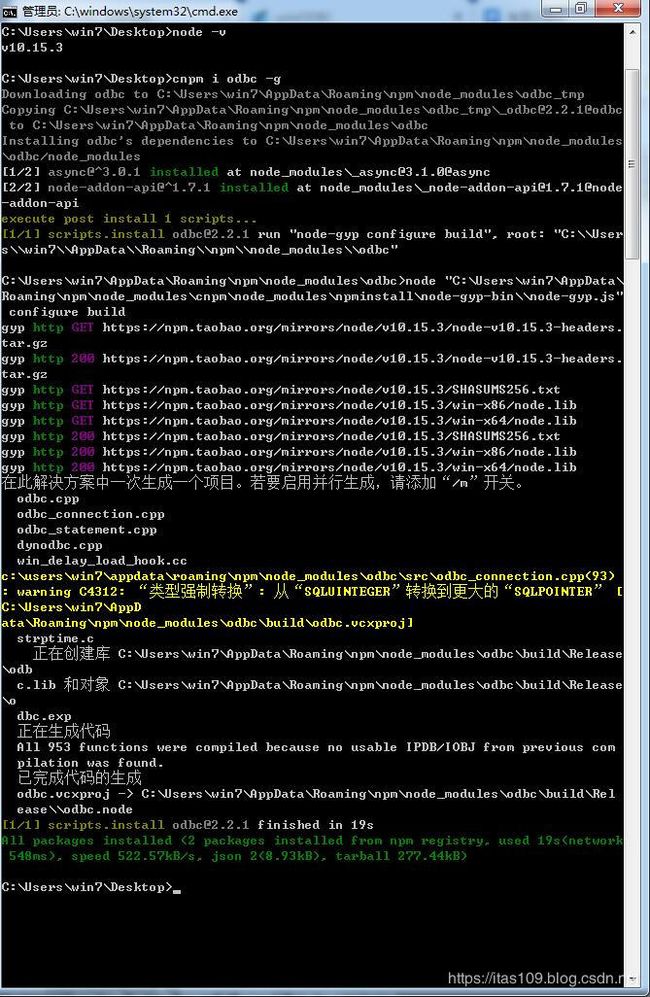
- 1.2 安装nodejs的odbc模块
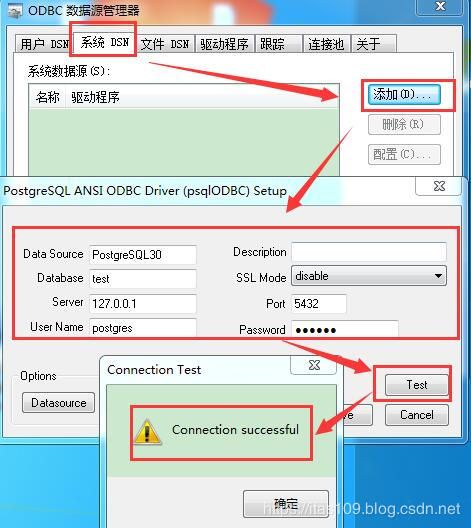
- 1.3 设置odbc数据源
- 1.4 测试代码
- 2.Linux下odbc
- 2.1 安装node和node-gyp
- 2.2 安装nodejs的odbc模块
- 2.3 安装unixodbc
- 2.3.1 下载unixodbc
- 2.3.2 编译安装unixodbc
- 2.3.3 unixodbc测试
- 2.4 PostgreSQL的ODBC驱动安装
- 2.4.1 psqlodbc-10.03源码编译
- 2.4.2 命令安装
- 2.5 设置odbc数据源
- 2.5.1 手动配置
- 2.5.2 gui图像化配置
- 2.6 测试代码
- 3.Installing and Configuring ODBC博文备份
环境:
windows:
OS:win7 64bit
Node:10.15.3 64bit
node-gyp:6.0.0
编译器:vs2015
python:2.7.5
async: 3.0.1(odbc依赖)
node-addon-api: 1.7.1(odbc依赖)
odbc:2.2.1
postgresql:10.10
Linux:
OS:deepIn 15.11
Node:10.15.3 64bit
node-gyp:6.0.0
编译器:gcc 6.3.0 20170516
python:2.7.5
unixodbc:2.3.7
async: 3.0.1(odbc依赖)
node-addon-api: 1.7.1(odbc依赖)
odbc:2.2.1
postgresql:10.10
1.windows下odbc
1.1 安装node和node-gyp
略
1.2 安装nodejs的odbc模块
npm i odbc
或者
cnpm i odbc
1.3 设置odbc数据源
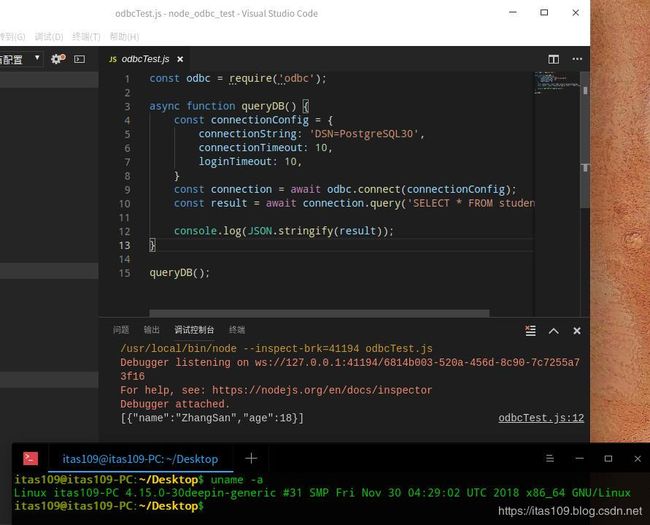
1.4 测试代码
const odbc = require('odbc');

async function queryDB() {
    const connectionConfig = {
        connectionString: 'DSN=PostgreSQL30',
        connectionTimeout: 10,
        loginTimeout: 10,
    }
    const connection = await odbc.connect(connectionConfig);
    const result = await connection.query('SELECT * FROM student;');

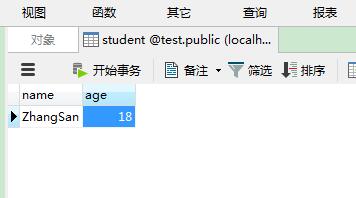
    console.log(JSON.stringify(result));// [{"name":"ZhangSan","age":18}]
}

queryDB();
2.Linux下odbc
2.1 安装node和node-gyp
2.2 安装nodejs的odbc模块
npm i odbc
或者
cnpm i odbc
2.3 安装unixodbc
2.3.1 下载unixodbc
下载unixodbc 2.3.7
MD5:274a711b0c77394e052db6493840c6f9
2.3.2 编译安装unixodbc
./configure --prefix=/usr/local/unixODBC-2.3.7 --includedir=/usr/include --libdir=/usr/lib --bindir=/usr/bin --sysconfdir=/etc

make -j 8

make install
2.3.3 unixodbc测试
odbcinst -j
注意:
这里由于动态库安装路径找不到的问题。一种处理就是按照上面的./configure 参数配置,再有一种就是软链接
odbcinst -j
odbcinst: error while loading shared libraries: libodbcinst.so.2: cannot open shared object file: No such file or directory
2.4 PostgreSQL的ODBC驱动安装
2.4.1 psqlodbc-10.03源码编译
下载地址:
psqlodbc-10.03
sudo ./configure --with-libpq=/opt/PostgreSQL/10

sudo make -j 8

sudo make install
其中,–with-libpq参数为pg安装根目录,默认路径为/opt/PostgreSQL/10
2.4.2 命令安装
sudo apt-get install odbc-postgresql
其他:
mysql
sudo apt-get install libmyodbc
2.5 设置odbc数据源
2.5.1 手动配置
- /usr/local/etc/odbcinst.ini配置
[PostgreSQL]
Description     = ODBC for PostgreSQL
Driver          = /usr/lib/x86_64-linux-gnu/odbc/psqlodbca.so
Setup           = /usr/lib/x86_64-linux-gnu/odbc/libodbcpsqlS.so
FileUsage       = 1
验证:
$ odbcinst -q -d
[PostgreSQL]
- /usr/local/etc/odbc.ini系统数据源配置
[PostgreSQL30]
Description         = PostgreSQL connection
Driver              = PostgreSQL
Database            = test
Servername          = localhost
UserName            = postgres
Password            = 123456
Port                = 5432
Protocol            = 8.1
ReadOnly            = No
RowVersioning       = No
ShowSystemTables    = No
ShowOidColumn       = No
FakeOidIndex        = No
ConnSettings        =
验证:
$ isql PostgreSQL30
+---------------------------------------+
| Connected!                            |
|                                       |
| sql-statement                         |
| help [tablename]                      |
| quit                                  |
|                                       |
+---------------------------------------+
SQL>
注意:
如果不是连接Linux本机的PostgreSQL数据库,需要验证Linux中是否能够正常连接PostgreSQL。
PostgreSQL默认只能本地连接。
例如,出现
$ isql PostgreSQL301
[ISQL]ERROR: Could not SQLConnect
可以尝试使用pgAdmin 4进行连接,可以查看到更多错误。
2.5.2 gui图像化配置
unixODBC-GUI-Qt
暂时略过
2.6 测试代码
const odbc = require('odbc');

async function queryDB() {
    const connectionConfig = {
        connectionString: 'DSN=PostgreSQL30',
        connectionTimeout: 10,
        loginTimeout: 10,
    }
    const connection = await odbc.connect(connectionConfig);
    const result = await connection.query('SELECT * FROM student;');

    console.log(JSON.stringify(result));// [{"name":"ZhangSan","age":18}]
}

queryDB();
3.Installing and Configuring ODBC博文备份
Installing and Configuring ODBC
The ODBC connector is a database abstraction layer that makes it possible for Asterisk to communicate with a wide range of databases without requiring the developers to create a separate database connector for every database Asterisk wants to support. This saves a lot of development effort and code maintenance. There is a slight performance cost, because we are adding another application layer between Asterisk and the database, but this can be mitigated with proper design and is well worth it when you need powerful, flexible database capabilities in your Asterisk system.
Before you install the connector in Asterisk, you have to install ODBC into Linux itself. To install the ODBC drivers, use one of the following commands.
On CentOS:
$ sudo yum install unixODBC unixODBC-devel libtool-ltdl libtool-ltdl-devel
If you’re using a 64-bit installation, remember to add .x86_64 to the end of your development packages to make sure the i386 packages are not also installed, as stability problems can result if Asterisk links against the wrong libraries.
On Ubuntu:
$ sudo apt-get install unixODBC unixODBC-dev
See Chapter 3, Installing Asterisk for the matrix of packages you should have installed.
You’ll also need to install the unixODBC development package, because Asterisk uses it to build the ODBC modules we will be using throughout this chapter.
The unixODBC drivers shipped with distributions are often a few versions behind the officially released versions on the http://www.unixodbc.org website. If you have stability issues while using unixODBC, you may need to install from source. Just be sure to remove the unixODBC drivers via your package manager first, and then update the paths in your /etc/odbcinst.ini file.
By default, CentOS will install the drivers for connecting to PostgreSQL databases via ODBC. To install the drivers for MySQL, execute the following command:
$ sudo yum install mysql-connector-odbc
To install the PostgreSQL ODBC connector on Ubuntu:
$ sudo apt-get install odbc-postgresql
Or to install the MySQL ODBC connector on Ubuntu:
$ sudo apt-get install libmyodbc
Configuring ODBC for PostgreSQL
Configuration for the PostgreSQL ODBC driver is done in the /etc/odbcinst.ini file.
On CentOS the default file already contains some data, including that for PostgreSQL, so just verify that the data exists. The file will look like the following:
[PostgreSQL]
Description     = ODBC for PostgreSQL
Driver          = /usr/lib/libodbcpsql.so
Setup           = /usr/lib/libodbcpsqlS.so
FileUsage       = 1
On Ubuntu, the /etc/odbcinst.ini file will be blank, so you’ll need to add the data to that configuration file. Add the following to the odbcinst.ini file:
[PostgreSQL]
Description     = ODBC for PostgreSQL
Driver          = /usr/lib/odbc/psqlodbca.so
Setup           = /usr/lib/odbc/libodbcpsqlS.so
FileUsage       = 1
On 64-bit systems, you will need to change the path of the libraries from /usr/lib/ to /usr/lib64/ in order to access the correct library files.
In either case, you can use cat > /etc/odbcinst.ini to write a clean configuration file, as we’ve done in other chapters. Just use Ctrl+D to save the file once you’re done.
Verify that the system is able to see the driver by running the following command. It should return the label name PostgreSQL if all is well:
$ odbcinst -q -d
[PostgreSQL]
Next, configure the /etc/odbc.ini file, which is used to create an identifier that Asterisk will use to reference this configuration. If at any point in the future you need to change the database to something else, you simply need to reconfigure this file, allowing Asterisk to continue to point to the same place[141]:
[asterisk-connector]
Description         = PostgreSQL connection to 'asterisk' database
Driver              = PostgreSQL
Database            = asterisk
Servername          = localhost
UserName            = asterisk
Password            = welcome
Port                = 5432
Protocol            = 8.1
ReadOnly            = No
RowVersioning       = No
ShowSystemTables    = No
ShowOidColumn       = No
FakeOidIndex        = No
ConnSettings        =
Configuring ODBC for MySQL
Configuration for the MySQL ODBC driver is done in the /etc/odbcinst.ini file.
On CentOS the default file already contains some data, including that for MySQL, but it needs to be uncommented and requires a couple of changes. Replace the existing text with the following:
[MySQL]
Description = ODBC for MySQL
Driver = /usr/lib/libmyodbc3.so
Setup = /usr/lib/libodbcmyS.so
FileUsage = 1
On Ubuntu, the /etc/odbcinst.ini file will be blank, so you’ll need to add the data to that configuration file. Add the following to the odbcinst.ini file:
[MySQL]
Description = ODBC for MySQL
Driver = /usr/lib/odbc/libmyodbc.so
Setup = /usr/lib/odbc/libodbcmyS.so
FileUsage = 1
On 64-bit systems, you will need to change the path of the libraries from /usr/lib/ to /usr/lib64/ in order to access the correct library files.
In either case, you can use cat > /etc/odbcinst.ini to write a clean configuration file, as we’ve done in other chapters. Just use Ctrl+D to save the file once you’re done.
Verify that the system is able to see the driver by running the following command. It should return the label name MySQL if all is well:
$ odbcinst -q -d
[MySQL]
Next, configure the /etc/odbc.ini file, which is used to create an identifier that Asterisk will use to reference this configuration. If at any point in the future you need to change the database to something else, you simply need to reconfigure this file, allowing Asterisk to continue to point to the same place:
[asterisk-connector]
Description           = MySQL connection to 'asterisk' database
Driver                = MySQL
Database              = asterisk
Server                = localhost
UserName              = asterisk
Password              = welcome
Port                  = 3306
Socket                = /var/lib/mysql/mysql.sock
觉得文章对你有帮助,可以扫描二维码捐赠给博主,谢谢!
![]()
如需转载请标明出处:http://blog.csdn.net/itas109
QQ技术交流群:129518033
License
License under CC BY-NC-ND 4.0: 署名-非商业使用-禁止演绎
Reference:
1.https://www.npmjs.com/package/odbc
2.https://github.com/markdirish/node-odbc/
3.http://www.unixodbc.org/
4.http://www.asteriskdocs.org/en/3rd_Edition/asterisk-book-html-chunk/installing_configuring_odbc.html


