2018年4月27日
一.jenkins实现不同环境用不同证书打包 (这样uat,pro线上环境就可以用生产证书(ad-hoc)打包,测试极光推送等功能)
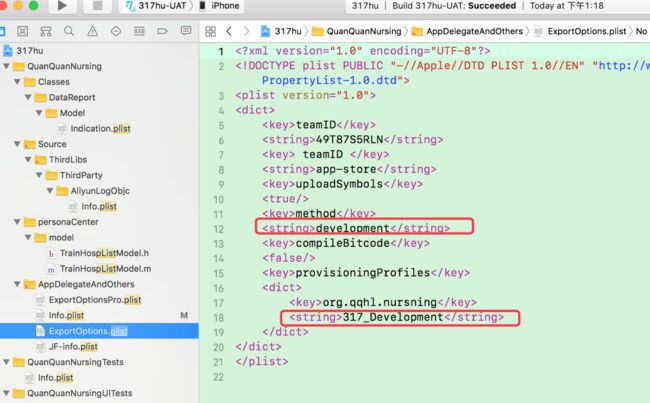
第一步.工程里面创建开发和生产的打包文件
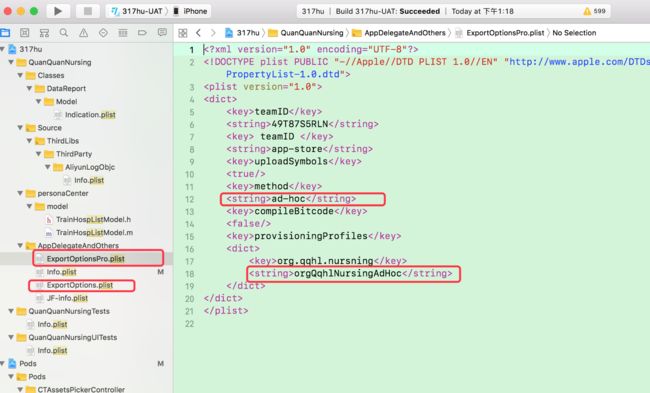
生产的(主要是以下几个地方的区别)
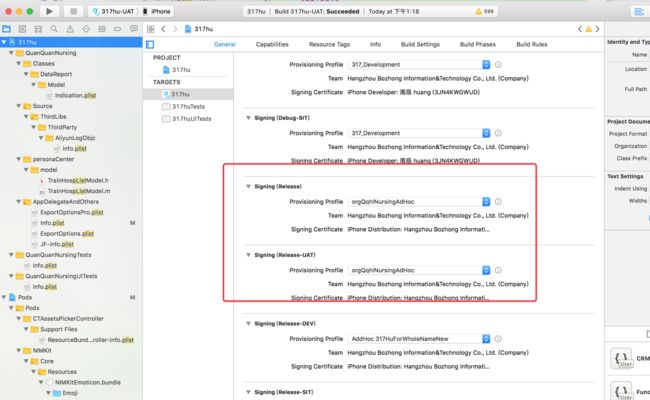
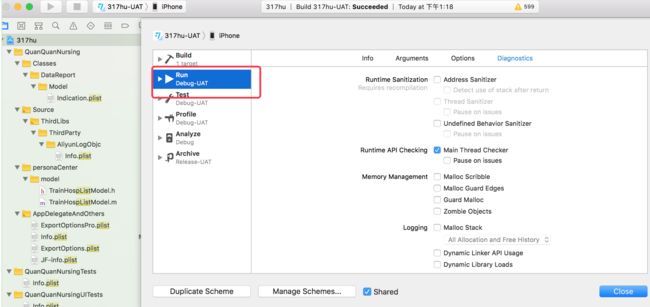
第二步:需要用生产证书打包的,改成对应的pp文件,建议用release, 这样debug模式 uat和pro环境本机工程上还可以调试。(生产证书无法联机调试)
第三步:不同环境指定不同打包脚本 (注意shell if条件判断一定要有左右空格,if [ ${i} == "UAT”] 这样会有问题的),注意用release打包。
env_array=("SIT" "DEV" "UAT" "PRO”)

configuration="Release"

if [ ${i} == "PRO" ]; then
    build_scheme="${project_name}"
    build_config="${configuration}"
    export_optionsplist_path=${project_path}/QuanQuanNursing/ExportOptionsPro.plist
elif [ ${i} == "UAT" ]; then
    export_optionsplist_path=${project_path}/QuanQuanNursing/ExportOptionsPro.plist
else
    export_optionsplist_path=${project_path}/QuanQuanNursing/ExportOptions.plist
fi


archivie_cmd=$(xcodebuild -exportArchive -archivePath ${archive_path} -exportPath ${ipa_path} -exportOptionsPlist ${export_optionsplist_path} -allowProvisioningUpdates)
成功:
image.png
2017年6月1日
已修改脚本 支持最新版本xcode8.3
2016年10月23日
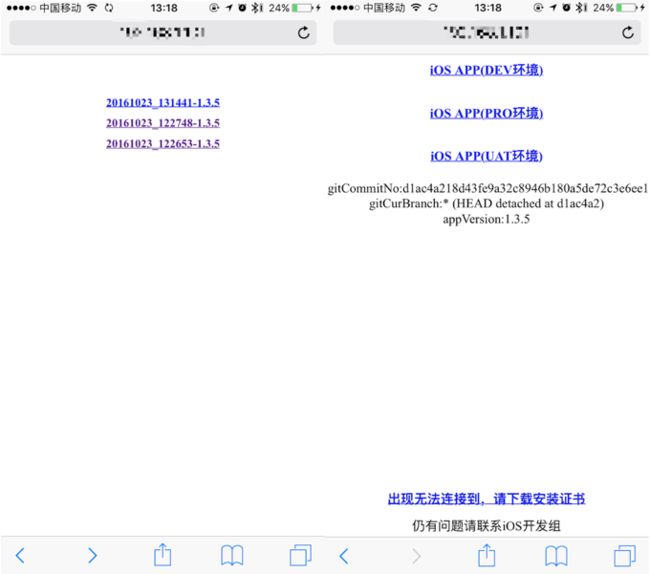
一.实现效果(一级目录和二级目录)
1.使用
a.直接运行脚本就可以
sh archiveAndDownloadShell.sh
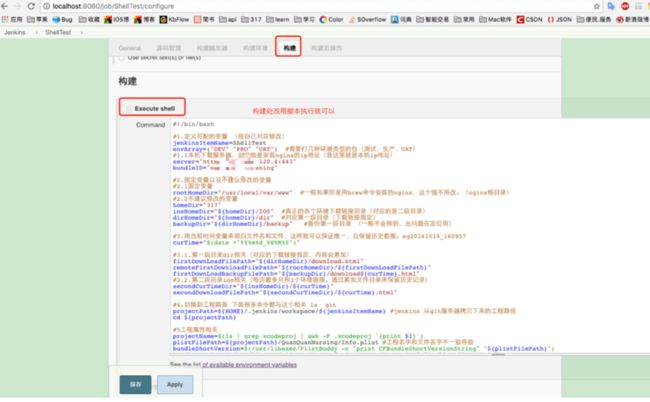
b.或者配置在jenkins上
二.脚本实现原理
1.先在jenkins目录下创建所有文件(都用相对路径定位,便于管理以及实现页面链接之间的跳转)
ps:不会jenkins安装参照如下链接
用Jenkins集成ios项目,同时实现同一代码自动输出多个环境包
不会创建可下载的ipa包链接的,参照如下链接
制作可以下载苹果app包链接
2.文件创建好后,在将创建好的文件目录整个移动到服务器根目录下面(我这里是nginx)
不会安装服务器nginx的参照如下链接
创建可供手机下载安装app包全过程(含服务器配置和支持https证书制作)
3.删除多余的文件
三.对应如下文件结构
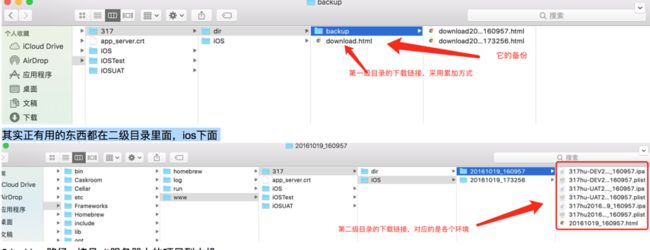
1.服务器的文件 ,最终下载链接都在这里, ipa包也在这个路径下面
2.jenkins 路径 拷贝git服务器上的项目到本机
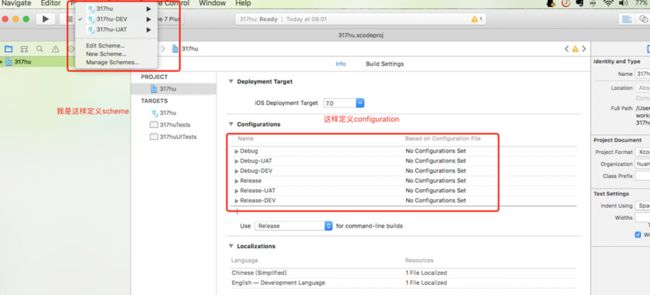
3.我是如下方式构建schema和configuration
四.shell脚本源码
#!/bin/bash
#1.定义可配的变量 (按自己对应修改)
jenkinsItemName=ShellTest
envArray=("DEV") #需要打几种环境类型的包(测试,开发,生产,UAT)"SIT" "DEV" "PRO" "UAT"
#1.1本机下载服务器,对应的是安装nginx的ip地址(我这里就是本机ip地址)
server="https://172.16.120.4:443"
bundleID="org.wangyu.app"
#2.固定变量以及不建议修改的变量exportOptions
#2.1固定变量
rootHomeDir="/usr/local/var/www" #一般如果你是用brew命令安装的nginx,这个值不用改。(nginx根目录)
#2.2不建议修改的变量
homeDir="317"
iosHomeDir="${homeDir}/IOS" #真正的各个环境下载链接目录(对应的是二级目录)
dirHomeDir="${homeDir}/dir" #对应第一级目录(下载链接固定)
backupDir="${dirHomeDir}/backup" #备份第一级目录 (一般不会用到,出问题在定位用)
#3.用当前时间变量来明白文件名和文件,这样就可以保证唯一,且保留历史数据。eg20161019_160957
curTime="$(date +"%Y%m%d_%H%M%S")"
#3.1.第一级目录dir相关(对应的下载链接首页,内容会累加)
firstDownLoadFilePath="${dirHomeDir}/download.html"
remoteFirstDownloadFilePath="${rootHomeDir}/${firstDownLoadFilePath}"
firstDownLoadBackupFilePath="${backupDir}/download${curTime}.html"
#3.2.第二级目录ios相关(每页最多只有3个环境链接,通过累加文件目录来保留历史记录)
secondCurTimeDir="${iosHomeDir}/${curTime}"
secondDownloadFilePath="${secondCurTimeDir}/${curTime}.html"
#4.切换到工程路面 下面很多命令都与这个相关 ls git
projectPath=${HOME}/.jenkins/workspace/${jenkinsItemName} #jenkins 从git服务器拷贝下来的工程路径
cd ${projectPath}
#5工程属性相关
projectName=$(ls | grep xcodeproj | awk -F .xcodeproj '{print $1}')
plistFilePath=${projectPath}/QuanQuanNursing/Info.plist #工程名字和文件名字不一致导致
export_optionsplist_path=${project_path}/QuanQuanNursing/ExportOptions.plist
bundleShortVersion=$(/usr/libexec/PlistBuddy -c "print CFBundleShortVersionString" "${plistFilePath}")
bundleVersion=$(/usr/libexec/PlistBuddy -c "print CFBundleVersion" "${plistFilePath}")
#5.1证书(按自己对应修改)
configuration="Debug"
signIdentity="iPhone Developer: wang yu (4FNNN527UN)"
provisioningProfile="317_Development"
#5.2 git数据相关
gitCommitNo=$(git log --pretty=format:"%H " -1)
gitCurBranch=$(git branch | grep '*')
#6.创建目录(创建最里层的目录就可以)
#remote ios/20161023_093325
if [ ! -d "${secondCurTimeDir}" ]; then
mkdir -p ${secondCurTimeDir}
fi
# /dir/backup
if [ ! -d "${backupDir}" ]; then
mkdir -p ${backupDir}
fi
#7.download.html(firstDownLoadFile)
htmlHeader="
317hu iOS下载目录
"
#7.1这里最好用相对路径(一级目录和二级目录的跳转链接,)
htmlContent=" ${curTime}-${bundleShortVersion}
"
htmlFooter="
"
echo "first=${firstDownLoadFilePath},remoteFist=${remoteFirstDownloadFilePath}"
#7.1复制远程的文件到本地(因为内容要累加)<建议只复制需要修改的文件,不要全部home文件复制,减轻服务器压力>
if [ -f "${remoteFirstDownloadFilePath}" ]; then
cp -r ${remoteFirstDownloadFilePath} ${firstDownLoadFilePath}
fi
#7.2如果没有直接创建改文件
if [ ! -f "${firstDownLoadFilePath}" ]; then
touch ${firstDownLoadFilePath}
echo "${htmlHeader}" >> ${firstDownLoadFilePath}
echo "${htmlContent}" >> ${firstDownLoadFilePath}
echo "${htmlFooter}" >> ${firstDownLoadFilePath}
else #7.3如果有了就追加,新插入新的固定5行,在将就文件的出头5行的其他部分追加到文件末尾
echo "${htmlHeader}" >> tmp.html
echo "${htmlContent}" >> tmp.html
sed "1,5d" ${firstDownLoadFilePath} >> tmp.html
mv tmp.html ${firstDownLoadFilePath}
fi
cp ${firstDownLoadFilePath} ${firstDownLoadBackupFilePath}
#10.真正下载各个环境的链接(secondDownloadFile)header部分
htmlHeader="
317hu iOS下载页面
"
#10.1 输入头部分
echo "${htmlHeader}" >> ${secondDownloadFilePath}
#8.循环打包命令
for i in ${envArray[@]}
do
#8.1清楚bulid文件夹(目前打的是debug包)
if [ ! -d "build" ]; then
xcodebuild clean -configuration ${configuration}
fi
#8.2 构建参数配置
env=${i}
buildScheme="${projectName}-${env}"
bulidConfiguration="${configuration}-${env}"
#生产环境特殊处理
if [ ${i} == "PRO" ]; then
buildScheme="${projectName}"
bulidConfiguration="${configuration}"
fi
#8.3输出包名字和路径设置
archiveName="${buildScheme}${curTime}.xcarchive"
archiveFilePath="archive/$archiveName"
ipaName="${buildScheme}${curTime}"
ipaFilePath="${iosHomeDir}/${curTime}/${ipaName}" #没有ipa
#8.4打包命令(法1写法先构建命令在执行)
#如果打的project的工程
#bulidCmd='xcodebuild archive -project '${projectName}.xcodeproj' -scheme '${buildScheme}' -configuration '${bulidConfiguration}' -archivePath '${archiveFilePath}
#如何打的是含有workspace(比如用到cocoapods)
bulidCmd='xcodebuild archive -workspace '${projectName}.xcworkspace' -scheme '${buildScheme}' -configuration '${bulidConfiguration}' -archivePath '${archiveFilePath}
#8.4.1执行命令
${bulidCmd}
#8.5(法2写法直接构建命令执行)
#(用证书打包,如果代码里面有通知功能,制作出来的ipa会无法下载)
#archiveCmd=$(xcodebuild -exportArchive -archivePath ${archiveFilePath} -exportPath ${ipaFilePath} -exportFormat ipa -exportSigningIdentity "${signIdentity}")
#archivie_cmd=$(xcodebuild -exportArchive -archivePath ${archiveFilePath} -exportPath ${ipaFilePath} -exportFormat ipa -exportProvisioningProfile "${provisioningProfile}")
archivie_cmd=$(xcodebuild -exportArchive -archivePath ${archive_path} -exportPath ${ipa_path} -exportOptionsPlist ${export_optionsplist_path} -allowProvisioningUpdates)
#${archiveCmd}
#9创建下载链接绑定的plist文件
plistName="${buildScheme}${curTime}.plist"
plistFilePath="${iosHomeDir}/${curTime}/${plistName}"
touch ${plistFilePath}
plistContent="
items
assets
kind
software-package
url
${server}/${ipaFilePath}/${buildScheme}.ipa
metadata
bundle-identifier
${bundleID}
bundle-version
${bundleShortVersion}
kind
software
subtitle
${projectName}
title
${buildScheme}
"
#9.1 创建文件
echo "${plistContent}" >> ${plistFilePath}
htmlContent=" iOS APP(${i}环境)${time}
"
#10.2 真正下载各个环境的链接(secondDownloadFile) content部分
echo "${htmlContent}" >> ${secondDownloadFilePath}
done
#10.3.真正下载各个环境的链接(secondDownloadFile)输入末尾部分 <第一次安装需要下载安装服务器的crt证书>
htmlFooter=" gitCommitNo:${gitCommitNo}
gitCurBranch:${gitCurBranch}
appVersion:${bundleShortVersion}
出现无法连接到,请下载安装证书
仍有问题请联系iOS开发组
"
echo "${htmlFooter}" >> ${secondDownloadFilePath}
#11.打包好后清除多余的文件
#11.1将jenkins下的创建好的项目复制到ngix下面
cp -r ${homeDir} ${rootHomeDir}
rm -r ${homeDir}
rm -r archive
rm -r build
如果您发现本文对你有所帮助,如果您认为其他人也可能受益,请把它分享出去。
