Heartbeat+LVS(VS/DR)+Ldirectord+ipvsadm
共分为3个实验:
实验一:Heartbeat双机热备
实验二:LVS(VS/DR)负载均衡
实验三:Heartbeat+LVS(VS/DR)+Ldirectord
做实验前务必理清几个概念:
1. 集群的分类
2. 高可用性(HA)集群和负载均衡集群的区别与联系
3. Heartbeat的几个术语、理论(与HA集群理论比较)
4. Heartbeat的3个常用插件
5. LVS的3种技术、8种算法
6. LVS与Heartbeat的关系
7. ipvsadm、heartbeat、heartbeat-ldirectord的区别与作用
请参照:http://book.51cto.com/art/200912/168029.htm
环境:
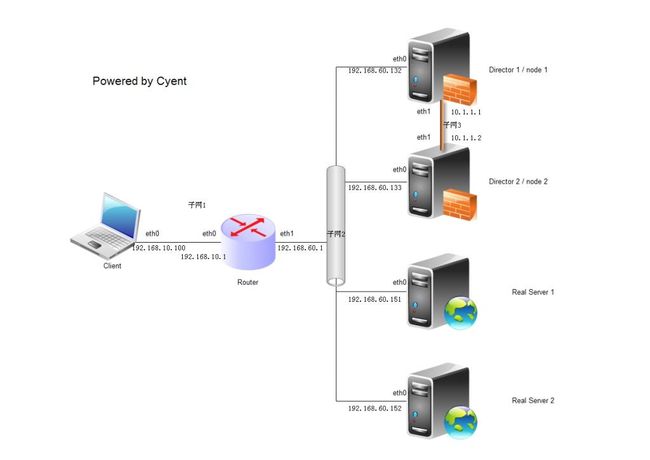
总拓扑为:
所有设备的操作系统均为:CentOS 5.5
共6台机器:
Client:
主机名:client
eth0:192.168.10.100/24 子网1
Router
主机名:router
eth0:192.168.10.1/24 子网1
eth1:192.168.60.1/24 子网2
Director 1(主节点)
主机名:node1
eth0:192.168.60.132/24 子网2 DIP
eth1:10.1.1.1/24 子网3 Private IP
Director 2(备用节点)
主机名:node2
eth0:192.168.60.133/24 子网2 DIP
eth1:10.1.1.2/24 子网3 Private IP
Real Server1
主机名:real1
eth0:192.168.60.151/24 子网2 RIP
lo0:0:192.168.60.200/32 VIP
Real Server2
主机名:real2
eth0:192.168.60.152/24 子网2 RIP
lo0:0:192.168.60.200/32 VIP
VIP(Virtual IP):192.168.60.200/32
注:
1. Director是在LVS里这么称呼的,但在Heartbeat里叫做Node,故以下实验中称呼的不一样
2. 本文档的实验均不设置域,只是单单的主机名,即执行uname -n输出的就是以上各个机器的主机名
3. 以上的网络设置现在就要配置好,并且保证网络完全连通(除了2个Private IP外),用ping来测试
实验一:Heartbeat双机热备
环境:用到了Client、Router、Node 1、Node 2,其他机器关闭
1. 在主节点node1和备用node2上分别安装heartbeat、libnet和httpd
[root@node1 ~]# yum -y install heartbeat libnet httpd
2. 获得heartbeat的相关默认配置文件
[root@node1 ~]# cd /usr/share/doc/heartbeat-2.1.3/
[root@node1 heartbeat-2.1.3]# cp ha.cf authkeys haresources /etc/ha.d
3. heartbeat的相关配置(根据所示,有的注释要去掉,有的不能去,其他的默认就好)
1) /etc/ha.d/ha.cf:
logfile /var/log/ha-log
#crm yes #去掉注释后,才会开启Heartbeat的LRM和CRM模块(现在别开启),否则只有CCM
logfacility local0
keepalive 2
deadtime 10
warntime 5
initdead 120
udpport 694
bcast eth1
#mcast eth0 ....
#ucast eth0 ....
auto_failback on
#watchdog /dev/watchdog #如果去掉注释,则要modprobe softdog,并保证系统启动后会自动加载softdog模块
node node1
node node2
ping 192.168.60.1
ping_group group1 192.168.60.151 192.168.60.152
respawn hacluster /usr/lib/heartbeat/ipfail
2) /etc/ha.d/haresources的配置(只有一行)
node1 IPaddr::192.168.60.200/32/eth0:0 httpd
3) /etc/ha.d/authkeys的配置(只有2行),按以下设置完之后chmod 600 authkeys
auth 1
1 crc
4) 要保证node1和node2上的这3个配置文件一样,因此可以在node1上配置完后scp到node2
5) node1和node2/etc/hosts内容均为:
127.0.0.1 localhost.localdomain localhost
::1 localhost6.localdomain6 localhost6
192.168.60.132 node1
192.168.60.133 node2
6) 在node1和node2上执行chkconfig heartbeat on
在node1和node2上开启heartbeat,执行service heartbeat start,观察:
Starting High-Availability services:
2011/03/05_12:10:19 INFO: Resource is stopped
[ OK ]
如果出现这种情形,代表已经成功,不要被Resource is stopped给吓到了
4. 测试:(基本的网络配置、网络连通测试以及node1与node2上的httpd设置就不赘述了)
1) 在node1上执行ifconfig查看是否有eth0:0,再netstat -lntpu | grep httpd查看80端口是否监听所有网卡;而此时在node2上,应该不存在eth0:0,并且httpd进程未开启。
2) 在Client上执行for i in `seq 1 1000`; do curl http://192.168.60.200/; sleep 1; done来测试能否正常访问VIP的http服务。
3) 将node1的任一网卡连接断掉,然后查看Client上curl输出的变化(建议node1和node2的网页内容设置不同,以便区分),是否30秒后curl输出的变为node2的网页
实验二:LVS(VS/DR)负载均衡
环境:用到了Client、Router、Director 1、Real 1、Real 2,其他机器关闭
1. 关闭Director 1的heartbeat,即执行service heartbeat stop
2. 在Director 1上执行yum -y install ipvsadm,Director 2也可以现在就装ipvsadm
3. 在Real 1和Real 2上的/etc/sysctl.conf文件里分别增加4行:
net.ipv4.conf.lo.arp_ignore = 1
net.ipv4.conf.lo.arp_announce = 2
net.ipv4.conf.all.arp_ignore = 1
net.ipv4.conf.all.arp_announce = 2
然后执行sysctl -p,使得立即生效。
4. 在Real 1和Real 2上分别安装httpd,并创建一个简单主页(便于区分)
5. 在Director 1上执行:
[root@node1 ~]# ipvsadm -A -t 192.168.60.200:80 -s wrr
[root@node1 ~]# ipvsadm -a -t 192.168.60.200:80 -r 192.168.60.151:80 -g -w 1
[root@node1 ~]# ipvsadm -a -t 192.168.60.200:80 -r 192.168.60.152:80 -g -w 2
然后执行ipvsadm -L查看是否已经增加成功
6. 测试:
在Client上仍然执行for i in `seq 1 1000`; do curl http://192.168.60.200/; sleep 1; done 查看是否能成功访问Real 1和Real 2的网页,正常情况下,应该是先访问Real 2的网页2次,然后再访问Real 1的网页1次,再访问Real 2的网页2次,如此循环下去。
实验三:Heartbeat+LVS(VS/DR)+Ldirectord
环境:用到了所有机器
1. 在node1和node2上分别执行yum -y install heartbeat-ldirectord
2. 获得heartbeat-ldirectord的相关默认配置文件,node2也一样配置
[root@node1 ~]# cd /usr/share/doc/heartbeat-ldirectord-2.1.3/
[root@node1 heartbeat-ldirectord-2.1.3]# cp ldirectord.cf /etc/ha.d
3. 将node1和node2的/etc/ha.d/haresources内容修改为:
node1 IPaddr::192.168.60.200/32/eth0:0 httpd ipvsadm ldirectord
4. 在node1和node2上创建/etc/sysconfig/ipvsadm文件,写入内容:
-A -t 192.168.60.200:80 -s wrr
-a -t 192.168.60.200:80 -r 192.168.60.151:80 -g -w 1
-a -t 192.168.60.200:80 -r 192.168.60.152:80 -g -w 2
5. node1和node2上的/etc/hosts内容均改为:
127.0.0.1 localhost.localdomain localhost
::1 localhost6.localdomain6 localhost6
192.168.60.132 node1
192.168.60.133 node2
192.168.60.151 real1
192.168.60.152 real2
6. node1和node2上的/etc/ha.d/ldirectord.cf内容均修改为:
checktimeout=5
checkinterval=2
#fallback=127.0.0.1:80
autoreload=yes
logfile="/var/log/ldirectord.log"
quiescent=no
virtual=192.168.60.200:80 #(以下行头均要Tab一下)
real=192.168.60.151:80 gate 1
real=192.168.60.152:80 gate 2
#fallback=127.0.0.1:80 gate
service=http
request=".healthcheck.html"
receive="successful"
#virtualhost=some.domain.com.au
scheduler=wrr
#persistent=20
#netmask=255.255.255.255
protocol=tcp
checktype=negotiate
checkport=80
#request="index.html"
#receive="Test Page"
#virtualhost=www.x.y.z
7. 在Real 1和Real 2的/var/www/html里建立.healthcheck.html文件(注意health前有个点),文件内容就一行successful
8. 在node1和node2上重启heartbeat:service heartbeat restart
9. 测试:
1) 在node1上执行ipvsadm -L查看是否有2个路由条目
2) node1上netstat -lntpu | grep httpd是否所有网卡监听,node2应该无此进程
3) node1上ifconfig,是否存在eth0:0,而node2上应该不存在
4) 在Client上for i in `seq 1 1000`; do curl http://192.168.60.200/; sleep 1; done 查看是否如实验二一样
5) 将node1的eth0拔掉,在Client上是否会呈现停止了一会,继而访问了node2,然后又开始访问Real 1与Real 2.此时node1上的eth0:0、httpd进程、ipvsadm -L应该都没有了,而node2上都有。
本文来自CSDN博客,转载请标明出处:http://blog.csdn.net/Loveychent/archive/2011/03/05/6226260.aspx
