CA搭建、自签名
1、判断UID是否大于等于500,如果为真就显示为普通用户,如果为假就显示为系统或管理用户
#!/bin/bash

if [ $# -lt 1 ];then
        echo "Usage: testuser.sh [username..]"
        exit 1
else
        for i in `seq $#`;do
                uid=`id ${!i} | cut -d' ' -f1| grep -o [[:digit:]]*`
                if [ $uid -ge 500 ];then
                        echo "${!i} is a normal user."
                else
                        echo "${!i} is a system user."
                fi
        done
fi
[root@localhost data]# ./testuser.sh mysql root wang
mysql is a system user.
root is a system user.
wang is a normal user.
2、显示用户id为奇数的用户
#!/bin/bash

while read line;do
        uid=`echo $line | awk -F: '{print $3}' `
        if [ $[$uid%2] -eq 0 ];then
                continue
        else
                echo $line| awk -F: '{print $1}'
        fi
done < /etc/passwd
[root@localhost data]# bash  checkuser.sh
bin
adm
sync
halt
operator
gopher
nobody
dbus
usbmuxd
rtkit
vcsa
abrt
rpcuser
postfix
pulse
user1
named
mysql
3、统计web服务访问日志中的ip访问量
[root@centos7 bin]# vim access.sh
#!/bin/bash

read -p "Please input the path of accesslogfile: " logfile
 awk  '{print $1}' $logfile  | sort -rn | uniq -c | sort -rn | head -10
[root@centos7 bin]# bash access.sh
Please input the path of accesslogfile: access.log
     40 172.18.254.70
     35 172.18.251.202
     10 172.18.253.55
      3 172.18.16.1
      1 172.18.252.194
      1 172.18.12.10
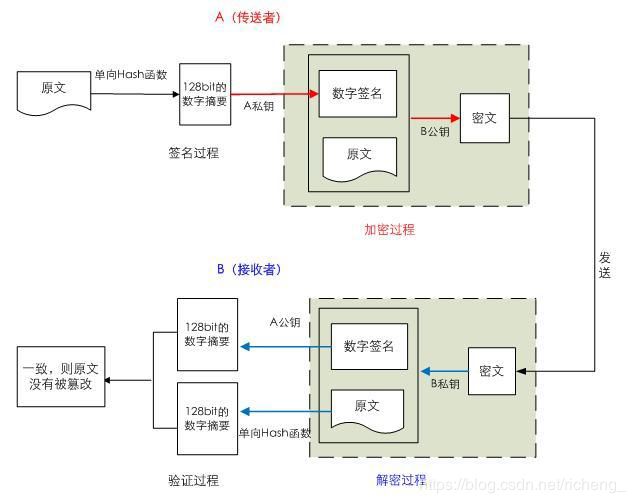
4、简述加密类型以及数据加密解密过程
加密根据其加密算法的不同一般分为两类,对称加密和非对称加密
- 对称加密
加密和解密使用同一个密钥,常见算法有DES,3DES,AES,IDEA等
特性:- 加密解密使用同一个密钥,效率相对较高
- 将原始数据分割成固定大小的块,逐个进行加密
缺陷: - 密钥过多,与每个用户进行通信都要有专用的密钥
- 密钥分发问题
- 数据来源无法确认
- 非对称加密
使用密钥对的方式进行加密,自己留有私钥,同时将公钥分发出去,当使用公钥对数据进行加密后,加密的数据只有用与公钥相匹配的私钥才能进行解密,同样的,当使用私钥进行加密后,仅有与私钥相匹配的公钥才可以进行解密,常见算法有RSA,DSA等
5、搭建私有CA并实现证书颁发
- openssl配置文件路径:/etc/pki/tls/openssl.cnf,其下为其中默认的CA配置,指定了CA的目录、证书、数据库、申请、编号、吊销文件、私钥的位置及名称
[ CA_default ]

dir             = /etc/pki/CA           # Where everything is kept
certs           = $dir/certs            # Where the issued certs are kept
crl_dir         = $dir/crl              # Where the issued crl are kept
database        = $dir/index.txt        # database index file.
#unique_subject = no                    # Set to 'no' to allow creation of
                                        # several ctificates with same subject.
new_certs_dir   = $dir/newcerts         # default place for new certs.

certificate     = $dir/cacert.pem       # The CA certificate
serial          = $dir/serial           # The current serial number
crlnumber       = $dir/crlnumber        # the current crl number
                                        # must be commented out to leave a V1 CRL
crl             = $dir/crl.pem          # The current CRL
private_key     = $dir/private/cakey.pem# The private key
- 创建CA
cd /etc/pki/CA/
(umask 066; openssl genrsa -out private/cakey.pem 2048) 					#生成私钥
touch index.txt 											#创建数据库索引文件
echo 01 > serial											#初始化数据库证书编号
cat serial
openssl req -new -x509 -key /etc/pki/CA/private/cakey.pem  -days 3650 -out /etc/pki/CA/cacert.pem 				#生成自签名证书
- 搭建好的CA目录结构应该如下所示
[root@localhost CA]# tree ./
./
├── cacert.pem          #自签名证书
├── certs
│   └── test.csr        #证书申请文件
├── crl
├── crlnumber           #证书吊销的下一个编号
├── crlnumber.old       #最后一个吊销证书的编号
├── crl.pem             #吊销证书列表
├── index.txt           #证书索引数据库文件
├── index.txt.attr
├── index.txt.attr.old
├── index.txt.old
├── newcerts
│   └── 01.pem          #已颁发的证书
├── private
│   └── cakey.pem       #私钥
├── serial              #下一个证书的编号
└── serial.old

4 directories, 13 files
- 生成证书申请
(umask 066; openssl genrsa –out /data/test.key 2048)
openssl req -new -key /data/test.key -out /data/test.csr
- 将证书请求文件传输给CA,使用scp等命令即可
- CA签署证书
openssl ca -in /tmp/test.csr –out /etc/pki/CA/certs/test.crt -days 100
- 查看证书中的信息
openssl x509 -in /etc/pki/CA/certs/test/crt -noout -text
openssl ca -status SERIAL
- 吊销证书
- 在客户端获取要吊销的证书的serial
openssl x509 -in /PATH/FROM/CERT_FILE -noout -serial -subject
- 在CA上,根据客户提交的serial与subject信息,对比检验是否与index.txt文件中的信息一致
openssl ca -revoke /etc/pki/CA/newcerts/SERIAL.pem
- 指定第一个吊销证书的编号,注意:第一次更新证书吊销列表前,才需要执行
echo 01 > /etc/pki/CA/crlnumber
- 更新证书吊销列表
openssl ca -gencrl -out /etc/pki/CA/crl.pem
- 查看crl文件
openssl crl -in /etc/pki/CA/crl.pem -noout -text
