深度学习DNNDK安装与使用
依赖库安装:
安装Caffe时,拷贝下面的命令即可
sudo apt-get install -y --force-yes build-essential autoconf libtool libopenblas-dev libgflags-dev libgoogle-glog-dev libopencv-dev protobuf-compiler libleveldb-dev liblmdb-dev libhdf5-dev libsnappy-dev libboost-all-dev libssl-dev
建议所有软件在虚拟环境下安装
conda的安装与使用(2019-6-28更新) - 简书
https://www.jianshu.com/p/edaa744ea47d
$ conda create -n decent pip python=3.6
$ conda env list
$ conda activate decent
$ source activate decent
#To deactivate an active environment, use
$ conda deactivate
删除虚拟环境conda env remove -n decent
If you’d prefer that conda’s base environment not be activated on startup, set the auto_activate_base parameter to false:
conda config --set auto_activate_base false
遵照文件UG1327 (v1.6) August 13, 2019进行安装,安装decent_q时,使用系统自带的.whl安装软件
https://forums.xilinx.com/t5/Deephi-DNNDK/decent-q-command-not-found/m-p/1000069#M1614
下面这段不再用作参考:
(如果网络慢,先从下面的网页下载.whl安装文件,用pip install进行离线安装
(decent)john@john-virtual-machine:~/xilinx_dnndk_v3.1/host_x86/decent-tf/ubuntu16.04$ pip install tensorflow-1.12.0-cp36-cp36m-linux_x86_64.whl
https://storage.googleapis.com/tensorflow/linux/gpu/tensorflow_gpu-1.12.0-cp36-cp36m-linux_x86_64.whl
https://storage.googleapis.com/tensorflow/linux/cpu/tensorflow-1.12.0-cp36-cp36m-linux_x86_64.whl)
地址解析:
如果不能解析网址,出现下面错误
E: Failed to fetch
http://us.archive.ubuntu.com/ubuntu/pool/main/u/usb-creator/usb-creator-gtk_0.3.2ubuntu16.04.2_amd64.deb Temporary failure resolving ‘us.archive.ubuntu.com’
需要在sudo vi /etc/resolv.conf文件中增加下面两个解析服务器
nameserver 202.96.134.133
nameserver 8.8.8.8
如果出现上不了网,用ifconfig发现没有IP地址和网卡,可能是没有正确配置DHCL服务器,用下面的命令可以正常启用网络,
john@john-virtual-machine:~$ service network-manager stop
john@john-virtual-machine:~$ service network-manager restart
john@john-virtual-machine:~$ sudo dhclient
出现如下的dpkg returned an error code时,
dpkg: error processing package python2.7 (–configure):
E: Sub-process /usr/bin/dpkg returned an error code (1)
解决方法是:
1、sudo mv /var/lib/dpkg/info/ /var/lib/dpkg/info_old/
2、sudo mkdir /var/lib/dpkg/info/
3、sudo apt-get update
4、sudo apt-get -f install
解决package ~ is not configured yet - yao201606的博客 - CSDN博客 https://blog.csdn.net/yao201606/article/details/76208644/
https://unix.stackexchange.com/questions/139586/e-sub-process-usr-bin-dpkg-returned-an-error-code-1-what-does-this-mean
DNNDK软件安装
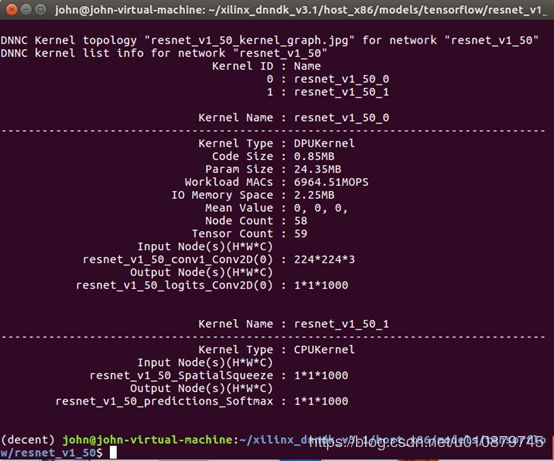
After downloading and unpacking the DNNDK package, execute the sudo ./install.sh command
under the host_x86 folder to install the DECENT,DNNC, DDump and DLet tools on the host.
(base) john@john-virtual-machine:~/xilinx_dnndk_v3.1/host_x86$ sudo ./install.sh
[system version]
No LSB modules are available.
16.04
Begin to install Xilinx DNNDK tools on host …
Complete dnnc installation successfully.
Complete CPU version of decent for caffe installation successfully.
The host system environment supported by GPU version of decent for caffe is as follows:
1 - Ubuntu 14.04 + CUDA 8.0 + cuDNN 7.05
2 - Ubuntu 16.04 + CUDA 8.0 + cuDNN 7.05
3 - Ubuntu 16.04 + CUDA 9.0 + cuDNN 7.05
4 - Ubuntu 16.04 + CUDA 9.1 + cuDNN 7.05
5 - Ubuntu 18.04 + CUDA 10.0 + cuDNN 7.41
But does not meet the above environment.
The GPU version of decent for caffe installation failed.
Host Package:
decent dnnc - --version, dnnc --version, dlet --version and ddump –version
Target Package:
dexplorer -v.
更换镜像源:
用清华的镜像代替美国镜像
(1条消息)Ubuntu 16.04配置国内高速apt-get更新源 - Naruto Inspire 的博客 - CSDN博客 https://blog.csdn.net/NarutoInspire/article/details/82184605
卸载tensorflow
pip uninstall tensorflow
安装指定版本tensorflow
(decent) john@john-virtual-machine:~$ conda install tensorflow==1.12.00
(decent) john@john-virtual-machine:~$ python
Python 3.6.9 |Anaconda, Inc.| (default, Jul 30 2019, 19:07:31)
import tensorflow
注意calibration.txt文件与实际相符,对于文件,caffe必须带label,tensorflow不能带label。
遇到文件夹的读写限制时,用下面的命令增加读写权限:
sudo chmod -R 777 /home/john/xilinx_dnndk_v3.1/host_x86/m
odels/caffe/resnet50/data

图像分辨率问题:
若运行decent_q问题,可参考
source: “./data/imagenet_256/calibration.txt”
注意每幅图像分辨率必须大于224x224
root_folder: “./data/imagenet_256/calibration_images/”
出现ValueError: setting an array element with a sequence问题时,一般是输入图像分辨率低于224x224所致
np.asarray(subfeed_val, dtype=subfeed_dtype)
ValueError: setting an array element with a sequence
修改过的程序见附录。
参考文献:
https://forums.xilinx.com/t5/Deephi-DNNDK/trouble-using-decent-sh/m-p/987651
https://stackoverflow.com/questions/34156639/tensorflow-python-valueerror-setting-an-array-element-with-a-sequence-in-t
https://forums.xilinx.com/t5/Deephi-DNNDK/failed-to-excute-decent-q-sh-in-tensorflow-version/td-p/978663
https://www.guru99.com/tensor-tensorflow.html
https://www.tensorflow.org/tutorials/load_data/tfrecord
https://stackoverflow.com/questions/34156639/tensorflow-python-valueerror-setting-an-array-element-with-a-sequence-in-t
定点编译:
sh decent_q.sh
100% (4 of 4) |##########################| Elapsed Time: 0:05:20 Time: 0:05:20
INFO: Calibration Done.
INFO: Generating Deploy Model…
********************* Quantization Summary *********************
INFO: Output:
quantize_eval_model: ./quantize_results/quantize_eval_model.pb
deploy_model: ./quantize_results/deploy_model.pb

sh dnnc_Ultra96.sh


Ultra96交叉编译:
aarch64-linux-gnu-gcc -fPIC -shared dpu_resnet50_*.elf -o libdpumodelresnet50.so
make
sudo sh resnet50.sh
附录:
改变默认python指向
,用进入bin, 使用ll命令,可以看到默认的python指向2.7
/usr/bin$ ll
Aug 20 04:59 python -> python2.7*
Aug 20 04:59 python2 -> python2.7*
Aug 22 12:43 python2.7*
Aug 20 04:59 python3 -> python3.5*
用下面的命令可以改变python指向
sudo rm python
sudo rm -r python2
sudo rm -r python2.7
也可以用下面的方法卸载
sudo apt-get remove --purge python3.5
重新创建新指向 python:ln -s /usr/local/bin/python3 python
ls -l /usr/bin | grep python
python3.6
sudo ln -s /usr/bin/python3.6 /usr/bin/python
![]()
寻找文件的确切位置
1.whereis 文件名 特点:快速,但是是模糊查找
例如:whereis php #会把php,php.ini,php.*所在的目录都找出来.
2.find / -name 文件名
例如:如果想找到php.ini的准确位置,需要用#find / -name php.ini
3.locate 文件名 最快,最好的方法.
网上搜索安装库文件的网址
apt-cache search openblas
补齐图像文件分辨率时,可使用
np.pad()
np.expand_dims
图像输入相关程序:
def eval_input(iter, eval_image_dir, eval_image_list, class_num, eval_batch_size):
images = []
labels = []
eval_image_dir = “/home/john/xilinx_dnndk_v3.1/common/imagenet_image/img_val/” #add
eval_image_list = “/home/john/xilinx_dnndk_v3.1/common/imagenet_image/val.txt” #add
line = open(eval_image_list).readlines()
for index in range(0, eval_batch_size):
curline = line[iter * eval_batch_size + index]
[image_name, label_id] = curline.split(’ ‘)
image = cv2.imread(eval_image_dir + image_name)
minshape = min(image.shape[0],image.shape[1])
index1=index
while minshape < 224:
index1 += 1
curline = line[iter * eval_batch_size + index1]
[image_name, label_id] = curline.split(’ ')
image = cv2.imread(eval_image_dir + image_name)
minshape = min(image.shape[0],image.shape[1])
print(“i=%d %s” %(index,image_name))
print(image.shape)
image = central_crop(image, 224, 224)
image = mean_image_subtraction(image, MEANS)
images.append(image)
labels.append(int(label_id))
lb = preprocessing.LabelBinarizer()
lb.fit(range(0, class_num))
labels = lb.transform(labels)
return {“input”: images, “labels”: labels}

