如何在Ubuntu 18.04上安装Java
Java is a general purpose, object-oriented and high-level programming language developed by Sun Microsystems way back in 1995. Today Java is commonly used for developing and delivering content on the web apart from powering many popular applications. In this tutorial, we will explore how to install Java on Ubuntu 18.04.
Java是Sun Microsystems于1995年开发的一种通用的,面向对象的高级编程语言。如今,除了支持许多流行的应用程序外,Java还通常用于在Web上开发和交付内容。 在本教程中,我们将探讨如何在Ubuntu 18.04上安装Java。
Before we dive in details about installing Java in Ubuntu 18.04, let us quickly understand a few terminologies associated with Java.
在深入探讨在Ubuntu 18.04中安装Java的细节之前,让我们快速了解与Java相关的一些术语。
JRE: If you are not a programmer and intends to run Java based applications only then you need Java Runtime Environment.
JRE:如果你不是一个程序员,并打算运行基于Java的应用程序只,那么你需要的J ava [R不定时ênvironment。
JDK: Java Development Kit is needed if you want to do some sort of programming or develop applications using Java in addition to running Java applications. JDK contains few more tools and components than standalone JRE those are needed for developing Java applications.
JDK: 的J ava d才有发展k如果你想要做某种编程或开发除了正在运行的Java应用程序中使用的Java应用程序需要它。 与开发Java应用程序所需的独立JRE相比,JDK包含的工具和组件很少。
OpenJDK: OpenJDK is free and open-source implementation of the Java SE Platform Edition(7) and was first released in 2007.
OpenJDK: OpenJDK是Java SE Platform Edition(7)的免费开放源代码实现,于2007年首次发布。
OracleJDK: Oracle’s JDK is the official version of Java Development Kit from Oracle and is targeted more towards an enterprise audience due to its stability and commercial support. The long term support (LTS) releases of OracleJDK are planned in every three years.
OracleJDK: Oracle的JDK是Oracle Java开发工具包的正式版本,由于其稳定性和商业支持,它更面向企业用户。 OracleJDK的长期支持(LTS)版本计划每三年发布一次。
先决条件 (Prerequisites)
- You can open a SSH session in your Ubuntu 18.04 system using
rootor asudoenabled user. 您可以使用root或启用sudo用户在Ubuntu 18.04系统中打开SSH会话。
在Ubuntu上安装默认Java (Install default Java on Ubuntu)
OpenJDK 11 is the default Java package in Ubuntu 18.04 LTS at the time of writing this tutorial. Remember OpenJDK package contains an open-source variant of both JRE and JDK. Let us find out how to install JRE, JDK or both of them one by one from the default OpenJDK package.
在编写本教程时, OpenJDK 11是Ubuntu 18.04 LTS中的默认Java软件包。 请记住,OpenJDK软件包包含JRE和JDK的开源变体。 让我们了解如何从默认的OpenJDK软件包中一一安装JRE,JDK或两者。
To start with, update the package index in your system:
首先,更新系统中的软件包索引:
# apt updateNow check if Java is already installed by typing the following command from the terminal:
现在,通过从终端输入以下命令来检查是否已经安装了Java:
# java -versionIf Java is not installed in your system then you will see the following output in the terminal:
如果您的系统中未安装Java,那么您将在终端中看到以下输出:

Java Version
Java版本
To install default JRE, issue the following command in the terminal:
要安装默认的JRE,请在终端中发出以下命令:
# apt install default-jreNow you will be able to run Java applications in your system using JRE. To verify the installation of JRE, find the version of Java.
现在,您将能够使用JRE在系统中运行Java应用程序。 要验证JRE的安装,请找到Java的版本。
# java -version
OpenJDK Version
OpenJDK版本
If you are interested in doing some sort of programming or development using Java then you need to install JDK that contains JRE as well. Run the following command in the terminal to install default JDK.
如果您对使用Java进行某种编程或开发感兴趣,则需要安装包含JRE的JDK。 在终端中运行以下命令以安装默认JDK。
# apt install default-jdkTo verify the installation of default JDK, find the version Java compiler which is javac.
要验证默认JDK的安装,请找到版本为Javac的Java编译器。
# javac -version
Javac Version
Javac版本
The installation of JRE/JDK from OpenJDK package is complete. If you are interested in setting up OracleJDK then follow the procedures in the next step.
从OpenJDK软件包完成JRE / JDK的安装。 如果您对设置OracleJDK感兴趣,请遵循下一步中的步骤。
在Ubuntu上安装OracleJDK (Install OracleJDK on Ubuntu)
To use Oracle Java, you need to buy a commercial license for the production environment. But it’s free for developmental use. Therefore you need to accept terms and conditions for non-commercial use at the time of installing OracleJDK.
要使用Oracle Java,您需要购买生产环境的商业许可证。 但是它是免费的,可供开发使用。 因此,在安装OracleJDK时,您需要接受非商业使用的条款和条件。
Before you begin, update the package list in your system to the latest:
在开始之前,请将系统中的软件包列表更新为最新版本:
# apt updateTo install latest OracleJDK, you need to add LinuxUprising Java PPA repository in your system. The script from this repository downloads and installs latest Java automatically from Oracle’s site.
要安装最新的OracleJDK,您需要在系统中添加LinuxUprising Java PPA存储库。 该存储库中的脚本从Oracle站点自动下载并安装最新的Java。
Add the LinuxUprising PPA to your system but before that, you need to install a dependency (software-properties-common) that will enable you to add the repository in your system. To do that, issue the following commands from the terminal:
将LinuxUprising PPA添加到系统中,但是在此之前,您需要安装一个依赖项(software-properties-common) ,该依赖关系使您能够在系统中添加存储库。 为此,请从终端发出以下命令:
# apt install software-properties-common
# add-apt-repository ppa:linuxuprising/java
Now that the repository for OracleJDK has been added, install it by typing following command from the terminal:
现在已经添加了OracleJDK的存储库,通过从终端输入以下命令来安装它:
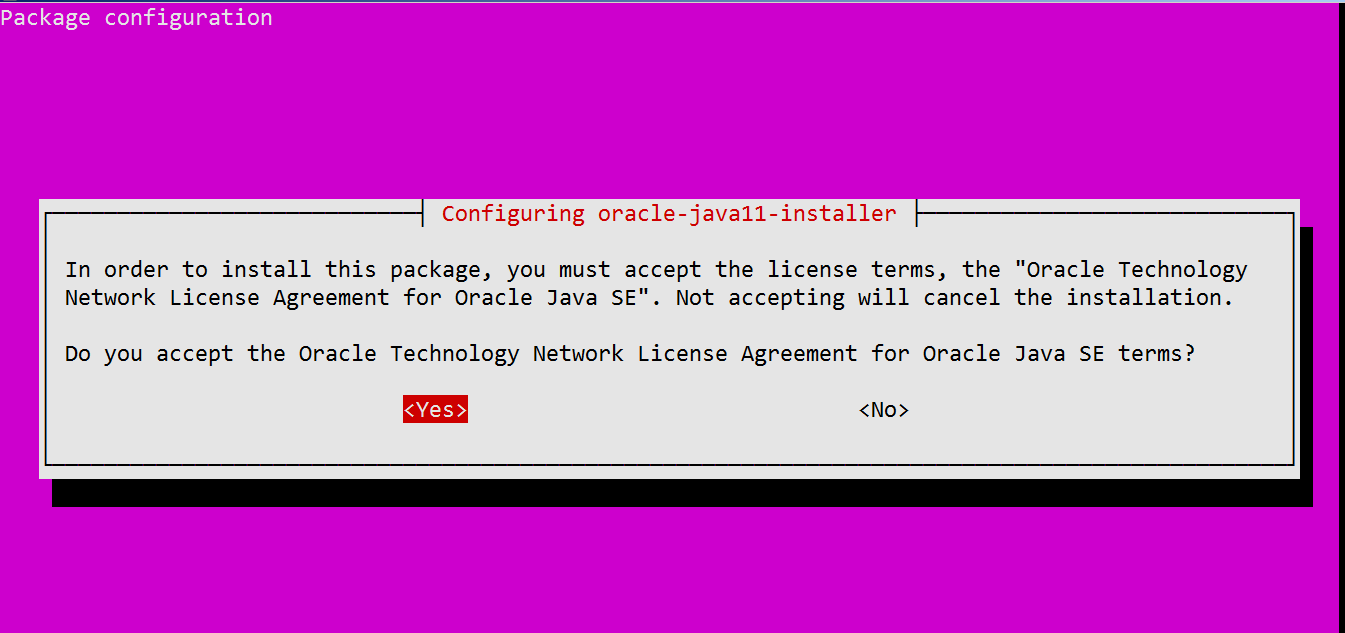
# apt install oracle-java11-installerYou will be prompted to accept Oracle’s license/terms and condition twice. Use the arrow key to navigate to ‘Ok’ and ‘Yes’ and press Enter.
系统将提示您两次接受Oracle的许可/条款和条件。 使用箭头键导航到“确定”和“是”,然后按Enter。

Accept Oracle License Aggrement
接受Oracle许可协议
Accept Oracle License Aggrement Again
再次接受Oracle许可协议
Once you have accepted the license, OracleJDK will be installed within a minute. If you have installed OpenJDK previously as well and want to make OracleJDK as the system default then run the following command from the terminal:
接受许可证后,将在一分钟内安装OracleJDK。 如果您以前也安装过OpenJDK,并且想将OracleJDK设置为系统默认值,则从终端运行以下命令:
# apt install oracle-java11-set-defaultTo verify the installation process, type the following command in the terminal to find the version of Java:
要验证安装过程,请在终端中键入以下命令以查找Java版本:
# java -version
OracleJDK Version
OracleJDK版本
At this point, installation of OracleJDK will be complete in your Ubuntu 18.04 system. Next, proceed with setting home of java by applying the following step.
至此,OracleJDK的安装将在您的Ubuntu 18.04系统中完成。 接下来,通过应用以下步骤继续设置Java的主页。
在Ubuntu上设置JAVA_HOME (Seting JAVA_HOME on Ubuntu)
It is always a good practice to set Java’s home environment once you have installed it. To do that, you need to find the path of installed Java. It is very much easy to find the path of installed Java by using update-alternatives command. To find the path, run the following command from the terminal:
一旦安装了Java的家庭环境,这始终是一个好习惯。 为此,您需要找到已安装的Java的路径。 使用update-alternatives命令查找已安装的Java的路径非常容易。 要查找路径,请在终端上运行以下命令:
# update-alternatives --config java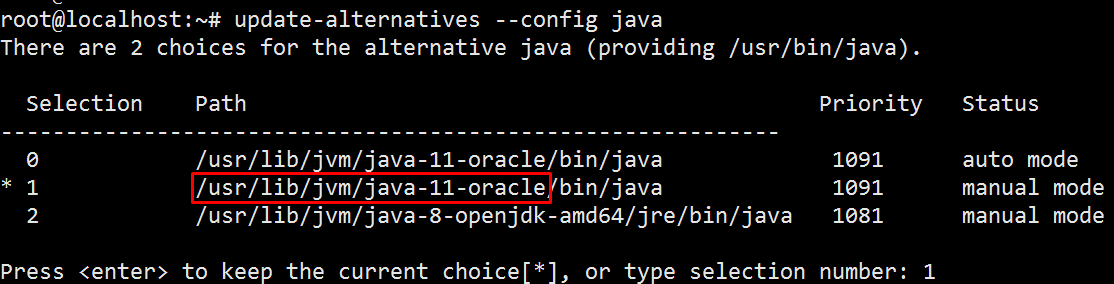
Java Home
Java主页
Copy the marked path (just before bin) from highlighted line and set the JAVA_HOME variable by pointing it to the copied path in the file /etc/profile.
从突出显示的行复制标记的路径(在bin之前),并通过将JAVA_HOME变量指向文件/etc/profile的复制路径来进行设置。
# vi /etc/profile
...
...
export JAVA_HOME=/usr/lib/jvm/java-11-oracle/
...
...
Save the file and reload the system settings defined in /etc/profile by using source command:
使用source命令保存文件并重新加载在/etc/profile定义的系统设置:
# source /etc/profileTo verify the setting of Java home, echo the variable in the terminal:
要验证Java home的设置,请在终端中回显该变量:
# echo $JAVA_HOME
/usr/lib/jvm/java-11-oracle
Echo Java Home
Echo Java主页
在Ubuntu上管理多个Java版本 (Manage multiple Java Versions on Ubuntu)
If you are running multiple version of Java in your system then it is possible to choose a default version for use by using update-alternatives command. To do that, run the following command from the terminal:
如果您在系统中运行Java的多个版本,则可以使用update-alternatives命令选择要使用的默认版本。 为此,请从终端运行以下命令:
# update-alternatives --config javaThe above command will list each installed version of Java along with installation path like the following.
上面的命令将列出每个Java安装版本以及安装路径,如下所示。

Update Alternative Configure Java
更新替代配置Java
The highlighted selection is the current default version of java in your system. To change the default java, type the selection number and press enter. If you change the default java then change the JAVA_HOME system variable accordingly.
高亮显示的选择是系统中Java的当前默认版本。 要更改默认的Java,请输入选择号,然后按Enter。 如果更改默认Java,则相应地更改JAVA_HOME系统变量。
摘要 (Summary)
That’s it! By now you have installed java in your Ubuntu 18.04 system. It is also advisable to set the home for Java since it is mandatory for running an application like Apache Tomcat, Confluence and so on. Hope you have liked the post and Thanks for going through it!
而已! 至此,您已经在Ubuntu 18.04系统中安装了Java。 还建议为Java设置主目录,因为运行诸如Apache Tomcat,Confluence等应用程序是强制性的。 希望您喜欢这篇文章,并感谢您的关注!
翻译自: https://www.journaldev.com/29623/install-java-ubuntu