Android自定义ViewGroup实战-----流式布局
本文是参考了鸿神之后的文章之后做的一些修改与总结,添加了一些自己的笔记,增加对自定义ViewGroup的理解。文章后面会给出原文地址。
首先,什么是流式布局(FlowLayout),我个人的理解就是各个宽高不完全相同的view控件之间按照一定的规律放置,当一行或者一列中放满了控件,再放置下一个控件时,由于空间宽度或者高度不够,会自动放置到下一行或者下一列。比较常见的应用是一些热门标签,精彩评论等。比如下图中的尺寸大小标签。
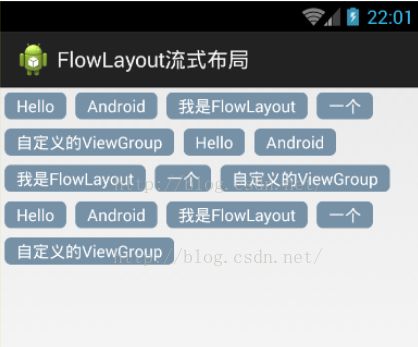
其中上图中的尺寸大小作为一个整体的ViewGroup,其中放置着各个子控件,由于他们宽度大小不一,不能很好的运用现有的布局来实现,而自定义的流式ViewGroup很好的可以实现。
相比于自定义View,最重要的是onDraw()方法,自定义的ViewGroup最重要的是onMeasure(),onLayout()。一个是帮助我们去测量整个ViewGroup的子控件,另一个是帮助我们去在我们的ViewGroup中去放置我们的子控件。
1.整体分析
1、由于每一个ViewGroup都对应着一个LayoutParams,都需要指定一个LayoutParams,对于FlowLayout,我们目前只需要能够识别控件之间的margin即可,即使用MarginLayoutParams.
2、onMeasure中计算所有childView的宽和高,然后根据childView的宽和高,计算自己的宽和高。(当然,如果父控件的宽或者高不是wrap_content,直接使用父ViewGroup传入的计算值即可)
3、onLayout中对所有的childView进行布局。
2.LayoutParams
因为我们只需要支持margin,所以直接使用系统的MarginLayoutParams,重写其中的generateLayoutParams方法
@Override
public ViewGroup.LayoutParams generateLayoutParams(AttributeSet attrs)
{
    return new MarginLayoutParams(getContext(), attrs);
} onMeasure完成对所有子控件的测量
/**
     * 负责设置子控件的测量模式和大小 根据所有子控件设置自己的宽和高
     */
    @Override
    protected void onMeasure(int widthMeasureSpec, int heightMeasureSpec)
    {
        super.onMeasure(widthMeasureSpec, heightMeasureSpec);
        // 获得它的父容器为它设置的测量模式和大小
        int sizeWidth = MeasureSpec.getSize(widthMeasureSpec);
        int sizeHeight = MeasureSpec.getSize(heightMeasureSpec);
        int modeWidth = MeasureSpec.getMode(widthMeasureSpec);
        int modeHeight = MeasureSpec.getMode(heightMeasureSpec);

        Log.e(TAG, sizeWidth + "," + sizeHeight);

        // 如果是warp_content情况下,记录宽和高
        int width = 0;
        int height = 0;
        /**
         * 记录每一行的宽度,width不断取最大宽度
         */
        int lineWidth = 0;
        /**
         * 每一行的高度,累加至height
         */
        int lineHeight = 0;

        int cCount = getChildCount();

        // 遍历每个子元素
        for (int i = 0; i < cCount; i++)
        {
            View child = getChildAt(i);
            // 测量每一个child的宽和高
            measureChild(child, widthMeasureSpec, heightMeasureSpec);
            // 得到child的lp
            MarginLayoutParams lp = (MarginLayoutParams) child
                    .getLayoutParams();
            // 当前子空间实际占据的宽度
            int childWidth = child.getMeasuredWidth() + lp.leftMargin
                    + lp.rightMargin;
            // 当前子空间实际占据的高度
            int childHeight = child.getMeasuredHeight() + lp.topMargin
                    + lp.bottomMargin;
            /**
             * 如果加入当前child,则超出最大宽度,则的到目前最大宽度给width,类加height 然后开启新行
             */
            if (lineWidth + childWidth > sizeWidth-getPaddingLeft()-getPaddingRight())
            {
                width = Math.max(lineWidth, width);// 取最大的
                lineWidth = childWidth; // 重新开启新行,开始记录
                // 叠加当前高度,
                height += lineHeight;
                // 开启记录下一行的高度
                lineHeight = childHeight;
            } else
            // 否则累加值lineWidth,lineHeight取最大高度
            {
                lineWidth += childWidth;
                lineHeight = Math.max(lineHeight, childHeight);
            }
            // 如果是最后一个,则将当前记录的最大宽度和当前lineWidth做比较
            if (i == cCount - 1)
            {
                width = Math.max(width, lineWidth);
                height += lineHeight;
            }

        }
        setMeasuredDimension((modeWidth == MeasureSpec.EXACTLY) ? sizeWidth
                : width, (modeHeight == MeasureSpec.EXACTLY) ? sizeHeight
                : height);

} 其中第48行是考虑到假如我们父ViewGroup使用了padding这一属性的话,那么我们就得减去这个值。
第50行,原文中写的是 width = Math.max(lineWidth, childWidth);// 取最大的 这样会有个问题,假如第一行最宽,后面逐渐变小,那么我们取的width也就有问题了,故修改过来。
还有第63到第67行,因为在计算最后一个控件时,不管换行不换行,我们都没有比较最后一个控件的宽(假如没换行)和将最后一个控件的高度加上去(假如是换行了)
4.onLayout()方法
onLayout中完成对所有childView的位置以及大小的指定
/**
     * 存储所有的View,按行记录
     */
    private List> mAllViews = new ArrayList>();
    /**
     * 记录每一行的最大高度
     */
    private List mLineHeight = new ArrayList();
    @Override
    protected void onLayout(boolean changed, int l, int t, int r, int b)
    {
        mAllViews.clear();
        mLineHeight.clear();

        int width = getWidth();

        int lineWidth = 0;
        int lineHeight = 0;
        // 存储每一行所有的childView
        List lineViews = new ArrayList();
        int cCount = getChildCount();
        // 遍历所有的孩子
        for (int i = 0; i < cCount; i++)
        {
            View child = getChildAt(i);
            MarginLayoutParams lp = (MarginLayoutParams) child
                    .getLayoutParams();
            int childWidth = child.getMeasuredWidth();
            int childHeight = child.getMeasuredHeight();

            // 如果已经需要换行
            if (childWidth + lp.leftMargin + lp.rightMargin + lineWidth > width-getPaddingLeft()-getPaddingRight())
            {
                // 记录这一行所有的View以及最大高度
                mLineHeight.add(lineHeight);
                // 将当前行的childView保存,然后开启新的ArrayList保存下一行的childView
                mAllViews.add(lineViews);
                lineWidth = 0;// 重置行宽
                lineViews = new ArrayList();
            }
            /**
             * 如果不需要换行,则累加
             */
            lineWidth += childWidth + lp.leftMargin + lp.rightMargin;
            lineHeight = Math.max(lineHeight, childHeight + lp.topMargin
                    + lp.bottomMargin);
            lineViews.add(child);
        }
        // 记录最后一行
        mLineHeight.add(lineHeight);
        mAllViews.add(lineViews);

        int left = getPaddingLeft();
        int top = getPaddingTop();
        // 得到总行数
        int lineNums = mAllViews.size();
        for (int i = 0; i < lineNums; i++)
        {
            // 每一行的所有的views
            lineViews = mAllViews.get(i);
            // 当前行的最大高度
            lineHeight = mLineHeight.get(i);

            Log.e(TAG, "第" + i + "行 :" + lineViews.size() + " , " + lineViews);
            Log.e(TAG, "第" + i + "行, :" + lineHeight);

            // 遍历当前行所有的View
            for (int j = 0; j < lineViews.size(); j++)
            {
                View child = lineViews.get(j);
                if (child.getVisibility() == View.GONE)
                {
                    continue;
                }
                MarginLayoutParams lp = (MarginLayoutParams) child
                        .getLayoutParams();

                //计算childView的left,top,right,bottom
                int lc = left + lp.leftMargin;
                int tc = top + lp.topMargin;
                int rc =lc + child.getMeasuredWidth();
                int bc = tc + child.getMeasuredHeight();

                Log.e(TAG, child + " , l = " + lc + " , t = " + t + " , r ="
                        + rc + " , b = " + bc);

                child.layout(lc, tc, rc, bc);

                left += child.getMeasuredWidth() + lp.rightMargin
                        + lp.leftMargin;
            }
            left = getPaddingLeft();
            top += lineHeight;
        }

    }
mLineHeight记录的为每行的最大高度。
23-48行,遍历所有的childView,用于设置allViews的值,以及mLineHeight的值。
57行,根据allViews的长度,遍历所有的行数
67-91行,遍历每一行的中所有的childView,对childView的left , top , right , bottom 进行计算,和定位。
92-93行,重置left和top,准备计算下一行的childView的位置。
好了,到此完成了所有的childView的绘制区域的确定,到此,我们的FlowLayout的代码也结束了
由于考虑到了padding,第32行要减去padding的大小,53、54行初始的left和top值也要相应的变化,同理第92行

左边是getHeight,右边是getMeasureHeight
5.布局文件如下
其中用到了style文件,节省了我们重复定义的时间,要修改时,我们只用修改这一个就好
style.xml
6.动态添加View
当然,最后你的控件多半也不是固定大小的,你也初始不知道的,那得要动态添加。
那我们把布局文件改下,改成只有一个父ViewGroup,其余控件我们动态添加。其中在要添加的Activity的onCreate方法中添加initView()方法
private void initView() {
		myFlowLayout = (MyFlowLayout) findViewById(R.id.myFlowLayout);
		// ViewGroup.MarginLayoutParams lp = new ViewGroup.MarginLayoutParams(
		// ViewGroup.LayoutParams.WRAP_CONTENT,
		// ViewGroup.LayoutParams.WRAP_CONTENT);
		// lp.leftMargin = 35;
		// lp.rightMargin = 35;
		// lp.topMargin = 10;
		// lp.bottomMargin = 10;
		// for (int i = 0; i < str.length; i++) {
		// Button btn=new Button(this);
		// btn.setText(str[i]);
		// myFlowLayout.addView(btn,lp);
		// }
		LayoutInflater mInflater = LayoutInflater.from(this);
		for (int i = 0; i < str.length; i++) {
			TextView tv = (TextView) mInflater.inflate(R.layout.myview,
					myFlowLayout, false);
			tv.setText(str[i]);
			tv.setTag(i);
			tv.setOnClickListener(this);
			myFlowLayout.addView(tv);

		}
	}
其中我们用到了LayoutInflater,它可以将我们的xml布局文件转变为view,这是动态添加的基础。
7.添加点击事件
可能你会对各个textView有点击事件的要求,我们可以使用setTag方法。后期根据tag来区分不同的textView。@Override
public void onClick(View v) {
reSetTextBg();
switch ((int) v.getTag()) {
case 0:
v.setBackgroundColor(0xffff0000);
break;
case 1:
v.setBackgroundColor(0xffff0000);
break;
case 2:
v.setBackgroundColor(0xffff0000);
break;
default:
break;
}
}
//重置标签颜色
private void reSetTextBg() {
for (int i = 0; i < str.length; i++) {
TextView tView = (TextView) myFlowLayout.getChildAt(i);
tView.setBackground(getResources().getDrawable(
R.drawable.my_textview_bg));
}
}
文章参考
1.http://blog.csdn.net/lmj623565791/article/details/38352503
2.http://blog.csdn.net/lmj623565791/article/details/38339817
源码地址,点我下载
好了,全文结束,有什么问题,好的想法,欢迎留言指出!
另:如果你觉得本篇博客对你有用,那么就顶一个~~