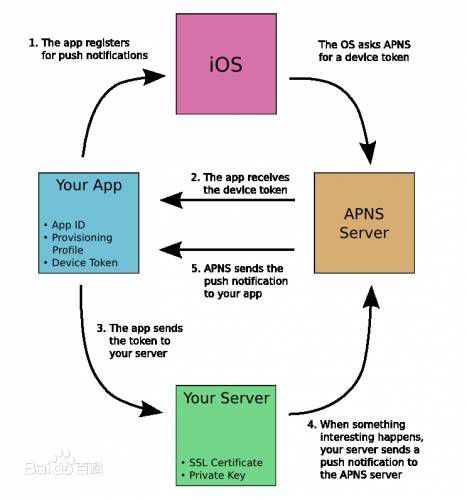
iOS远程推送代码分析
推送步骤分为:
1.注册推送
2.接收推送
3.处理推送
以上的步骤都是在AppDelegate内完成。
1.注册推送
- (BOOL)application:(UIApplication *)application didFinishLaunchingWithOptions:(NSDictionary *)launchOption在上面这个方法中执行注册推送:
//if >= iOS 8.0
[[UIApplication sharedApplication] registerUserNotificationSettings:[UIUserNotificationSettings settingsForTypes:UIUserNotificationTypeAlert|UIUserNotificationTypeBadge|UIUserNotificationTypeSound categories:nil]];
        [[UIApplication sharedApplication] registerForRemoteNotifications];
    } else {
        [[UIApplication sharedApplication] registerForRemoteNotificationTypes:(UIRemoteNotificationTypeAlert|UIRemoteNotificationTypeBadge|UIRemoteNotificationTypeSound)];
    }

//else
[[UIApplication sharedApplication] registerForRemoteNotificationTypes:(UIRemoteNotificationTypeAlert|UIRemoteNotificationTypeBadge|UIRemoteNotificationTypeSound)];UIUserNotificationSettings配置推送通知类型(声音,badge,通知条)
registerForRemoteNotifications执行推送注册操作,官方文档中对它的解释为“Register to receive remote notifications via Apple Push Notification service”
然后还有一段解释:
> Call this method to initiate the registration process with Apple Push Notification service. If registration succeeds, the app calls your app delegate object’s application:didRegisterForRemoteNotificationsWithDeviceToken:method and passes it a device token. You should pass this token along to the server you use to generate remote notifications for the device. If registration fails, the app calls its app delegate’s application:didFailToRegisterForRemoteNotificationsWithError:method instead.
>If you want your app’s remote notifications to display alerts, play sounds, or perform other user-facing actions, you must call the registerUserNotificationSettings: method to request the types of notifications you want to use. If you do not call that method, the system delivers all remote notifications to your app silently. Because the registration process takes into account the user’s preferred notification settings, requesting access to user-facing notification types also does not guarantee that they will be granted. To find out what notification settings are available, use the currentUserNotificationSettings method.
通过APNS注册推送通知,如果注册成功就会执行application:didRegisterForRemoteNotificationsWithDeviceToken:如果调用失败就执行application:didFailToRegisterForRemoteNotificationsWithError:,且调用成功后,会将device token返回,然后用这个token去注册到自己的推送服务器,就可以进行推送。
- (void)application:(UIApplication *)application didRegisterForRemoteNotificationsWithDeviceToken:(NSData *)deviceToken {
//use deviceToken to register your own push server
}
以上就是推送注册过程。
2.接收推送
App有三种状态:未启动状态,后台,前台。
当App处于后两种状态时,接收到推送系统会调用一下两个delegate:
- (void)application:(UIApplication *)application didReceiveRemoteNotification:(NSDictionary *)userInfo
- (void)application:(UIApplication *)application didReceiveRemoteNotification:(NSDictionary *)userInfo fetchCompletionHandler:(void (^)(UIBackgroundFetchResult result))completionHandler
推送的消息内容都保存在了userInfo中,当接收到通知时,通过解析userInfo来执行对应的操作。
第二个方法根据苹果给出的文档,系统给出30s的时间对推送的消息进行处理,此后就会运行CompletionHandler程序块。
当App处于未启动状态时,推送就不会触发上面两个方法。这个时候如果点击通知栏,启动App后,可以在- (BOOL)application:(UIApplication *)application didFinishLaunchingWithOptions:(NSDictionary *)launchOptions捕获推送通知。
推送消息会保存在launchOptions中,获取方法:NSDictionary *userInfo = [launchOptions objectForKey:UIApplicationLaunchOptionsRemoteNotificationKey];,解析userInfo数据,此处的userInfo数据与上面两个方法中捕获的是一样的内容。
3.处理推送
知道了接收推送的时机,就需要自己创建一个方法来处理推送,其实主要就是通过解析userInfo中的内容,如果推送服务器是自己搭建的,就可以自定义一些字段。
userInfo的默认结构是:
{
“aps” : {
“alert” : “You got your emails.”,
“badge” : 9,
“sound” : “bingbong.aiff”
“acme1” : “bar”,
“acme2” : 42
}
也可以自定义其中的结构。
如果推送消息会改变badge的数字的话,在处理推送的方法中,还要记得对badge进行处理
int badge = [UIApplication sharedApplication].applicationIconBadgeNumber;
        if (badge>0) {
           //如果应用程序消息通知标记数(即小红圈中的数字)大于0,清除标记。
            badge--;
          //清除标记。清除小红圈中数字,小红圈中数字为0,小红圈才会消除。
            [UIApplication sharedApplication].applicationIconBadgeNumber = badge;
}参考文献:
APNS百度百科
IOS 基于APNS消息推送原理与实现(JAVA后台)
