Java与RabbitMQ交互实战教程之Rabbit Java Client(二)
在前面(RabbitMQ介绍)已经介绍了RabbitMQ的基本概念,接下来我们来实际搭建Java与RabbitMQ通信交互实例。Java使用Java Client来整合RabbitMQ。
搭建RabbitMQ Service:
环境基础:自己搭建准备一套Linux 服务器,并安装好docker容器。
1、进入docker hub镜像仓库地址:https://hub.docker.com/
2、搜索rabbitMq,进入官方的镜像,可以看到以下几种类型的镜像;我们选择带有“mangement”的版本(包含web管理页面);
3、拉取镜像
docker pull rabbitmq:3.7-management-alpine使用:docker images 查看所有镜像
4、根据下载的镜像创建和启动容器
docker run -d --name Myrabbitmq -e RABBITMQ_DEFAULT_USER=admin -e RABBITMQ_DEFAULT_PASS=admin -p 15672:15672 -p 5673:5672 rabbitmq:3.7-management-alpine说明:
-d 后台运行容器;
--name 指定容器名;
-p 指定服务运行的端口(5672:应用访问端口;15672:控制台Web端口号);
-v 映射目录或文件;
--hostname 主机名(RabbitMQ的一个重要注意事项是它根据所谓的 “节点名称” 存储数据,默认为主机名);
-e 指定环境变量;(RABBITMQ_DEFAULT_VHOST:默认虚拟机名;RABBITMQ_DEFAULT_USER:默认的用户名;RABBITMQ_DEFAULT_PASS:默认用户名的密码)
5、使用命令:docker ps 查看正在运行容器
6、可以使用浏览器打开web管理端:http://Server-IP:15672
搭建Java项目:
导入pom依赖(其他为springboot项目依赖省略,springboot-2.1.11.RELEASE版本):
    com.rabbitmq
    amqp-client
    5.1.2
具体详细Code:
1. 连接配置工具类:ChannelUtils
package com.he.process.rabbitmq.java.client.utils;

import com.rabbitmq.client.Channel;
import com.rabbitmq.client.Connection;
import com.rabbitmq.client.ConnectionFactory;

import java.util.HashMap;
import java.util.Map;

public class ChannelUtils {

    public static Channel getChannelInstance(String connectionDescription){
        try {
            ConnectionFactory connectionFactory = getConnectionFactory();
            Connection connection = connectionFactory.newConnection(connectionDescription);
            return connection.createChannel();
        }catch (Exception e){
            throw new RuntimeException(e);
        }
    }


    private static ConnectionFactory getConnectionFactory(){
        ConnectionFactory connectionFactory = new ConnectionFactory();
        //配置连接信息
        connectionFactory.setHost("192.168.33.180");
        connectionFactory.setPort(5673);
        connectionFactory.setVirtualHost("/");
        connectionFactory.setUsername("admin");
        connectionFactory.setPassword("admin");

        //配置网络异常自动连接恢复
        connectionFactory.setAutomaticRecoveryEnabled(true);
        //设置重试连接时间间隔   10s
        connectionFactory.setNetworkRecoveryInterval(10000);

        //设置ConnectionFactory属性信息
        Map connectionFactoryPropertiesMap = new HashMap<>();
        connectionFactoryPropertiesMap.put("principal","CoolHe");
        connectionFactoryPropertiesMap.put("description","Rabbit测试系统V1.0");
        connectionFactoryPropertiesMap.put("emailAddress","[email protected]");
        connectionFactory.setClientProperties(connectionFactoryPropertiesMap);

        return connectionFactory;
    }
}
2. 消息生产者类:MessageProducer
package com.he.process.rabbitmq.java.client.producer;

import com.he.process.rabbitmq.java.client.utils.ChannelUtils;
import com.rabbitmq.client.AMQP;
import com.rabbitmq.client.BuiltinExchangeType;
import com.rabbitmq.client.Channel;

import java.io.IOException;
import java.util.HashMap;

public class MessageProducer {

    public static void main(String[] args) throws IOException {
        Channel channel = ChannelUtils.getChannelInstance("HZM测试系统生产者");

        //声明交换机(交换机名,交换机类型,是否持久化,是否自动删除,是否是内部交换机,交换机属性)
        channel.exchangeDeclare("hzm.order", BuiltinExchangeType.DIRECT,true,false,false,new HashMap<>());

        //设置消息属性 发布消息(交换机名,Routing key , 可靠消息相关属性,消息属性,消息体);
        AMQP.BasicProperties basicProperties = new AMQP.BasicProperties().builder().deliveryMode(2).contentEncoding("UTF-8").build();

        channel.basicPublish("hzm.order","add",false,basicProperties,"I just message4 !".getBytes());

    }
}
3. 消息消费者: MessageConsumer
package com.he.process.rabbitmq.java.client.consumer;

import com.he.process.rabbitmq.java.client.utils.ChannelUtils;
import com.rabbitmq.client.*;

import java.io.IOException;
import java.util.HashMap;

public class MessageConsumer {

    public static void main(String[] args) throws IOException {
        Channel channel = ChannelUtils.getChannelInstance("HZM测试系统消费者");

        //声明队列(对列名,是否持久化,是否排他,是否自动删除,队列属性);
        AMQP.Queue.DeclareOk declareOk = channel.queueDeclare("hzm.order.add", true, false, false, new HashMap<>());

        //声明交换机(交换机名,交换机类型,是否持久化,是否自动删除,是否是内部交换机,交换机属性)
        channel.exchangeDeclare("hzm.order", BuiltinExchangeType.DIRECT,true,false,false,new HashMap<>());

        //将队列Binding到交换机上(队列名,交换机名,Routing key,绑定属性)
        channel.queueBind(declareOk.getQueue(),"hzm.order","add",new HashMap<>());

        //消费者订阅消息 监听如上声明的队列(队列名,是否自动应答(与消息可靠相关),消费者标签,消费者)
        channel.basicConsume(declareOk.getQueue(),true,"HZM测试系统ADD处理逻辑消费者",new DefaultConsumer(channel){
            @Override
            public void handleDelivery(String consumerTag, Envelope envelope, AMQP.BasicProperties properties, byte[] body){
                System.out.println(consumerTag);
                System.out.println(envelope.toString());
                System.out.println(properties.toString());
                System.out.println("消息内容:"+new String(body));
            }
        });
    }
}
4.依次启动消息消费者和消息生产者,控制台打印
HZM测试系统ADD处理逻辑消费者
Envelope(deliveryTag=1, redeliver=false, exchange=hzm.order, routingKey=add)
#contentHeader(content-type=null, content-encoding=UTF-8, headers=null, delivery-mode=2, priority=null, correlation-id=null, reply-to=null, expiration=null, message-id=null, timestamp=null, type=null, user-id=null, app-id=null, cluster-id=null)
消息内容:I just message4 !
注意: 初次运行时一定要先运行消费者后运行生产者,因为初次运行时还没有声明队列和交换机的绑定关系,如果先启动生产者会导致消息无法被正确路由而被丢弃
5. 进入rabbitMq 控制台查看信息: ip:port (http://192.168.33.180:15672/#/),用户名密码在启动命令默认都是admin
点击上图中任一一个链接进入查看属性如下:
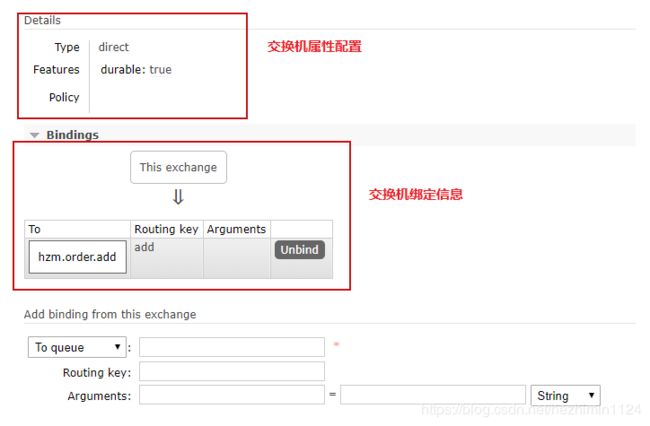
5.1 在Exchanges选项卡中,找到hzm.order点击进入详细:
5.2 在Queues 选项卡中,查看队列信息(同上图绑定信息一致):


