Android第三方登录-----微信登录接入方法
Android第三方登录—–微信登录接入方法
1.微信开发者平台添加自己的APP
微信开放平台:
https://open.weixin.qq.com/cgi-bin/index?t=home/index&lang=zh_CN&token=29de13099656b716fba7c5b72389d15e58d3508b
(1)到微信开发者平台申请创建应用

这里我已经通过了应用认证。
(2)申请开发者认证:需每年向微信缴纳300元
(3)申请接口:这里我们需要申请微信登录的接口
(4)填写app的应用签名及包名。app签名工具可以到微信开发平台上下载,包名即为manifest文件中的包名。注:app签名工具是.apk文件,需下载到手机上安装,输入包名即可获取。
(5)备注:应用申请成功后会生成AppID、AppSecret两个值,在后面会用到它们。


签名工具下载
https://res.wx.qq.com/open/zh_CN/htmledition/res/dev/download/sdk/Gen_Signature_Android2.apk
2.下载导入微信登录的SDK
下载地址:
https://res.wx.qq.com/open/zh_CN/htmledition/res/dev/download/sdk/Android_SDK_3.1.1.zip
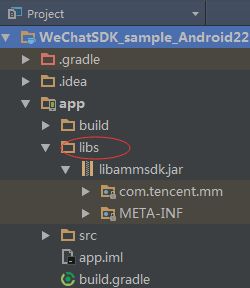
找到里面的 libammsdk.jar,在AndroidStudio中的project文件视图下,复制进libs文件夹,然后在libammsdk.jar上右键选择add as library,这样jar包已经成功添加到工程中。

3.开始创建微信登录
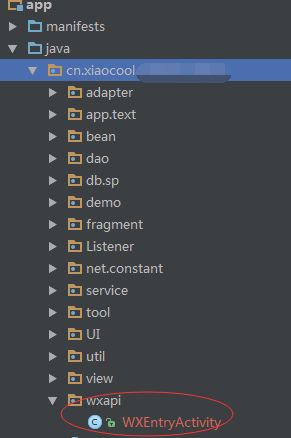
(1)在包下新建子包wxapi,并新建Activity,命名 WXEntryActivity

代码如下:
public class WXEntryActivity extends Activity implements IWXAPIEventHandler {
    private IWXAPI api;
    private BaseResp resp = null;
    private etongApplaction applaction;

    @Override
    protected void onCreate(Bundle savedInstanceState) {
        super.onCreate(savedInstanceState);
        applaction = (etongApplaction) getApplication();
        api = WXAPIFactory.createWXAPI(this, "wxb32c00ffa8140d93", false);
        api.handleIntent(getIntent(), this);
        Log.e("aaa","abc");
    }


    // 微信发送请求到第三方应用时,会回调到该方法
    @Override
    public void onReq(BaseReq req) {
        finish();
    }

    // 第三方应用发送到微信的请求处理后的响应结果,会回调到该方法
    @Override
    public void onResp(BaseResp resp) {
        String result = "";
        if (resp != null) {
            this.resp = resp;
            applaction.setResp(resp);
        }
        switch(resp.errCode) {
            case BaseResp.ErrCode.ERR_OK:
                result ="发送成功";
                Toast.makeText(this, result, Toast.LENGTH_LONG).show();
                finish();
                break;
            case BaseResp.ErrCode.ERR_USER_CANCEL:
                result = "发送取消";
                Toast.makeText(this, result, Toast.LENGTH_LONG).show();
                finish();
                break;
            case BaseResp.ErrCode.ERR_AUTH_DENIED:
                result = "发送被拒绝";
                Toast.makeText(this, result, Toast.LENGTH_LONG).show();
                finish();
                break;
            default:
                result = "发送返回";
                Toast.makeText(this, result, Toast.LENGTH_LONG).show();
                finish();
                break;
        }
    }

    @Override
    protected void onNewIntent(Intent intent) {
        super.onNewIntent(intent);
        setIntent(intent);
        api.handleIntent(intent, this);
        finish();
    }
}
这里需要注意,因为登陆后回调时需要用到resp这个变量,所以最好把它放在全局变量中保存,这里我把它放在了Application中保存,以便可以在全局调用。
定义一个类,继承Application:
public class etongApplaction extends Application {

public BaseResp resp;//微信登录

@Override
    public void onCreate() {
        super.onCreate();
}

public void setResp(BaseResp resp){
        this.resp = resp;
    }
    public BaseResp getResp(){
        return resp;
    }
在WXEntryActivity中,调用了setResp方法存入变量。
(2)在你的登录的Activity中,加入以下代码,不需要新建这个Activity。这里我做一个完整的activity。加入代码后只需要在微信登录按钮的点击事件里加入一行代码:
WXLogin();
调用到登陆微信的方法即可。
代码如下:
/**
 * Created by wzh on 2016/11/11.
 */

public class MainLoginTest extends Activity {
    public static IWXAPI WXapi;
    private String weixinCode;
    private final static int LOGIN_WHAT_INIT = 1;
    private static String get_access_token = "";
    // 获取第一步的code后,请求以下链接获取access_token
    public static String GetCodeRequest = "https://api.weixin.qq.com/sns/oauth2/access_token?appid=APPID&secret=SECRET&code=CODE&grant_type=authorization_code";
    //获取用户个人信息
    public static String GetUserInfo="https://api.weixin.qq.com/sns/userinfo?access_token=ACCESS_TOKEN&openid=OPENID";
    private BaseResp resp;
    private etongApplaction applaction;

    @Override
    protected void onCreate(Bundle savedInstanceState) {
        // TODO Auto-generated method stub
        super.onCreate(savedInstanceState);
        applaction = (etongApplaction) getApplication();
        resp = applaction.getResp();
    }

    /**
     * 登录微信
     */
    private void WXLogin() {
        WXapi = WXAPIFactory.createWXAPI(this, 此处填写你的AppID码, true);
        WXapi.registerApp(此处填写你的AppID码);
        SendAuth.Req req = new SendAuth.Req();
        req.scope = "snsapi_userinfo";
        req.state = "wechat_sdk_demo";
        WXapi.sendReq(req);
    }

    @Override
    protected void onNewIntent(Intent intent) {
        super.onNewIntent(intent);

        setIntent(intent);
    }


    @Override
    protected void onResume() {
        super.onResume();

        //获得resp全局变量
        applaction = (etongApplaction) getApplication();
        resp = applaction.getResp();
        if (resp!=null){
        if (resp.getType() == ConstantsAPI.COMMAND_SENDAUTH) {
            // code返回
            weixinCode = ((SendAuth.Resp)resp).code;
                /*
                 * 将你前面得到的AppID、AppSecret、code,拼接成URL
                 */
            get_access_token = getCodeRequest(weixinCode);
            Thread thread=new Thread(downloadRun);
            thread.start();
            try {
                thread.join();
            } catch (InterruptedException e) {
                // TODO Auto-generated catch block
                e.printStackTrace();
            }
        }
    }
    /**
     * 获取access_token的URL(微信)
     * @param code 授权时,微信回调给的
     * @return URL
     */
    public static String getCodeRequest(String code) {
        String result = null;
        GetCodeRequest = GetCodeRequest.replace("APPID",
                urlEnodeUTF8(此处填写你的AppID码));//AppId
        GetCodeRequest = GetCodeRequest.replace("SECRET",
                urlEnodeUTF8(此处填写你的AppSecret码));//AppSecret码
        GetCodeRequest = GetCodeRequest.replace("CODE",urlEnodeUTF8( code));
        result = GetCodeRequest;
        return result;
    }
    /**
     * 获取用户个人信息的URL(微信)
     * @param access_token 获取access_token时给的
     * @param openid 获取access_token时给的
     * @return URL
     */
    public static String getUserInfo(String access_token,String openid){
        String result = null;
        GetUserInfo = GetUserInfo.replace("ACCESS_TOKEN",
                urlEnodeUTF8(access_token));
        GetUserInfo = GetUserInfo.replace("OPENID",
                urlEnodeUTF8(openid));
        result = GetUserInfo;
        return result;
    }
    public static String urlEnodeUTF8(String str) {
        String result = str;
        try {
            result = URLEncoder.encode(str, "UTF-8");
        } catch (Exception e) {
            e.printStackTrace();
        }
        return result;
    }
    public  Runnable downloadRun = new Runnable() {

        @Override
        public void run() {
            WXGetAccessToken();

        }
    };

    /**
     * 获取access_token等等的信息(微信)
     */
    private  void WXGetAccessToken(){
        HttpClient get_access_token_httpClient = new DefaultHttpClient();
        HttpClient get_user_info_httpClient = new DefaultHttpClient();
        String access_token="";
        String openid ="";
        try {
            HttpPost postMethod = new HttpPost(get_access_token);
            HttpResponse response = get_access_token_httpClient.execute(postMethod); // 执行POST方法
            if (response.getStatusLine().getStatusCode() == HttpStatus.SC_OK) {
                InputStream is = response.getEntity().getContent();
                BufferedReader br = new BufferedReader(
                        new InputStreamReader(is));
                String str = "";
                StringBuffer sb = new StringBuffer();
                while ((str = br.readLine()) != null) {
                    sb.append(str);
                }
                is.close();
                String josn = sb.toString();
                JSONObject json1 = new JSONObject(josn);
                access_token = (String) json1.get("access_token");
                openid = (String) json1.get("openid");


            } else {
            }
        } catch (UnsupportedEncodingException e) {
            e.printStackTrace();
        } catch (ClientProtocolException e) {
            e.printStackTrace();
        } catch (IOException e) {
            e.printStackTrace();
        } catch (JSONException e) {
            e.printStackTrace();
        }

        String get_user_info_url=getUserInfo(access_token,openid);
        WXGetUserInfo(get_user_info_url);
    }

    /**
     * 获取微信用户个人信息
     * @param get_user_info_url 调用URL
     */
    private  void WXGetUserInfo(String get_user_info_url){
        HttpClient get_access_token_httpClient = new DefaultHttpClient();
        String openid="";
        String nickname="";
        String headimgurl="";
        try {
            HttpGet getMethod = new HttpGet(get_user_info_url);
            HttpResponse response = get_access_token_httpClient.execute(getMethod); // 执行GET方法
            if (response.getStatusLine().getStatusCode() == HttpStatus.SC_OK) {
                InputStream is = response.getEntity().getContent();
                BufferedReader br = new BufferedReader(
                        new InputStreamReader(is));
                String str = "";
                StringBuffer sb = new StringBuffer();
                while ((str = br.readLine()) != null) {
                    sb.append(str);
                }
                is.close();
                String josn = sb.toString();
                JSONObject json1 = new JSONObject(josn);
                openid = (String) json1.get("openid");
                nickname = (String) json1.get("nickname");
                headimgurl=(String)json1.get("headimgurl");

            } else {
            }
        } catch (UnsupportedEncodingException e) {
            e.printStackTrace();
        } catch (ClientProtocolException e) {
            e.printStackTrace();
        } catch (IOException e) {
            e.printStackTrace();
        } catch (JSONException e) {
            e.printStackTrace();
        }

    }

}
这里有几点需要注意:
【1】AppIDhe AppSecret码是在微信开发平台申请应用时的标识码,此处填写你自己的。
【2】通过getResp()方法获取到了全局的resp变量。
【3】WXLogin()方法中,第一步先将app注册到微信:
WXapi = WXAPIFactory.createWXAPI(this, 此处填写你的AppID码, true);
        WXapi.registerApp(此处填写你的AppID码);
可以把这一步放在活动入口onCreate()中,或者放在全局Application中也行。
随后,发起请求微信登录:
SendAuth.Req req = new SendAuth.Req();
        req.scope = "snsapi_userinfo";
        req.state = "wechat_sdk_demo";
        WXapi.sendReq(req);
【4】微信授权成功后,需要的昵称等信息可根据返回值自己获取:
比如上述代码中的:
openid = (String) json1.get("openid");
nickname = (String) json1.get("nickname");
headimgurl=(String)json1.get("headimgurl");
【5】微信授权后会回调onResp,会得到一个resp,通过这个resp会得到code,调用方法:
(SendAuth.Resp) .code;
得到code。
在getCodeRequest()方法中需要把code、AppId、AppSecret三个值拼接成url发起请求。
(3)manifest文件添加:
  <activity
            android:name="xx.xx.xx.WXEntryActivity"
            android:configChanges="orientation|keyboardHidden"
            android:exported="true"
            android:launchMode="singleTop"
            android:screenOrientation="portrait"
            android:theme="@android:style/Theme.Translucent.NoTitleBar" >
            <intent-filter>
                <action android:name="android.intent.action.VIEW" >
                action>
                <category android:name="android.intent.category.LAUNCHER" />
            intent-filter>
        activity>
注:把android:name=”xx.xx.xx.WXEntryActivity”替换为自己的包名。