蓝牙(Bluetooth)设备通讯,并连接WIFI
蓝牙&WiFi
蓝牙:安卓平台提供对蓝牙的通讯栈的支持,允许设别和其他的设备进行无线传输数据。应用程序层通过安卓API来调用蓝牙的相关功能,这些API使程序无线连接到蓝牙设备,并拥有P2P或者多端无线连接的特性。

功能:客户端先在系统页面打开蓝牙和服务端进行配对,配对完成后,返回APP中,显示所有已经配对的蓝牙设备信息列表。点击某一个已配对的蓝牙设备,客户端和服务端进行蓝牙通讯连接。连接成功后,显示服务端的一些支持信息,然后进入WIFI设置页面,扫描WiFi列表,点击某一个WiFi进行密码连接,连接成功后,将WiFi信息发送到服务端,服务端接收后开始连接,完成。

支持Apple的设备与Android设备的通讯:通过使用BLE(低功耗蓝牙,Bluetooth Low Energy,又叫蓝牙4.0)就可以实现,它有两个角色,分别是中央角色,和周边角色。中心设备(中央角色)使用来自与外部设备的信息去完成某项特定任务,外部设备(周边角色)包含一项或者多项服务,一个服务是一个数据集合。
(一)蓝牙相关
(1)权限
蓝牙所需权限,(6.0之上需要用户授权)
(2)API相关
经典模式:
BluetoothAdapter:代表本地蓝牙适配器(蓝牙无线电)。BluetoothAdapter是所有蓝牙交互的入口。使用这个你可以发现其他蓝牙设备,查询已配对的设备列表,使用一个已知的MAC地址来实例化一个BluetoothDevice,以及创建一个BluetoothServerSocket来为监听与其他设备的通信。
BlueDevice:代表一个远程蓝牙设备,使用这个来请求一个与远程设备的BluetoothSocket连接,或者查询关于设备名称、地址、类和连接状态等设备信息。
BluetoothSocket:代表一个蓝牙socket的接口(和TCP Socket类似)。这是一个连接点,它允许一个应用与其他蓝牙设备通过InputStream和OutputStream交换数据。
BluetoothServerSocket:代表一个开放的服务器socket,它监听接受的请求(与TCP ServerSocket类似)。为了连接两台Android设备,一个设备必须使用这个类开启一个服务器socket。当一个远程蓝牙设备开始一个和该设备的连接请求,BluetoothServerSocket将会返回一个已连接的BluetoothSocket,接受该连接。
BLE:
BluetoothGatt:继承BluetoothProfile,通过BluetoothGatt可以连接设备(connect),发现服务(discoverServices),并把相应地属性返回到BluetoothGattCallback,可以看成蓝牙设备从连接到断开的生命周期。
BluetoothGattCharacteristic:相当于一个数据类型,可以看成一个特征或能力,它包括一个value和0~n个value的描述(BluetoothGattDescriptor)。
BluetoothGattDescriptor:描述符,对Characteristic的描述,包括范围、计量单位等。
BluetoothGattService:服务,Characteristic的集合。
BluetoothGattCallback:已经连接上设备,对设备的某些操作后返回的结果。
(3)功能的实现:
经典模式:
1>. 获取蓝牙适配器:
BluetoothAdapter bluetoothAdapter = BluetoothAdapter.getDefaultAdapter();
2>.判断蓝牙是否打开,并监听蓝牙打开状态
if (!mBluetoothAdapter.isEnabled()) {
       //若没打开则打开蓝牙
       mBluetoothAdapter.enable();
      }
IntentFilter btoothFilter = new IntentFilter(BluetoothAdapter.ACTION_STATE_CHANGED);
registerReceiver(btoothWifiBrocast, btoothFilter);
class BtoothWifiBrocast extends BroadcastReceiver {
@Override
public void onReceive(Context context, Intent intent) {
String action = intent.getAction();
if (action.equals(BluetoothAdapter.ACTION_STATE_CHANGED)) {
int blueState = intent.getIntExtra(BluetoothAdapter.EXTRA_STATE, 0);
switch (blueState) {
case BluetoothAdapter.STATE_TURNING_ON:
ToastUtil.showShort("蓝牙打开中...");
break;
case BluetoothAdapter.STATE_ON:
ToastUtil.showShort("蓝牙已打开");
llBtoothInfo.setVisibility(View.VISIBLE);
getBluetoothList();
break;
case BluetoothAdapter.STATE_TURNING_OFF:
ToastUtil.showShort("蓝牙关闭中...");
break;
case BluetoothAdapter.STATE_OFF:
ToastUtil.showShort("蓝牙已关闭");
llBtoothInfo.setVisibility(View.INVISIBLE);
break;
default:
break;
}
}
}
} 3>.跳转到蓝牙系统界面
public void setBluetooth() {
if (!bluetoothAdapter.isEnabled()) {
bluetoothAdapter.enable();
}
Intent intent = new Intent(Settings.ACTION_BLUETOOTH_SETTINGS);
startActivity(intent);
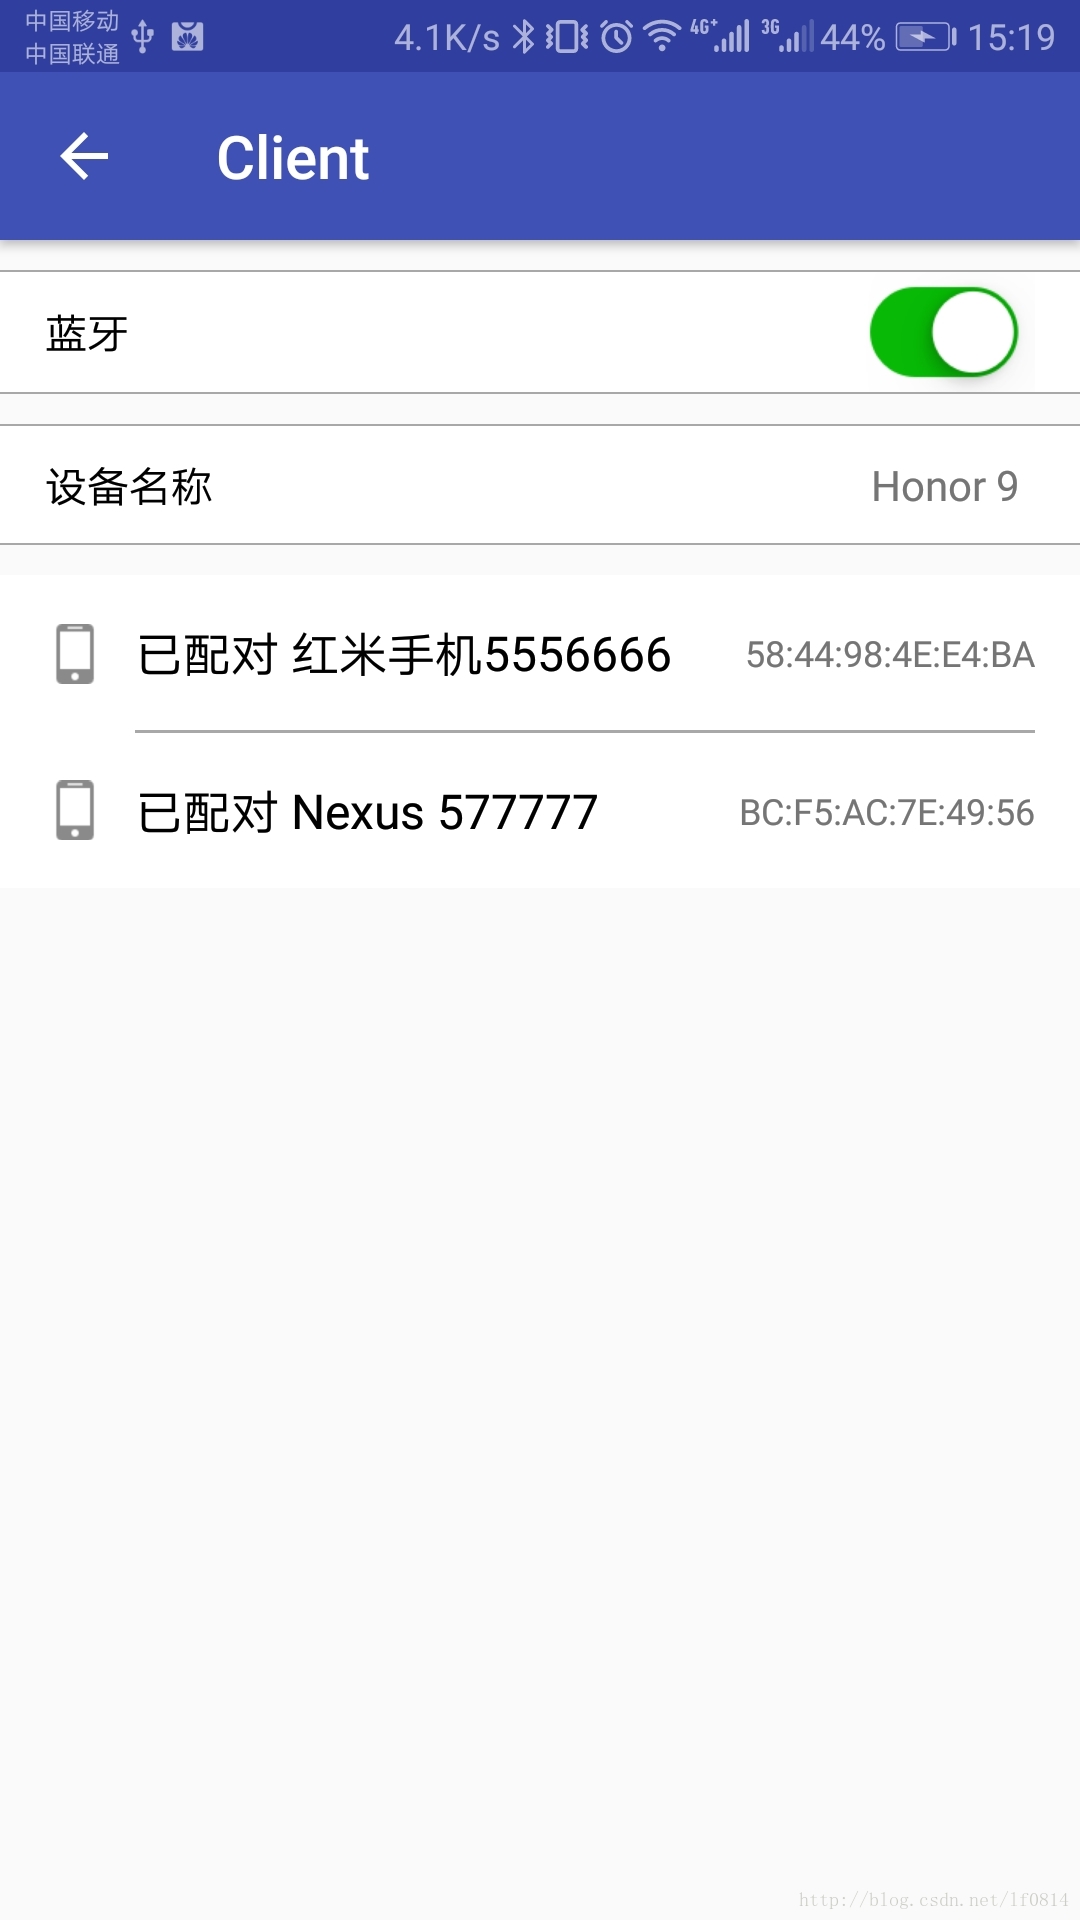
}4>.获取已配对的蓝牙设备列表
 /**
   * 获取已经配对的设备列表
   */
    private void getBluetoothList() {
      Set pList = bluetoothAdapter.getBondedDevices();
        if (pList != null && pList.size() > 0) {
            for (BluetoothDevice bluetoothDevice : pList) {
                //进行相关操作,如列表展示
            }
        }
    }
效果图:
(4)通讯服务(BluetoothSocket & BluetoothServerSocket)
在Demo中,BluetoothSocket和BluetoothServerSocket的初始化已经通讯功能都在BluetoothChatService类完善,由于代码比较多,这里主要就说明主要功能,大家也可以参考Google的官方Demo:[GitHub](https://github.com/googlesamples/android-BluetoothChat)
1>.监听蓝牙设备的连接(AcceptThread—->Server)
首先需要在线程中初始化BluetoothSocket和BluetoothServerSocket,并建立RFCOMM通道即可。
  /**
    * 监听来自其他设备的蓝牙连接
    */
    private class AcceptThread extends Thread {
       private final BluetoothServerSocket mmServerSocket;
       private String mSocketType;
       public AcceptThread(boolean secure) {
           BluetoothServerSocket tmp = null;
           mSocketType = secure ? "Secure" : "Insecure";
           try {
               if (secure) {
                   tmp = mAdapter.listenUsingRfcommWithServiceRecord(NAME_SECURE,
                           MY_UUID_SECURE);
               } else {
                   tmp = mAdapter.listenUsingInsecureRfcommWithServiceRecord(
                           NAME_INSECURE, MY_UUID_INSECURE);
               }
           } catch (IOException e) {
               Log.e(TAG, "Socket Type: " + mSocketType + "listen() failed", e);
           }
           mmServerSocket = tmp;
           mState = STATE_LISTEN;
       }
       @Override
       public void run() {
           Log.d(TAG, "Socket Type: " + mSocketType +
                   "BEGIN mAcceptThread" + this);
           setName("AcceptThread" + mSocketType);
           BluetoothSocket socket = null;
           while (mState != STATE_CONNECTED) {
               try {
                   socket = mmServerSocket.accept();
               } catch (IOException e) {
                   Log.e(TAG, "Socket Type: " + mSocketType + "accept() failed", e);
                   break;
               }
               if (socket != null) {
                   synchronized (BluetoothChatService.this) {
                       switch (mState) {
                           case STATE_LISTEN:
                           case STATE_CONNECTING:
                               // 情况正常,开始连接线程。
                               connected(socket, socket.getRemoteDevice(),
                                       mSocketType);
                               break;
                           case STATE_NONE:
                           case STATE_CONNECTED:
                               // 要么没有准备好,要么已经连接好了。终止新的Socket
                               try {
                                   socket.close();
                               } catch (IOException e) {
                                   Log.e(TAG, "Could not close unwanted socket", e);
                               }
                               break;
                           default:
                               break;
                       }
                   }
               }
           }
           Log.i(TAG, "END mAcceptThread, socket Type: " + mSocketType);
       }
       public void cancel() {
           Log.d(TAG, "Socket Type" + mSocketType + "cancel " + this);
           try {
               mmServerSocket.close();
           } catch (IOException e) {
               Log.e(TAG, "Socket Type" + mSocketType + "close() of server failed", e);
           }
       }
    }
说明:在蓝牙协议中,UUID被用来标识蓝牙设备所提供的服务,并非是标识蓝牙设备本身哦,一个蓝牙设备可以提供多种服务,每种服务都对应一个UUID,其中在蓝牙协议栈里,这些默认提供的profile是都有对应的UUID的,也就是默认的UUID,比如00001101-0000-1000-8000-00805F9B34FB就是一个非常 well-known的UUID,基本上所有的蓝牙板不修改的话都是这个值。
2>.试图连接已配对的蓝牙设备(ConnectThread—->Client)
通过在该线程中初始化BluetoothSocket和BluetoothServerSocket,并建立RFCOMM通道,然后将需要连接的蓝牙设备(BluetoothDevice)传入,并开始执行连接,这是在1>中的监听就会监听到,通过UUID来匹配连接。连接完成之后就可以通讯。
 /**
     * 这个线程运行时试图做一个外向的连接一个设备
     */
     private class ConnectThread extends Thread {
        private final BluetoothSocket mmSocket;
        private final BluetoothDevice mmDevice;
        private String mSocketType;
        public ConnectThread(BluetoothDevice device, boolean secure) {
            mmDevice = device;
            BluetoothSocket tmp = null;
            mSocketType = secure ? "Secure" : "Insecure";
            try {
                if (secure) {
                    tmp = device.createRfcommSocketToServiceRecord(
                            MY_UUID_SECURE);
                } else {
                    tmp = device.createInsecureRfcommSocketToServiceRecord(
                            MY_UUID_INSECURE);
                }
            } catch (IOException e) {
                Log.e(TAG, "Socket Type: " + mSocketType + "create() failed", e);
            }
            mmSocket = tmp;
            mState = STATE_CONNECTING;
        }
        @Override
        public void run() {
            Log.i(TAG, "BEGIN mConnectThread SocketType:" + mSocketType);
            setName("ConnectThread" + mSocketType);
            // 取消发现,因为它会减慢连接速度
            mAdapter.cancelDiscovery();
            // 开始连接
            try {
                mmSocket.connect();
            } catch (IOException e) {
                try {
                    mmSocket.close();
                } catch (IOException e2) {
                    Log.e(TAG, "unable to close() " + mSocketType +
                            " socket during connection failure", e2);
                }
                connectionFailed();
                return;
            }
            synchronized (BluetoothChatService.this) {
                mConnectThread = null;
            }
            connected(mmSocket, mmDevice, mSocketType);
        }
        public void cancel() {
            try {
                mmSocket.close();
            } catch (IOException e) {
                Log.e(TAG, "close() of connect " + mSocketType + " socket failed", e);
            }
        }
    }
3>.通讯(ConnectedThread—-Client<—–>Server)
当两个已配对的设备连接成功后,就可以通过流(由BluetoothSocket来获得InputStream & OutputStream)来实现通讯
  /**
     * 当两个设备连接时这个线程开始运行。它处理所有传入和传出的传输
     */
    private class ConnectedThread extends Thread {
       private final BluetoothSocket mmSocket;
       private final InputStream mmInStream;
       private final OutputStream mmOutStream;
       public ConnectedThread(BluetoothSocket socket, String socketType) {
           Log.d(TAG, "create ConnectedThread: " + socketType);
           mmSocket = socket;
           InputStream tmpIn = null;
           OutputStream tmpOut = null;
           try {
               tmpIn = socket.getInputStream();
               tmpOut = socket.getOutputStream();
           } catch (IOException e) {
               Log.e(TAG, "temp sockets not created", e);
           }
           mmInStream = tmpIn;
           mmOutStream = tmpOut;
           mState = STATE_CONNECTED;
       }
       @Override
       public void run() {
           Log.i(TAG, "BEGIN mConnectedThread");
           byte[] buffer = new byte[1024];
           int bytes;
           // 在连接的同时,继续监听InputStream
           while (mState == STATE_CONNECTED) {
               try {
                   bytes = mmInStream.read(buffer);
                   //发送收到的数据
                   mHandler.obtainMessage(Constants.MESSAGE_READ, bytes, -1, buffer)
                           .sendToTarget();
               } catch (IOException e) {
                   Log.e(TAG, "disconnected", e);
                   connectionLost();
                   break;
               }
           }
       }
效果图:


BLE:

关于BLE的通讯,在Demo中的BLEManager类中管理
(二)WIFI相关
(1)权限
(2)API相关
1>. WifiManager:wifi连接统一管理类,获取WIFI网卡的状态(WIFI网卡的状态是由一系列的整形常量来表示的)

2>. ScanResult:主要用来描述已经检测出的接入点,包括接入点的地址,接入点的名称,身份认证,频率,信号强度等信息。其实就是通过wifi 硬件的扫描来获取一些周边的wifi 热点的信息。

3>. WifiConfiguration:Wifi网络的配置,包括安全设置等,在我们连通一个wifi 接入点的时候,需要获取到的一些信息(主要的四个属性)。

        ① BSSID:简要说就是无线路由的MAC地址
        ② networkid:网络ID
        ③ PreSharedKey:无线网络的安全认证模式
        ④ SSID:SSID(Service SetIdentif)用于标识无线局域网,SSID不同的无线网络是无法进行互访的。

4>. WifiInfo:wifi无线连接的描述,包括(接入点,网络连接状态,隐藏的接入点,IP地址,连接速度,MAC地址,网络ID,信号强度等信息)
(3)功能实现:
1>.获取WifiManager
WifiManager wifiManager =(WifiManager)getApplicationContext().getSystemService(Context.WIFI_SERVICE);2>.判断WiFi是否打开
 if (!wifiManager.isWifiEnabled()) {
            wifiManager.setWifiEnabled(true);
        }
**注意:这里在6.0系统之上需要用户授权,而且还由于对安全考虑,高版本的手机可能打开WiFi还需要打开定位。**
3>.监听扫描(广播)
//注册广播
      WifiReceiver receiverWifi = new WifiReceiver();
      registerReceiver(receiverWifi, new IntentFilter(WifiManager.SCAN_RESULTS_AVAILABLE_ACTION));
      //开始扫描(必须)
      wifiManager.startScan();
// wifi列表广播
class WifiReceiver extends BroadcastReceiver {
@Override
public void onReceive(Context context, Intent intent) {
String action = intent.getAction();
if (action.equals(WifiManager.SCAN_RESULTS_AVAILABLE_ACTION)) {
//获取当前已连接的wifi信息
WifiInfo wifiInfo = wifiManager.getConnectionInfo();
//得到扫描的列表集合
List result = wifiManager.getScanResults();
}
}
} 4>.开始连接WiFi列表中的某一个WiFi
这里对于WiFi的连接都在Demo中的BFWifiManagers类中管理,这里包括WiFi连接的监听广播,以及创建连接时所需的WiFi信息等。
①WiFi连接的监听广播
  WifiStateReceiver_ mStateReceiver = new WifiStateReceiver_();
    IntentFilter filter = new IntentFilter();
    filter.addAction(ConnectivityManager.CONNECTIVITY_ACTION);
    mContext.registerReceiver(mStateReceiver, filter);

 public class WifiStateReceiver_ extends BroadcastReceiver {
        @Override
        public void onReceive(Context context, Intent intent) {
            if (ConnectivityManager.CONNECTIVITY_ACTION.equals(intent.getAction())) {
                NetworkInfo info = intent.getParcelableExtra(ConnectivityManager.EXTRA_NETWORK_INFO);
                if (info != null) {
                    NetworkInfo.State state = info.getState();
                    if (state == NetworkInfo.State.DISCONNECTED) {
                        ToastUtil.showShort("Wifi断开,尝试连接");
                        //相应的操作
                        ......
                    } else if (state == NetworkInfo.State.CONNECTED) {
                        WifiInfo wifiInfo = wifiManager.getConnectionInfo();
                        ToastUtil.showShort("成功连接" + wifiInfo.getSSID());
                        //相应的操作
                        ......
                    } else if (state == NetworkInfo.State.CONNECTING) {
                        ToastUtil.showShort("正在连接...");
                        //相应的操作
                        ......
                    }
                }
            }
        }
    }
注意:这里对WiFi连接的广播用的是CONNECTIVITY_ACTION,而不是NETWORK_STATE_CHANGED_ACTION,是因为NETWORK_STATE_CHANGED_ACTION里面的监听状态要比CONNECTIVITY_ACTION中的执行次数多,这样的话对于蓝牙之间进行通讯的话就会报以下异常:
java.io.IOException: bt socket closed, read return: -1;
②创建WIFI信息
 /**
     * 创建WIFI信息
     * @param SSID
     * @param password
     * @param wifiType
     * @return
     */
    private WifiConfiguration createWifiInfo(String SSID, String password, int wifiType) {
        //清空config
        WifiConfiguration config = new WifiConfiguration();
        config.allowedAuthAlgorithms.clear();
        config.allowedGroupCiphers.clear();
        config.allowedKeyManagement.clear();
        config.allowedPairwiseCiphers.clear();
        config.allowedProtocols.clear();
        //wifi名称
        config.SSID = "\"" + SSID + "\"";
        if (wifiType == 0) {
            config.wepKeys[0] = "";
            config.allowedKeyManagement.set(WifiConfiguration.KeyMgmt.NONE);
            config.wepTxKeyIndex = 0;
        }
        if (wifiType == 1) {
            config.hiddenSSID = false;
            //密码
            config.wepKeys[0] = "\"" + password + "\"";
            config.allowedAuthAlgorithms.set(WifiConfiguration.AuthAlgorithm.SHARED);
            config.allowedKeyManagement.set(WifiConfiguration.KeyMgmt.IEEE8021X);
            config.allowedGroupCiphers.set(WifiConfiguration.GroupCipher.CCMP);
            config.allowedGroupCiphers.set(WifiConfiguration.GroupCipher.TKIP);
            config.allowedGroupCiphers.set(WifiConfiguration.GroupCipher.WEP40);
            config.allowedGroupCiphers.set(WifiConfiguration.GroupCipher.WEP104);
            config.status = WifiConfiguration.Status.ENABLED;
        }
        if (wifiType == 2) {
            config.hiddenSSID = false;
            config.preSharedKey = "\"" + password + "\"";
            config.allowedAuthAlgorithms.set(WifiConfiguration.AuthAlgorithm.OPEN);
            config.allowedKeyManagement.set(WifiConfiguration.KeyMgmt.WPA_PSK);
            config.allowedGroupCiphers.set(WifiConfiguration.GroupCipher.TKIP);
            config.allowedGroupCiphers.set(WifiConfiguration.GroupCipher.CCMP);
            config.allowedPairwiseCiphers.set(WifiConfiguration.PairwiseCipher.TKIP);
            config.allowedPairwiseCiphers.set(WifiConfiguration.PairwiseCipher.CCMP);
            config.allowedPairwiseCiphers.set(WifiConfiguration.PairwiseCipher.NONE);
            // For WPA
            config.allowedProtocols.set(WifiConfiguration.Protocol.WPA);
            // For WPA2
            config.allowedProtocols.set(WifiConfiguration.Protocol.RSN);
            config.status = WifiConfiguration.Status.ENABLED;
        }
        return config;
    }
③连接WiFi
WifiConfiguration wifiConfig = createWifiInfo(infoWifi.getSSID(), infoWifi.getPwd(), infoWifi.getWifiType());
        int netId = wifiManager.addNetwork(wifiConfig);
        if (netId != -1) {
            wifiManager.saveConfiguration();
        }
        wifiManager.enableNetwork(netId, true);
效果图:


总结
对于蓝牙连接通讯这块,主要遇一个问题是有异常导致Socket连接中断,这导致的异常原因可能是每次写流时,写入的次数过快导致奔溃,还有就是客户端和服务端的请求和响应没有处理好导致的Socket中断。
参考:GitHub
GitHub (其中的bleperipheraldemo)
Demo地址:BluetoothTest