Volley源码详解
一、概述
Volley 是 Google 推出的轻量级 Android 异步网络请求框架和图片加载框架。在 Google I/O 2013 大会上发布。其适用场景是数据量小,通信频繁的网络操作。
主要特点:
(1). 扩展性强。Volley 中大多是基于接口的设计,可配置性强。
(2). 一定程度符合 Http 规范,包括返回 ResponseCode(2xx、3xx、4xx、5xx)的处理,请求头的处理,缓存机制的支持等。并支持重试及优先级定义。
(3). 默认 Android2.3 及以上基于 HttpURLConnection,2.3 以下基于 HttpClient 实现。
HttpURLConnection 和 AndroidHttpClient(HttpClient 的封装)如何选择及原因:
在 Froyo(2.2) 之前,HttpURLConnection 有个重大 Bug,调用 close() 函数会影响连接池,导致连接复用失效,所以在 Froyo 之前使用 HttpURLConnection 需要关闭 keepAlive。另外在 Gingerbread(2.3) HttpURLConnection 默认开启了 gzip 压缩,提高了 HTTPS 的性能,Ice Cream Sandwich(4.0) HttpURLConnection 支持了请求结果缓存。再加上 HttpURLConnection 本身 API 相对简单,所以对 Android 来说,在 2.3 之后建议使用 HttpURLConnection,之前建议使用 AndroidHttpClient。
(4). 提供简便的图片加载工具。
二、流程图
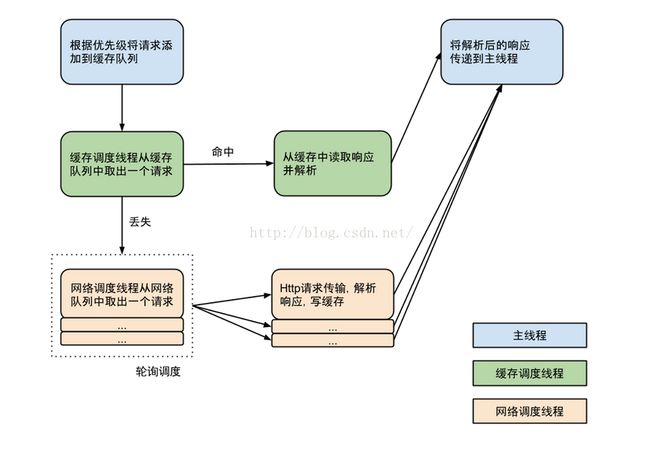
分析:蓝色部分代表主线程,绿色部分代表缓存线程,橙色部分代表网络请求线程。
三、详解
1.网络请求队列
使用时,我们首先构造一个请求队列。
RequestQueue queue = Volley.newRequestQueue(context)我们从分析源码可以看,在这里做了那些事情。
1. 根据不同的系统版本号实例化不同的请求类,如果版本号小于9,用HttpClient 。如果版本号大于9,用HttpUrlConnection。
   /**
     * Creates a default instance of the worker pool and calls {@link RequestQueue#start()} on it.
     *
     * @param context A {@link Context} to use for creating the cache dir.
     * @param stack A {@link BaseHttpStack} to use for the network, or null for default.
     * @return A started {@link RequestQueue} instance.
     */
    public static RequestQueue newRequestQueue(Context context, BaseHttpStack stack) {
        BasicNetwork network;
        if (stack == null) {
            if (Build.VERSION.SDK_INT >= 9) {
                network = new BasicNetwork(new HurlStack());
            } else {
                // Prior to Gingerbread, HttpUrlConnection was unreliable.
                // See: http://android-developers.blogspot.com/2011/09/androids-http-clients.html
                // At some point in the future we'll move our minSdkVersion past Froyo and can
                // delete this fallback (along with all Apache HTTP code).
                String userAgent = "volley/0";
                try {
                    String packageName = context.getPackageName();
                    PackageInfo info =
                            context.getPackageManager().getPackageInfo(packageName, /* flags= */ 0);
                    userAgent = packageName + "/" + info.versionCode;
                } catch (NameNotFoundException e) {
                }

                network =
                        new BasicNetwork(
                                new HttpClientStack(AndroidHttpClient.newInstance(userAgent)));
            }
        } else {
            network = new BasicNetwork(stack);
        }

        return newRequestQueue(context, network);
    }
2.设置缓存路径,并调用RequestQueue的构造方法。
private static RequestQueue newRequestQueue(Context context, Network network) {
        File cacheDir = new File(context.getCacheDir(), DEFAULT_CACHE_DIR);
        RequestQueue queue = new RequestQueue(new DiskBasedCache(cacheDir), network);
        queue.start();
        return queue;
    }
3.构造方法,4个参数,mCache(文件缓存)、mNetwork(BasicNetwork实例)、mDispatchers(网络请求线程数组)、以及mDelivery(网络请求结果回调的接口,与主线程通信,Handler)
    public RequestQueue(
            Cache cache, Network network, int threadPoolSize, ResponseDelivery delivery) {
        mCache = cache;
        mNetwork = network;
        mDispatchers = new NetworkDispatcher[threadPoolSize];
        mDelivery = delivery;
    }
4. 我们看2当中,调用了RequestQueue中 queue.start()方法,我们看一下,方法里面的设置。
    /** Starts the dispatchers in this queue. */
    public void start() {
        stop(); // Make sure any currently running dispatchers are stopped.
        // Create the cache dispatcher and start it.
        mCacheDispatcher = new CacheDispatcher(mCacheQueue, mNetworkQueue, mCache, mDelivery);
        mCacheDispatcher.start();

        // Create network dispatchers (and corresponding threads) up to the pool size.
        for (int i = 0; i < mDispatchers.length; i++) {
            NetworkDispatcher networkDispatcher =
                    new NetworkDispatcher(mNetworkQueue, mNetwork, mCache, mDelivery);
            mDispatchers[i] = networkDispatcher;
            networkDispatcher.start();
        }
}- 创造缓存调用的线程,并开启缓存线程。
- 根据线程池的大小,创造网络请求线程,并开启线程。
- 我们从上面的流程图中,能看出,如果请求不能缓存,直接添加到网络请求队列,默认是可以缓存,所以请求将首先放入缓存中,当缓存线程工作时,缓存线程会从缓存请求队列当中取出一个请求,如果命中结果将从缓存当中去取出求并解析。如果丢失,将会把请求放入网络请求线程当中,进而进行请求。
2.缓存线程和网络请求线程
1.缓存线程
 @Override
    public void run() {
        if (DEBUG) VolleyLog.v("start new dispatcher");
        Process.setThreadPriority(Process.THREAD_PRIORITY_BACKGROUND);

        // Make a blocking call to initialize the cache.
        mCache.initialize();

        while (true) {
            try {
                processRequest();
            } catch (InterruptedException e) {
                // We may have been interrupted because it was time to quit.
                if (mQuit) {
                    Thread.currentThread().interrupt();
                    return;
                }
                VolleyLog.e(
                        "Ignoring spurious interrupt of CacheDispatcher thread; "
                                + "use quit() to terminate it");
            }
        }
    }


 @VisibleForTesting
    void processRequest(final Request request) throws InterruptedException {
        request.addMarker("cache-queue-take");

        // If the request has been canceled, don't bother dispatching it.
        if (request.isCanceled()) {
            request.finish("cache-discard-canceled");
            return;
        }

        // Attempt to retrieve this item from cache.
        Cache.Entry entry = mCache.get(request.getCacheKey());
        if (entry == null) {
            request.addMarker("cache-miss");
            // Cache miss; send off to the network dispatcher.
            if (!mWaitingRequestManager.maybeAddToWaitingRequests(request)) {
                mNetworkQueue.put(request);
            }
            return;
        }

        // If it is completely expired, just send it to the network.
        if (entry.isExpired()) {
            request.addMarker("cache-hit-expired");
            request.setCacheEntry(entry);
            if (!mWaitingRequestManager.maybeAddToWaitingRequests(request)) {
                mNetworkQueue.put(request);
            }
            return;
        }

        // We have a cache hit; parse its data for delivery back to the request.
        request.addMarker("cache-hit");
        Response response =
                request.parseNetworkResponse(
                        new NetworkResponse(entry.data, entry.responseHeaders));
        request.addMarker("cache-hit-parsed");

        if (!entry.refreshNeeded()) {
            // Completely unexpired cache hit. Just deliver the response.
            mDelivery.postResponse(request, response);
        } else {
            // Soft-expired cache hit. We can deliver the cached response,
            // but we need to also send the request to the network for
            // refreshing.
            request.addMarker("cache-hit-refresh-needed");
            request.setCacheEntry(entry);
            // Mark the response as intermediate.
            response.intermediate = true;

            if (!mWaitingRequestManager.maybeAddToWaitingRequests(request)) {
                // Post the intermediate response back to the user and have
                // the delivery then forward the request along to the network.
                mDelivery.postResponse(
                        request,
                        response,
                        new Runnable() {
                            @Override
                            public void run() {
                                try {
                                    mNetworkQueue.put(request);
                                } catch (InterruptedException e) {
                                    // Restore the interrupted status
                                    Thread.currentThread().interrupt();
                                }
                            }
                        });
            } else {
                // request has been added to list of waiting requests
                // to receive the network response from the first request once it returns.
                mDelivery.postResponse(request, response);
            }
        }
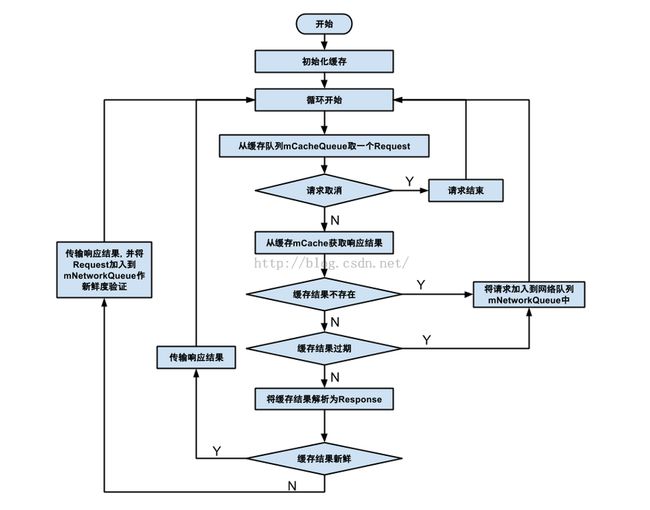
}- 从缓存队列当中取出一个请求,判断缓存当中是否存在。如果不存在、过期,将请求添加到网络队列当中。
- 如果命中,将从缓存当中,取出对应的请求资源。
- 通过 mDelivery.postResponse(request, response);将结果发送到主线程。
小结:CacheDispatcher线程主要对请求进行判断,是否已经有缓存,是否已经过期,根据需要放进网络请求队列。同时对相应结果进行包装、处理,然后交由ExecutorDelivery处理。这里以一张流程图显示它的完整工作流程:
2.网络请求线程
 @Override
    public void run() {
        Process.setThreadPriority(Process.THREAD_PRIORITY_BACKGROUND);
        while (true) {
            try {
                processRequest();
            } catch (InterruptedException e) {
                // We may have been interrupted because it was time to quit.
                if (mQuit) {
                    Thread.currentThread().interrupt();
                    return;
                }
                VolleyLog.e(
                        "Ignoring spurious interrupt of NetworkDispatcher thread; "
                                + "use quit() to terminate it");
            }
        }
    }


   @VisibleForTesting
    void processRequest(Request request) {
        long startTimeMs = SystemClock.elapsedRealtime();
        try {
            request.addMarker("network-queue-take");

            // If the request was cancelled already, do not perform the
            // network request.
            if (request.isCanceled()) {
                request.finish("network-discard-cancelled");
                request.notifyListenerResponseNotUsable();
                return;
            }

            addTrafficStatsTag(request);

            // Perform the network request.
            NetworkResponse networkResponse = mNetwork.performRequest(request);
            request.addMarker("network-http-complete");

            // If the server returned 304 AND we delivered a response already,
            // we're done -- don't deliver a second identical response.
            if (networkResponse.notModified && request.hasHadResponseDelivered()) {
                request.finish("not-modified");
                request.notifyListenerResponseNotUsable();
                return;
            }

            // Parse the response here on the worker thread.
            Response response = request.parseNetworkResponse(networkResponse);
            request.addMarker("network-parse-complete");

            // Write to cache if applicable.
            // TODO: Only update cache metadata instead of entire record for 304s.
            if (request.shouldCache() && response.cacheEntry != null) {
                mCache.put(request.getCacheKey(), response.cacheEntry);
                request.addMarker("network-cache-written");
            }

            // Post the response back.
            request.markDelivered();
            mDelivery.postResponse(request, response);
            request.notifyListenerResponseReceived(response);
        } catch (VolleyError volleyError) {
            volleyError.setNetworkTimeMs(SystemClock.elapsedRealtime() - startTimeMs);
            parseAndDeliverNetworkError(request, volleyError);
            request.notifyListenerResponseNotUsable();
        } catch (Exception e) {
            VolleyLog.e(e, "Unhandled exception %s", e.toString());
            VolleyError volleyError = new VolleyError(e);
            volleyError.setNetworkTimeMs(SystemClock.elapsedRealtime() - startTimeMs);
            mDelivery.postError(request, volleyError);
            request.notifyListenerResponseNotUsable();
        }
}- 执行网络请求,mNetwork.performRequest(request),根据不同的系统版本号而实例化的HttpStack对象(版本号大于9的是HurlStack,小于9的是HttpClientStack)。
- 判断网络请求是否能够缓存,默认能,将请求结果添加到缓存当中。
- 将请求的结果,通过mDelivery.postResponse(request, response);发送到主线程当中。
3.与主线程通信
Volley与主线线程的通信是用Handler来实现的,熟悉Handler机制应该很容易理解。
1.首先我们看,请求队列的初始化时,构造方法的参数。
  /**
     * Creates the worker pool. Processing will not begin until {@link #start()} is called.
     *
     * @param cache A Cache to use for persisting responses to disk
     * @param network A Network interface for performing HTTP requests
     * @param threadPoolSize Number of network dispatcher threads to create
     */
    public RequestQueue(Cache cache, Network network, int threadPoolSize) {
        this(
                cache,
                network,
                threadPoolSize,
                new ExecutorDelivery(new Handler(Looper.getMainLooper())));
    }
我们看到new Handler时,传入的参数为Looper.getMainLooper(),所以是用的主线程的Looper。
2.看一下ExecutorDelivery构造方法,
  /**
     * Creates a new response delivery interface.
     *
     * @param handler {@link Handler} to post responses on
     */
    public ExecutorDelivery(final Handler handler) {
        // Make an Executor that just wraps the handler.
        mResponsePoster =
                new Executor() {
                    @Override
                    public void execute(Runnable command) {
                        handler.post(command);
                    }
                };
    }
关键是 handler.post(command);无论是从缓存当中取出的结果还是从网络请求中获取的结果,都将通过Handler类当中post方法将消息加入主线程Looper当中的消息队列。主线程当中,如果消息队列有消息需要处理,就会回调Handler 的方法,在主线程当中进行消息的处理。
4.关于缓存
volley的CacheDispatcher工作时需要指定缓存策略,这个缓存策略即Cache接口,这个接口有两个实现类,DiskBasedCache和NoCache,默认使用DiskedBasedCache。它会将请求结果存入文件中,以备复用。Volley是一个高度灵活的框架,缓存是可以配置的。甚至你可以使用自己的缓存策略。
可惜这个DiskBasedCache很多时候并不能被使用,因为CacheDispatcher即使从缓存文件中拿到了缓存的数据,还需要看该数据是否过期,如果过期,将不使用缓存数据。这就要求服务端的页面可以被缓存,这个是由Cache-Control和Expires等字段决定的,服务端需要设定此字段才能使数据可以被缓存。否则缓存始终是过期的,最终总是走的网络请求。
参考:
https://www.jianshu.com/p/15e6209d2e6f
https://www.cnblogs.com/wangzehuaw/p/5583919.html

