Centos7.x部署RocketMQ-4.7.0集群及工作原理
大家好,我是Linux运维工程师 Linke 。技术过硬,从不挖坑,谷歌百度,无所不用~
消息队列的作用
做为大数据高并发架构中核心中间件的消息队列,可谓是相当重要的存在。在我现有的知识层面,我的理解这就是在 S2S (server to server)级别的一个缓冲存储,主要解决瞬时压力大于应用服务处理能力,导致消息丢失、系统奔溃等问题,另外它还有解耦(不同重要程度、不同能力级别系统之间依赖)、一对多调用、蓄流(通过堆积一定量消息然后放开消费端)。
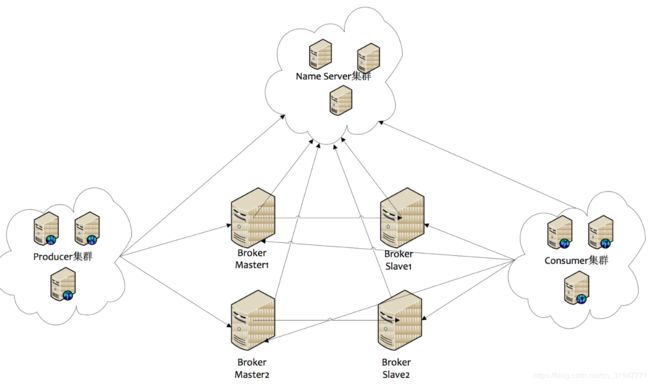
RocketMQ集群套路图
由图可见其大致工作原理,所有工作节点由管理节点来调度。好吧,我又想说其实所有的分布式计算、分布式存储都是近乎一个套路,叫法上不同而已。人类的基础科学还是没有进步。。。
Name Server集群: 几乎是无状态节点,可集群部署,节点之间无数据同步。也就是说,Nameserver 各节点之间并不存在主从复制的策略,记录维护Topic、Broker的信息,及监控Broker的运行状态。为client提供路由能力。
Broker: 没错,脏活儿累活儿都这货干的。这货分在集群中有两种角色,即master、slave 。在集群中,master可以有多个,slave也可以有多个,一个slave只准嫁给一个master,但一个master却可以娶多个slave,这像极了爱情。master和slave之间通过 配置相同的 brokerName 来确定是一对儿主从,通过 brokerId 来区分谁是 master 谁是 slave (0表示master,非 0表示slave),这像极了夫妻二人。每个Broker与Name Server集群中的所有节点建立长连接,定时注册Topic信息到所有Name Server。
Producet:与Name Server集群中的其中一个节点(随机选择)建立长连接,定期从Name Server取Topic路由信息,并向提供Topic服务的Master建立长连接,且定时向Master发送心跳。Producer完全无状态,可集群部署。不怕笑话,我就说它是写操作。
Consumer: 与Name Server集群中的其中一个节点(随机选择)建立长连接,定期从Name Server取Topic路由信息,并向提供Topic服务的Master、Slave建立长连接,且定时向Master、Slave发送心跳。Consumer既可以从Master订阅消息,也可以从Slave订阅消息,订阅规则由Broker配置决定。这就好比是读操作。
由此以上理论可知,所有的 broker 、 product 、 consumer 都是主动去和 nameserver 通信,nameserver收到以后,就将信息维护下来。nameserver完全是被动的存在。
---------------------------------------------------------------------------------------------------------------------------------------------------------------
RocketMQ-4.7.0集群部署
服务器资源:
| ip | 服务器配置 | 角色 |
| 192.168.10.181 | 4c 16g | Nameserver,Broker-a-master |
| 192.168.10.182 | 4c 16g | Nameserver,Broker-b-master |
| 192.168.10.183 | 4c 16g | Nameserver,Broker-c-master |
| 192.168.10.184 | 4c 8g | Broker-a-slave |
| 192.168.10.185 | 4c 8g | Broker-b-slave |
| 192.168.10.186 | 4c 8g | Broker-c-slave |
官网下载网页:
http://rocketmq.apache.org/release_notes/release-notes-4.7.0/
下载二进制包:
wget https://mirror.bit.edu.cn/apache/rocketmq/4.7.0/rocketmq-all-4.7.0-bin-release.zip依赖环境:
JDK1.8
将文件传到每个节点后解压文件到 /data 目录:
unzip rocketmq-all-4.7.0-bin-release.zip
mv rocketmq-all-4.7.0-bin-release /data/rocketmq-4.7.0
cd /data/rocketmq-4.7.0
创建配置文件:
192.168.10.181为 Nameserver 和 Broker-a-master,创建配置文件
cat > conf/broker-a-master.properties << EOF
#### Mq cluster broker-a-master node ###
namesrvAddr=192.168.10.181:9876;192.168.10.182:9876;192.168.10.183:9876
brokerClusterName=DefaultCluster
brokerName=broker-a
brokerIP1=192.168.10.181
brokerId=0
autoCreateTopicEnable=false
sendMessageThreadPoolNums=128
deleteWhen=04
fileReservedTime=48
brokerRole=SYNC_MASTER
flushDiskType=ASYNC_FLUSH

#存储路径
storePathRootDir=/data/rocketmq-4.7.0/store

#commitLog存储路径
storePathCommitLog=/data/rocketmq-4.7.0/store/commitlog

#消费队列存储路径
storePathConsumeQueue=/data/rocketmq-4.7.0/store/consumequeue

# 消息索引存储路径
storePathIndex=/data/rocketmq-4.7.0/store/index

# checkpoint 文件存储路径
storeCheckpoint=/data/rocketmq-4.7.0/store/checkpoint

#abort 文件存储路径
abortFile=/data/rocketmq-4.7.0/store/abort

#发送消息是否使用可重入锁
useReentrantLockWhenPutMessage=true

#消息在发送队列超时时间
waitTimeMillsInSendQueue=300
EOF
192.168.10.182为 Nameserver 和 Broker-b-master,创建配置文件
cat > conf/broker-b-master.properties << EOF
#### Mq cluster broker-b-master node ###
namesrvAddr=192.168.10.181:9876;192.168.10.182:9876;192.168.10.183:9876
brokerClusterName=DefaultCluster
brokerName=broker-b
brokerIP1=192.168.10.182
brokerId=0
autoCreateTopicEnable=false
sendMessageThreadPoolNums=128
deleteWhen=04
fileReservedTime=48
brokerRole=SYNC_MASTER
flushDiskType=ASYNC_FLUSH

#存储路径
storePathRootDir=/data/rocketmq-4.7.0/store

#commitLog存储路径
storePathCommitLog=/data/rocketmq-4.7.0/store/commitlog

#消费队列存储路径
storePathConsumeQueue=/data/rocketmq-4.7.0/store/consumequeue

# 消息索引存储路径
storePathIndex=/data/rocketmq-4.7.0/store/index

# checkpoint 文件存储路径
storeCheckpoint=/data/rocketmq-4.7.0/store/checkpoint

#abort 文件存储路径
abortFile=/data/rocketmq-4.7.0/store/abort

#发送消息是否使用可重入锁
useReentrantLockWhenPutMessage=true

#消息在发送队列超时时间
waitTimeMillsInSendQueue=300
EOF
192.168.10.183为 Nameserver 和 Broker-c-master,创建配置文件
cat > conf/broker-c-master.properties << EOF
#### Mq cluster broker-c-master node ###
namesrvAddr=192.168.10.181:9876;192.168.10.182:9876;192.168.10.183:9876
brokerClusterName=DefaultCluster
brokerName=broker-c
brokerIP1=192.168.10.183
brokerId=0
autoCreateTopicEnable=false
sendMessageThreadPoolNums=128
deleteWhen=04
fileReservedTime=48
brokerRole=SYNC_MASTER
flushDiskType=ASYNC_FLUSH

#存储路径
storePathRootDir=/data/rocketmq-4.7.0/store

#commitLog存储路径
storePathCommitLog=/data/rocketmq-4.7.0/store/commitlog

#消费队列存储路径
storePathConsumeQueue=/data/rocketmq-4.7.0/store/consumequeue

# 消息索引存储路径
storePathIndex=/data/rocketmq-4.7.0/store/index

# checkpoint 文件存储路径
storeCheckpoint=/data/rocketmq-4.7.0/store/checkpoint

#abort 文件存储路径
abortFile=/data/rocketmq-4.7.0/store/abort

#发送消息是否使用可重入锁
useReentrantLockWhenPutMessage=true

#消息在发送队列超时时间
waitTimeMillsInSendQueue=300
EOF
192.168.10.184为 Broker-a-slave,创建配置文件
cat < conf/broker-a-slave.properties <192.168.10.185为 Broker-b-slave,创建配置文件
cat < conf/broker-b-slave.properties <192.168.10.186为 Broker-c-slave,创建配置文件
cat < conf/broker-c-slave.properties <启动 Mq 集群:
先依次或同时在 3 个 nameserver 节点启动 nameserver 服务
nohup /data/rocketmq-4.7.0/bin/mqnamesrv &jps命令可以看到有进程 “NamesrvStartup” 存在
然后依次或同时在 3 个 broker-master 和 broker-slave 节点启动 broker 服务
nohup /data/rocketmq-4.7.0/bin/mqbroker -c /data/rocketmq-4.7.0/conf/broker-a-master.properties &nohup /data/rocketmq-4.7.0/bin/mqbroker -c /data/rocketmq-4.7.0/conf/broker-b-master.properties &nohup /data/rocketmq-4.7.0/bin/mqbroker -c /data/rocketmq-4.7.0/conf/broker-c-master.properties &nohup /data/rocketmq-4.7.0/bin/mqbroker -c /data/rocketmq-4.7.0/conf/broker-a-slave.properties &nohup /data/rocketmq-4.7.0/bin/mqbroker -c /data/rocketmq-4.7.0/conf/broker-b-slave.properties &nohup /data/rocketmq-4.7.0/bin/mqbroker -c /data/rocketmq-4.7.0/conf/broker-c-slave.properties &jps命令可以看到nameserver和broker master 节点有 “NamesrvStartup” 和 “BrokerStartup” 两个进程;broker slave 节点有 “BrokerStartup” 进程存在。
停止的话,直接 kill PID 就可以,毕竟自带的停止脚本里也是 kill PID 。毕竟 java 程序在启动上实际执行的都是 java -server 的命令启动到后台的,停止的话,只能 kill 这个进程的 PID 。
安装RokectMq图形化界面
github地址: https://github.com/apache/rocketmq-externals
编译完后,会生成一个 rocketmq-console-ng-0.0.jar 包
使用这个包,愉快的启动就成
nohup java -jar rocketmq-console-ng-1.0.0.jar --server.port=8080 --rocketmq.config.namesrvAddr=192.168.10.181:9876;192.168.10.182:9876;192.168.10.183:9876 &浏览器 ip:port 打开查看 Cluster 一列是否有正常的集群信息,在 Topic 中尝试添加 新的 topic 到每一broker 。
写的不好,多多见谅。这篇博客是给我自个儿看的。


