EMCC监控_ORACLE
目录:
01-EMCC课程概述
02-EMCC架构概述
03-EMCC安装部署-1
04-Redhat配置使用yum
05-EMCC安装部署-2
06-OMS管理
07-agent管理
08-使用EMCC在Linux系统部署agent代理
09-使用EMCC监控Oracle数据库
10-使用EMCC监控CDB容器数据库
11-使用EMCC监控RAC集群
12-在Windows系统手工部署agent代理
02-EMCC架构概述
Oracle Enterprise Manager Cloud Control(EMCC)
Grid control:
13.3:
10g/11g EM 管理单机
12c em express 轻量级
企业管理器云控制架构:
Enterprise Manager Cloud Control包括以下组件:
1.Oracle Management Agent(管理代理)
2.Oracle Management Service(管理服务)
3.Oracle Management Repository(管理资料档案库)12c数据库
4.Plug-Ins(插件)
5.Enterprise Manager Cloud Control Console(EMCC控制台)web界面

Java虚拟机诊断(JVMD)引擎能够诊断生产环境中Java应用程序中的性能问题。
Oracle商业智能(BI)发布者是Oracle的主要报告工具。
企业管理器管理重点领域:
- 框架和基础设施
- 企业监控
- 应用管理
- 数据库管理
- 中间件管理
- 硬件和虚拟化管理
- 异构(非Oracle)管理
- 云管理
- 混合云管理
- 生命周期管理
- 应用性能管理
- 应用质量管理
03-EMCC安装部署
3.1安装包及环境参数准备
安装包下载并上传:
使用Oracle用户上传并授权
chmod a+x em13300_linux64.bin
EMCC的硬件要求:
Oracle Management Service的CPU,RAM,堆大小和硬盘空间要求:
CPU:4核,内存:10GB
Oracle Management Agent的CPU,RAM和硬盘空间要求
CPU:2核,内存:512M
Oracle Management Repository的CPU,RAM和硬盘空间要求
CPU:4核,内存:7GB
操作系统:
Redhat Linux 6/7
Oracle Linux 6/7
Centos 不受支持,但是可以安装,安装的时候有些项目不会进行检查。
内存:本课程使用16GB
数据库字符集:AL32UTF8
操作系统:Redhat 7.6 64位
CPU:本课程使用4核
Oracle Management Service的内核参数要求:
cat /proc/sys/net/ipv4/ip_local_port_range
vi /etc/sysctl.d/97-oracledatabase-sysctl.conf
net.ipv4.ip_local_port_range = 11000 65000
设置kernel.shmmax内核参数:
如果OMS和OMR位于不同的主机上:
将kernel.shmmax参数设置为小于4 GB的1字节值或4294967295。
如果OMS和OMR位于同一主机上:
和oracle配置保持一致
/etc/sysctl.d/97-oracledatabase-sysctl.conf
建立目录:
mkdir -p /u02/middleware
mkdir -p /u02/agent
chown -R oracle:oinstall /u02
chmod -R 775 /u02
Oracle123
数据库设置:
_allow_insert_with_update_check=TRUE

alter system set session_cached_cursors=400 scope=spfile;
alter system set shared_pool_size=1G scope=spfile;

alter system set sga_target=5G scope=spfile;
alter system set pga_aggregate_target=1G scope=spfile;
注意: _allow_insert_with_update_check=TRUE设置说明:
SQL> show parameter _allow(查看设置情况)
SQL> shutdown immediate
SQL> create pfile from spfile;(通过spfile创建pfile)
[oracle@ouzy ~]$ cd $ORACLE_HOME/dbs
[oracle@ouzy dbs]$ ll
[oracle@ouzy dbs]$ vi initzydb.ora (编辑pfiel)
添加: _allow_insert_with_update_check=TRUE
[oracle@ouzy dbs]$ sqlplus / as sysdba
SQL> create spfile from pfile;
SQL> startup
SQL> show parameter _allow

redo日志大小300M
TOAD
查看redo日志
[oracle@ouzy db_1]$ cd /u01/app/oracle/oradata/zydb/
[oracle@ouzy zydb]$ ll

3.2 redhat替换为 centos的yum:
redhat centos
替换yum:
rpm -qa|grep yum
rpm -qa|grep yum|xargs rpm -e --nodeps(不检查依赖,直接删除rpm包)
rpm -qa |grep yum (查询确认)
wget http://mirrors.163.com/centos/7/os/x86_64/Packages/yum-3.4.3-161.el7.centos.noarch.rpm
wget http://mirrors.163.com/centos/7/os/x86_64/Packages/yum-metadata-parser-1.1.4-10.el7.x86_64.rpm
wget http://mirrors.163.com/centos/7/os/x86_64/Packages/yum-plugin-fastestmirror-1.1.31-50.el7.noarch.rpm
wget http://mirrors.163.com/centos/7/os/x86_64/Packages/yum-utils-1.1.31-50.el7.noarch.rpm
rpm -ivh *.rpm
配置yum源:
http://mirrors.aliyun.com/repo/Centos-7.repo
wget -O /etc/yum.repos.d/Centos-7.repo http://mirrors.aliyun.com/repo/Centos-7.repo
配置/subscription-manager.conf:
vi /etc/yum/pluginconf.d/subscription-manager.conf
enabled=0
将下载的Centos-7.repo文件中的 $releasever 全部修改为目标版本 7.6.1810
yum clean all #清理yum缓存,使设置生效
yum makecache #将服务器上的软件包信息缓存到本地,以提高搜索安装软件的速度
替换yum完成。
3.3开始安装emcc
安装前:
启动监听:[oracle@ouzy ~]$ lsnrctl start
启动数据库:
SQL> startup
SQL> select status from v i n s t a n c e ; 检 查 是 否 为 非 C D B 数 据 库 : S Q L > d e s c v instance; 检查是否为非CDB数据库: SQL> desc v instance;检查是否为非CDB数据库:SQL>descvdatabase;
SQL> select cdb from v$database;
开始安装emcc:(到软件存放目录下执行)
[oracle@ouzy soft]$ ./em13300_linux64.bin
根据提示安装缺包:
yum install glibc-devel.i686

选择路径:

设置密码:(统一设置为:Oracle123)


设置sysman/agent密码:(Oracle123)

不创建同享的发布器

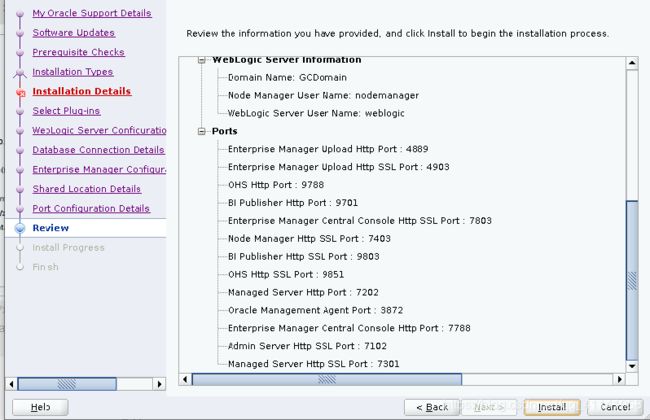
端口保存备忘:

概要:


root用户执行提示命令:
/u02/middleware/allroot.sh
安装时间非常长:1个半小时左右
This information is also available at:

	/u02/middleware/install/setupinfo.txt

See the following for information pertaining to your Enterprise Manager installation:


Use the following URL to access:

	1. Enterprise Manager Cloud Control URL: https://ouzy:7803/em
	2. Admin Server URL: https://ouzy:7102/console
	3. BI Publisher URL: https://ouzy:9803/xmlpserver/servlet/home

The following details need to be provided while installing an additional OMS:

	1. Admin Server Host Name: ouzy
	2. Admin Server Port: 7102

You can find the details on ports used by this deployment at : /u02/middleware/install/portlist.ini


 NOTE:
 An encryption key has been generated to encrypt sensitive data in the Management Repository. If this key is lost, all encrypted data in the Repository becomes unusable.

 A backup of the OMS configuration is available in /u02/gc_inst/em/EMGC_OMS1/sysman/backup on host ouzy. See Cloud Control Administrators Guide for details on how to back up and recover an OMS.

 NOTE: This backup is valid only for the initial OMS configuration. For example, it will not reflect plug-ins installed later, topology changes like the addition of a load balancer, or changes to other properties made using emctl or emcli. Backups should be created on a regular basis to ensure they capture the current OMS configuration. Use the following command to backup the OMS configuration:
/u02/middleware/bin/emctl exportconfig oms -dir

web地址:
emcc地址:
https://192.168.230.211:7803/em
sysman/Oracle123
weblogic控制台地址:
https://192.168.230.211:7102/console
weblogic/Oracle123
BI Publisher地址:
https://192.168.230.211:9803/xmlpserver/servlet/home
https://192.168.230.211:9851/xmlpserver/servlet/home
sysman/Oracle123
4-EMCC管理(OMS/agent管理)
jps命令
查询jps位置:
[root@ouzy ~]# find /u02 -name java
[root@ouzy ~]# cd /u02/middleware/oracle_common/jdk/bin

设置root环境变量(根目录cd ~):
[root@ouzy ~]# vi .bash_profile
export PATH=/u02/middleware/oracle_common/jdk/bin:$PATH
[root@ouzy ~]# source .bash_profile(使环境变量设置生效)
[root@ouzy ~]# jps(查看进程)

设置oracle环境变量(根目录cd ~):
[root@ouzy ~]# vi .bash_profile
export PATH=/u02/middleware/oracle_common/jdk/bin:$PATH
[root@ouzy ~]# source .bash_profile(使环境变量设置生效)
ps -ef|grep java(查看进程)
1.启动数据库
Oracle Management Repository
2.启动oms
cd /u02/middleware/bin(执行文件路径)
./emctl getversion oms(查看版本)
./emctl status oms(查看状态)
./emctl status oms -details(查看oms详细信息)
./emctl status oms -details -sysman_pwd Oracle123(指定密码查看详细)
./emctl list properties(查看属性)
./emctl stop oms
./emctl start oms(启动oms)
修改OMS的JVM内存:
./emctl get property -name OMS_HEAP_MAX -sysman_pwd Oracle123
./emctl set property -name OMS_HEAP_MAX -value 2048M -sysman_pwd Oracle123

./emctl get property -name OMS_HEAP_MIN -sysman_pwd Oracle123
./emctl set property -name OMS_HEAP_MIN -value 512M -sysman_pwd Oracle123
或直接修改如下属性的配置文件:(编辑后需重启)
/u02/gc_inst/em/EMGC_OMS1/emgc.properties
数据采集端口:4903
/u02/middleware/install/portlist.ini(查看端口信息)
/u02/middleware/install/eminstall.info(查看路径信息)
/u02/middleware/install/setupinfo.txt(查看安装信息)
3.启动agent
cd /u02/agent/agent_13.3.0.0.0/bin(路径)
./emctl getversion agent(查看版本)
./emctl status agent(查看agent状态)
./emctl stop agent
./emctl start agent

./emctl pingOMS(测试agent是否与OMS连通)
./emctl upload agent(上传agent至服务端OMS)
端口:3872
停止云控制及其所有组件
执行路径:cd /u02/middleware/bin/
./emctl stop oms -all 停止云控制及其所有组件
执行路径:cd /u02/agent/agent_13.3.0.0.0/bin/
./emctl stop agent
./emctl reload agent
/u02/agent/agent_13.3.0.0.0/install/eminstall.info(查看agent信息)
/u02/agent/agent_13.3.0.0.0/agent.rsp(端口信息)
/u02/agent/agent_inst/sysman/config/emd.properties(查看属性文件)
web地址:
emcc地址:
https://192.168.230.211:7803/em
sysman/Oracle123
weblogic控制台地址:
https://192.168.230.211:7102/console
weblogic/Oracle123
五、添加主机
添加主机(windows和linux)
添加数据库(非CDB)
添加数据库(CDB)
添加集群数据库(RAC)
5.1添加主机目标:
1️⃣配置etc/hosts:
192.168.230.101 ouzy
设置-添加目标-手动添加目标-在主机上安装代理-
添加-手动-输入添加主机IP,选择对应平台-下一步-设置安装基目录:/u02/agent
验证填oracle、root用户身份证明信息(默认设置密码Oracle123,方便记忆,密码另存为改为root或者Oracle)-安装部署代理-完成
查看部署日志:(tail -f 文件名)(emcc主机上)
tail -f /u02/gc_inst/em/EMGC_OMS1/sysman/agentpush/2019-08-20_20-55-47-PM/applogs/192.168.230.100_deploy.log

安装完成后在agent上查看安装情况(oracle)
/u02/agent/agent_13.3.0.0.0/bin
[oracle@ouzy bin]$ ./emctl status agent
[oracle@ouzy bin]$ ./emctl upload agent(手动上传)
删除目标主机:
主机-目标设置-删除目标
全选-移去
代理:
点击无法删除的代理主机-代理-目标设置-取消代理使用(先停止代理agent)

5.2 添加数据库
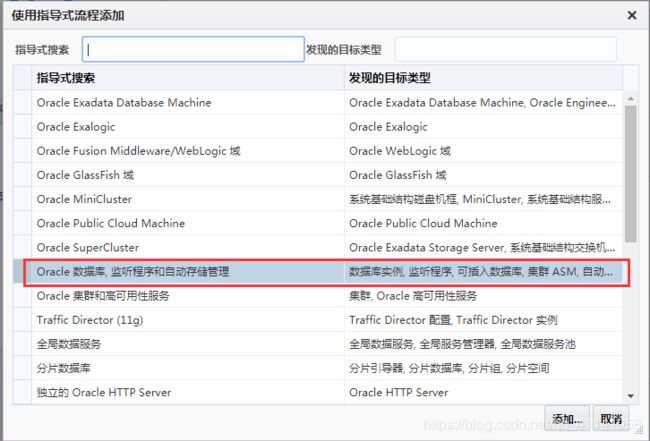
目标-数据库-搜索列表
添加-Oracle数据库-选择主机
配置身份证明-监视口令、监听配置
5.3 添加集群数据库(RAC):
11.2.0.4 RAC
1.批量添加主机
2.添加集群和高可用服务
3.添加集群数据库
下载agent:
./emcli login -username=sysman -password=Oracle123
./emcli get_supported_platforms
./emcli get_agentimage -destination=/tmp/agentImage -platform=“Linux x86-64”
./emcli get_agentimage -destination=/tmp/agentImage -platform=“Microsoft Windows x64 (64-bit)”
安装windows Agent:
agentDeploy.bat -ignorePrereqs ORACLE_HOSTNAME=WIN-69T8P7124O4 AGENT_BASE_DIR=d:\u02\agent OMS_HOST=fxemcc EM_UPLOAD_PORT=4903 AGENT_INSTANCE_HOME=d:\u02\agent\agent_inst b_startAgent=false AGENT_PORT=3872
./emctl unsecure agent
./emctl secure agent
导入agent软件:
emcli import_update -omslocal -file xxx.zip


