LimeSDR实验教程(9) GPS接收 (portapack发射的信号、实际卫星信号)

LimeSDR接收GPS其实我去年试过,但是没成功锁定。所以停滞了一段时间。最近用了portapack,可以手持式发射gps信号,这样我有了可控的信号源,确保信号强度没问题,并且实验环境搭建也方便了好多,所以这几天我打算重新测试gps接收功能,搞定以后再到室外收实际信号。
首先我们来实现portapack的gps发射。
参考这个视频:
https://www.bilibili.com/video/av76517684
要注意portapack必须要购买带高精度晶振的版本,另外固件要刷gridRF版本,用官方的或者havoc的都不行。
固件在这下载:
链接: https://pan.baidu.com/s/16flB0h_nBvkfMGmqYMv95w 提取码: iccf
刷完固件要上github:
https://github.com/furrtek/portapack-havoc
到这里把sdcard目录里的东西复制到一张tf卡里。
如果网速不够可以从下面地址下载:
链接: https://pan.baidu.com/s/1wnjvZTCjrqkQyzI147bSFQ 提取码: avgp
然后用之前发射gps文章里提过的gps-sdr-sim里的命令
./gps-sdr-sim -e brdc3540.14n -l 40,110,100 -b 8
这个命令会生成生成gpssim.bin文件。
接下来是关键部分:
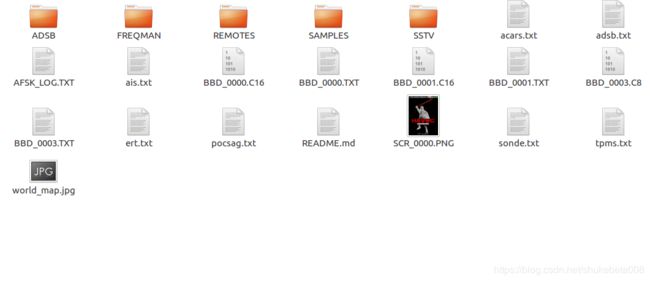
首先把你生成的gpssim.bin文件改名为BBD_0003.C8,另外再新建一个BBD_0003.TXT,内容是:
sample_rate=2600000
center_frequency=1575420000
然后把BBD_0003.C8和BBD_0003.TXT这两个文件一起复制到sd卡根目录下,再把sd卡放到portapack里。
这样,你在portapack里就能用这个文件了,步骤如下。
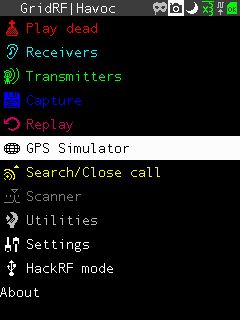
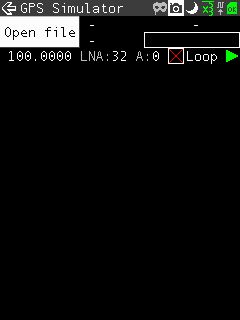
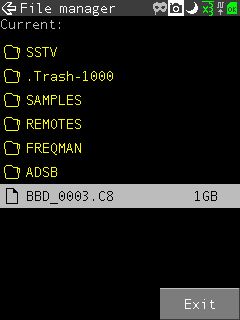
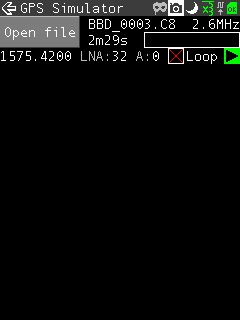
这样portapack就能作为gps信号源了。
接下来说电脑如何安装gnss-sdr。ubuntu 16.04里可以apt安装0.0.6版本,但是我的ubuntu里现在gnuradio是我自己编译的3.7.13了,gnss-sdr会自动让apt装3.7.9的老版本gnuradio,有冲突,所以我自己下载了gnss-sdr源代码安装。我也试过了好多个版本,最新的0.0.11版本,它会嫌弃ubuntu 16.04里的2.6版protobuf太老,要求下载protobuf,是从code.google.com里下载的,国内被墙,而且我自己按照他们的步骤编译安装的3.9版本也没找到。然后我倒退了几个版本,发现0.0.9版本,编译起来还算比较容易。下面是步骤,由于我试过几个版本,安装包有重复安装的情况,所以下面的步骤不一定完全正确,要以后找干净的电脑试了才准确知道。
有几个包挺重要的,如果不apt装他们,编译gnss-sdr的时候会自动上网下载它们的源代码,那就非常耗时了而且可能失败,所以推荐apt装好:
libmatio-dev libpugixml-dev libgtest-dev
另外,libblas-dev liblapack-dev libarmadillo-dev libgflags-dev libgoogle-glog-dev libhdf5-dev libgnutls-openssl-dev这些包我应该没去装,我是按照gnss-sdr的编译教程里下载源代码装的,但是apt装这些包有可能就不用编译那些代码了,以后可以试试。
下面是gnss-sdr里编译这些依赖库的步骤,我都做过了,但是我觉得可以用上面那些apt包代替,也许你可以不装下面的这些东西。
Install Armadillo, a C++ linear algebra library:
$ sudo apt-get install libblas-dev liblapack-dev       # For Debian/Ubuntu/LinuxMint
$ sudo yum install lapack-devel blas-devel             # For Fedora/CentOS/RHEL
$ sudo zypper install lapack-devel blas-devel          # For OpenSUSE
$ sudo pacman -S blas lapack                           # For Arch Linux
$ wget http://sourceforge.net/projects/arma/files/armadillo-9.600.4.tar.xz
$ tar xvfz armadillo-9.600.4.tar.xz
$ cd armadillo-9.600.4
$ cmake .
$ make
$ sudo make install
The full stop separated from cmake by a space is important. CMake will figure out what other libraries are currently installed and will modify Armadillo's configuration correspondingly. CMake will also generate a run-time armadillo library, which is a combined alias for all the relevant libraries present on your system (eg. BLAS, LAPACK and ATLAS).
Install Gflags, a commandline flags processing module for C++:
$ wget https://github.com/gflags/gflags/archive/v2.2.2.tar.gz
$ tar xvfz v2.2.2.tar.gz
$ cd gflags-2.2.2
$ cmake -DBUILD_SHARED_LIBS=ON -DBUILD_STATIC_LIBS=OFF -DBUILD_gflags_nothreads_LIB=OFF .
$ make
$ sudo make install
$ sudo ldconfig
Install Glog, a library that implements application-level logging:
$ wget https://github.com/google/glog/archive/v0.4.0.tar.gz
$ tar xvfz v0.4.0.tar.gz
$ cd glog-0.4.0
$ ./autogen.sh
$ ./configure
$ make
$ sudo make install
$ sudo ldconfig
Build the Google C++ Testing Framework, also known as Google Test:
$ wget https://github.com/google/googletest/archive/release-1.8.1.zip
$ unzip release-1.8.1.zip
$ cd googletest-release-1.8.1
$ cmake -DINSTALL_GTEST=OFF -DBUILD_GMOCK=OFF .
$ make
Please DO NOT install Google Test (do not type sudo make install). Every user needs to compile his tests using the same compiler flags used to compile the installed Google Test libraries; otherwise he may run into undefined behaviors (i.e. the tests can behave strangely and may even crash for no obvious reasons). The reason is that C++ has this thing called the One-Definition Rule: if two C++ source files contain different definitions of the same class/function/variable, and you link them together, you violate the rule. The linker may or may not catch the error (in many cases it is not required by the C++ standard to catch the violation). If it does not, you get strange run-time behaviors that are unexpected and hard to debug. If you compile Google Test and your test code using different compiler flags, they may see different definitions of the same class/function/variable (e.g. due to the use of #if in Google Test). Therefore, for your sanity, we recommend to avoid installing pre-compiled Google Test libraries. Instead, each project should compile Google Test itself such that it can be sure that the same flags are used for both Google Test and the tests. The building system of GNSS-SDR does the compilation and linking of googletest to its own tests; it is only required that you tell the system where the googletest folder that you downloaded resides. Just add to your $HOME/.bashrc file the following line:
export GTEST_DIR=/home/username/googletest-release-1.8.1/googletest
changing /home/username/googletest-release-1.8.1/googletest by the actual directory where you built googletest.
Install the GnuTLS or OpenSSL libraries:
$ sudo apt-get install libgnutls-openssl-dev    # For Debian/Ubuntu/LinuxMint
$ sudo yum install openssl-devel                # For Fedora/CentOS/RHEL
$ sudo zypper install openssl-devel             # For OpenSUSE
$ sudo pacman -S openssl                        # For Arch Linux
In case the GnuTLS library with openssl extensions package is not available in your GNU/Linux distribution, GNSS-SDR can also work well with OpenSSL.
Install Protocol Buffers, a portable mechanism for serialization of structured data:
GNSS-SDR requires Protocol Buffers v3.0.0 or later. If the packages that come with your distribution are older than that (e.g., Ubuntu 16.04 Xenial and Debian 8 Jessie came with older versions), then you will need to install it manually. First, install the dependencies:
$ sudo apt-get install autoconf automake libtool curl make g++ unzip
and then:
$ wget https://github.com/protocolbuffers/protobuf/releases/download/v3.9.0/protobuf-cpp-3.9.0.tar.gz
$ tar xvfz protobuf-cpp-3.9.0.tar.gz
$ cd protobuf-3.9.0
$ ./autogen.sh
$ ./configure
$ make
$ sudo make install
$ sudo ldconfig
前期准备做完了可以编译安装gnss-sdr了。
https://github.com/gnss-sdr/gnss-sdr
你可以直接到gnss-sdr的release里找到0.0.9版本。
$ cd gnss-sdr
$ mkdir build
$ cd build
$ cmake -DENABLE_OSMOSDR=ON ..
$ make
$ sudo make install
这样gnss-sdr就装好了,你还需要一个好用的conf文件,这个也很重要。
我用的是这个,对于limesdr-mini,天线用LNAW,如果是limesdr-usb,我用的是LNAL。
[GNSS-SDR]

;######### GLOBAL OPTIONS ##################
GNSS-SDR.internal_fs_hz=2000000

;######### SIGNAL_SOURCE CONFIG ############
SignalSource.implementation=Osmosdr_Signal_Source
SignalSource.item_type=gr_complex
SignalSource.sampling_frequency=2000000
;# LimeSDR RX1 antennas: NONE,LNAH,LNAL,LNAW
SignalSource.antenna=LNAW
SignalSource.freq=1575420000
SignalSource.gain=40
SignalSource.rf_gain=40
SignalSource.if_gain=30
SignalSource.AGC_enabled=false
SignalSource.samples=0
SignalSource.repeat=false
;# Next line enables the LimeSDR
SignalSource.osmosdr_args=driver=lime,soapy=0
SignalSource.enable_throttle_control=false
SignalSource.dump=false
SignalSource.dump_filename=./LimeSDR_signal_source.dat

;######### SIGNAL_CONDITIONER CONFIG ############
SignalConditioner.implementation=Signal_Conditioner

;######### DATA_TYPE_ADAPTER CONFIG ############
DataTypeAdapter.implementation=Pass_Through

;######### INPUT_FILTER CONFIG ############
InputFilter.implementation=Freq_Xlating_Fir_Filter
InputFilter.decimation_factor=1
InputFilter.input_item_type=gr_complex
InputFilter.output_item_type=gr_complex
InputFilter.taps_item_type=float
InputFilter.number_of_taps=5
InputFilter.number_of_bands=2
InputFilter.band1_begin=0.0
InputFilter.band1_end=0.85
InputFilter.band2_begin=0.9
InputFilter.band2_end=1.0
InputFilter.ampl1_begin=1.0
InputFilter.ampl1_end=1.0
InputFilter.ampl2_begin=0.0
InputFilter.ampl2_end=0.0
InputFilter.band1_error=1.0
InputFilter.band2_error=1.0
InputFilter.filter_type=bandpass
InputFilter.grid_density=16
InputFilter.dump=false
InputFilter.dump_filename=…/data/input_filter.dat

;######### RESAMPLER CONFIG ############
Resampler.implementation=Pass_Through

;######### CHANNELS GLOBAL CONFIG ############
Channels_1C.count=8
Channels.in_acquisition=1
Channel.signal=1C

;######### ACQUISITION GLOBAL CONFIG ############
Acquisition_1C.implementation=GPS_L1_CA_PCPS_Acquisition_Fine_Doppler
Acquisition_1C.item_type=gr_complex
Acquisition_1C.if=0
Acquisition_1C.sampled_ms=1
Acquisition_1C.threshold=0.015
Acquisition_1C.doppler_max=10000
Acquisition_1C.doppler_min=-10000
Acquisition_1C.doppler_step=500
Acquisition_1C.max_dwells=15
Acquisition_1C.dump=false
Acquisition_1C.dump_filename=./acq_dump.dat

;######### TRACKING GLOBAL CONFIG ############
Tracking_1C.implementation=GPS_L1_CA_DLL_PLL_Tracking
Tracking_1C.item_type=gr_complex
Tracking_1C.if=0
Tracking_1C.pll_bw_hz=30.0;
Tracking_1C.dll_bw_hz=4.0;
Tracking_1C.order=3;
Tracking_1C.early_late_space_chips=0.5;
Tracking_1C.dump=false
Tracking_1C.dump_filename=./tracking_ch_

;######### TELEMETRY DECODER GPS CONFIG ############
TelemetryDecoder_1C.implementation=GPS_L1_CA_Telemetry_Decoder
TelemetryDecoder_1C.dump=false
TelemetryDecoder_1C.decimation_factor=1;

;######### OBSERVABLES CONFIG ############
Observables.implementation=GPS_L1_CA_Observables
Observables.dump=true
Observables.dump_filename=./observables.dat

;######### PVT CONFIG ############
PVT.implementation=GPS_L1_CA_PVT
PVT.flag_averaging=true
PVT.averaging_depth=5
PVT.output_rate_ms=100
PVT.display_rate_ms=500
PVT.flag_nmea_tty_port=false;
PVT.nmea_dump_devname=/dev/pts/4
PVT.nmea_dump_filename=./nmea_pvt.nmea
PVT.flag_rtcm_server=false
PVT.flag_rtcm_tty_port=false
PVT.rtcm_dump_devname=/dev/pts/1
PVT.dump=true
PVT.dump_filename=./PVT
有了这个文件以后,在这个文件目录下,执行:
gnss-sdr --config_file=./limesdr.conf
参考limesdr接收gps(portapack发射):
https://www.bilibili.com/video/av77174591
如果你要接收室外真实gps信号,还需要一个有源天线和电压偏置就行。
参考:https://www.bilibili.com/video/av77179389
portapack镜像: