Andriod Scroller使用小结
View的滚动
为了记录滚动位置,View里面定义了两个成员变量:
     * The offset, in pixels, by which the content of this view is scrolled
     * horizontally.
     * {@hide}
     */
    @ViewDebug.ExportedProperty(category = "scrolling")
    protected int mScrollX;
    /**
     * The offset, in pixels, by which the content of this view is scrolled
     * vertically.
     * {@hide}
     */
    @ViewDebug.ExportedProperty(category = "scrolling")
    protected int mScrollY;
从注释by which the content of this view is scrolled可以知道滚动的不是View自己,而是内容,后面有例子可以看到,如果是View的话,比如TextView滚动自己的内容是内部的文字在滚动,如果是ViewGroup的话,就是内部的子View在滚动。
/**
     * Return the scrolled left position of this view. This is the left edge of
     * the displayed part of your view. You do not need to draw any pixels
     * farther left, since those are outside of the frame of your view on
     * screen.
     *
     * @return The left edge of the displayed part of your view, in pixels.
     */
    public final int getScrollX() {
        return mScrollX;
    }
注释:返回此视图的向左滚动位置。 这是左边缘显示视图的一部分。 您不需要在更远的左边绘制任何像素,因为那些在你的视图的框架之外屏幕。
    /**
     * Return the scrolled top position of this view. This is the top edge of
     * the displayed part of your view. You do not need to draw any pixels above
     * it, since those are outside of the frame of your view on screen.
     *
     * @return The top edge of the displayed part of your view, in pixels.
     */
    public final int getScrollY() {
        return mScrollY;
    }
注释:返回此视图的向上滚动位置。 这是上边缘显示视图的一部分。 您不需要在更远的上边绘制任何像素,因为那些在你的视图的框架之外屏幕。
那么怎么滚动呢?
View中定义了scrollTo()和scrollBy()方法来让View的内容滚动。具体实现请参照源码。scrollTo()可以是滚动到指定位置,scrollBy()是相对原位置滚动指定偏移量。
例:
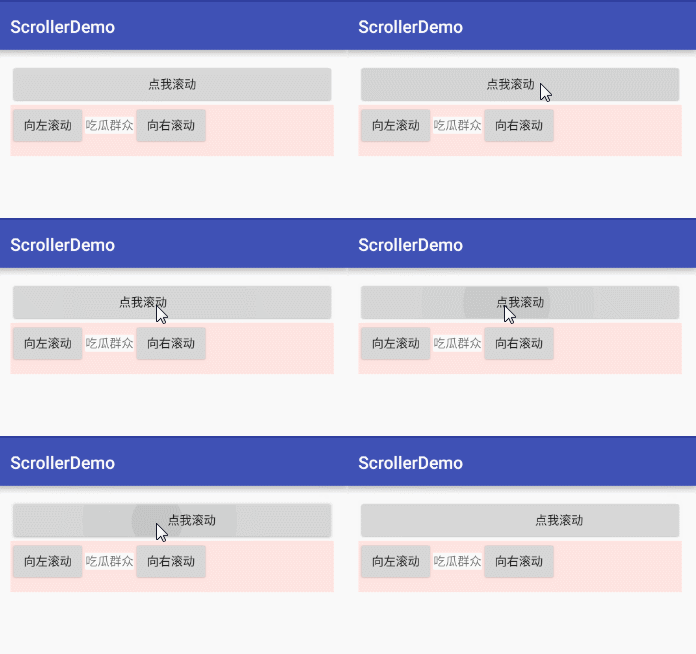
- 一个按钮,点击调用它的scrollBy方法
    public void btnScroll(View view) {
        int x = System.currentTimeMillis() % 2 == 0 ? 30 : -30;
        view.scrollBy(x, 0);
    }
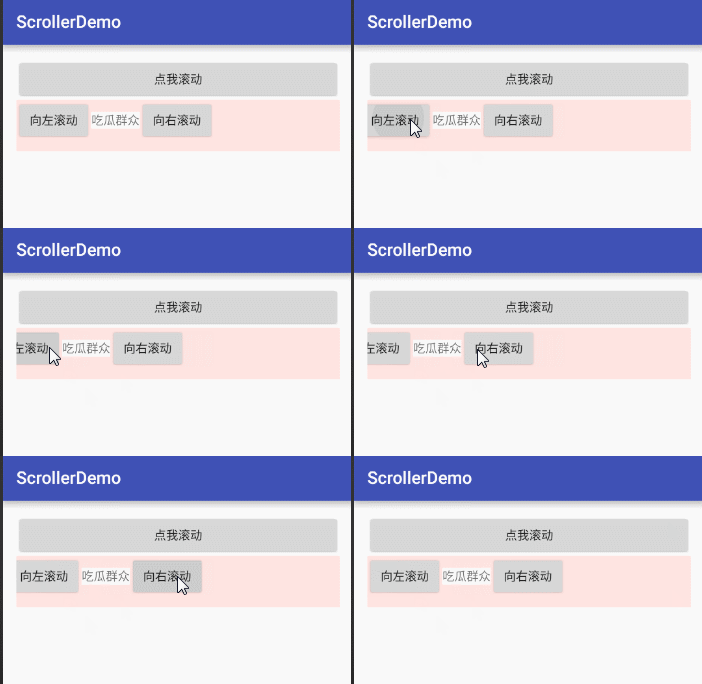
- 一个LinearLayout,点击调用它的scrollBy方法
public void layoutScrollLeft(View view) {
        llScroll.scrollBy(30, 0);
    }

    public void layoutScrollRight(View view) {
        llScroll.scrollBy(-30, 0);
    }
结论:View滚动的不是View自己,而是内容。横向偏移量为正值时向左滚动,为负值时向右滚动。竖直方向滚动类同,为正值时向上滚动,为负值时向下滚动。
Scroller
官方解释:
| android.widget.Scroller是用于模拟scrolling行为,它是scrolling行为的一个帮助类。 |
| 我们通常通过它的startScroll(int startX, int startY, int dx, int dy, int duration) 函数来设置一个scrolling行为模型,即在 int duration (单位为毫秒)时间的内从int startX, int startY,这个点起向X和Y方向分别滚动 int dx和 int dy 个像素。然后我们可以调用 computeScrollOffset() 计算此时scroll到的位置,并调用 getCurrX() 和 getCurrY() 得到到此时在X和Y方向的位置。 |
| 另外我们通常通过它的 fling(int startX, int startY, int velocityX, int velocityY, int minX, int maxX, int minY, int maxY) 函数来设置一个fling行为(特殊的scroll)模型,即在在nt startX, int startY,这个点起向X和Y方向分别以 int velocityX 和 int velocityY 个像素的速度进行滚动。 |
| 然后我们可以调用 computeScrollOffset() 计算此时scroll到的位置,并调用 getCurrX() 和 getCurrY() 得到到此时在X和Y方向的位置。 |
- 构造方法:
Scroller(Context context)
Create a Scroller with the default duration and interpolator.
Scroller(Context context, Interpolator interpolator)
Create a Scroller with the specified interpolator.
interpolator参数只是在computeScrollOffset()函数中用于对我们的流逝的时间(通过timePassed()取得)这值进行重新解析
Scroller(Context context, Interpolator interpolator, boolean flywheel)
Create a Scroller with the specified interpolator.
interpolator只是在computeScrollOffset()函数中用于对我们的流逝的时间(通过timePassed()取得)这值进行重新解析
- 常用方法
| 返回值 | 方法名 | 说明 |
|---|---|---|
| void | abortAnimation() | 停止滚动 |
| boolean | computeScrollOffset() | 计算scroll的情况,返回true表示动画未结束 |
| final void | forceFinished(boolean finished) | 强制设置scroll状态 |
| final int | getStartX() | 得到scroll行为起点的X值 |
| final int | getStartY() | 得到scroll行为起点的Y值 |
| final int | getFinalX() | 得到scroll行为终点的X值 |
| final int | getFinalY() | 得到scroll行为终点的Y值 |
| final boolean | isFinished() | 返回scroll行为是否结束 |
| void | startScroll(int startX, int startY, int dx, int dy) | 设置一个scrolling行为模型,即在 int duration (单位为毫秒)时间的内从int startX, int startY,这个点起向X和Y方向分别滚动 int dx和 int dy 个像素 |
| void | startScroll(int startX, int startY, int dx, int dy, int duration) | 设置一个scrolling行为模型,即在默认时间(250毫秒)内从int startX, int startY,这个点起向X和Y方向分别滚动 int dx和 int dy 个像素 |
| void | fling(int startX, int startY, int velocityX, int velocityY, int minX, int maxX, int minY, int maxY) | 模拟fling形式的scroll行为。int startX, int startY代表起点,int velocityX, int velocityY代表初速度,int minX, int maxX, int minY, int maxY代表终点的范围 |
实践
- 继承LinearLayout,使用Scroller实现左右滑动
定义mScroller: private Scroller mScroller;
重写computeScroll():
    @Override
    public void computeScroll() {
        //先判断mScroller滚动是否完成
        if (mScroller.computeScrollOffset()) {
            //这里调用View的scrollTo()完成实际的滚动
            scrollTo(mScroller.getCurrX(), mScroller.getCurrY());
            //必须调用该方法,否则不一定能看到滚动效果
            postInvalidate();
        }
        super.computeScroll();
    }
重写onTouchEvent:
@Override
    public boolean onTouchEvent(MotionEvent event) {
        int action = event.getAction();
        int xPosition = (int) event.getX();
        switch (action) {
            case MotionEvent.ACTION_DOWN:
                mScroller.abortAnimation();
                mLastX = xPosition;
                mMove = 0;
                break;
            case MotionEvent.ACTION_MOVE:
                mMove = (xPosition - mLastX);
                smoothScrollBy(-mMove, 0);
                break;
        }

        mLastX = xPosition;
        return true;
    }
    //调用此方法设置滚动的相对偏移
    public void smoothScrollBy(int dx, int dy) {
        //设置mScroller的滚动偏移量
        mScroller.startScroll(mScroller.getFinalX(), mScroller.getFinalY(), dx, dy);
        invalidate();//这里必须调用invalidate()才能保证computeScroll()会被调用,否则不一定会刷新界面,看不到滚动效果
    }
关于Scroller使用实例还有:
自定义LinearLayout实现淘宝详情页
重写LinearLayout实现弹性ScrollView效果
- 继承View实现手势滑动
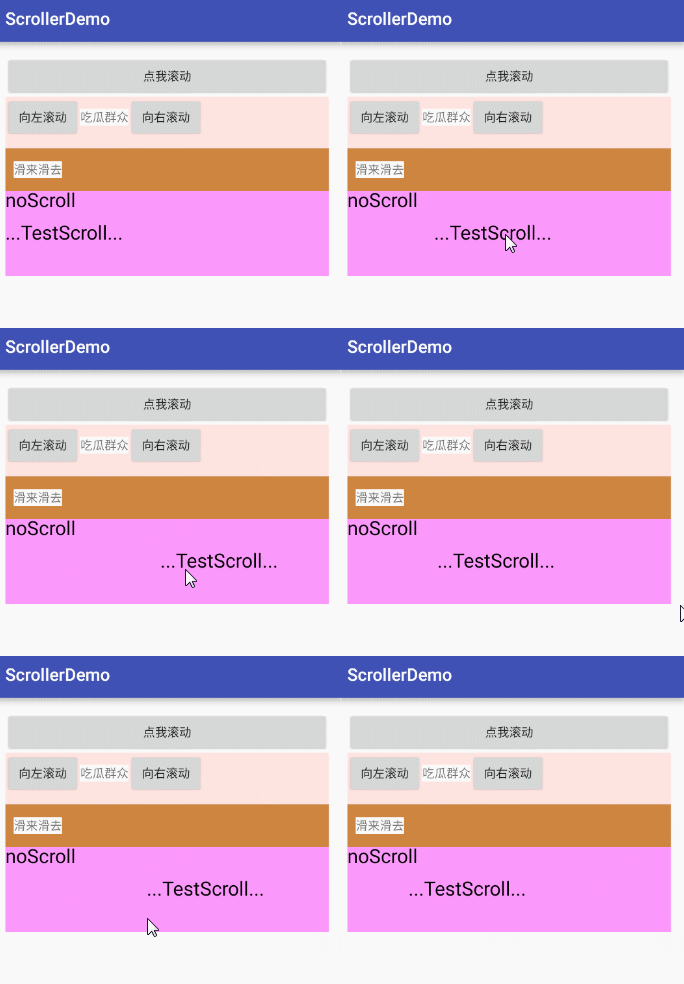
这个例子主要通过Scroller去计算滑动偏移量,并不会调用View的scrollTo()或scrollBy()方法去时内容滚动,而是根据偏移量去绘制滚动(onDraw里控制绘制位置),这样能更容易控制这个View中哪些内容需要滚动。
定义mScroller: private Scroller mScroller;
记录偏移量:int mMove;
重写computeScroll():
这里只是根据Scroller获取偏移量,没有调用View的scrollTo()或scrollBy()方法
 @Override
    public void computeScroll() {
        Log.e(TAG, "-----------computeScroll");
        if (mScroller.computeScrollOffset()) {
            mMove = mScroller.getCurrX();
            Log.e(TAG, "mMove:" + mMove);
            postInvalidate();
        }
    }
在onDraw里控制偏移位置,invalidate的时候出现滑动的效果,这样还可以控制哪些内容滑动,哪些不需要滑动
    @Override
    protected void onDraw(Canvas canvas) {
        super.onDraw(canvas);
        paint.setStyle(Paint.Style.FILL);
        paint.setColor(Color.MAGENTA);
        paint.setAlpha(100);
        canvas.drawRect(0, 0, getMeasuredWidth(), getMeasuredHeight(), paint);

        paint.setAlpha(255);
        paint.setColor(Color.BLACK);

//控制这个不滑动
        canvas.drawText("noScroll", 0, 50, paint);

        mMove = Math.max(0, mMove);
        mMove = Math.min(getMeasuredWidth() - 200, mMove);
//        Log.e(TAG, "mMove=" + mMove);
        canvas.drawText("...TestScroll...", mMove, 150, paint);
    }
这里还借助GestureDetector来控制fling效果(就是惯性滑动):
private GestureDetectorCompat gestureDetector;
gestureDetector = new GestureDetectorCompat(getContext(), new SimpleGestureListener());
 private class SimpleGestureListener extends
            GestureDetector.SimpleOnGestureListener {
        @Override
        public boolean onFling(MotionEvent e1, MotionEvent e2, float velocityX, float velocityY) {
            mScroller.fling(mMove, 0, (int)velocityX, (int)velocityY, 0, getMeasuredWidth(), 0, 0);
            return true;
        }
    }
smoothScrollBy()方法和上一个例子一样
    //调用此方法设置滚动的相对偏移
    public void smoothScrollBy(int dx, int dy) {
        Log.e(TAG, "smoothScrollBy:" + dx);
        //设置mScroller的滚动偏移量
        mScroller.startScroll(mScroller.getFinalX(), mScroller.getFinalY(), dx, dy);
        invalidate();//这里必须调用invalidate()才能保证computeScroll()会被调用,否则不一定会刷新界面,看不到滚动效果
    }
下载
https://github.com/LineChen/ScrollerDemo


