一个文件实现横向纵向拉拽刷新
今天分享一个非常轻量级的拉拽刷新控件,源码已上传到github:
https://github.com/huzenan/EasyPullLayout
再老的司机也难免遇到这样的场景,产品跑过来大声对我说:首页要加刷新,下拉刷新非侵入式,上拉加载为侵入式,头部轮播图片最左边向右继续拖拽进入xx页,最右边向左继续拖拽进入xx页!噢,xx页再加一个从中间下拉刷新吧!噢,设计已经出好了刷新的动画和规范,照着做就好了。
(╯‵□′)╯︵┻━┻ 顿时有了掀桌子的小心情,怎么办,写一个统一的刷新的库?太重了而且方法数爆了怎么办?
然而,现在我有了EasyPullLayout,你想加什么随便加就是了,上拉、下拉、左拉、右拉,任何姿势我都能给,整个控件只有一个文件,不到500行代码,支持横向纵向,侵入非侵入,自定义拉拽行为以及刷新内容,ListView、RecyclerView、ViewPager等等什么内容都能包裹进来,再也不用导入这样那样的库来支持各种各样的刷新了。
看看效果
纵向
横向
一共5个demo,其余的都传了效果图到github上,其中变形金刚动画用到了我写的另一个轻量级的控件EasyPath,使用方法很简单,传送门:
https://github.com/huzenan/EasyPath
用法
1.布局
接着在布局文件中,在需要刷新的地方用EasyPullLayout包裹起来(例如根布局),并为EasyPullLayout下的子View声明layout_type属性,使得子View可以被EasyPullLayout识别,分别可以为content(必选)、edge_top、edge_bottom、edge_left和edge_right:
<com.hzn.lib.EasyPullLayout
    xmlns:android="http://schemas.android.com/apk/res/android"
    xmlns:app="http://schemas.android.com/apk/res-auto"
    android:id="@+id/epl"
    android:layout_width="match_parent"
    android:layout_height="match_parent"
    >

    <com.hzn.easypulllayout.TransformerView
        android:id="@+id/topView"
        android:layout_width="match_parent"
        android:layout_height="wrap_content"
        app:layout_type="edge_top" />

    <android.support.v7.widget.RecyclerView
        android:id="@+id/rv"
        android:layout_width="match_parent"
        android:layout_height="match_parent"
        app:layout_type="content"
        tools:listitem="@layout/item"
        />
com.hzn.lib.EasyPullLayout>
因为layout_type属性是EasyPullLayout提供的,所以不要忘记加入自定义的命名空间(如上为app)。
上面我们的边缘视图(TransformerView)是自定义的一个视图,我们可以通过EasyPullLayout提供的接口来动态改变它的行为。
EasyPullLayout本身也提供属性可选,用于控制拉拽行为和距离等,详细可以参考github中的“属性”一栏。
2.监听
EasyPullLayout的设计遵从单一职责原则,只负责处理拉拽相关的操作,其他的均交给外部进行处理,因此其子View可以是任何一种View,这有点类似于RecyclerView只负责使用和回收操作。
EasyPullLayout有3个监听可以设置,分别为:
OnEdgeListener:
可选,用于通知EasyPullLayout当前是否到达边缘,到达边缘后EasyPullLayout会拦截触摸事件,开始拉拽行为,默认会自动监听layout_type为content的子View是否到达边缘。
OnPullListener:
可选,用于EasyPullLatout向外通知当前拉拽的一些参数(例如拉拽进度),我们可以利用这些参数来改变我们的边缘视图的行为,例如调整变形金刚矢量动画当前的执行位置。
OnTriggerListener:
必选,用于EasyPullLayout在触发边缘动作后向外通知,此时EasyPullLayout会一直停留在STATE_TRIGGERING(触发中)的状态,我们做一些耗时操作后,需要调用stop方法让其回到STATE_IDLE(闲置)状态,这样才完成整个过程。
原理
在看了安卓的SwipeRefreshLayout,以及一些开源的刷新库的源码后,有了一些思路,总结起来,控件主要处理的问题有:
1、为EasyPullLayout的子View提供layout_type属性
2、如何摆放子View
3、在什么时机进行拉拽(即处理事件分发)
处理了这3个问题后,剩下的例如拉拽过程,以及触发事件都很好实现了。
1.提供layout_type属性
EasyPullLayout需要辨别子View的类型,因此需要子View声明自己的类型,我们在ViewGroup的generateLayoutParams方法中,返回我们自己的LayoutParams:
// 返回LayoutParmas
override fun generateLayoutParams(attrs: AttributeSet?): ViewGroup.LayoutParams {
    return LayoutParams(context, attrs)
}

// 自定义LayoutParams
class LayoutParams : ViewGroup.MarginLayoutParams {
    // layout_type默认为NONE
    var type = TYPE_NONE

    constructor(c: Context?, attrs: AttributeSet?) : super(c, attrs) {
        //...
        // 在构造函数中,获取layout_type属性,存储起来
        type = it?.getInt(R.styleable.EasyPullLayout_LayoutParams_layout_type, TYPE_NONE)
        //...
    }

    constructor(width: Int, height: Int) : super(width, height)
    constructor(source: MarginLayoutParams?) : super(source)
    constructor(source: ViewGroup.LayoutParams?) : super(source)
}
这样我们便可以通过子View的LayoutParams对象获取到这个type值。
2.如何摆放子View
EasyPullLayout继承自ViewGroup,在完成xml解析后,即onFinishInflate方法中,获取到子View后用一个HashMap来存储,key对应View,value对应View的一些参数,接着再设置默认的OnEdgeListener:
override fun onFinishInflate() {
    super.onFinishInflate()
    // 遍历子View
    var i = 0
    while (i < childCount) {
        getChildAt(i++).let {
            val lp = it.layoutParams as LayoutParams
            childViews.getByType(lp.type)?.let {
                throw Exception("Each child type can only be defined once!")
            } ?: childViews.put(it, ChildViewAttr()) // 存储子View
        }
    }

    // 确保有一个子View的layout_type为content
    val contentView = childViews.getByType(TYPE_CONTENT) ?:
        throw Exception("Child type \"content\" must be defined!")

    // 设置默认的OnEdgeListener,可以被覆盖
    setOnEdgeListener {
        // 若存在左侧的边缘视图
        childViews.getByType(TYPE_EDGE_LEFT)?.let {
            // 此时判断content是否能向左滚动
            if (!contentView.canScrollHorizontally(-1))
                // 若已经不能滚动,则返回TYPE_EDGE_LEFT表示已经到达了左侧边缘
                return@setOnEdgeListener TYPE_EDGE_LEFT
        }

        // 其余3个方向实现方法也一样

        // 若都不满足,则说明没有到达边缘,返回NONE
        TYPE_NONE
    }
}
然后做测量,遍历子View,对每个子View进行测量,然后记录下边缘视图的一些参数,以及根据这些参数初始化EasyPullLayout自身的一些参数:
override fun onMeasure(widthMeasureSpec: Int, heightMeasureSpec: Int) {
    super.onMeasure(widthMeasureSpec, heightMeasureSpec)
    // 遍历子View
    for ((childView, childViewAttr) in childViews) {
        // 要求该子View进行测量
        measureChildWithMargins(childView,
            widthMeasureSpec, 0, heightMeasureSpec, 0)
        // 得到子View的LayoutParams对象
        val lp = childView.layoutParams as LayoutParams

        when (lp.type) {
            // 类型为横向的子View
            TYPE_EDGE_LEFT, TYPE_EDGE_RIGHT -> {
                // 把子View的size值记录下来,在摆放子View时会用到
                // 横向size对应为宽度加左右margin
                // 纵向size对应为高度加上下margin
                childViewAttr.size =
                    childView.measuredWidth + lp.leftMargin + lp.rightMargin

                // 初始化EasyPullLayout的属性,例如拖拽距离等

            }

            // 纵向的实现方式也一样

        }
    }
}
然后开始摆放,根据测量时记录的参数,我们将边缘视图分别摆放到四周:
override fun onLayout(changed: Boolean, l: Int, t: Int, r: Int, b: Int) {
    // 首先获取content,得到宽高用于给其他子View做参考
    val contentView = childViews.getByType(TYPE_CONTENT)
    val contentWidth = contentView?.measuredWidth
        ?: throw Exception("子View必须包含一个content")
    val contentHeight = contentView.measuredHeight

    for ((childView, childViewAttr) in childViews) {
        // 首先计算出子View的位置
        // 此时还未进行偏移,左上角都位于(0,0)
        val lp = childView.layoutParams as LayoutParams
        var left: Int = paddingLeft + lp.leftMargin
        var top: Int = paddingTop + lp.topMargin
        var right: Int = left + childView.measuredWidth
        var bottom: Int = top + childView.measuredHeight

        when (lp.type) {
            TYPE_EDGE_LEFT -> {
                // 左侧的子View应该向左偏移,摆放在左侧
                left -= childViewAttr.size
                right -= childViewAttr.size
            }

            // 其他3个方向的实现方式也一样

        }
        childViewAttr.set(left, top, right, bottom) // child views' initial location
        childView.layout(left, top, right, bottom)
    }

    // 若设置了左侧拖拽时固定
    if (fixed_content_left)
        // 改变左侧边缘视图z-order,使其在顶部
        childViews.getByType(TYPE_EDGE_LEFT)?.bringToFront()
}
可以看到最后我们还把子View的当前摆放位置记录下来,因为EasyPullLayout是通过改变View的x和y属性来达到位移效果的, 因此需要参考子View的初始位置。另外这样做的好处是,我们可以不通过onLayout来重置位置,避免回调onLayout。
3.处理事件分发
首先要在onInterceptTouchEvent中适当地对事件进行拦截,在ACTION_MOVE事件中回调了OnEdgeListener,这样就把是否进行拦截的判断操作交给了外部进行处理,只要返回正确的类型,则开始对触摸事件进行拦截:
override fun onInterceptTouchEvent(ev: MotionEvent?): Boolean {
    // 不为闲置状态时不处理触摸事件
    if (currentState != STATE_IDLE)
        return false

    when (ev?.action) {
        MotionEvent.ACTION_DOWN -> {
            // 记录按下位置
            downX = ev.x
            downY = ev.y
        }
        MotionEvent.ACTION_MOVE -> {
            // 回调OnEdgeListener,得到type值
            val type = onEdgeListener.invoke()
            currentType = type
            val dx = ev.x - downX
            val dy = ev.y - downY
            return when (type) {
                // 边缘监听返回的是左侧,若向右拉拽且横向比纵向偏移大
                // 则返回值为true,表示开始拦截触摸事件
                TYPE_EDGE_LEFT -> ev.x > downX && Math.abs(dx) > Math.abs(dy)

                // 另外3个方向处理规则相同

                TYPE_NONE -> false
                else -> false
            }
        }
    }
    return false
}
拦截了触摸事件后,开始进行拉拽操作,在onTouchEvent中,ACTION_MOVE事件对必要的子View进行偏移(设置了对应的fixed选项后,content不会进行偏移,达到侵入式效果),ACTION_CANCEL、ACTION_UP事件则将子View位置还原:
override fun onTouchEvent(event: MotionEvent?): Boolean {
    // 不为闲置状态时不处理触摸事件
    if (currentState != STATE_IDLE)
        return false

    when (event?.action) {
        MotionEvent.ACTION_MOVE -> {
            val x = event.x
            val y = event.y
            // 当前偏移值,sticky_factor参数使得拖拽时有黏着效果
            offsetX = (x - downX) * (1 - sticky_factor * 0.75f)
            offsetY = (y - downY) * (1 - sticky_factor * 0.75f)
            var pullFraction = 0f

            when (currentType) {
                TYPE_EDGE_LEFT -> {
                    // 限制offsetX的最小和最大值
                    offsetX = "..."
                    // 计算出当前拖拽进度,未拖拽时为0,到达触发位置时为1
                    pullFraction = "..."
                }
            }

            // 是否经过触发位置,使用该参数可以只在经过触发位置时进行更新
            val changed =
                !(lastPullFraction < 1f && pullFraction < 1f ||
                    lastPullFraction == 1f && pullFraction == 1f)

            // 回调OnPullListener
            onPullListener?.invoke(currentType, pullFraction, changed)

            lastPullFraction = pullFraction

            when (currentType) {
                TYPE_EDGE_LEFT ->
                    for ((childView, childViewAttr) in childViews)
                        if ("如果设置了对应的fixed,且为content,则不偏移")
                            // 子View偏移
                            childView.x = childViewAttr.left + offsetX

                // 其他3个方向规则相同

            }
        }
        MotionEvent.ACTION_CANCEL, MotionEvent.ACTION_UP -> {
            currentState = STATE_ROLLING
            // 松开手指,还原子View位置
            when (currentType) {
                TYPE_EDGE_LEFT, TYPE_EDGE_RIGHT -> rollBackHorizontal()
                TYPE_EDGE_TOP, TYPE_EDGE_BOTTOM -> rollBackVertical()
            }
        }
    }
    return true
}
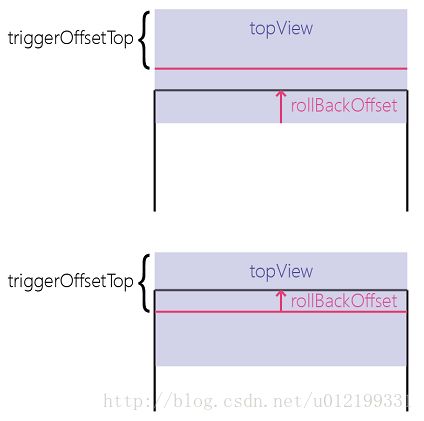
还原子View位置时,我们通过ValueAnimator,在一段时间内将子View还原,还原后的位置分2种情况,第一种还没超过触发偏移量,则还原回到初始位置,第二种已经超过了触发偏移量,则回到触发偏移量的位置,看图比较直观:
rollback分为横向和纵向,下面贴出横向的大致的流程:
private fun rollBackHorizontal() {
    // 需要还原的偏移量
    val rollBackOffset = "..."
    // 触发位置的偏移量
    val triggerOffset = "..."
    // 动画,值从1->0
    horizontalAnimator = ValueAnimator.ofFloat(1f, 0f).apply {
        duration = roll_back_duration
        interpolator = DecelerateInterpolator()
        // 动画更新
        addUpdateListener {
            //...
            for ((childView, childViewAttr) in childViews)
                // 通过rollBackOffset和triggerOffset,以及animatedValue计算得出x
                childView.x = "..."
        }
        // 动画结束后,还原一些参数,回调监听
        addListener(object : AnimatorListenerAdapter() {
            override fun onAnimationEnd(animation: Animator?) {
                if (triggerOffset != 0 && currentState == STATE_ROLLING) {
                    // 还原到触发位置
                    currentState = STATE_TRIGGERING
                    offsetX = triggerOffset.toFloat()
                    // 回调触发监听
                    onTriggerListener?.invoke(currentType)
                } else {
                    // 还原到初始位置
                    currentState = STATE_IDLE
                    offsetX = 0f
                }
            }
        })
        start()
    }
}
最后
因为是Kotlin写的库,所以没有使用kotlin的项目,通过直接gradle直接导入后是看不到源码的,不过不要慌,已经写了一个简单的java版本demo(下面有地址),可以直接用。嗯,随便用,稳稳的。写了好长,逻辑也是已经凌乱了,感谢大伙的围观,谢谢了!
https://github.com/huzenan/EasyPullLayoutJavaDemo
