Android 发布开源项目到jcenter
简介
相信现在android程序猿们大多都使用了studio进行开发,想必大家对于compile 'com.android.support:appcompat-v7:23.3.0'这种方式引入开源项目肯定不陌生,那么大家有没有自己发布开源项目让别人来引用的想法呢?猜也猜得到,大家都想,那么下面我与大家分享一下自己的上传方法,很是简单哦~
本文采用的方式是bintray-release,上传的项目分为两种情况:
1、上传单个moudle项目
2、上传多个moudle项目
单个moudle项目上传
一、创建你要上传的项目
二、注册bintray.com账号
注:jcenter()属于bintray旗下的一个仓库。
我们的上传流程其实就是,从你的Androd Studio,到你的bintray 仓库,最后同步到jcenter仓库。
- 进入https://bintray.com/,注册账号。
- 注册完成后,需要邮箱激活,也可以选择第三方登录。
登录:
登陆后,你可以点击Your Profile->Edit然后就能看到上图的界面。
点击API Key,就可以看到你一段key字符串,把这个copy下放一边,一会上传要用。
三、引入bintray-release
在项目根的build.gradle添加bintray-release的classpath
buildscript {
  repositories {
    jcenter()
  }
  dependencies {
    classpath 'com.android.tools.build:gradle:2.1.0'
    classpath 'com.novoda:bintray-release:0.3.4'

    // NOTE: Do not place your application dependencies here; they belong
    // in the individual module build.gradle files
  }
}

allprojects {
  repositories {
    jcenter()
  }
  tasks.withType(Javadoc) {
    options {
      encoding "UTF-8"
      charSet 'UTF-8'
      links "http://docs.oracle.com/javase/7/docs/api"
    }
  }
}
您准备上传moudle的build.gralde
apply plugin: 'com.android.library'
apply plugin: 'com.novoda.bintray-release'//添加

android {
 lintOptions {
    abortOnError false
  }
}

dependencies {
    //保持不变
}

//添加
publish {
    userOrg = 'walid1992'//bintray.com用户名
    groupId = 'com.walid'//jcenter上的路径
    artifactId = 'retrofit2-tools'//项目名称
    publishVersion = '1.0.0'//版本号
    desc = 'retrofit2 tools to download file '//描述
    website = 'https://github.com/walid1992/retrofit2-tools'//网站,不重要,尽量模拟github上的地址
}
若成功,最终引入的方式为:
compile 'com.walid:retrofit-tools:1.0.0
上传
上传很简单,执行下面的代码即可
mac上传:
 ./gradlew clean build bintrayUpload
 -PbintrayUser=hyman
 -PbintrayKey=xxxxxxxxxxxxxxxxxxxxxx
 -PdryRun=false
 gradlew clean build bintrayUpload
 -PbintrayUser=hyman
 -PbintrayKey=xxxxxxxxxxxxxxxxxxxxxx
 -PdryRun=false
user就是用户名,key就是我们刚才的让你保存的key,dryRun是一个配置参数,当为true的时候,会运行所有的环节,但是不会上传。
点击底部的Terminal即可,注意下你当前的路径是当前项目下,然后enter运行。
稍作等待,当运行完成,看到BUILD SUCCESSFUL就没问题了,如果有什么问题呢,根据log排查下。
到此就上传完成了~
访问https://bintray.com/你的用户名/maven,即可看到如下界面
看到您上传的项目了,你可以点击进去看该库的一些信息,但此时不能够直接被引用。
点击进去该库,按照下图,点击Add To jcenter
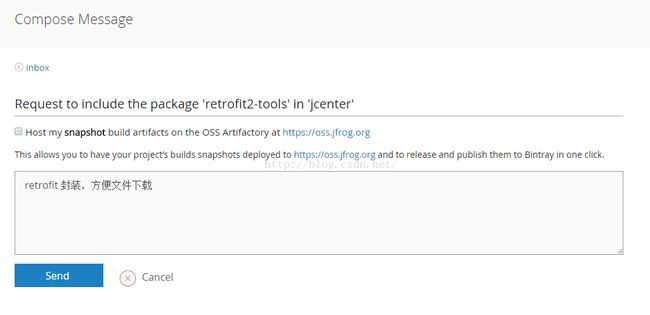
简单写一下对该开源库的描述
ok,您成功了,但是目前依然不能直接引用,你需要等待bintray的工作人员审核,审核通过会给你发送站内Message,并且Add to Jcenter那个按钮就不见了。
多个moudle项目上传
buildscript {
  repositories {
    jcenter()
  }
  dependencies {
    classpath 'com.android.tools.build:gradle:2.1.0'
    classpath 'com.novoda:bintray-release:0.3.4'

    // NOTE: Do not place your application dependencies here; they belong
    // in the individual module build.gradle files
  }
}

allprojects {
  repositories {
    jcenter()
  }
  tasks.withType(Javadoc) {
    options {
      encoding "UTF-8"
      charSet 'UTF-8'
      links "http://docs.oracle.com/javase/7/docs/api"
    }
  }
}

//添加
ext {
  userOrg = 'walid1992'
  groupId = 'com.walid'
  uploadName = 'StrongMVC'
  publishVersion = '1.0.0'
  desc = '强化版mvc设计模式 '
  website = 'https://github.com/walid1992/StrongMVC'
  licences = ['Apache-2.0']
}
2、moudle中build.gradle配置,几个moudle配置几乎一样,只有artifactId有区别,每个moudle都有自己的名字
apply plugin: 'com.android.library'
apply plugin: 'bintray-release'
android {
}
dependencies {
}
publish {
    artifactId = 'event'
    userOrg = rootProject.userOrg
    groupId = rootProject.groupId
    uploadName = rootProject.uploadName
    publishVersion = rootProject.publishVersion
    desc = rootProject.description
    website = rootProject.website
    licences = rootProject.licences
}
上传操作如出一辙。。。
到此发布项目到jcenter介绍完毕,希望对大家有所帮助哦~


