Android开发:JNI开发过程以及两种生成.so文件的方法
简单的Jni开发过程:
1、新建一个调用native的工具类,并且设置需要加载的动态so文件
public class JNIUtils {
    static {
        System.loadLibrary("JNIHello");
    }
    public static native String sayHelloFromJNI();
}
2、然后根据JNIUtils的包名以及类名生成对应的头文件(即.h文件),此处使用命令生成(快捷键alt + F12调出AS下的Terminal窗口)
cd app/src/main/java //进入项目的java文件夹

//新建与java同级的jni文件夹,并且在文件夹下生成.h文件
javah -d ../jni com.example.joy.jnidemo.JNIUtils
3、在.h文件同级文件夹下,新建c++文件JNIHello.cpp(根据需要新建C文件或者C++文件)
#include "com_example_joy_jnidemo_JNIUtils.h"
JNIEXPORT jstring JNICALL Java_com_example_joy_jnidemo_JNIUtils_sayHelloFromJNI
        (JNIEnv *env, jclass jclass){
return env->NewStringUTF("Hello World From JNI!!!!!");
}
4、生成对应的so文件(两种生成方法)
方法一:利用Android.mk、Application.mk生成so文件,步骤如下:
(1)新建Android.mk、Application.mk两个文件
Android.mk:
LOCAL_PATH := $(call my-dir)

include $(CLEAR_VARS)

LOCAL_MODULE := JNIHello  #输出so文件的名称
LOCAL_SRC_FILES := JNIHello.cpp   #需要读取的C++源文件地址

include $(BUILD_SHARED_LIBRARY)
Application.mk:
APP_STL := gnustl_static
APP_CPPFLAGS := -frtti -fexceptions
APP_ABI := all #生成所有版本的so文件
APP_PLATFORM := android-8
(2)在build.gradle文件中条件配置代码
apply plugin: 'com.android.application'

android {
    compileSdkVersion 28
    defaultConfig {
        applicationId "com.example.joy.jnidemo"
        minSdkVersion 24
        targetSdkVersion 28
        versionCode 1
        versionName "1.0"
        testInstrumentationRunner "android.support.test.runner.AndroidJUnitRunner"

    }

    buildTypes {
        release {
            minifyEnabled false
            proguardFiles getDefaultProguardFile('proguard-android.txt'), 'proguard-rules.pro'
        }

    }
    sourceSets {
        main {
            jni.srcDirs = []//禁止gradle 自动编译,使用已经编译好的So库
            jniLibs.srcDirs = ['src/main/jniLibs']//指向要使用的库文件//的路径,前边的是自己项目的,后边的是第三方的so
        }
    }
}

task ndkBuild(type: Exec, description: 'Compile JNI source via NDK') {
    //配置ndk的路径
    commandLine "G:\\android-ndk-r20-windows-x86_64\\android-ndk-r20\\build\\ndk-build.cmd",

            //ndk默认的生成so的文件
            'NDK_PROJECT_PATH=build/intermediates/ndk',

//配置的我们想要生成的so文件所在的位置
            'NDK_LIBS_OUT=src/main/jniLibs',

//指定项目以这个mk的方式
            'APP_BUILD_SCRIPT=src/main/jni/Android.mk',

            //指定项目以这个mk的方式
            'NDK_APPLOCATION_MK=src/main/jni/Application.mk'


}

tasks.withType(JavaCompile) {

        //使用ndkBuild

    compileTask -> compileTask.dependsOn ndkBuild

}


dependencies {
    implementation fileTree(include: ['*.jar'], dir: 'libs')
    implementation 'com.android.support.constraint:constraint-layout:1.1.3'
    testImplementation 'junit:junit:4.12'
    androidTestImplementation 'com.android.support.test:runner:1.0.2'
    androidTestImplementation 'com.android.support.test.espresso:espresso-core:3.0.2'
    implementation 'com.android.support:appcompat-v7:28.0.0'
}
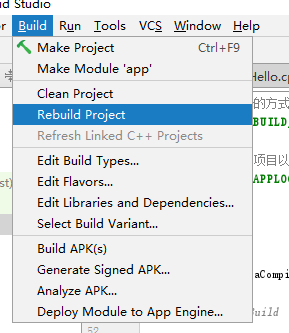
(3)点击rebulid project ,即可看见出现的jniLibs文件夹,以及文件夹下的so文件
方法二:使用CMake工具生成so文件
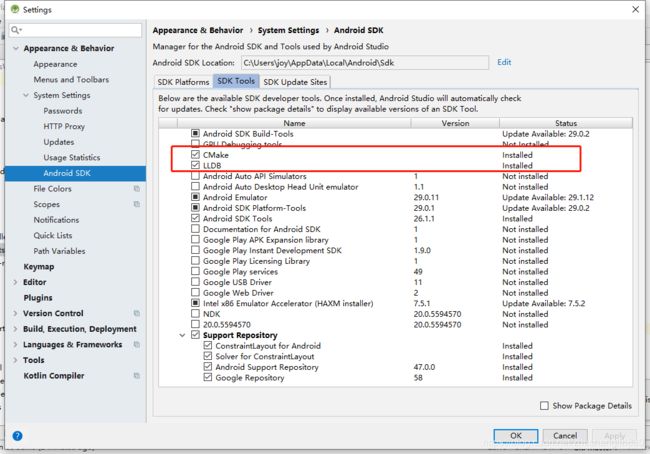
(1)下载安装cmake相关工具:file-->setting...-->appearance&behavior--->system settings-->android sdk -->sdk tools-->选中CMake、LLDB下载安装
(2)新建CMakeLists.txt文件
# For more information about using CMake with Android Studio, read the
# documentation: https://d.android.com/studio/projects/add-native-code.html

# Sets the minimum version of CMake required to build the native library.

cmake_minimum_required(VERSION 3.4.1)

# Creates and names a library, sets it as either STATIC
# or SHARED, and provides the relative paths to its source code.
# You can define multiple libraries, and CMake builds them for you.
# Gradle automatically packages shared libraries with your APK.

add_library( # Sets the name of the library.
             JNIHello #此处填入library名称

             # Sets the library as a shared library.
             SHARED

             # Provides a relative path to your source file(s).
             src/main/jni/JNIHello.cpp ) #此处填入c/C++文件路径

# Searches for a specified prebuilt library and stores the path as a
# variable. Because CMake includes system libraries in the search path by
# default, you only need to specify the name of the public NDK library
# you want to add. CMake verifies that the library exists before
# completing its build.

find_library( # Sets the name of the path variable.
              log-lib

              # Specifies the name of the NDK library that
              # you want CMake to locate.
              log )

# Specifies libraries CMake should link to your target library. You
# can link multiple libraries, such as libraries you define in this
# build script, prebuilt third-party libraries, or system libraries.

target_link_libraries( # Specifies the target library.
                      JNIHello  #此处填入library名称

                       # Links the target library to the log library
                       # included in the NDK.
                       ${log-lib} )
(3)配置 build.gradle文件
apply plugin: 'com.android.application'

android {
    compileSdkVersion 28
    defaultConfig {
        applicationId "com.example.joy.jnidemo2"
        minSdkVersion 24
        targetSdkVersion 28
        versionCode 1
        versionName "1.0"
        testInstrumentationRunner "android.support.test.runner.AndroidJUnitRunner"
        ndk{
            moduleName "JNIHello"
        }
        externalNativeBuild {
            cmake {
                cppFlags ""
            }
        }
    }
    buildTypes {
        release {
            minifyEnabled false
            proguardFiles getDefaultProguardFile('proguard-android.txt'), 'proguard-rules.pro'
        }
    }
    externalNativeBuild {
        cmake {
            path "CMakeLists.txt"
        }
    }
}

dependencies {
    implementation fileTree(include: ['*.jar'], dir: 'libs')
    implementation 'com.android.support.constraint:constraint-layout:1.1.3'
    testImplementation 'junit:junit:4.12'
    androidTestImplementation 'com.android.support.test:runner:1.0.2'
    androidTestImplementation 'com.android.support.test.espresso:espresso-core:3.0.2'
    implementation 'com.android.support:appcompat-v7:28.0.0'
}
(4)rebulid project
5、调用native方法
JNIUtils.sayHelloFromJNI();注意:jni项目启动前,需要添加ndk,可以下载后在添加本地的ndk也可以直接在Android studio上直接下载


