Centos下堡垒机Jumpserver V3.0环境部署完整记录
[Centos下堡垒机Jumpserver V3.0环境部署完整记录-安装篇]
作为运维人员,如何摆脱以上背黑锅的尴尬局面呢?也许堡垒机是一个破解此局面的必杀技。
1)统一入口、规范管理
提供统一入口,所有运维人员只能登录堡垒机才能访问服务器,梳理“人与服务器”之间的关系,防止越权登录;
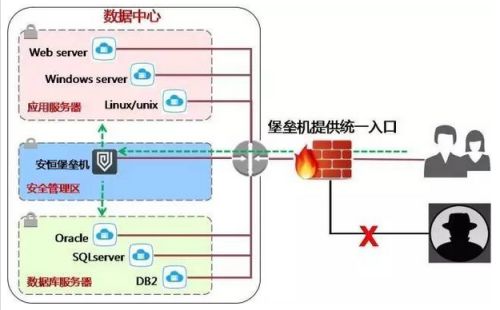
2)利用手机APP动态口令等验证机制(比如Google Authenticator)
采用手机APP动态口令、OTP动态令牌、USBKEY、短信口令等双因素身份实名鉴别机制,防止密码被暴力破解,解决访问身份模糊的问题。
3)托管服务器密码,实现自动改密
通过堡垒机定期自动修改服务器的密码,解决手工修改密码、密码泄露和记住密码的烦恼;
a.可自动修改Windows、Linux、Unix、网络设备等操作系统的密码;
b.可以设置周期或指定时间执行改密任务;
c.可设定密码的复杂度、随机密码、指定密码、固定密码格式等;
d.可通过邮件、SFTP、FTP方式自动发送密码文件给管理员;
e.提供密码容错机制:改密前自动备份、备份失败不改密、改密后自动备份、自动恢复密码等;
4)事中控制,防止违规操作
作为运维人员,如何摆脱以上背黑锅的尴尬局面呢?也许堡垒机是一个破解此局面的必杀技。
a.通过命令控制策略,拦截高危、敏感的命令
c.通过文件传输控制策略,防止数据、文件的泄露
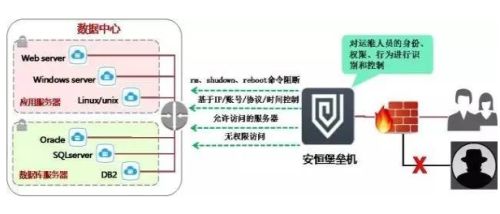
5)精细化审计,追溯整个运维过程
堡垒机要做到文件记录、视频回放等精细化完整审计,快速定位运维过程:
a.不仅要对所有操作会话的在线监控、实时阻断、日志回放、起止时间、来源用户来源地址、目标地址、协议、命令、操作(如对文件的上传、下载、删除、修改等操作等)等行为记录;
b.还要能保存SFTP/FTP/SCP/RDP/RZ/SZ传输的文件为上传恶意文件、拖库、窃取数据等危险行为起到了追踪依据。
一、Jumpserver堡垒机介绍
Jumpserver是一款由python编写, Django开发的开源跳板机/堡垒机系统, 助力互联网企业高效 用户、资产、权限、审计 管理。jumpserver实现了跳板机应有的功能,基于ssh协议来管理,客户端无需安装agent。
Jumpserver特点:
1)完全开源,GPL授权
2)Python编写,容易再次开发
3)实现了跳板机基本功能,身份认证、访问控制、授权、审计 、批量操作等。
4)集成了Ansible,批量命令等
5)支持WebTerminal
6)Bootstrap编写,界面美观
7)自动收集硬件信息
8)录像回放
9)命令搜索
10)实时监控
11)批量上传下载
二、Jumpserver安装
1)关闭jumpserver部署机的iptables和selinux
[root@jumpserver ~]# cd /opt
[root@jumpserver ~]# /etc/init.d/iptables stop
[root@jumpserver ~]# setenforce 0
2)安装依赖包
[root@jumpserver ~]# yum -y install epel-release
[root@jumpserver ~]# yum clean all && yum makecache
[root@jumpserver ~]# yum -y update
[root@jumpserver ~]# yum -y install git python-pip mysql-devel gcc automake autoconf python-devel vim sshpass lrzsz readline-devel
3)下载jumpserver V3.0
链接:https://pan.baidu.com/s/1ychrQ1l0NxaxCs_BcCXVzg
提取码:ca4e
[root@jumpserver ~]# tar -zvxf jumpserver3.0.tar.gz -C /usr/local
[root@jumpserver ~]# cd /usr/local/jumpserver/
[root@jumpserver jumpserver]# ls
connect.py  jasset  jumpserver       keys     manage.py         service.sh
docs        jlog    jumpserver.conf  LICENSE  README.md         static
install     jperm   juser            logs     run_websocket.py  templates
[root@jumpserver jumpserver]# cd install/
[root@jumpserver install]# ls
developer_doc.txt  install.py  requirements.txt
initial_data.yaml  next.py     zzjumpserver.sh
4)执行快速安装脚本
[root@jumpserver install]#pip install -r requirements.txt
  Running setup.py install for pycrypto ... done
  Running setup.py install for MySQL-python ... done
  Running setup.py install for psutil ... done
  Running setup.py install for xlrd ... done
  Running setup.py install for django-bootstrap-form ... done
  Running setup.py install for tornado ... done
  Running setup.py install for PyYAML ... done
  Running setup.py install for ansible ... done
  Running setup.py install for pyinotify ... done
Successfully installed MarkupSafe-1.1.1 MySQL-python-1.2.5 PyYAML-5.3.1 ansible-1.9.4 argparse-1.4.0 backports-abc-0.5 certifi-2020.6.20 django-1.6 django-bootstrap-form-3.2 django-crontab-0.6.0 ecdsa-0.13 jinja2-2.11.2 paramiko-1.16.0 passlib-1.6.5 psutil-3.3.0 pycrypto-2.6.1 pyinotify-0.9.6 singledispatch-3.4.0.3 six-1.15.0 tornado-4.3 xlrd-0.9.4 xlsxwriter-0.7.7
报错:
  Could not find a version that satisfies the requirement django==1.6 (from -r requirements.txt...
  解决办法:
# pip install -r requirements.txt -i https://pypi.tuna.tsinghua.edu.cn/simple
5)查看安装的包
[root@jumpserver install]# pip freeze
ansible==1.9.4
backports-abc==0.5
backports.ssl-match-hostname==3.5.0.1
certifi==2020.6.20
configobj==4.7.2
decorator==3.4.0
Django==1.6
django-bootstrap-form==3.2
django-crontab==0.6.0
ecdsa==0.13
iniparse==0.4
ipaddress==1.0.16
Jinja2==2.11.2
MarkupSafe==1.1.1
MySQL-python==1.2.5
paramiko==1.16.0
passlib==1.6.5
perf==0.1
psutil==3.3.0
pycrypto==2.6.1
pycurl==7.19.0
pygobject==3.22.0
pygpgme==0.3
pyinotify==0.9.6
pyliblzma==0.5.3
python-linux-procfs==0.4.9
pyudev==0.15
pyxattr==0.5.1
PyYAML==5.3.1
schedutils==0.4
singledispatch==3.4.0.3
six==1.15.0
slip==0.4.0
slip.dbus==0.4.0
tornado==4.3
urlgrabber==3.10
xlrd==0.9.4
XlsxWriter==0.7.7
yum-metadata-parser==1.1.4
You are using pip version 8.1.2, however version 20.1.1 is available.
You should consider upgrading via the 'pip install --upgrade pip' command.
- 安装并启动MariaDB
[root@jumpserver install]# yum -y install mariadb mariadb-server
[root@jumpserver ~]# systemctl start mariad
[root@jumpserver ~]# systemctl enable mariadb
Created symlink from /etc/systemd/system/multi-user.target.wants/mariadb.service to /usr/lib/systemd/system/mariadb.service.
接下来进行MariaDB的相关简单配置,设置密码,会提示先输入密码
[root@jumpserver ~]# mysql_secure_installation
首先是设置密码,会提示先输入密码

Enter current password for root (enter for none):<–初次运行直接回车

设置密码

Set root password? [Y/n] <– 是否设置root用户密码,输入y并回车或直接回车
New password: <– 设置root用户的密码
Re-enter new password: <– 再输入一次你设置的密码

其他配置
Remove anonymous users? [Y/n] <– 是否删除匿名用户,回车
Disallow root login remotely? [Y/n] <–是否禁止root远程登录,回车,
Remove test database and access to it? [Y/n] <– 是否删除test数据库,回车
Reload privilege tables now? [Y/n] <– 是否重新加载权限表,回车

初始化MariaDB完成,接下来测试登录
[root@jumpserver ~]# mysql -p123.com
Welcome to the MariaDB monitor.  Commands end with ; or \g.
Your MariaDB connection id is 11
Server version: 5.5.65-MariaDB MariaDB Server

Copyright (c) 2000, 2018, Oracle, MariaDB Corporation Ab and others.

Type 'help;' or '\h' for help. Type '\c' to clear the current input statement.

MariaDB [(none)]> show databases;
+--------------------+
| Database           |
+--------------------+
| information_schema |
| mysql              |
| performance_schema |
+--------------------+
3 rows in set (0.00 sec)
接下来配置MariaDB的字符集
-> 首先是配置文件/etc/my.cnf,在[mysqld]标签下添加
init_connect='SET collation_connection = utf8_unicode_ci'
init_connect='SET NAMES utf8'
character-set-server=utf8
collation-server=utf8_unicode_ci
skip-character-set-client-handshake

-> 接着配置文件/etc/my.cnf.d/client.cnf,在[client]中添加
default-character-set=utf8

-> 然后配置文件/etc/my.cnf.d/mysql-clients.cnf,在[mysql]中添加
default-character-set=utf8

最后是重启MariaDB,并登陆MariaDB查看字符集
[root@jumpserver ~]# mysql -p123.com
Welcome to the MariaDB monitor.  Commands end with ; or \g.
Your MariaDB connection id is 2
Server version: 5.5.65-MariaDB MariaDB Server

Copyright (c) 2000, 2018, Oracle, MariaDB Corporation Ab and others.

Type 'help;' or '\h' for help. Type '\c' to clear the current input statement.

MariaDB [(none)]> show variables like "%character%";show variables like "%collation%";
+--------------------------+----------------------------+
| Variable_name            | Value                      |
+--------------------------+----------------------------+
| character_set_client     | utf8                       |
| character_set_connection | utf8                       |
| character_set_database   | utf8                       |
| character_set_filesystem | binary                     |
| character_set_results    | utf8                       |
| character_set_server     | utf8                       |
| character_set_system     | utf8                       |
| character_sets_dir       | /usr/share/mysql/charsets/ |
+--------------------------+----------------------------+
8 rows in set (0.00 sec)

+----------------------+-----------------+
| Variable_name        | Value           |
+----------------------+-----------------+
| collation_connection | utf8_unicode_ci |
| collation_database   | utf8_unicode_ci |
| collation_server     | utf8_unicode_ci |
+----------------------+-----------------+
3 rows in set (0.00 sec)
7)在MariaDB数据库中创建jumpserver库,并授权连接
MariaDB [(none)]> create database jumpserver;
Query OK, 1 row affected (0.00 sec)

MariaDB [(none)]> grant all on jumpserver.* to jumpserver@'192.168.145.%' identified by "123.com";
Query OK, 0 rows affected (0.00 sec)

MariaDB [(none)]> grant all on jumpserver.* to root@'192.168.145.%' identified by "123.com";
Query OK, 0 rows affected (0.00 sec)

MariaDB [(none)]> flush privileges;
Query OK, 0 rows affected (0.00 sec)

MariaDB [(none)]>
8)配置邮箱
[root@jumpserver install]# yum -y install mailx
[root@jumpserver jumpserver]# cat /etc/mail.rc
set from=[email protected]
set smtp=smtp.163.com
set smtp-auth-user=[email protected]
set smtp-auth-password=授权码
set ssl-verify=ignore
set nss-config-dir=/etc/maildbs/
set smtp-auth=login
9)接着继续执行install安装
[root@jumpserver ~]# cd /usr/local/jumpserver/install
[root@jumpserver install]# python install.py
请务必先查看wiki https://github.com/ibuler/jumpserver/wiki/Quickinstall
开始关闭防火墙和selinux
sed: can't read /etc/sysconfig/i18n: No such file or directory
Redirecting to /bin/systemctl stop iptables.service
Failed to stop iptables.service: Unit iptables.service not loaded.

请输入您服务器的IP地址,用户浏览器可以访问 [192.168.145.129]: 192.168.145.129
是否安装新的MySQL服务器? (y/n) [y]: n
请输入数据库服务器IP [127.0.0.1]: 192.168.145.129
请输入数据库服务器端口 [3306]: 3306
请输入数据库服务器用户 [root]: root
请输入数据库服务器密码: 123.com
请输入使用的数据库 [jumpserver]: jumpserver
连接数据库成功
请输入SMTP地址: smtp.163.coom
请输入SMTP端口 [25]: 25
请输入账户:  个人的网易邮箱账号
请输入密码:   授权码

 请登陆邮箱查收邮件, 然后确认是否继续安装         //到[email protected]邮箱里会发现收到了一封"Jumpserver Mail Test!"的测试邮件。  #邮件发送失败在install.py脚本中将邮件类型改为smtp.163.com,更改邮件发送超时时间为15s

 是否继续? (y/n) [y]: y
开始写入配置文件
开始安装Jumpserver
开始更新jumpserver
Creating tables ...
Creating table django_admin_log
Creating table auth_permission
Creating table auth_group_permissions
.......
请输入管理员用户名 [admin]: admin
请输入管理员密码: [passwd]: admin
请再次输入管理员密码: [passwd]: admin
Starting jumpsever service:                                [  OK  ]

安装成功,请访问web, 祝你使用愉快。
[root@jumpserver install]# cd .. && ./service.sh start/restart 启动/重启
10)运行 crontab,定期处理失效连接,定期更新资产信息
 [root@jumpserver install]# python manage.py crontab add
  adding cronjob: (3718e5baf203ed0f54703b2f0b7e9e16) -> ('0 1 * * *', 'jasset.asset_api.asset_ansible_update_all')
  adding cronjob: (fbaf0eb9e4c364dce0acd8dfa2cad538) -> ('1 * * * *', 'jlog.log_api.kill_invalid_connection')

上面命令执行后,查看crontab任务列表
[root@jumpserver install]# crontab -l
0 1 * * * /usr/bin/python /use/local/jumpserver/manage.py crontab run 3718e5baf203ed0f54703b2f0b7e9e16 # django-cronjobs for jumpserver
1 * * * * /usr/bin/python /usr/local/jumpserver/manage.py crontab run fbaf0eb9e4c364dce0acd8dfa2cad538 # django-cronjobs for jumpserver
11)jumpserver启动
如上安装后,jumpserver服务就会自动起来了
Jumpserver的启动和重启
[root@jumpserver jumpserver]# ls
connect.py   jasset      jumpserver.conf  logs              service.sh
connect.pyc  jlog        juser            manage.py         static
docs         jperm       keys             README.md         templates
install      jumpserver  LICENSE          run_websocket.py
12)浏览器登录验证
