【uni-app】uni-app基础知识
目录
- 1.uni-app的初体验
- 1.1 开发方式
- 1.2 脚手架搭建项目
- 1.3 搭建过程可能出现的问题
- 2. 项目结构介绍
- 2.1 项目目录
- 3. 样式和sass
- 3.1 rpx,vw,vh
- 3.2 安装sass依赖
- 3.3 vue组件中,style标签上加上 lang=scss
- 4. 基本语法
- 4.1 数据的展示
- 4.2 数据的循环
- 4.3 条件编译
- 4.4 计算属性
- 5. 事件
- 5.1 事件的使用
- 6. 组件
- 6.1 组件的简单使用
- 1. 组件的定义
- 2. 组件的引入
- 3. 组件的注册
- 4. 组件的使用
- 6.2 组件传参
- 1. 父向子传递参数
- 2. 子向父传递参数
- 3. 全局共享数据
- 6.3 组件插槽
- 7 生命周期
- 7.1 常用生命周期
- 7.2 完整生命周期
- 使用 uni-app 开发 微信小程序,
1.uni-app的初体验
1.1 开发方式
- 使用 DCloud 公司提供的 HBuilderX 来快速开发
- 使用脚手架来快速搭建和开发
1.2 脚手架搭建项目
(这些命令都是可以执行的)
- 全局安装
npm install -g @vue/cli
- 创建项目
vue create -p dcloudio/uni-preset-vue my-project
- 启动项目
npm run dev:mp-weixin
- 微信小程序开发者工具导入项目
my-project5\dist\dev\mp-weixin
1.3 搭建过程可能出现的问题
容易出现 vue 和 vue-template-complier 版本不一致的问题
此时根据提示 重新安装对应的 vue 版本即可 npm install [email protected]
然后在重新运行项目 npm run dev:mp-weixin
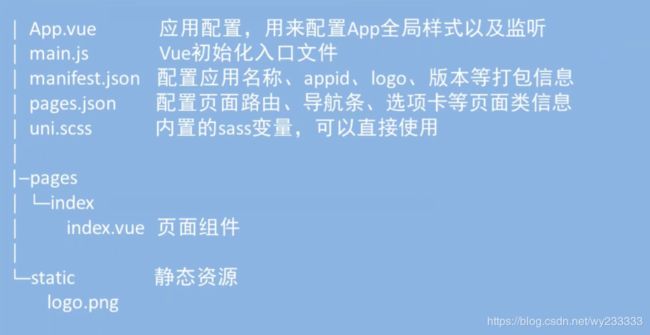
2. 项目结构介绍
2.1 项目目录
3. 样式和sass
3.1 rpx,vw,vh
<template>
	<view class="content">
		<view class="rpx">rpxview>
		<view class="vw">vwview>
	view>
template>

<script>
script>

<style>
	.rpx{
		/* rpx 小程序单位 750rpx = 屏幕的宽度  */
		width: 750rpx;
		height: 100px;
		background-color: #007AFF;
	}
	.vw{
		/* vw h5单位 100vw = 屏幕的宽度 100vh = 屏幕的高度 */
		width: 50vw;
		height: 100px;
		background-color: #DD524D;
	}
style>
3.2 安装sass依赖
npm i node-sass sass-loader
我安装的时候报了一个错
Error: Command failed: F:\python\Python37\python.EXE -c import sys; print “%s.%s.%s” % sys.version_info[:3];
Error: Can’t find Python executable “python”, you can set the PYTHON env variable.
我把 Python 删除,也没好·,我也很纳闷
我就安装cnpm
cnpm install
使用 cnpm安装sass
cnpm i node-sass sass-loader
成功了
3.3 vue组件中,style标签上加上 lang=scss
<template>
	<view class="content">
		<view class="rpx">rpx11view>
		<view class="vw">vwview>
		<view class="sass">sass1view>
	view>
template>

<script>
script>

<style lang="scss">
	.rpx{}
	.vw{}
	.content{
		.sass{
			background-color: #710909;
			color: $uni-bg-color;
		}
	}
style>
4. 基本语法
4.1 数据的展示
- 在 js 的 data 中定义数据
- 在 template 中通过 {{ 数据 }} 来显示
- 在标签的属性上通过 :data-index=‘数据’ 来使用
<template>
	<view class="content">
	<view>{{title}}view>
	<image :src="color">image>
	view>
template>

<script >
export default {
	data() {
		return{
			title: "这个是标题",
			color: "../../static/logo.png"
		};
	}
}
script>

<style>
style>
4.2 数据的循环
- 通过 v-for 来指定要循环的数组
- item 和 index 分别位 循环项 和 循环索引
- :key 指定唯一的属性,用来提高循环效率
<template>
	<view class="content">
		<view v-for="item in list" :key="item.id">
			{{item.id}}---{{item.text}}
		view>
	view>
template>

<script >
export default {
	data() {
		return{
			list: [
				{id:1,text:'橙子'},
				{id:2,text:'橘子'},
				{id:3,text:'桃子'}
			]
		};
	}
}
script>

<style>
style>
4.3 条件编译
- 通过 v-if 来决定显示和隐藏 不适合做频繁的切换显示
- 通过 v-show 来决定显示和隐藏 合适做频繁的切换显示
<view v-if="true">显示1view>
<view v-if="false">看不到2view>
<view v-show="true">显示3view>
<view v-show="false">看不到4view>

<view v-if="true">1111view>
<view v-else-if="true">2222view>
<view v-else>3333view>
4.4 计算属性
- 可以理解为是对 data 中的数据提供了一种 加工 或者 过滤的能力
- 通过 computed 来定义计算属性
<template>
	<view class="content">
		<view>{{cnMoney}}view>
		<view v-for="item in filterList" :key="item.id">
			{{item.id}}---{{item.text}}
		view>

	view>
template>

<script >
export default {
	data() {
		return{
			money: 10000,
			list: [
				{id:1,text:'橙子'},
				{id:2,text:'橘子'},
				{id:3,text:'桃子'}
			]
		};
	},
	computed:{
		//加工数据
		cnMoney(){
			return "¥" + this.money;
		},
		//过滤数组
		filterList(){
			//只要 id > 2 都不要显示
			return this.list.filter(v=>v.id<=2);
		}
	}
}
script>

<style>
style>
5. 事件
5.1 事件的使用
- 注册事件 @click= “handleClick”
- 定义事件监听函数 需要在 “methods” 中定义
- 事件的传参
<template>
	<view class="content">
		<view data-index="11" @click="handleClick(1,$event)">点我view>
		<view data-index="22" @click="handleClick(2,$event)">点我view>
	view>
template>

<script>
	export default{
		methods:{
			handleClick: (x,event) => {
				console.log("我不想努力了"+x);
				console.log(event);
				console.log(event.currentTarget.dataset.index);

			}
		}
	}
script>

<style>
style>
6. 组件
6.1 组件的简单使用
1. 组件的定义
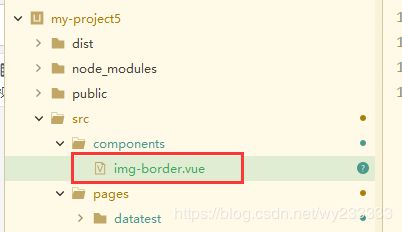
- 在 src 目录下新建 文件夹
- 在 components 目录下直接新建组件 *.vue
<template>
	<image src="/static/logo.png">image>
template>

<script>
	export default{

	}
script>

<style>
style>
2. 组件的引入
- 在页面中 引入 组件 "import 组件名 from ‘组件路径’ "
3. 组件的注册
- 在页面中实例中,新增属性 components
- 属性 components 是一个对象,把组件放进去注册
4. 组件的使用
- 在页面的标签中,直接使用引入的组件 “<组件>”
<template>
	<view class="content">

		<imgBorder>imgBorder>
		<img-border>img-border>
	view>
template>

<script>
	//2.引入自定义组件
	import imgBorder from "@/components/img-border.vue"
	export default{
		//3.组件注册
		components:{
			imgBorder:imgBorder
		},
		methods:{
			handleClick: (x,event) => {
				console.log("我不想努力了"+x);
				console.log(event);
				console.log(event.currentTarget.dataset.index);

			}
		}
	}
script>

<style>
style>
6.2 组件传参
- 父向子传递参数 通过 属性 的方式
- 子向父传递参数 通过 触发事件 的方式
- 使用全局数据传递参数
- 通过 挂载 vue 的原型上
- 通过 globalData 的方式
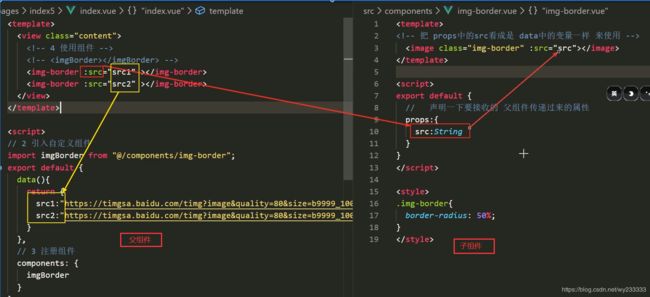
1. 父向子传递参数
- 父页面向子组件 ul-com 通过属性名 list 传递了一个数组数据
- 子组件 通过 props 进行接受 数据
子组件:
<template>
	<image :src="mysrc">image>
template>

<script>
	export default{
		//声明一下要接收的 父组件传递过来的属性
		props:{
			mysrc:String
		}
	}
script>

<style>
style>
父组件:
<template>
	<view class="content">

		<imgBorder :mysrc="src1">imgBorder>
	view>
template>

<script>
	//2.引入自定义组件
	import imgBorder from "@/components/img-border.vue"
	export default{
		data(){
			return {
				src1:"/static/logo.png"
			}
		},
		//3.组件注册
		components:{
			imgBorder:imgBorder
		}
	}
script>

<style>
style>
2. 子向父传递参数
- 子组件通过 触发事件 的方式向父组件传递数据
- 父组件通过 监听事件 的方式来接收数据
这个有点拗
父组件:
<template>
	<view class="content">
		<view>
			子组件传递过来的路径:{{src}}
		view>


		<imgBorder @srcChange="handleSrcChange" :mysrc="src1">imgBorder>

	view>
template>

<script>
	//2.引入自定义组件
	import imgBorder from "@/components/img-border.vue"
	export default{
		data(){
			return {
				src: "",
				src1:"/static/logo.png"
			}
		},
		//3.组件注册
		components:{
			imgBorder:imgBorder
		},
		methods:{
			handleSrcChange(e){
				console.log("父组件的自定义事件被触发了");
				console.log(e);
				this.src = e
			}
		}
	}
script>

<style>
style>
子组件:
<template>
	<image @click="handleClick" :src="mysrc">image>
template>

<script>
	export default{
		//声明一下要接收的 父组件传递过来的属性
		props:{
			mysrc:String
		},
		data(){
			return {
				src: "",
			}
		},
		methods:{
			handleClick(){
				console.log("女孩为何喜欢穿短裙???");
				//子向父 传递数据 通过触发事件
				//$emit("自定义的事件名称","要传递的参数")
				this.$emit("srcChange",this.mysrc)

			}
		}
	}
script>

<style>
style>
3. 全局共享数据
- 通过 Vue 的原型共享数据
- 通过 globalData 共享数据
- vuex
- 本地存储
- 通过 Vue 的原型共享数据
在 main.js 中
//定义全局数据 通过 vue 的原型来实现
Vue.prototype.baseurl="www.baidu.com";
<script>
	//2.引入自定义组件
	import imgBorder from "@/components/img-border.vue"
	export default{
		data(){
			return {
				src: "",
			}
		},
		//3.组件注册
		components:{
		},
		methods:{
			handleSrcChange(e){
				console.log("父组件的自定义事件被触发了");
				console.log(e);
				this.src = e
			}
		},
		onLoad() {
			console.log(this.baseurl);
		}
	}
</script>
- 通过 globalData 共享数据
这个是小程序独有的
在 App.vue 中
<script>
	export default {
		onLaunch: function() {
			console.log('App Launch')
		},
		onShow: function() {
			console.log('App Show')
		},
		onHide: function() {
			console.log('App Hide')
		},
		globalData:{
			base:"www.360.com"
		}
	}
</script>

<style>
	/*每个页面公共css */
</style>
onLoad() {
			console.log(this.baseurl);
			console.log(getApp().globalData.base);
		}
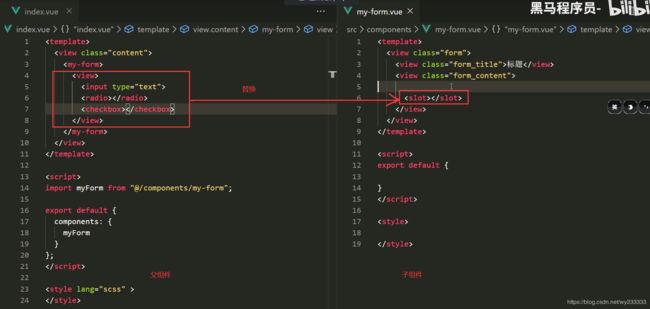
6.3 组件插槽
- 标签其实也是数据中的一种,想实现动态的给 子组件传递 标签,就可以使用插槽 slot
- 通过 slot 来实现占位符
7 生命周期
7.1 常用生命周期
- uni-app 框架的生命周期结合了 vue 和 微信小程序 的生命周期
- 全局的APP中 使用 onLaunch 表示应用启动时
- 页面中 使用 onLoad 或者 onShow 分别表示 页面加载完毕时 和页面 显示时
- 组件中使用 mounted 组件挂载完毕时
在 App.vue 中
onLaunch: function(){}
<script>
	export default {
		onLaunch: function() {
			console.log('App Launch 应用启动')
		},
		onShow: function() {
			console.log('App Show')
		},
		onHide: function() {
			console.log('App Hide')
		},
		globalData:{
			base:"www.360.com"
		}
	}
</script>

<style>
	/*每个页面公共css */
</style>
在页面中:
onLoad(),onShow()
<script>
	//2.引入自定义组件
	import imgBorder from "@/components/img-border.vue"
	export default{
		data(){
			return {
				src: "",
				src1:"/static/logo.png"
			}
		},
		//3.组件注册
		components:{
			imgBorder:imgBorder
		},
		methods:{
			handleSrcChange(e){
				console.log("父组件的自定义事件被触发了");
				console.log(e);
				this.src = e
			}
		},
		onLoad() {
			console.log("页面加载完毕");
		},
		onShow() {
			console.log("页面被看到");
		}
	}
</script>
在组件中:
mounted()
<script>
	export default{
		//声明一下要接收的 父组件传递过来的属性
		props:{
			mysrc:String
		},
		data(){
			return {
				src: "",
			}
		},
		methods:{
			handleClick(){
				console.log("女孩为何喜欢穿短裙???");
				//子向父 传递数据 通过触发事件
				//$emit("自定义的事件名称","要传递的参数")
				this.$emit("srcChange",this.mysrc)

			}
		},
		mounted() {
			console.log("组件挂载完毕")
		}
	}
</script>
7.2 完整生命周期
-
uni-app https://uniapp.dcloud.io/frame?id=生命周期
-
vue https://cn.vuejs.org/v2/guide/instance.html?#生命周期图示
-
微信小程序 https://developers.weixin.qq.com/miniprogram/dev/framework/app-service/page-life-cycle.html


