JointJS入门实例01-在JOINTJS元素中使用HTML
1.1 简介
很多时候,您可能希望在JointJS图表中使用HTML输入或其他HTML元素。本实例中使用的技术是创建一个自定义视图,用于呈现HTML并处理与HTML的交互。一种不同的方法可能是使用 foreignObject并将其嵌入markup到您的JointJS元素中。然而,由于浏览器支持不佳,这种技术是有问题的。但是,这似乎是将来在JointJS中将HTML与SVG相结合的正确方法。如果您正确设置自定义HTML视图,则可以利用JointJS提供的许多功能。
1.2 实例
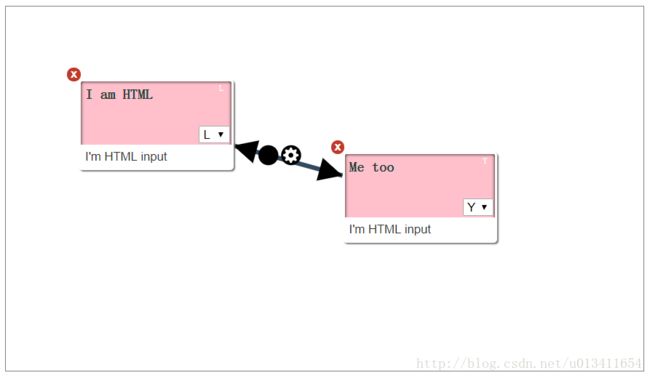
1.2.1 效果图
1.2.2 主要JS代码简介
如何创建一个自定义的JointJS视图来呈现HTML(包括功能输入)。诀窍是更新HTML元素的位置和维度,以便它遵循基本的JointJS元素。另外,我们观察嵌入式输入的变化,并相应更新JointJS模型。这也是相反的,如果模型发生变化,我们会反映HTML中的变化。下面以文件中的htmlInJoint.js的主要代码片段进行简单讲解:
1、新建画布
var graph = new joint.dia.Graph;
var paper = new joint.dia.Paper({ el: $('#paper-html-elements'), width:700, height: 400, gridSize: 1, model: graph }); joint.shapes.html = {};
joint.shapes.html.Element = joint.shapes.basic.Rect.extend({
defaults: joint.util.deepSupplement({
type: 'html.Element',
attrs: {
rect: { stroke: 'none', 'fill-opacity': 0 }
}
}, joint.shapes.basic.Rect.prototype.defaults)
});
1)创建template
template: [
'',
'',
'',
'', '
',
'',
'',
''
].join(''),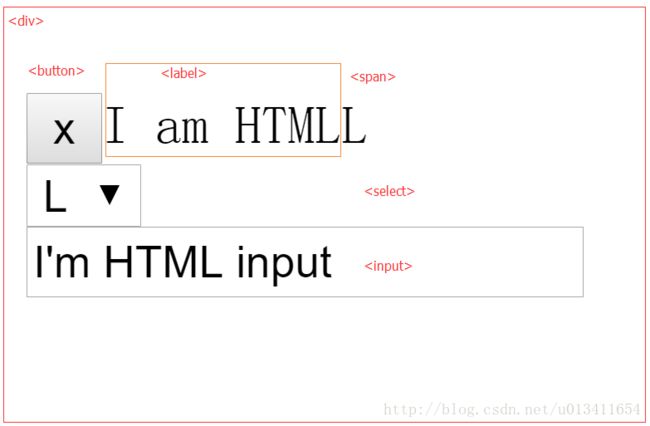
2)初始化
initialize: function() { //初始化
_.bindAll(this, 'updateBox');
joint.dia.ElementView.prototype.initialize.apply(this, arguments);
this.$box = $(_.template(this.template)());
// 防止paper向下处理指针.
this.$box.find('input,select').on('mousedown click', function(evt) {
evt.stopPropagation();
});
// 这是对输入变化做出反应并将输入数据存储在单元格模型中的一个例子。
this.$box.find('input').on('change', _.bind(function(evt) {
this.model.set('input', $(evt.target).val());
}, this));
this.$box.find('select').on('change', _.bind(function(evt) {
this.model.set('select', $(evt.target).val());
}, this));
this.$box.find('select').val(this.model.get('select'));
this.$box.find('.delete').on('click', _.bind(this.model.remove, this.model));
// 基础模型发生更改时更新框位置
this.model.on('change', this.updateBox, this);
// 当模型获取从图中删除时,删除框。
this.model.on('remove', this.removeBox, this);
this.updateBox();
},
3)函数
render: function() {
joint.dia.ElementView.prototype.render.apply(this, arguments);
this.paper.$el.prepend(this.$box);
this.updateBox();
return this;
},
updateBox: function() {
// 设置框的位置和尺寸,以便它涵盖了JointJS元素
var bbox = this.model.getBBox();
// Example of updating the HTML with a data stored in the cell model.
this.$box.find('label').text(this.model.get('label'));
this.$box.find('span').text(this.model.get('select')); //将从select获取的元素回显到span
this.$box.css({
width: bbox.width,
height: bbox.height,
left: bbox.x,
top: bbox.y,
transform: 'rotate(' + (this.model.get('angle') || 0) + 'deg)'
});
},
removeBox: function(evt) {
this.$box.remove();
}
4、创建JointJS元素并将它们添加到图形像往常一样
var el1 = new joint.shapes.html.Element({
position: { x: 80, y: 80 },
size: { width: 170, height: 100 },
label: 'I am HTML',
select: 'L'
});
var el2 = new joint.shapes.html.Element({
position: { x: 370, y: 160 },
size: { width: 170, height: 100 },
label: 'Me too',
select: 'Y'
});
var l = new joint.dia.Link({
source: { id: el1.id },
target: { id: el2.id },
attrs: { '.connection': { 'stroke-width': 5, stroke: '#34495E' } }
});
graph.addCells([el1, el2,l]);1.2.3 代码
1、index.html
Demo01
#paper-html-elements {
position: relative;
border: 1px solid gray;
display: inline-block;
background: transparent;
overflow: hidden;
}
#paper-html-elements svg {
background: transparent;
}
/*#paper-html-elements svg .link {*/
/*z-index: 2;*/
/*}*/
.html-element {
position: absolute;
background: PINK;
/* Make sure events are propagated to the JointJS element so, e.g. dragging works.*/
pointer-events: none;
-webkit-user-select: none;
border-radius: 4px;
border: 2px solid WHITE;
box-shadow: inset 0 0 5px black, 2px 2px 1px gray;
padding: 5px;
box-sizing: border-box;
z-index: 2;
}
.html-element select,
.html-element input,
.html-element button {
/* Enable interacting with inputs only. */
pointer-events: auto;
}
.html-element button.delete {
color: white;
border: none;
background-color: #C0392B;
border-radius: 20px;
width: 15px;
height: 15px;
line-height: 15px;
text-align: middle;
position: absolute;
top: -15px;
left: -15px;
padding: 0;
margin: 0;
font-weight: bold;
cursor: pointer;
}
.html-element button.delete:hover {
width: 20px;
height: 20px;
line-height: 20px;
}
.html-element select {
position: absolute;
right: 2px;
bottom: 28px;
}
.html-element input {
position: absolute;
bottom: 0;
left: 0;
right: 0;
border: none;
color: #333;
padding: 5px;
height: 16px;
}
.html-element label {
color: #333;
text-shadow: 1px 0 0 lightgray;
font-weight: bold;
}
.html-element span {
position: absolute;
top: 2px;
right: 9px;
color: white;
font-size: 10px;
}(function() {
var graph = new joint.dia.Graph;
var paper = new joint.dia.Paper({ el: $('#paper-html-elements'), width:700, height: 400, gridSize: 1, model: graph });
// 创建一个自定义元素
// ------------------------
 joint.shapes.html = {};
    joint.shapes.html.Element = joint.shapes.basic.Rect.extend({
        defaults: joint.util.deepSupplement({
            type: 'html.Element',
            attrs: {
                rect: { stroke: 'none', 'fill-opacity': 0 }
            }
        }, joint.shapes.basic.Rect.prototype.defaults)
    });
// 为在页面显示HTML的div元素创建自定义视图。
// -------------------------------------------------------------------------
joint.shapes.html.ElementView = joint.dia.ElementView.extend({
template: [
'',
'',
'',
'', '
',
'',
'',
''
].join(''),
initialize: function() {    //初始化
            _.bindAll(this, 'updateBox');
            joint.dia.ElementView.prototype.initialize.apply(this, arguments);

            this.$box = $(_.template(this.template)());
            // 防止paper向下处理指针.
            this.$box.find('input,select').on('mousedown click', function(evt) {
                evt.stopPropagation();
            });
            // 这是对输入变化做出反应并将输入数据存储在单元格模型中的一个例子。
            this.$box.find('input').on('change', _.bind(function(evt) {
                this.model.set('input', $(evt.target).val());
            }, this));
            this.$box.find('select').on('change', _.bind(function(evt) {
                this.model.set('select', $(evt.target).val());
            }, this));
            this.$box.find('select').val(this.model.get('select'));
            this.$box.find('.delete').on('click', _.bind(this.model.remove, this.model));
            // 基础模型发生更改时更新框位置
            this.model.on('change', this.updateBox, this);
            // 当模型获取从图中删除时,删除框。
            this.model.on('remove', this.removeBox, this);

            this.updateBox();
        },
render: function() {
            joint.dia.ElementView.prototype.render.apply(this, arguments);
            this.paper.$el.prepend(this.$box);
            this.updateBox();
            return this;
        },
        updateBox: function() {
            // 设置框的位置和尺寸,以便它涵盖了JointJS元素
            var bbox = this.model.getBBox();
            // Example of updating the HTML with a data stored in the cell model.
            this.$box.find('label').text(this.model.get('label'));
            this.$box.find('span').text(this.model.get('select'));  //将从select获取的元素回显到span
            this.$box.css({
                width: bbox.width,
                height: bbox.height,
                left: bbox.x,
                top: bbox.y,
                transform: 'rotate(' + (this.model.get('angle') || 0) + 'deg)'
            });
        },
        removeBox: function(evt) {
            this.$box.remove();
        }
});
// 创建JointJS元素并将它们添加到图形像往常一样。
// -----------------------------------------------------------
var el1 = new joint.shapes.html.Element({
        position: { x: 80, y: 80 },
        size: { width: 170, height: 100 },
        label: 'I am HTML',
        select: 'L'
    });
    var el2 = new joint.shapes.html.Element({
        position: { x: 370, y: 160 },
        size: { width: 170, height: 100 },
        label: 'Me too',
        select: 'Y'
    });
    var l = new joint.dia.Link({
        source: { id: el1.id },
        target: { id: el2.id },
        attrs: { '.connection': { 'stroke-width': 5, stroke: '#34495E' } }
    });

    graph.addCells([el1, el2,l]);
}());
ps:下载地址QLY_JointJS_Demo01