Julia语言初体验
最近MIT发布的julia 1.0.0版,据传整合了C、Python、R等诸多语言特色,是数据科学领域又一把顶级利器。
周末心血来潮赶快体验了一把,因为用习惯了jupyter notebook,安装完julia 1.0.0之后就配置好了jupyter notebook。
在安装配置环境阶段就遭遇了不少坑,吃了不少苦头,这里不得不吐槽级距,julia的安装配置一点儿也不比python简单,自己配置原生环境,结果下载包各种不兼容,想要导入本地数据,需要解决CSV包、xlsx包的接口问题,总之一路坎坷。
这里把自己走过的弯路总结一下,方便后来者学习!
1、环境选择:
强烈建议选择JuliaPro来安装,这里稍稍说明一下,julia虽然在8月8日更新了Julia 1.0.0版本,但是作为一门新兴语言,它的版本后向兼容实在是不敢恭维,原生环境里面一个包都不给配置,需要自己一个一个下载。所以选择了JuliaPro这个集成环境(主要集成了Atom+juno【julia的第三方IDE】、jupyter notebook【浏览器端的编辑器】)。主要是JuliaPro初始化就配置了好几十个常用的包,省的自己一个个下载还不一定能搞定各种路径配置。
下载JuliaPro并安装之后,会有三个主要入口:
● Juno for JuliaPro 0.6.4.1● JuliaPro - Command Prompt 0.6.4.1
● Jupyter for JuliaPro 0.6.4.1
第一个是Atom+juno的环境,相当于PyCharm之于Python,第二个是julia的命令行,第三个是Jupyter notebook编辑环境。如果是要单独下载原生环境并手动配置的话,需要摸索各种难题(还不一定能在网上找到解决方案)。
2、常用文件管理工具:
julia的包管理工具类似Pyrhon中的conda,叫做Pkg:
Pkg.add("packages")    #安装包
Pkg.build("packages")   #配置包
Pkg.rm("packages")     #卸载包

using packages     #加载包
import PyCall      #与using功能一样(和Python的导入相同)

using IJulia  #IJulia是julia与jupyter notebook之间的连接器
notebook()    #启动jupyter环境

Pkg.status()    #查看当前环境中的包列表
Pkg.installed() #查看已经安装的包信息

homedir()         #获取当前用户目录
pwd()             #获取当前工作目录
cd("D:/")         #设定当前工作目录
cd("C:/Users/RAINDU/Desktop/")

include("hello.jl")              #脚本执行(julia环境中)
julia script.jl arg1 arg2...     #终端命令行执行
3、文件I/O常用环境:
3.1 TXT文件导入导出:
Pkg.add("CSV") #如果没有安装需先安装
using CSV

mydata = CSV.read("EyesAsia.txt")
可恶的中文乱码。最简单的办法就是手动修改编码为UTF-8然后再次导入。
CSV.write("out.csv", mydata) #数据导出3.2 xlsx文件导入导出
Pkg.add("XLSXReader")
Pkg.add("XLSX")
using XLSXReader
using XLSX

cd("C:/Users/RAINDU/Desktop/")
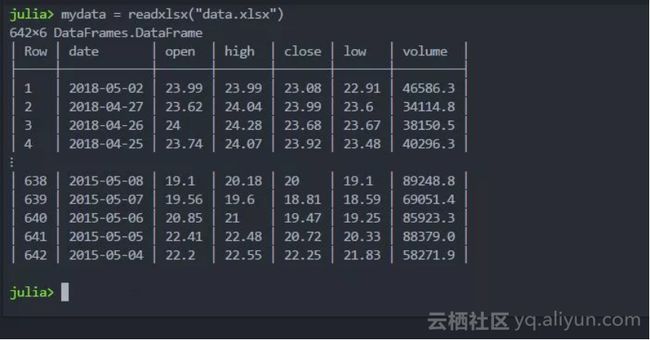
mydata = readxlsx("data.xlsx","Sheet1") #读入
XLSX.writetable("mydata.xlsx", DataFrames.columns(mydata), DataFrames.names(mydata))
4、基本数据类型
4.1 字符串
char = "hello,world!"

julia> char = "hello,world!"
"hello,world!"

julia> print(char)
hello,world!

julia> length(char)
12

julia> char[1]
'h': ASCII/Unicode U+0068 (category Ll: Letter, lowercase)

julia> char[end]
'!': ASCII/Unicode U+0021 (category Po: Punctuation, other)

julia中字符串可以继续遍历(区别于R,与Python相同)
Julia中区别标量和向量(区别于R,同Python)
4.2 列表
mylist = ["A"]
1-element Array{String,1}:
 "A"

julia> mylist = ["A","B","C","D","E"]
5-element Array{String,1}:
 "A"
 "B"
 "C"
 "D"
 "E"

julia> myarray = [["A","B","C","D","e"],[3,4,9,6,7]]
2-element Array{Array{Any,1},1}:
 Any["A", "B", "C", "D", "e"]
 Any[3, 4, 9, 6, 7]

julia> getindex(myarray,1)
5-element Array{Any,1}:
 "A"
 "B"
 "C"
 "D"
 "e"

julia> getindex(myarray,2)
5-element Array{Any,1}:
 3
 4
 9
 6

julia中不区分向量和数组,一维数组便是向量。

myarray[1,2]
4.3 元组
julia> my_tuple = ("hello","world")
("hello", "world")

julia>  typeof(my_tuple)
Tuple{String,String}

julia> getindex(my_tuple,2)
"world"
typeof()函数可以用于检查数据对象的类型结构(同R中的typeof,区别于Python中的type())
julia中的索引从1开始,区别于Python中的从0开始,与R相同。
4.4 字典
julia> dict = Dict("a" => 1, "b" => 2, "c" => 3)
Dict{String,Int64} with 3 entries:
  "c" => 3
  "b" => 2
  "a" => 1

julia> dict
Dict{String,Int64} with 3 entries:
  "c" => 3
  "b" => 2
  "a" => 1

julia> dict["a"]  #字段索引
1
4.5 数据框
using DataFrames #julia的数据框并非内置类型,而是需要额外加载包
julia> DataFrame(A = 1:4, B = ["M", "F", "F", "M"])
4×2 DataFrames.DataFrame
│ Row │ A │ B │
├-──┼─-┼─-┤
│ 1   │ 1 │ M │
│ 2   │ 2 │ F │
│ 3   │ 3 │ F │
│ 4   │ 4 │ M │

df = DataFrame()
df[:A] = 1:8
df[:B] = ["M", "F", "F", "M", "F", "M", "M", "F"]
8×2 DataFrames.DataFrame
│ Row │ A │ B │
├-──┼-─┼-─┤
│ 1   │ 1 │ M │
│ 2   │ 2 │ F │
│ 3   │ 3 │ F │
│ 4   │ 4 │ M │
│ 5   │ 5 │ F │
│ 6   │ 6 │ M │
│ 7   │ 7 │ M │
│ 8   │ 8 │ F │

julia> size(df, 1)  #数据框行数
8
julia> size(df, 2)  #数据框列数
2

head(df) #预览指定行
tail(df) #预览指定列

julia> size(df)     #数据框维度(包含行列)
(8, 2)

julia> df[1:3, :]  #索引行列
3×2 DataFrames.DataFrame
│ Row │ A │ B │
├─-─┼-─┼-─┤
│ 1   │ 1 │ M │
│ 2   │ 2 │ F │
│ 3   │ 3 │ F │

julia> df[1:3, 2]
3-element Array{String,1}:
 "M"
 "F"
 "F"
在数据框索引这一点儿上,julia是吸收了R和Python的特点,即允许直接基于数据框 本身索引行列,使用 范围符号numA:numB,同时默认取所有列或行时用:。
当取单列时,自动降维为一维数组。
julia> describe(df) #描述性统计
A
Summary Stats:
Mean:           4.500000
Minimum:        1.000000
1st Quartile:   2.750000
Median:         4.500000
3rd Quartile:   6.250000
Maximum:        8.000000
Length:         8
Type:           Int64

B
Summary Stats:
Length:         8
Type:           String
Number Unique:  2
关于数据合并:
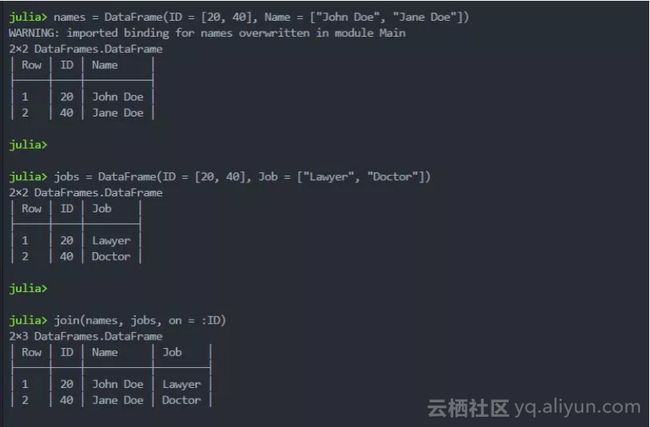
names = DataFrame(ID = [20, 40], Name = ["John Doe", "Jane Doe"])
jobs = DataFrame(ID = [20, 40], Job = ["Lawyer", "Doctor"])
join(names, jobs, on = :ID)
现实中数据合并的多种情况,julia中的DataFrames中的dataframe都能够很好地满足。
jobs = DataFrame(ID = [20, 60], Job = [“Lawyer”, “Astronaut”])
join(names, jobs, on = :ID, kind = :inner)
join(names, jobs, on = :ID, kind = :left)
join(names, jobs, on = :ID, kind = :right)
join(names, jobs, on = :ID, kind = :outer)
join(names, jobs, on = :ID, kind = :semi)
join(names, jobs, on = :ID, kind = :anti)
join(names, jobs, kind = :cross)

rename!(b, :IDNew => :ID) #修改数据框指定列字段名称
5 简单的聚合运算
using DataFrames, CSV
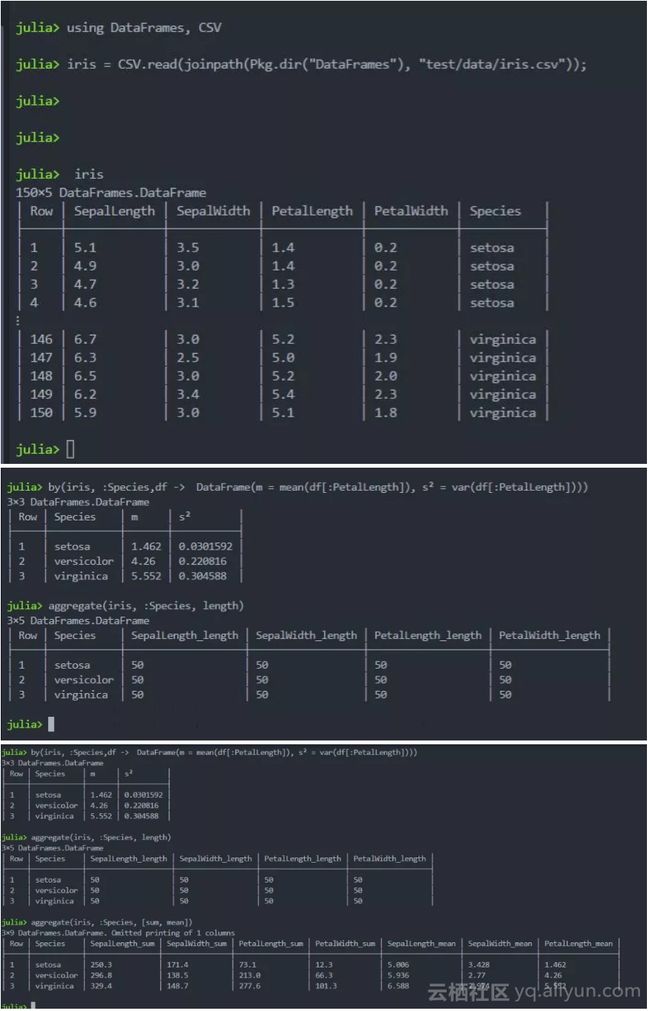
iris = CSV.read(joinpath(Pkg.dir("DataFrames"), "test/data/iris.csv"));
julia> by(iris, :Species, size)  #分类计数运算
3×2 DataFrames.DataFrame
│ Row │ Species    │ x1      │
├─-─┼──────┼──-──┤
│ 1   │ setosa     │ (50, 5) │
│ 2   │ versicolor │ (50, 5) │
│ 3   │ virginica  │ (50, 5) │
by(iris, :Species, df -> mean(df[:PetalLength]))
julia> by(iris, :Species, df -> mean(df[:PetalLength]))
3×2 DataFrames.DataFrame
│ Row │ Species │ x1 │
├──-┼──────┼-───┤
│ 1 │ setosa │ 1.462 │
│ 2 │ versicolor │ 4.26 │
│ 3 │ virginica │ 5.552 │这里:Species代表列引用,df -> mean(df[:PetalLength])这一句中的df并无实际意义,仅仅是julia中的匿名函数。所以df写成什么并无所谓。
julia> by(iris, :Species, x -> mean(x[:PetalLength]))
3×2 DataFrames.DataFrame
│ Row │ Species    │ x1    │
├──-┼──────┼-───┤
│ 1   │ setosa     │ 1.462 │
│ 2   │ versicolor │ 4.26  │
│ 3   │ virginica  │ 5.552 │
可以看到结果一模一样。
by(iris, :Species, df -> DataFrame(N = size(df, 1)))

julia> by(iris, :Species, df -> DataFrame(N = size(df, 1)))
3×2 DataFrames.DataFrame
│ Row │ Species    │ N  │
├─-─┼──--───┼──┤
│ 1   │ setosa     │ 50 │
│ 2   │ versicolor │ 50 │
│ 3   │ virginica  │ 50 │
分类计数的另一种写法。
by(iris, :Species,df ->  DataFrame(m = mean(df[:PetalLength]), s² = var(df[:PetalLength])))

julia> by(iris, :Species,df ->  DataFrame(m = mean(df[:PetalLength]), s² = var(df[:PetalLength])))
3×3 DataFrames.DataFrame
│ Row │ Species    │ m     │ s²        │
├──-┼──────┼─-----────────┤
│ 1   │ setosa     │ 1.462 │ 0.0301592 │
│ 2   │ versicolor │ 4.26  │ 0.220816  │
│ 3   │ virginica  │ 5.552 │ 0.304588  │

aggregate(iris, :Species, length)      #聚合每一个类别的长度
aggregate(iris, :Species, [sum, mean]) #同时聚合汇总、均值

#长宽转换操作-由宽转长
d = melt(iris, :Species);
6. 日期&时间处理
Pkg.add("Dates")
using Dates

Date(2013)
2013-01-01
Date(2013,7)
2013-07-01
Date(2013,7,5)
2013-07-05

DateTime(2013)
DateTime(2013,7)
DateTime(2013,7,5)
DateTime(2013,7,1,12)
DateTime(2013,7,1,12,30)
DateTime(2013,7,1,12,30,59)
DateTime(2013,7,1,12,30,59,1)

取日期对应元素
t = Date(2014,1,31)
Dates.year(t)
Dates.month(t)
Dates.week(t)
Dates.day(t)
6.一些好用的魔法工具
6.1 函数
julia中的函数定义很有意思,如果是尊重语法规范,应该是这样定义
function f_jisaun(x)
    result = x^2 + 2x - 1
    return result
end

julia> f_jisaun(5)
34
以上函数定义可简化为:
f_jisaun(x) = x^2 + 2x - 1
34
几乎接近代数运算中对函数的定义。
6.1 匿名函数
匿名函数配合map高阶函数可以实现快速计算
n_fun = x -> x^2 + 2x - 1           #匿名函数

map(round, [1.2,3.5,1.7])
julia> map(round, [1.2,3.5,1.7])
3-element Array{Float64,1}:
 1.0
 4.0
 2.0

map(n_fun, [1.2,3.5,1.7])
julia> map(n_fun, [1.2,3.5,1.7])
3-element Array{Float64,1}:
  2.84
 18.25
  5.29
6.2 列表表达式
[i for i in 1:10]

julia> [i for i in 1:10]
10-element Array{Int64,1}:
  1
  2
  3
  4
  5
  6
  7
  8
  9
 10

[(i^2,sqrt(i)) for i = 30:-2:10]

julia> [(i^2,sqrt(i)) for i = 30:-2:10]
11-element Array{Tuple{Int64,Float64},1}:
 (900, 5.47723)
 (784, 5.2915)
 (676, 5.09902)
 (576, 4.89898)
 (484, 4.69042)
 (400, 4.47214)
 (324, 4.24264)
 (256, 4.0)
 (196, 3.74166)
 (144, 3.4641)
 (100, 3.16228)
7 控制流与逻辑判断
7.1 for 循环
function my_fun(h)
    i = []
    for c in 1:h
        if c%3 == 0
          push!(i,c)
         end
    end
   return i
 end
julia> dd = my_fun(100)
33-element Array{Any,1}:
3
6
9
12
15
18
21
24
27
30
⋮
72
75
78
81
84
87
90
93
96
997.2 while 循环
function my_fun(h)
    i = []
    range = 1
    while range <= 100
        if range%3 == 0
          push!(i,range)
         end
         range += 1
      end
   return i
 end

julia> my_fun(100)
33-element Array{Any,1}:
  3
  6
  9
 12
 15
 18
 21
 24
 27
 30
 33
 36
 39
  ⋮
 66
 69
 72
 75
 78
 81
 84
 87
 90
 93
 96
 99
以上便是初次体验julia学会的一些简单知识点,以后有时间还会继续学习julia~
原文发布时间为:2018-08-26
本文作者:杜雨
本文来自云栖社区合作伙伴“数据小魔方”,了解相关信息可以关注“数据小魔方”。


