Python人脸微笑识别2-----Ubuntu16.04基于Tensorflow卷积神经网络模型训练的Python3+Dlib+Opencv实现摄像头人脸微笑检测
Python人脸微笑识别2--卷积神经网络进行模型训练目录
- 一、微笑数据集下载
- 1、微笑数据集下载
- 2、创建人脸微笑识别项目
- 3、数据集上传至Ubuntu人脸微笑识别项目文件夹
- 二、Python代码实现Tensorflow神经网络模型训练
- 1、创建模型训练train.py文件
- 2、Tensorflow神经网络模型训练
- 3、运行train.py进行模型训练
- 4、训练模型train.py源码
- 三、Dlib+Opencv实现人脸微笑检测
- 1、创建测试tset.py文件
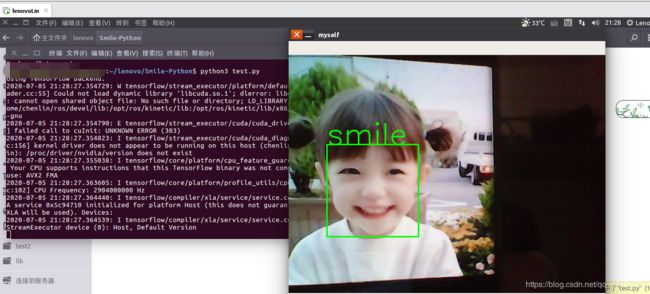
- 2、运行test.py进行人脸微笑识别
上次博客,我们在Ubuntu16.04上进行dlib模型训练进行人脸微笑识别检测,本次博客,我们将通过Tensorflow进行神经网络进行微笑数据集的模型训练,然后通过Opencv实现对微笑人脸的检测
- Tensorflow版本:Tensorflow-2.2.0
- Keras版本:Keras-2.3.1
- Ubuntu版本:Ubuntu-16.04
- Python版本:Python-3.6
一、微笑数据集下载
1、微笑数据集下载
1)、微笑数据集下载注意事项
小伙伴在进行微笑数据集下载的时候,请一定注意要有正负样本的划分,并且,最好已经分类好的,也就是训练集和测试集应该需要有smile和unsmlie的分别
2)、对于微笑数据集的下载,小伙伴可以通过如下链接进行下载,是林君学长整理好的微笑数据集,且分为正负样本,链接如下所示:
https://download.csdn.net/download/qq_42451251/12579015
3)、数据集展示

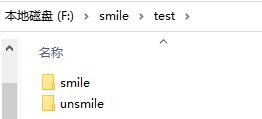
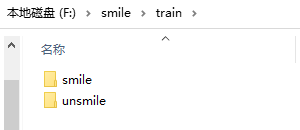
smile和unsmile中的便是数据集图片啦!
2、创建人脸微笑识别项目
1)、打开终端,创建项目文件夹Smile-Python
cd ~/lenovo
mkdir Smile-Python
cd Smile-Python
3、数据集上传至Ubuntu人脸微笑识别项目文件夹
1)、将上面下载的数据集上传至Ubuntu,进行划分,林君学长之所以上传至Ubuntu上面做,是因为在Ubuntu上面配置好了Tensorflow以及Dlib环境,而在win上没有改环境,如果小伙伴在Win上面配置以上环境,便可以在Win下进行对应的操作哦!
二、Python代码实现Tensorflow神经网络模型训练
1、创建模型训练train.py文件
1)、创建训练模型文件
cd ~/lenovo/Smile-Python
touch train.py
gedit train.py
2、Tensorflow神经网络模型训练
1)、导入需要的库
import keras
import os, shutil
from keras import layers
from keras import models
from keras import optimizers
from keras.preprocessing.image import ImageDataGenerator
import matplotlib.pyplot as plt
2)、设置数据集训练测试集、正负样本路径
train_dir='./smile/train'
train_smiles_dir='./smile/train/smile'
train_unsmiles_dir='./smile/train/unsmile'
test_dir='./smile/test'
test_smiles_dir='./smile/test/smile'
test_unsmiles_dir='./smile/test/unsmile'
3)、定义打印出训练集和测试集的正负样本尺寸函数
def printSmile():
    print('total training smile images:', len(os.listdir(train_smiles_dir)))
    print('total training unsmile images:', len(os.listdir(train_unsmiles_dir)))
    print('total test smile images:', len(os.listdir(test_smiles_dir)))
    print('total test unsmile images:', len(os.listdir(test_unsmiles_dir)))
4)、定义构建小型卷积网络并进行数据集预处理函数
#构建小型卷积网络并进行数据集预处理
def convolutionNetwork():
    model = models.Sequential()
    model.add(layers.Conv2D(32, (3, 3), activation='relu',
                            input_shape=(150, 150, 3)))
    model.add(layers.MaxPooling2D((2, 2)))
    model.add(layers.Conv2D(64, (3, 3), activation='relu'))
    model.add(layers.MaxPooling2D((2, 2)))
    model.add(layers.Conv2D(128, (3, 3), activation='relu'))
    model.add(layers.MaxPooling2D((2, 2)))
    model.add(layers.Conv2D(128, (3, 3), activation='relu'))
    model.add(layers.MaxPooling2D((2, 2)))
    model.add(layers.Flatten())
    model.add(layers.Dense(512, activation='relu'))
    model.add(layers.Dense(1, activation='sigmoid'))
    #数据预处理
    #对于编译步骤,我们将像往常一样使用RMSprop优化器。由于我们的网络是以一个单一的sigmoid单元结束的,所以我们将使用二元交叉矩阵作为我们的损失
    model.compile(loss='binary_crossentropy',
              optimizer=optimizers.RMSprop(lr=1e-4),
              metrics=['acc'])
    # 数据预处理
    #All images will be rescaled by 1./255
    train_datagen = ImageDataGenerator(rescale=1./255)
    test_datagen = ImageDataGenerator(rescale=1./255)
    train_generator = train_datagen.flow_from_directory(
        # This is the target directory
            train_dir,
        # All images will be resized to 150x150
            target_size=(150, 150),
            batch_size=20,
        # Since we use binary_crossentropy loss, we need binary labels
            class_mode='binary')

    test_generator = test_datagen.flow_from_directory(
            test_dir,
            target_size=(150, 150),
            batch_size=20,
            class_mode='binary')
    #输出打印
    for data_batch, labels_batch in train_generator:
        print('data batch shape:', data_batch.shape)
        print('labels batch shape:', labels_batch.shape)
        break
5)、定义模型训练并在训练和验证数据上绘制模型的损失和准确性函数
#模型训练并在训练和验证数据上绘制模型的损失和准确性
def modelTrain():
    #数据增强
    datagen = ImageDataGenerator(
      rotation_range=40,
      width_shift_range=0.2,
      height_shift_range=0.2,
      shear_range=0.2,
      zoom_range=0.2,
      horizontal_flip=True,
      fill_mode='nearest')
    #为了进一步对抗过拟合,我们还将在我们的模型中增加一个Dropout层,就在密集连接分类器之前:
    model = models.Sequential()
    model.add(layers.Conv2D(32, (3, 3), activation='relu',
                            input_shape=(150, 150, 3)))
    model.add(layers.MaxPooling2D((2, 2)))
    model.add(layers.Conv2D(64, (3, 3), activation='relu'))
    model.add(layers.MaxPooling2D((2, 2)))
    model.add(layers.Conv2D(128, (3, 3), activation='relu'))
    model.add(layers.MaxPooling2D((2, 2)))
    model.add(layers.Conv2D(128, (3, 3), activation='relu'))
    model.add(layers.MaxPooling2D((2, 2)))
    model.add(layers.Flatten())
    model.add(layers.Dropout(0.5))
    model.add(layers.Dense(512, activation='relu'))
    model.add(layers.Dense(1, activation='sigmoid'))

    model.compile(loss='binary_crossentropy',
                  optimizer=optimizers.RMSprop(lr=1e-4),
                  metrics=['acc'])
    #用数据增强来训练我们的网络:
    train_datagen = ImageDataGenerator(
    rescale=1./255,
    rotation_range=40,
    width_shift_range=0.2,
    height_shift_range=0.2,
    shear_range=0.2,
    zoom_range=0.2,
    horizontal_flip=True,)
    # Note that the validation data should not be augmented!
    test_datagen = ImageDataGenerator(rescale=1./255)
    train_generator = train_datagen.flow_from_directory(
            # This is the target directory
            train_dir,
            # All images will be resized to 150x150
            target_size=(150, 150),
            batch_size=32,
            # Since we use binary_crossentropy loss, we need binary labels
            class_mode='binary')
    test_generator = test_datagen.flow_from_directory(
            test_dir,
            target_size=(150, 150),
            batch_size=32,
            class_mode='binary')
    history = model.fit_generator(
          train_generator,
          steps_per_epoch=100,
          epochs=100,
          validation_data=test_generator,
          validation_steps=50)
    #训练模型保存
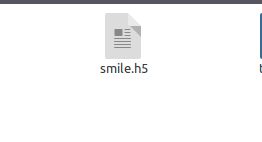
    model.save('./smile.h5')
    acc = history.history['acc']
    val_acc = history.history['val_acc']
    loss = history.history['loss']
    val_loss = history.history['val_loss']
    epochs = range(len(acc))
    plt.plot(epochs, acc, 'bo', label='Training acc')
    plt.plot(epochs, val_acc, 'b', label='Validation acc')
    plt.title('Training and validation accuracy')
    plt.legend()
    plt.figure()
    plt.plot(epochs, loss, 'bo', label='Training loss')
    plt.plot(epochs, val_loss, 'b', label='Validation loss')
    plt.title('Training and validation loss')
    plt.legend()
    plt.show()
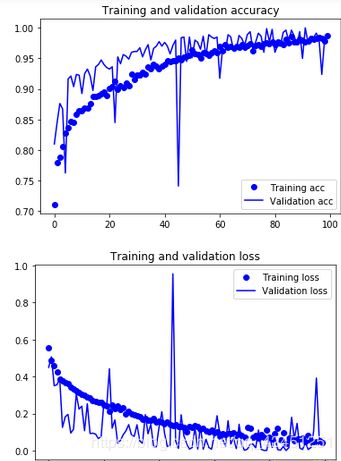
以上函数包括对模型的训练,模型优化、和模型保存、以及模型精度和损失作图
6)、主函数
if __name__ == "__main__":
    printSmile()
    convolutionNetwork()
    modelTrain()
以上内容编写之后,点击保存并关闭文件!
3、运行train.py进行模型训练
1)、在终端运行train.py文件
python3 train.py
2)、运行结果如下所示:
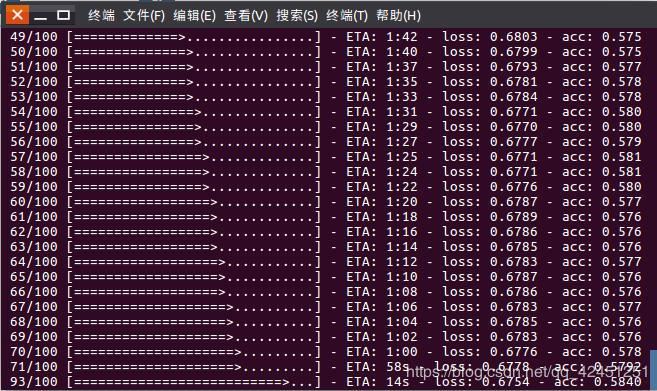
模型训练时间较长,由于训练100级,因此在提示识别准确率的同时,肯定会花费大量的时间,有的小伙伴在win10上面进行操作,然后配置过Tensorflow-GPU进行加速之后,便会很快就训练完了,没有配置大约训练了接近2个小时,所以,慢慢等待吧!
3)、训练完成之后的模型文件
4)、训练模型精度及损失
4、训练模型train.py源码
import keras
import os, shutil
from keras import layers
from keras import models
from keras import optimizers
from keras.preprocessing.image import ImageDataGenerator
import matplotlib.pyplot as plt
train_dir='./smile/train'
train_smiles_dir='./smile/train/smile'
train_unsmiles_dir='./smile/train/unsmile'
test_dir='./smile/test'
test_smiles_dir='./smile/test/smile'
test_unsmiles_dir='./smile/test/unsmile'
#打印出训练集和测试集的正负样本尺寸
def printSmile():
    print('total training smile images:', len(os.listdir(train_smiles_dir)))
    print('total training unsmile images:', len(os.listdir(train_unsmiles_dir)))
    print('total test smile images:', len(os.listdir(test_smiles_dir)))
    print('total test unsmile images:', len(os.listdir(test_unsmiles_dir)))
#构建小型卷积网络并进行数据集预处理
def convolutionNetwork():
    model = models.Sequential()
    model.add(layers.Conv2D(32, (3, 3), activation='relu',
                            input_shape=(150, 150, 3)))
    model.add(layers.MaxPooling2D((2, 2)))
    model.add(layers.Conv2D(64, (3, 3), activation='relu'))
    model.add(layers.MaxPooling2D((2, 2)))
    model.add(layers.Conv2D(128, (3, 3), activation='relu'))
    model.add(layers.MaxPooling2D((2, 2)))
    model.add(layers.Conv2D(128, (3, 3), activation='relu'))
    model.add(layers.MaxPooling2D((2, 2)))
    model.add(layers.Flatten())
    model.add(layers.Dense(512, activation='relu'))
    model.add(layers.Dense(1, activation='sigmoid'))
    #数据预处理
    #对于编译步骤,我们将像往常一样使用RMSprop优化器。由于我们的网络是以一个单一的sigmoid单元结束的,所以我们将使用二元交叉矩阵作为我们的损失
    model.compile(loss='binary_crossentropy',
              optimizer=optimizers.RMSprop(lr=1e-4),
              metrics=['acc'])
    # 数据预处理
    #All images will be rescaled by 1./255
    train_datagen = ImageDataGenerator(rescale=1./255)
    test_datagen = ImageDataGenerator(rescale=1./255)
    train_generator = train_datagen.flow_from_directory(
        # This is the target directory
            train_dir,
        # All images will be resized to 150x150
            target_size=(150, 150),
            batch_size=20,
        # Since we use binary_crossentropy loss, we need binary labels
            class_mode='binary')

    test_generator = test_datagen.flow_from_directory(
            test_dir,
            target_size=(150, 150),
            batch_size=20,
            class_mode='binary')
    #输出打印
    for data_batch, labels_batch in train_generator:
        print('data batch shape:', data_batch.shape)
        print('labels batch shape:', labels_batch.shape)
        break
#模型训练并在训练和验证数据上绘制模型的损失和准确性
def modelTrain():
    #数据增强
    datagen = ImageDataGenerator(
      rotation_range=40,
      width_shift_range=0.2,
      height_shift_range=0.2,
      shear_range=0.2,
      zoom_range=0.2,
      horizontal_flip=True,
      fill_mode='nearest')
    #为了进一步对抗过拟合,我们还将在我们的模型中增加一个Dropout层,就在密集连接分类器之前:
    model = models.Sequential()
    model.add(layers.Conv2D(32, (3, 3), activation='relu',
                            input_shape=(150, 150, 3)))
    model.add(layers.MaxPooling2D((2, 2)))
    model.add(layers.Conv2D(64, (3, 3), activation='relu'))
    model.add(layers.MaxPooling2D((2, 2)))
    model.add(layers.Conv2D(128, (3, 3), activation='relu'))
    model.add(layers.MaxPooling2D((2, 2)))
    model.add(layers.Conv2D(128, (3, 3), activation='relu'))
    model.add(layers.MaxPooling2D((2, 2)))
    model.add(layers.Flatten())
    model.add(layers.Dropout(0.5))
    model.add(layers.Dense(512, activation='relu'))
    model.add(layers.Dense(1, activation='sigmoid'))

    model.compile(loss='binary_crossentropy',
                  optimizer=optimizers.RMSprop(lr=1e-4),
                  metrics=['acc'])
    #用数据增强来训练我们的网络:
    train_datagen = ImageDataGenerator(
    rescale=1./255,
    rotation_range=40,
    width_shift_range=0.2,
    height_shift_range=0.2,
    shear_range=0.2,
    zoom_range=0.2,
    horizontal_flip=True,)
    # Note that the validation data should not be augmented!
    test_datagen = ImageDataGenerator(rescale=1./255)
    train_generator = train_datagen.flow_from_directory(
            # This is the target directory
            train_dir,
            # All images will be resized to 150x150
            target_size=(150, 150),
            batch_size=32,
            # Since we use binary_crossentropy loss, we need binary labels
            class_mode='binary')
    test_generator = test_datagen.flow_from_directory(
            test_dir,
            target_size=(150, 150),
            batch_size=32,
            class_mode='binary')
    history = model.fit_generator(
          train_generator,
          steps_per_epoch=100,
          epochs=100,
          validation_data=test_generator,
          validation_steps=50)
    #训练模型保存
    model.save('./smile.h5')
    acc = history.history['acc']
    val_acc = history.history['val_acc']
    loss = history.history['loss']
    val_loss = history.history['val_loss']
    epochs = range(len(acc))
    plt.plot(epochs, acc, 'bo', label='Training acc')
    plt.plot(epochs, val_acc, 'b', label='Validation acc')
    plt.title('Training and validation accuracy')
    plt.legend()
    plt.figure()
    plt.plot(epochs, loss, 'bo', label='Training loss')
    plt.plot(epochs, val_loss, 'b', label='Validation loss')
    plt.title('Training and validation loss')
    plt.legend()
    plt.show()
if __name__ == "__main__":
    printSmile()
    convolutionNetwork()
    modelTrain()
三、Dlib+Opencv实现人脸微笑检测
1、创建测试tset.py文件
1)、进入人脸微笑识别项目
cd ~/lenovo/Smile-Python
touch test.py
gedit test.py
文件内容如下所示:
#检测视频或者摄像头中的人脸
import cv2
from keras.preprocessing import image
from keras.models import load_model
import numpy as np
import dlib
from PIL import Image
model = load_model('./smile.h5')
detector = dlib.get_frontal_face_detector()
video=cv2.VideoCapture(0)
font = cv2.FONT_HERSHEY_SIMPLEX
def rec(img):
    gray=cv2.cvtColor(img,cv2.COLOR_BGR2GRAY)
    dets=detector(gray,1)
    if dets is not None:
        for face in dets:
            left=face.left()
            top=face.top()
            right=face.right()
            bottom=face.bottom()
            cv2.rectangle(img,(left,top),(right,bottom),(0,255,0),2)
            img1=cv2.resize(img[top:bottom,left:right],dsize=(150,150))
            img1=cv2.cvtColor(img1,cv2.COLOR_BGR2RGB)
            img1 = np.array(img1)/255.
            img_tensor = img1.reshape(-1,150,150,3)
            prediction =model.predict(img_tensor)
            if prediction[0][0]>0.5:
                result='smile'
            else:
                result='unsmile'
            cv2.putText(img, result, (left,top), font, 2, (0, 255, 0), 2, cv2.LINE_AA)
        cv2.imshow('myself', img)
while video.isOpened():
    res, img_rd = video.read()
    if not res:
        break
    rec(img_rd)
    if cv2.waitKey(5) & 0xFF == ord('q'):
        break
video.release()
cv2.destroyAllWindows()
2、运行test.py进行人脸微笑识别
1)、通过如下命令运行test.py
python3 test.py
2)、微笑识别结果
3)、非微笑识别结果

如果想结束测试,便可以通过键盘输入Q进行退出!
以上就是本次博客的全部内容了,借助Tensorflow卷积神经网络对微笑数据集进行模型训练,并且通过训练的模型进行人脸微笑识别认证、其中重要的一点在于对数据集的处理、卷积神经网络构建、数据增强优化、以及模型训练的理解,至于通过摄像头捕捉人脸进行微笑检测则通过opencv-python实现,比较简单!
遇到问题的小伙伴记得留言评论哦,学长看到会为大家解答的,这个学长不太冷!
陈一月的又一天编程岁月^ _ ^
