handler消息机制源码解析
1, 基本概念
Handler主要做什么?机制是怎样的?有其他相同或者类似的机制吗?
我们知道,Binder主要用于跨进程通信,Handler呢?主要用于进程内部进行通信,或者说进程内部不同线程之间进行通信,即是不同线程之间互相发送消息。
额外知识:
libcore/libart/src/main/java/java/lang/Thread.java
libcore/luni/src/main/java/java/lang/ThreadLocal.java
Thread类的内容有一个成员专门用于存储线程的ThreadLocal的数据。
ThreadLocal是做啥的呢? 啥都不说,直接上例子:
1. private ThreadLocalmBooleanThreadLocal = newThreadLocal(Boolean);
2.
3. mBooleanThreadLocal.set(true);
4. Log.d(TAG, [Thread#main]mBooleanThreadLocal=+ mBooleanThreadLocal.get());
5.
6. new Thread(Thread#1) {
7. @Override
8. publicvoid run() {
9. mBooleanThreadLocal.set(false);
10. Log.d(TAG,[Thread#1]mBooleanThreadLocal= + mBooleanThreadLocal.get());
11. };
12. }.start();
13.
14. new Thread(Thread#2) {
15. @Override
16. publicvoid run() {
17. Log.d(TAG,[Thread#2]mBooleanThreadLocal= + mBooleanThreadLocal.get());
18. };
19. }.start();
20.
输出结果:
21. D/TestActivity(8676):[Thread#main]mBooleanThreadLocal=true
22. D/TestActivity(8676):[Thread#1]mBooleanThreadLocal=false
23. D/TestActivity(8676):[Thread#2]mBooleanThreadLocal=null
很神奇吧,可以这样理解, ThreadLocal虽然作为主线程的全部变量,但是在不同的字线程中都有各自一个独立的副本,彼此之间互不干扰。也就是说ThreadLocal是基于线程的。
那么Handler相关消息概念中为啥要使用ThreadLocal呢?
对于Handler来说,它需要获取当前线程的Looper,通过ThreadLocal就可以轻松实现Looper在线程中的存取.如果不采用ThreadLocal,那么系统就必须提供一个全局的哈希表供Handler查找指定线程的Looper,这样一来就必须提供一个类似于LooperManager的类了,这就是ThreadLocal的好处。
所以, 当某些数据是以线程为作用域并且不同线程具有不同的数据副本的时候,就可以考虑采用ThreadLocal。比如比如Looper、ActivityThread以及AMS等都用到了ThreadLocal。
主要做两件事情,1,(延时)发送消息;2,(延时)运行一个线程,最后都是以消息的形式封装处理。
主要包括三个类:handler, Looper, MessageQueue,还有Message
消息的表示:Message
消息队列:MessageQueue
消息循环,用于循环取出消息进行处理:Looper
消息处理,消息循环从消息队列中取出消息后要对消息进行处理:Handler
一个进程仅有一个looper,looper中包含一个消息链表(按照时间排序).
同一个handler可以对应(处理)不同的消息(Message)
2, 流程图
在apk启动时,会创建一个主线程,在ActivityThread的main函数中
【frameworks/base/core/java/android/app/ActivityThread.java】
1. public static void main(String[] args) {
2. ···
3. Looper.prepareMainLooper();
4. ···
5. Looper.loop();
6. }
流程如下:
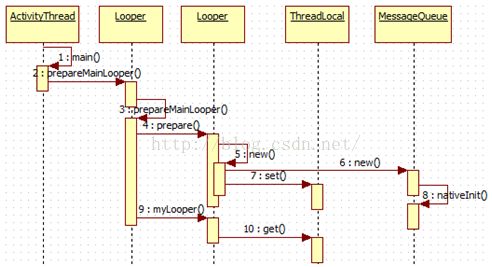
2.1 Looper初始化
7. private static void prepare(booleanquitAllowed) {
8. ···
9. sThreadLocal.set(newLooper(quitAllowed));
10. // 构造当前线程的Looper并且保存在sThreadLocal中
11. }
12. private Looper(boolean quitAllowed) {
13. mQueue = new MessageQueue(quitAllowed);//构造消息队列 MessageQueue
14. mThread = Thread.currentThread();
15. }
16. MessageQueue(boolean quitAllowed) {
17. mQuitAllowed = quitAllowed;
18. mPtr = nativeInit();// 该函数是一个C/C++层函数
19. }
可以看看mQuitAllowed的定义:
20. // True if the message queue can be quit.
21. private final boolean mQuitAllowed;
该变量为false时表示不可以退出,只有主线程在调用prepare函数时传入false。也就是说仅有主线程不允许退出。
2.2 获取当前线程的Looper
直接看myLooper函数:
22. public static @Nullable Looper myLooper() {
23. return sThreadLocal.get();// 如前所述,可以直接得到当前线程的Looper
24. }
获取消息队列
25. public static @NonNull MessageQueue myQueue(){
26. return myLooper().mQueue;
27. }
3, 消息入队列
普通用法:
1,(延时)发送消息
28. protected static final int MSG_send = 0; // 标记
29. private static int DELAY_TIME = 700; // 延迟时间 单位: ms
30.
31. Message msga = mHandler.obtainMessage();
32. msga.what = MSG_send;
33. mHandler.sendMessageDelayed(msga,DELAY_TIME);
34.
35. private final Handler mHandler = newHandler() {
36. @Override
37. public void handleMessage(Message msg){
38. switch (msg.what) {
39. case MSG_send:
40. ···
41. break;
42. }
43. }
44.
45. };
2, (延时)运行一个线程
46. private Handler mHandler = new Handler();
47. private static int AUTO_TEST_DELAY_TIME =700;
48.
49. mHandler.postDelayed(mRunnable,AUTO_TEST_DELAY_TIME);
50.
51. private Runnable mRunnable = new Runnable() {
52. @Override
53. publicvoid run() {
54. ···
55. }
56. };
这2种方法的机制,原理是完全相同的。
还有一些其他的用法,以及下面类的构造函数和方法,便于不偏离主线,只讲紧要部分。
3.1 Handler
57. public Handler(Callback callback, booleanasync) { // 通常callback=null,async=false
58. mLooper = Looper.myLooper();
59. mQueue = mLooper.mQueue;
60. mCallback = callback;
61. mAsynchronous = async;
62. }
由Handler的构造函数以及上面分析可知,1个线程仅有1个Looper对象,并且一个Looper仅有一个消息队列 MessageQueue。
3.2 Message
首先看Message类: 实现Parcelable说明是可以封装和打包的
63. public final class Message implementsParcelable {
重要变量:
64. public int what; // 不同消息的区分标志
65. Handler target;
66. private static Message sPool;
67. private static int sPoolSize = 0;
68. private static final int MAX_POOL_SIZE = 50;
69. long when; // 消息延迟的时间
70. Message next; // 消息的下一条消息,这样就可以组成一个单向链表
Message的获取(初始化)过程:
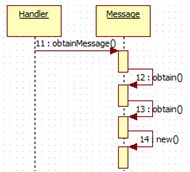
71. public static Message obtain(Handler h) {
72. Message m = obtain();
73. m.target = h; // Message 的目标就是获取Message的Handler
74. return m;
75. }
76. public static Message obtain() {
77. synchronized (sPoolSync) {
78. if (sPool != null) {
79. Message m = sPool;
80. sPool = m.next;
81. m.next = null;
82. m.flags = 0; // clear in-useflag
83. sPoolSize--;
84. return m;
85. }
86. }
87. return new Message(); // 新建一个Message对象
88. }
3.3消息队列MessageQueue
重要变量和函数:
89. Message mMessages; // 该变量表示第一个消息,根据next可以遍历所有消息,也可以说它是一条消息链表
90. Runnable callback;
91. private native static long nativeInit();
92. private native static void nativeDestroy(longptr);
93. private native void nativePollOnce(long ptr,int timeoutMillis);
94. private native static void nativeWake(longptr);
所谓的消息入队列就是将新建的Message插入mMessages中,在mMessages找到合适的位置。那么mMessages中消息排序的依据是什么呢? 延迟时间
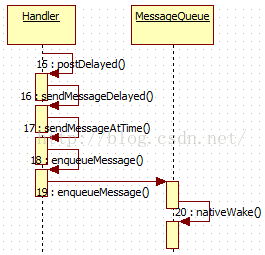
从使用方法上可以看到,延迟运行线程多了一个步骤: postDelayed
95. public final boolean postDelayed(Runnable r,long delayMillis)
96. {
97. returnsendMessageDelayed(getPostMessage(r), delayMillis);
98. }
99. private static MessagegetPostMessage(Runnable r) {
100. Message m = Message.obtain();
101. m.callback = r;
102. return m;
103. }
主要是为callback 变量赋值,当发送普通消息时, callback=null,仅运行线程时才有值,这在消息的处理时有一点差别。
104.public final booleansendMessageDelayed(Message msg, long delayMillis)
105. {
106. if (delayMillis < 0) {
107. delayMillis = 0;
108. }
109. return sendMessageAtTime(msg, SystemClock.uptimeMillis() + delayMillis);
110. }
关键是这句 SystemClock.uptimeMillis() + delayMillis以系统的绝对时间为基准,对消息进行插入操作。
111.boolean enqueueMessage(Message msg, longwhen) {
112. synchronized (this) {
113. if (mQuitting) {
114. msg.recycle();
115. return false;
116. }
117.
118. msg.markInUse();
119. msg.when = when;
120. Message p = mMessages;
121. boolean needWake;
122. if (p == null || when == 0 || when < p.when) {
123. // New head, wake up the eventqueue if blocked.
124. msg.next = p; // 还未有消息,作为链表的表头
125. mMessages = msg;
126. needWake = mBlocked;
127. } else {
128. // Inserted within the middleof the queue. Usually we don't have towake
129. // up the event queue unlessthere is a barrier at the head of the queue
130. // and the message is theearliest asynchronous message in the queue.
131. needWake = mBlocked &&p.target == null && msg.isAsynchronous();
132. Message prev;
133. for (;;) {
134. prev = p;
135. p = p.next; // 找到合适的位置并插入链表
136. if (p == null || when 137. break; 138. } 139. if (needWake &&p.isAsynchronous()) { 140. needWake = false; 141. } 142. } 143. msg.next = p; // invariant:p == prev.next 144. prev.next = msg; 145. } 146. 147. // We can assume mPtr != 0 because mQuitting is false. 148. if (needWake) { 149. nativeWake(mPtr); 150. } 151. } 152. return true; 153. }
4,消息循环
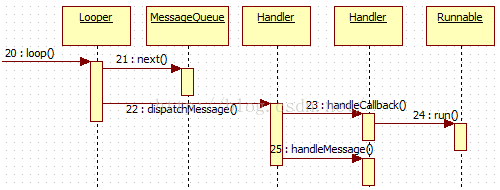
Looper只是个简单的类而已,它虽然提供了循环处理方面的成员函数loop(),却不能自己凭空地运行起来,而只能寄身于某个真实的线程。
在线程中,调用loop方法,不断从MessageQueue中去取消息,交给消息的target属性的dispatchMessage去处理。
154.public static void loop() {
155. final Looper me = myLooper(); // 获取当前线程的Looper
156. final MessageQueue queue = me.mQueue; // 获取消息链表
157.
158. // Make sure the identity of this thread is that of the local process,
159. // and keep track of what that identity token actually is.
160. for (;;) {
161. Message msg = queue.next(); // 直接获取下一条消息
162. if (msg == null) {
163. // No message indicates thatthe message queue is quitting.
164. return;
165. }
166. // This must be in a local variable, in case a UI event sets the logger
167.
168. msg.target.dispatchMessage(msg);// 分发处理消息
169. msg.recycleUnchecked(); // 消息本身的处理,进行回收
170. }
171. }
loop方法主要做3件事情:
1,从消息链表中取出下一条消息。
2,将消息分发给Handler去处理(msg.target的值就是handler)
3,处理完消息之后,消息本身也需要做后续处理。
首先说说消息的分发,然后解析如何从消息队列中取出消息。
4.1分发消息
分发消息比较简单,上面流程图中的步骤22到25.
172.public void dispatchMessage(Message msg) {
173. if (msg.callback != null) {
174. handleCallback(msg); // 运行线程时调用
175. } else {
176. if (mCallback != null) {
177. if(mCallback.handleMessage(msg)) {
178. return;
179. }
180. }
181. handleMessage(msg);// 发送消息时调用
182. }
183. }
184.private static void handleCallback(Messagemessage) {
185. message.callback.run();
186. }
187.
分别调用自写的handleMessage 方法和Runnable 的run方法
188.private class H extends Handler {····}
5, MessageQueue C/C++
/system/core/include/utils/Looper.h
/system/core/libutils/Looper.cpp
/frameworks/base/core/jni/android_os_MessageQueue.h
/frameworks/base/core/jni/android_os_MessageQueue.cpp
Java层的MessageQueue.java 通过JNI对应 C/C++ 层的
android_os_MessageQueue.cpp。但是java层的Looper.java 和 C/C++ 的
Looper.cpp 无任何联系。
5.1创建

在构造java层的MessageQueue时,会调用nativeInit 方法。
189.static jlong android_os_MessageQueue_nativeInit(JNIEnv*env, jclass clazz) {
190. NativeMessageQueue* nativeMessageQueue = new NativeMessageQueue();
191. if(!nativeMessageQueue) {
192. jniThrowRuntimeException(env, "Unable to allocate nativequeue");
193. return 0;
194. }
195.
196. nativeMessageQueue->incStrong(env);
197. return reinterpret_cast
198.}
新建一个NativeMessageQueue 对象,然后将对象回传给java层保存。
199.NativeMessageQueue::NativeMessageQueue() :
200. mPollEnv(NULL), mPollObj(NULL), mExceptionObj(NULL) {
201. mLooper = Looper::getForThread(); // 也是一个线程对应一个Looper
202. if(mLooper == NULL) {
203. mLooper = new Looper(false);
204. Looper::setForThread(mLooper);
205. }
206.}
5.2获取消息
在分发消息之前,还有获取消息的过程,获取消息涉及到JNI机制和C/C++方法的调用,所以拿到这儿来论述。
207.Message next() {
208. final long ptr = mPtr;
209. if (ptr == 0) {
210. return null;
211. }
212. int pendingIdleHandlerCount = -1;
213. int nextPollTimeoutMillis = 0;
214. for (;;) {
215. nativePollOnce(ptr,nextPollTimeoutMillis);
216.
217. synchronized (this) {
218. final long now =SystemClock.uptimeMillis();
219. Message prevMsg = null;
220. Message msg = mMessages;
221. if (msg != null &&msg.target == null) {
222. do {
223. prevMsg = msg;
224. msg = msg.next;
225. } while (msg != null&& !msg.isAsynchronous());
226. }
227. if (msg != null) {
228. if (now < msg.when) {
229.nextPollTimeoutMillis = (int)Math.min(msg.when - now, Integer.MAX_VALUE);
230. } else {
231. // Got a message.
232. mBlocked = false;
233. if (prevMsg != null) {
234. prevMsg.next =msg.next;
235. } else {
236. mMessages =msg.next;
237. }
238. msg.next = null;
239. msg.markInUse();
240. return msg;
241. }
242. } else {
243. // No more messages.
244. nextPollTimeoutMillis = -1;
245. }
246.
247. if (mQuitting) {
248. dispose();
249. return null;
250. }
251. ···
252. }
253. }
该方法主要完成3件事情:
1.调用nativePollOnce方法(阻塞)等待下一条消息的到来.
2.获取下一条消息。
3.后续处理,比如垃圾回收。
这个函数里的for循环并不是起循环摘取消息节点的作用,而是为了连贯“当前时间点”和“处理下一条消息的时间点”。简单地说,当“定时机制”触发“摘取一条消息”的动作时,会判断事件队列的首条消息是否真的到时了,如果已经到时了,就直接返回这个msg,而如果尚未到时,则会努力计算一个较精确的等待时间(nextPollTimeoutMillis),计算完后,那个for循环会掉过头再次调用到nativePollOnce(mPtr, nextPollTimeoutMillis),进入阻塞状态,从而等待合适的时长。
总体的流程图如下:
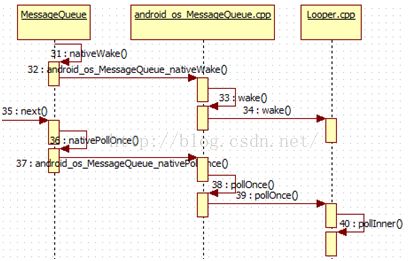
在nativePollOnce方法之前,还有消息入列时的nativeWake方法。这2个方法分别是C/C++ 层消息的入列和获取,我们主要分析的是java层代码,所以在此仅贴出了主要的流程图。
6,小结
Handler 相关消息在android上层开发中无处不在,通过它可以很轻松的将一个任务切换到Handler所在的线程中去执行,执行完成之后也可以轻易地切换到主线程中。相关消息机制用一段话总结就是:Handler主要将Message 打入MessageQueue, Handler所在线程的Looper从MessageQueue中取出Message并且分发给Handler进行最后的处理。