Eclipse中spring mvc配置实例详解
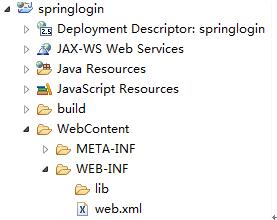
1.建立动态网页项目,并修改web.xml。
Web.xml内容如下:
xml version="1.0"encoding="UTF-8"?>
<web-app version="2.5"
xmlns="http://java.sun.com/xml/ns/javaee"
xmlns:xsi="http://www.w3.org/2001/XMLSchema-instance"
xsi:schemaLocation="http://java.sun.com/xml/ns/javaee
http://java.sun.com/xml/ns/javaee/web-app_2_5.xsd">
<servlet>
<servlet-name>dispatchservlet-name>
<servlet-class>org.springframework.web.servlet.DispatcherServletservlet-class>
<init-param>
<param-name>contextConfigLocationparam-name>
<param-value>/WEB-INF/spring-servlet.xmlparam-value>
init-param>
<load-on-startup>1load-on-startup>
servlet>
<servlet-mapping>
<servlet-name>dispatchservlet-name>
<url-pattern>*.dourl-pattern>
servlet-mapping>
<welcome-file-list>
<welcome-file>index.jspwelcome-file>
welcome-file-list>
web-app>
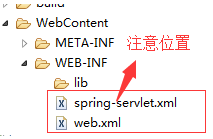
2.建立servlet.xml文件,并根据自身文件修改其内容。
文件内容:
xml version="1.0"encoding="UTF-8"?>
<beans xmlns="http://www.springframework.org/schema/beans"
xmlns:xsi="http://www.w3.org/2001/XMLSchema-instance"
xmlns:mvc="http://www.springframework.org/schema/mvc"
xmlns:context="http://www.springframework.org/schema/context"
xsi:schemaLocation="
http://www.springframework.org/schema/mvc http://www.springframework.org/schema/mvc/spring-mvc-3.0.xsd
http://www.springframework.org/schema/beanshttp://www.springframework.org/schema/beans/spring-beans-3.0.xsd
http://www.springframework.org/schema/contexthttp://www.springframework.org/schema/context/spring-context-3.0.xsd">
<context:component-scan base-package="logintest">context:component-scan>
<mvc:annotation-driven />
<bean class="org.springframework.web.servlet.view.InternalResourceViewResolver">
<property name="prefix"value="/WEB-INF/jsp/"/>
<property name="suffix"value=".jsp"/>
<property name="viewClass"
value="org.springframework.web.servlet.view.JstlView"/>
bean>
beans>
3.建立登陆页面
<form action="login.do"method="post">
<input type="text"name = "username" ><p>
<input type="password"name = "password" ><p>
<input type="submit"value="submit">
form>
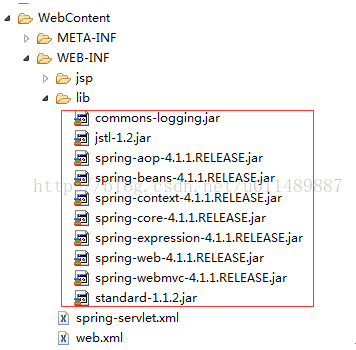
4.导入jar包,导入jar包很关键。大都是以RELEASE.jar结尾的jar包,全部导入也有可能出错。Jar包版本的选择也要考虑与jdk与tomcat版本。Jdk1.8要考虑spring4.0及以上。
5.建立control类
packagelogintest; //与servlet.xml文件中对应的包名要对应
importorg.springframework.stereotype.Controller;
importorg.springframework.web.bind.annotation.RequestMapping;
@Controller //表示为控制类
public class logincontrol {
@RequestMapping("login") //对应form表单 action中的内容
public Stringlogin(String username,String password){
if ("test".equals(username)) {
System.out.println(username +" 登录成功");
return"Success";//逻辑视图名 跳转页面默认为转发
}
return"Error";
}
}
6.建立Success.jsp 与Error.jsp
不再赘述。
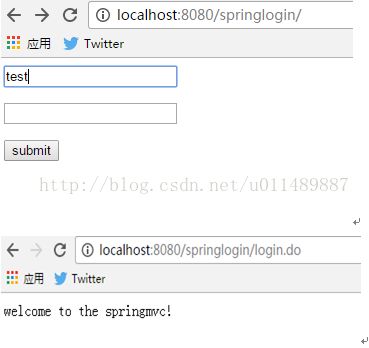
7、测试结果
下载源代码链接:http://download.csdn.net/detail/u011489887/9731973


