实验二 Android数据存储实例-通讯录
实验二 Android数据存储实例-通讯录
一、实验目的
(1)熟练UI界面设计流程及方法;
(2)进一步掌握SQLite数据库的建立和操作方法;
(3)熟练Andriod数据库编程。
二、实验环境
(1) 硬件:PC 机,其它相关硬件 ;
(2)软件:Windows XP,Android Studio集成开发环境,Android Development Tools插件。
三、实验内容及 要求
(1)掌握界面布局;
(2)熟练SQLite数据库的创建与操作编程;
(3)熟练ListView控件的使用;
(4)完成手机通讯录的编程设计与调试。
四、实验步骤
本次实验我们将在Android上完成一个通讯录的功能。首先我们将确定要实现的这个通讯录有什么样的功能,比如:浏览联系人、添加联系人、删除联系人、编辑联系人、查看联系人,当找到一个联系人之后,可以呼叫或者发送短信息给该联系人。确定了这些功能之后,再来思考需要使用哪些知识,比如:要存储很多联系人,可以使用数据库,以方便管理和维护。在确定之后,就可以开始新建工程了。
1、UI设计
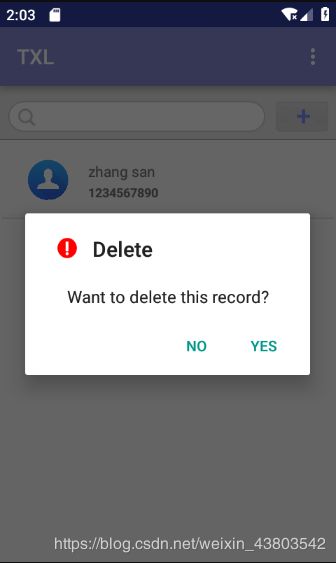
在设计界面时,需要根据所定的功能来设计,本节中我们浏览联系人是通过一个List来展示给用户的,如图1所示;用户需要操作,所以需要设计供用户操作的选项,如添加、查询等,图2和图3分别是长按联系人的菜单和直接点击联系人的效果。


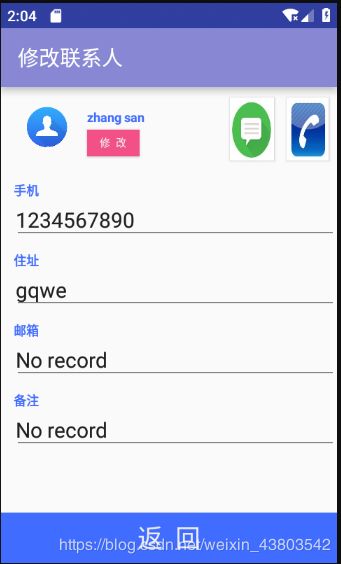
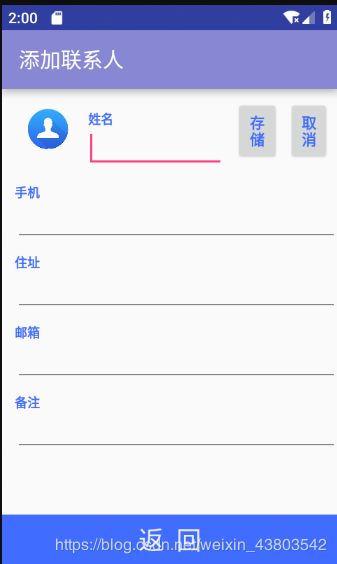
在完成了这些基本功能的设计之后,需要设计添加和修改联系人的界面。这样的布局很简单,可以通过TextView来显示一个标签,比如:姓名、电话等。既然要编辑肯定需要接收用户的输入,所以这里使用了EditText来供用户输入信息,如图3所示;在修改之后可以在当前界面查看联系人的信息,如图4所示。


2、数据库设计
对于联系人信息的存储,可以使用Android中提供的数据库。要设计数据库,首先要确定数据都是什么内容,为了方便管理、维护和共享,首先将数据库中要使用的数据全部定义到DBdao类,该例中定义的数据信息在文件DBdao.java中;其中联系人信息数据封装到Person类中,其代码清单如下所示。
//定义数据
public class Person implements Serializable {
    private String DEFAULT="No record";
    /*姓名*/
    private String name;
    /*联系电话*/
    private String tel;

    public String getAddr() {
        return addr;
    }
    public void setAddr(String addr) {
        if (addr.trim().length()==0){
            this.addr=DEFAULT;
        }
        this.addr = addr;
    }
    public String getName() {
        return name;
    }
    public void setName(String name) {
        this.name = name;
    }
    public String getTel() {
        return tel;
    }
    public void setTel(String tel) {
        this.tel = tel;
    }

    public String getEmail() {
        return email;
    }
    public void setEmail(String email) {
        if (email.trim().length()==0){
         this.email=DEFAULT;
        }else {
            this.email = email;
        }
    }
    public String getRemarks() {
        return remarks;
    }

    public void setRemarks(String remarks) {
        //如果空串,设为默认
        if (remarks.trim().length()==0) {
            this.remarks=DEFAULT;
        }else {
            this.remarks = remarks;
        }
    }
    public void setHeadPickture(Bitmap headPickture) {
        this.headPickture = headPickture;
    }
    /*住址*/
    private String addr;
    /*电子邮件*/
    private String email;
    /*备注*/
    private String remarks;
    /*头像*/
    private Bitmap headPickture;
}
Android中的android.database.sqlite.SQLiteOpenHelper类是一个专门用于数据库创建和版本管理的辅助类。因此,为了更好地管理数据库,这里我们创建一个继承自SQLiteOpenHelper的辅助类DBdao来维护和更新数据库,并实现数据库的增、删、查、改操作,其代码清单下所示。
/* 提供数据库的 增 删 改 查 四种方法*/
public class DBdao extends SQLiteOpenHelper{
    private  static  final String DB_NAME ="TXL.db";
    private static final String TABLE_NAME = "person";
    private  static  int  DB_VERSION =1;
    private  SQLiteDatabase db;
    private Context context;
    /*全局persons容器*/
    public static  final List<Person> persons = new ArrayList<Person>();
    /*构建表结构,初始化表*/
    private static final String CREATETABLE="create table if not exists person(" +
             "tel text  primary key not null,"+
             "name text,"+
             "addr text, "+
             "email text ,"+
             "remarks text)";
    public DBdao(Context context) {
        super(context,DB_NAME,null,DB_VERSION);
        this.context = context;
        db = getWritableDatabase();//建立数据库
    }
    //打开SQLite数据库连接
    public SQLiteDatabase openConnection(){

        db = getWritableDatabase();
        return db;
    }


    //关闭数据库连接,只有一个连接在外面
    public void closeConnection(){
        db.close();
    }
    //创建表
    public boolean creatTable(String createTableSql){
        try {
            openConnection();
            db.execSQL(createTableSql);

        }catch (Exception e){

           e.printStackTrace();
            return false;

        }finally {
            closeConnection();
        }

        return  true;
    }


    //添加数据
    public boolean save(Person person/*String tableName,ContentValues context*/){

        String tableName=TABLE_NAME;

        ContentValues context=new ContentValues();

        context.put("name",person.getName().trim());
        context.put("tel",person.getTel().trim());
        context.put("addr",person.getAddr().trim());
        context.put("email",person.getEmail().trim());
        context.put("remarks",person.getRemarks().trim());

        try {
            openConnection();
            db.insert(tableName,null,context);

        }catch (Exception e){

            e.printStackTrace();
            return false;

        }finally {
            closeConnection();
        }
        return true;
    }

    //修改数据
    public boolean update(Person p){
        /*String tableName,ContentValues contentValues,String whereClause,String []whereArgs*/

        ContentValues contentValues = new ContentValues();

        contentValues.put("name"/*表的字段名*/,p.getName().trim()/*该字段对应的值*/);

        contentValues.put("tel",p.getTel().trim());
        contentValues.put("addr",p.getAddr().trim());
        contentValues.put("email",p.getEmail().trim());
        contentValues.put("remarks",p.getRemarks().trim());

        /*
        * 问号出现的次序和String[]表中下标一一对应,从0开始
        * 例如:
        * 第一个问号,对应String[]中下标为 0 的元素
        * 第二个问号,对应String[]中下标为 1 的元素
        * */
        String whereClause = "name=?";
        String []whereArgs=new String[]{p.getName().trim()};

        try {
            openConnection();
            db.update(TABLE_NAME,contentValues,whereClause,whereArgs);

        }catch (Exception e){

            e.printStackTrace();
            return false;

        }finally {
            closeConnection();
        }
        return true;

    }

    //删除数据
    public boolean delete(String condition){

        String[] obj=new String[]{condition};
        String delSql="tel=?";

        try {
            openConnection();
           db.delete(TABLE_NAME,delSql,obj);

        }catch (Exception e){

            e.printStackTrace();
            return false;

        }finally {
            closeConnection();
        }
        return true;
    }

    //查询操作
       /*
       *1.从数据库中读取person对象到persons集合中
       *2.迭代 persons集合,并封装成 map对象放入 list集合中
       * 3.返回list集合
       * */
    public List<Person> getData() {
        //读表操作
        //读取表操作之前要清空 persons容器
        if (persons.size()>0){
            persons.clear();
        }
        String sql = "select *from person";
        /*
            Cursor: 功能与 JDBC 中的 ResultSet类似
            rawQuery:功能与PrepareStatement类似
            rawQuery(String sqlStatment,String[] agrs);
            eg:
            String sql = "select *from person where name=? and tel=?"
            String[] agrs={"fang","188XXXXXX"};
            Cursor c = rawQuery(sql,agrs);
        */
        openConnection();
        Cursor cursor =null;
        try {
            cursor = db.rawQuery(sql, null);
            while (cursor.moveToNext()) {
                Person person = new Person();
            /*
            * getColumnIndex("name")根据列名返回起索引值
            * getString() 根据索引返回该列对应的值
            * */
                person.setName(cursor.getString(cursor.getColumnIndex("name")).trim());
                person.setTel(cursor.getString(cursor.getColumnIndex("tel")).trim());
                        person.setEmail(cursor.getString(cursor.getColumnIndex("email")).trim());
                person.setAddr(cursor.getString(cursor.getColumnIndex("addr")).trim());
                person.setRemarks(cursor.getString(cursor.getColumnIndex("remarks")).trim());
                persons.add(person);
            }
        }catch (Exception e){
            e.printStackTrace();
        }finally {
            closeConnection();
        }
        //判断是否为第一次使用
        if (persons.size()==0){
            Person s =new Person();
            s.setName("fangzirui");
            s.setTel("18871245731");
            persons.add(s);
        }
        return persons;
    }
    @Override
    public void onCreate(SQLiteDatabase db) {
        db.execSQL(CREATETABLE);
    }

    @Override
    public void onUpgrade(SQLiteDatabase db, int oldVersion, int newVersion) {
    }
}
3、联系人列表实现
在MainActivity.java文件中实现联系人列表的查看与联系人查询及删除操作,代码清单如下所示。
public class MainActivity extends AppCompatActivity implements View.OnClickListener{
    private Button btnadd;
    private EditText etSearch;
    private ListView  lv;
    private ImageButton btnImage;
    private String searchCondition;
    //适配器
    private SimpleAdapter simpleAdapter=null;

    //装数据的全局容器
    private   final List<Map<String,String>> data=new ArrayList<>();
    //装符合搜索条件的数据
    private final List<Map<String,String>>  newData=new ArrayList<>();
    private List<Person> persons=null;
    private  final  Intent intent = new Intent();
    private Thread thread=null;
    //定义助手
    private  final Handler handler = new Handler(){
        @Override
        public void handleMessage(Message msg) {
            switch (msg.what) {
                case 1:
                    searchCondition = (String) msg.obj;
                    //更新UI

                    newData.clear();
                        //遍历data集合
                    /*
                    * 1.得到map
                    * 2.得到map的手机号
                    * 3.放入到newData中去
                    * */
                    for (int i=0;i<data.size();i++) {
                        Map map = data.get(i);
                        /*
                        * 将person的tel和姓名组合成一个新串,
                        * 然后在这个新串中找searchCondition子串
                        * 达到搜索效果
                        * */
                        String te = (String)map.get("tel");
                        te += (String)map.get("name");

                        if (te.contains(searchCondition)){
                            newData.add(map);
                        }
                    }
                    adapterSet(newData);
                    break;

                case 2:
                    adapterSet(data);
                    break;
            }
        }
    };

    /*
    * 设置适配器
    * */
    private void adapterSet(List<Map<String,String>> data) {
        simpleAdapter = new SimpleAdapter(
                MainActivity.this,     //上下文环境
                data,                  //填充更新后的数据
                R.layout.lv_item,      //定义的列表样式
                new String[]{"img","name","tel"},//索引值
                //要填入数据的控件
                new int[]{R.id.lv_item_head,R.id.lv_item_name,R.id.lv_item_tel}
        );
        lv.setAdapter(simpleAdapter);
    }

    @Override
    protected void onCreate(Bundle savedInstanceState) {
        super.onCreate(savedInstanceState);
        //禁止横屏
        setRequestedOrientation(ActivityInfo.SCREEN_ORIENTATION_PORTRAIT);
        setContentView(R.layout.activity_main);
        /*
        一般的来说在Actionbar中在条目过多时会显示三个竖着的小点的菜单,但在实机测试的时候发现并不显示,
        如果该机器拥有实体的menu键则不在右侧显示溢出菜单,而改为按menu来生成。这样就不利于统一的界面风格。
        我们可以改变系统探测实体menu键的存在与否来改变这个的显示。
        菜单显示是根据public boolean hasPermanentMenuKey ()这个方法来判断的。这个方法是获取sHasPermanentMenuKey的boolean值。
        解决办法:通过在onCreate()中
       */
        try {
            ViewConfiguration mconfig = ViewConfiguration.get(this);
            Field menuKeyField = ViewConfiguration.class.getDeclaredField("sHasPermanentMenuKey");
            if(menuKeyField != null) {
                menuKeyField.setAccessible(true);
                menuKeyField.setBoolean(mconfig, false);
            }
        } catch (Exception ex) {
            ex.printStackTrace();
        }

        btnadd = (Button) findViewById(R.id.main_btn_add);
        btnadd.setOnClickListener(this);
        btnImage = (ImageButton) findViewById(R.id.main_btn_del);
        btnImage.setOnClickListener(this);
        btnImage.setVisibility(View.GONE);

        etSearch = (EditText) findViewById(R.id.main_et_search);
        lv = (ListView) findViewById(R.id.main_lV);
        DBdao DBdao = new DBdao(MainActivity.this);
        //从SQLtie中读取联系人Map中
        persons = DBdao.getData();

        //迭代persons 集合,并把person转化成map对象 放入 data中去
        for (Person p: persons){
            Map map = new HashMap();

            map.put("img", R.drawable.a);
            map.put("name", p.getName());
            map.put("tel", p.getTel());
            data.add(map);
        }
        //数据适配器
        adapterSet(data);
        //设置etSearch监听器
        etSearch.addTextChangedListener(new TextWatcher() {
            //改变前
            @Override
            public void beforeTextChanged(CharSequence s, int start, int count, int after) {

            }
            //改变时候
            @Override
            public void onTextChanged(CharSequence s, int start, int before, int count) {
            }

            //改变后
            @Override
            public void afterTextChanged(Editable s) {
                if(s.length() == 0){
                    btnImage.setVisibility(View.GONE);//当文本框为空时,则叉叉消
                    Message mgs2 = new Message();
                    mgs2.what=2;
                    handler.sendMessage(mgs2);
                }
                else {
                    btnImage.setVisibility(View.VISIBLE);//当文本框不为空时,出现叉叉
                    Message mgs = new Message();
                    mgs.what=1;
                    mgs.obj =s.toString().trim();
                    handler.sendMessage(mgs);
                }

            }
        });
        //lv的点击事件
        lv.setOnItemClickListener(new AdapterView.OnItemClickListener() {
            @Override
            public void onItemClick(AdapterView<?> parent, View view, int position, long id) {

                Person person=new Person();
                person.setName(data.get(position).get("name").toString());
                person.setTel(data.get(position).get("tel").toString());
               //跳转
                intent.setClass(MainActivity.this, UpdateActivity.class);
                Bundle bundle = new Bundle();
                bundle.putSerializable("person", person);
                intent.putExtras(bundle);
                startActivity(intent);
                finish();
            }
        });
        //lv的长按事件
        lv.setOnItemLongClickListener(new AdapterView.OnItemLongClickListener() {
            @Override
            public boolean onItemLongClick(AdapterView<?> parent, View view, int position, long id) {

                final  int pos = position;
                AlertDialog.Builder builder = new AlertDialog.Builder(
                        MainActivity.this);
                builder.setTitle("Delete");
                builder.setIcon(R.drawable.w);
                builder.setMessage("    Want to delete this record?");
                builder.setPositiveButton("Yes",
                        new DialogInterface.OnClickListener() {
                            public void onClick(DialogInterface dialog,
                                                int which) {

                                /*
                                    删除操作顺序一定是 1-2-3 不能反
                                    假如先在data容器中删除掉被选中的记录后此时pos值,由于pos被 final修饰
                                    本次操作结束前,它的值不会发生任何变化,所有当 我们再用 data.get(pos)
                                    方法来获取对象时候,这个pos对应的对象已经不在 data容器中,所有会报一个
                                    indexBorderOutException
                             */
                                //删除操作
                                //1.从数据库中删除
                                    //1.1先得到被选中的手机号
                                String Tel=  MainActivity.this.data.get(pos).get("tel").trim();
                                    //1.2根据得到的手机号,从SQLite中删除有关记录
                                boolean flag = new DBdao(MainActivity.this).delete(Tel);
                                //2.从listView中删除
                                MainActivity.this.data.remove(pos);
                                //3.刷新simpleAdapter
                                MainActivity.this.lv.setAdapter(MainActivity.this.simpleAdapter);
                                if (!flag){

                                    Toast.makeText(MainActivity.this, "delete failed!", Toast.LENGTH_LONG).show();
                                }else {
                                    Toast.makeText(MainActivity.this, "delete ok!", Toast.LENGTH_LONG).show();
                                }

                            }
                        });
                builder.setNegativeButton("No", null);
                builder.create().show();
                return true;
            }
        });

    }

    @Override
    public void onClick(View v) {
        switch (v.getId()){
            case R.id.main_btn_add:{
                //跳转到添加联系人界面
        /* 1.新建一个Intent对象 */
                //
        /* 2.指定intent要启动的类 */
                intent.setClass(this, AddActivity.class);
        /* 3.启动一个新的Activity */
                this.startActivity(intent);
        /* 4.关闭当前的Activity */
                this.finish();
                break;
            }
            case R.id.main_btn_del:{
                etSearch.setText("");
                break;
            }
        }

    }

    /**
     * 菜单设置
     * @param menu
     * @return
     */
    @Override
    public boolean onCreateOptionsMenu(Menu menu) {
        getMenuInflater().inflate(R.menu.main_main, menu);

        return super.onCreateOptionsMenu(menu);
    }

    @Override
    public boolean onOptionsItemSelected(MenuItem item) {
        switch(item.getItemId()){
            case R.id.bakSet_item:
                Toast.makeText(this,"you clicked SET",Toast.LENGTH_SHORT).show();
                break;
            case R.id.bakGet_item:
                Toast.makeText(this,"you clicked GET",Toast.LENGTH_SHORT).show();
                break;
            default:
        }
        return true;
    }
}
4、添加联系人实现
在AddActivity.java文件中实现联系人的添加,代码清单如下所示。
public class AddActivity extends AppCompatActivity implements View.OnClickListener{

    private Button btn_retrun;
    private Button btn_cancel;
    private Button btn_save;

    private EditText et_name;
    private EditText et_tel;
    private EditText et_email;
    private EditText et_remarks;
    private EditText et_addr;
    private View im;

    private DBdao DBdao =null;
    @Override
    protected void onCreate(Bundle savedInstanceState) {
        super.onCreate(savedInstanceState);
        setContentView(R.layout.actitiy_add);
        setRequestedOrientation(ActivityInfo.SCREEN_ORIENTATION_PORTRAIT);

        btn_retrun = (Button) findViewById(R.id.add_btn_return);
        btn_cancel = (Button) findViewById(R.id.add_btn_cancel);
        btn_save = (Button) findViewById(R.id.add_btn_save);

        btn_save.setOnClickListener(this);
        btn_cancel.setOnClickListener(this);
        btn_retrun.setOnClickListener(this);

        et_name = (EditText) findViewById(R.id.add_ET_name);
        et_addr = (EditText) findViewById(R.id.add_ET_addr);
        et_tel = (EditText) findViewById(R.id.add_ET_tel);
        et_email = (EditText) findViewById(R.id.add_ET_email);
        et_remarks = (EditText) findViewById(R.id.add_ET_remarks);
        im  = findViewById(R.id.add_IV_headPickture);

        //设置可以获取ImageView上的图片
        im.setDrawingCacheEnabled(true);

        //设置开始进入页面时候光标的位置
        et_name.setFocusable(true);
        et_name.setFocusableInTouchMode(true);

    }
    /*  点击事件
    * 存储按钮
    * 取消按钮
    * 返回按钮
    * */
    @Override
    public void onClick(View v) {
        switch (v.getId()){
            //存储按钮
            case R.id.add_btn_save:{
                //检测输入的姓名或电话是否为空
                if(et_tel.getText().toString().length()==0 ||
                        et_name.getText().toString().length()==0){

                    Toast.makeText(this,"姓名或电话不能为空!",Toast.LENGTH_SHORT).show();
                    switchActivity();

                }else {
                    Person person = new Person();
                    person.setName(et_name.getText().toString());
                    person.setAddr(et_addr.getText().toString());
                    person.setEmail(et_email.getText().toString());
                    person.setTel(et_tel.getText().toString());
                    person.setRemarks(et_remarks.getText().toString());

                    /*
                    * 将Person存入SQLite中
                    * */
                    DBdao = new DBdao(AddActivity.this);
                    DBdao.save(person);

                    Toast.makeText(this, "add success!", Toast.LENGTH_SHORT).show();
                }
                break;
            }

            //取消按钮
            case R.id.add_btn_cancel:{
                this.et_name.setText("");
                this.et_tel.setText("");
                this.et_email.setText("");
                this.et_addr.setText("");
                this.et_remarks.setText("");
                Toast.makeText(this,"clean success!",Toast.LENGTH_SHORT).show();
                break;
            }

            //返回主页面按钮
            case R.id.add_btn_return:{
                switchActivity();
                break;
            }

        }
    }

    /*
    * 跳转函数
    * */
    private void switchActivity() {
      /* 1.新建一个Intent对象 */
        Intent intent = new Intent();
        /* 2.指定intent要启动的类 */
        intent.setClass(this, mainActivity.class);
        /* 3.启动一个新的Activity */
        this.startActivity(intent);
        /* 4.关闭当前的Activity */
        this.finish();
    }
}
5、修改及查看联系人实现
在UpdateActivity.java文件中实现联系人的查看与修改,即,当从主界面点击进入时,可查看联系人所有信息,当点击修改按钮后进入可编辑模式进行修改,修改完成后点击保存按钮完成信息的修改。实现代码如下所示。
public class UpdateActivity extends AppCompatActivity implements View.OnClickListener {
    private Button btn_modify;
    private Button btn_call;
    private Button btn_ems;
    private Button btn_return;

    private TextView tv_name;
    private EditText et_tel;
    private EditText et_email;
    private EditText et_remarks;
    private EditText et_addr;
    private ImageView im;

    @Override
    protected void onCreate(Bundle savedInstanceState) {
        super.onCreate(savedInstanceState);
        setRequestedOrientation(ActivityInfo.SCREEN_ORIENTATION_PORTRAIT);
        setContentView(R.layout.activity_update);

        btn_modify = (Button) findViewById(R.id.update_btn_modify);
        btn_call = (Button) findViewById(R.id.update_btn_call);
        btn_ems = (Button) findViewById(R.id.update_btn_ems);
        btn_return = (Button) findViewById(R.id.update_btn_return);

        btn_modify.setOnClickListener(this);

        btn_call.setOnClickListener(this);

        btn_ems.setOnClickListener(this);
        btn_return.setOnClickListener(this);

        tv_name = (TextView) findViewById(R.id.update_TV_name);

        et_addr = (EditText) findViewById(R.id.update_ET_addr);
        et_tel = (EditText) findViewById(R.id.update_ET_tel);
        et_email = (EditText) findViewById(R.id.update_ET_email);
        et_remarks = (EditText) findViewById(R.id.update_ET_remarks);
        im = (ImageView) findViewById(R.id.update_IV_headPickture);

        im.setDrawingCacheEnabled(true);

        //接收从mainActivity页面穿传过来的Person对象
        Person person = getDataFromMain();

        shows(person);

        //进入只读模式
        loseFocuse();
    }

    /*
    *将person信息填入到场景对应的控件上
    *@param person
    * */
    private void shows(Person person) {
        //这里的查询没必要去数据库里面查询,直接在 Persons 容器里面找到对应的
        //对象即可
        for (Person p: DBdao.persons){
            if (person.getTel().trim().equals(p.getTel().trim())){

                tv_name.setText(p.getName());
                et_tel.setText(p.getTel());
                et_addr.setText(p.getAddr());
                et_email.setText(p.getEmail());
                et_remarks.setText(p.getRemarks());
            }

        }


    }

    /*
   *接收从mainActivity页面穿传过来的Person对象
   *@param null
   * */
    private Person getDataFromMain() {

        //获取主页面放入Intent中的person对象,索引值为“person”
        //并根据其tel从mainActivity.data中找到对应的数据
        //包装成person对象,返回出去

        Intent intent =getIntent();
        Person p = (Person) intent.getSerializableExtra("person");
        //从数据库中读取该对象
        return p;
    }

    private int flag=0;
    @Override
    public void onClick(View v) {
        switch (v.getId()) {
           //拨号按钮
            case R.id.update_btn_call: {
            //拨打电话
                Intent in2 = new Intent();
                in2.setAction(Intent.ACTION_CALL);//指定意图动作
                in2.setData(Uri.parse("tel:"+this.et_tel.getText().toString().trim().toLowerCase()));//指定电话号码
                startActivity(in2);
                this.finish();//结束当前页面
                break;
            }

            //编辑按钮
            case R.id.update_btn_modify: {
                /*
                * flag = 0表示 编辑
                * flag = 1表示 保存
                * */

               switch (flag) {
                   case 0:{
                       btn_modify.setText("保 存");
                       btn_modify.setTextColor(this.getResources().getColor(R.color.btn));
                       flag=1;
                       Toast.makeText(this, "Enter Modify Mode", Toast.LENGTH_SHORT).show();
                       //失去焦点
                       getFoucuse();
                       break;
                   }
                   case 1:{

                       Person person = new Person();
                       person.setName(this.tv_name.getText().toString());
                       person.setAddr(this.et_addr.getText().toString());
                       person.setEmail(this.et_email.getText().toString());
                       person.setTel(this.et_tel.getText().toString());
                       person.setRemarks(this.et_remarks.getText().toString());

                       //获取ImageView上的图片
                       // person.setHeadPickture(this.im.getDrawingCache());
                        /*
                        * 将Person存入person表中
                        * */
                       new DBdao(this).update(person);

                       Toast.makeText(this,"Save Success",Toast.LENGTH_SHORT).show();
                       //还原成只读模式
                       loseFocuse();

                       btn_modify.setText("修 改");
                       btn_modify.setTextColor(this.getResources().getColor(R.color.white));
                       flag=0;
                       break;
                   }
               }
                break;
            }
            //发短信按钮
            case R.id.update_btn_ems: {
                Intent intent = new Intent("android.intent.action.SENDTO",
                        Uri.parse("smsto:"+this.et_tel.getText().toString().trim().toLowerCase()));
                startActivity(intent);
                break;
            }
            //返回主页面按钮
            case R.id.update_btn_return: {

        /* 1.新建一个Intent对象 */
                Intent intent = new Intent();
        /* 2.指定intent要启动的类 */
                intent.setClass(this, mainActivity.class);
        /* 3.启动一个新的Activity */
                this.startActivity(intent);
        /* 4.关闭当前的Activity */
                this.finish();

                break;
            }

        }
    }

    /*
    *   让所有编辑框处于无法获取焦点的状态
    * */
    private void loseFocuse() {

        et_tel.setFocusable(false);
        et_remarks.setFocusable(false);
        et_addr.setFocusable(false);
        et_email.setFocusable(false);
        tv_name.setFocusable(false);
        //不可触摸
        tv_name.setFocusableInTouchMode(false);
        et_tel.setFocusableInTouchMode(false);
        et_email.setFocusableInTouchMode(false);
        et_addr.setFocusableInTouchMode(false);
        et_remarks.setFocusableInTouchMode(false);
    }
    private void getFoucuse() {
        //可触摸
        et_tel.setFocusableInTouchMode(true);
        et_email.setFocusableInTouchMode(true);
        et_addr.setFocusableInTouchMode(true);
        et_remarks.setFocusableInTouchMode(true);
        et_tel.setFocusable(true);
        et_remarks.setFocusable(true);
        et_addr.setFocusable(true);
        et_email.setFocusable(true);
    }
}
}
6、权限设置
本例中创建了新的类型,所以需要在AndroidManifest.xml中定义、声明。另外还设置了直接呼叫联系人和发送短信,这都需要在AndroidManifest.xml中注册,代码清单如下所示。
<?xml version="1.0" encoding="utf-8"?>
<manifest xmlns:android="http://schemas.android.com/apk/res/android"
    package="homework.cn.txl">
    <!--call Permission-->
    <uses-permission android:name="android.permission.CALL_PHONE"/>
    <uses-permission android:name="android.permission.SEND_SMS"/>
    <application
        android:allowBackup="true"
        android:icon="@mipmap/ic_launcher"
        android:label="@string/app_name"
        android:supportsRtl="true"
        android:theme="@style/AppTheme">
        <!--
            禁止横屏属性
             android:screenOrientation="portrait"
        -->
        <activity android:name=".main.mainActivity"
            android:screenOrientation="portrait"
            >
            <intent-filter>
                <action android:name="android.intent.action.MAIN" />
                <category android:name="android.intent.category.LAUNCHER" />
            </intent-filter>
        </activity>
        <!--添加联系人场景-->
        <activity android:name=".main.AddActivity"
            android:label="添加联系人"
            android:screenOrientation="portrait"
            >
        </activity>
        <!--修改联系人场景-->
        <activity android:name=".main.UpdateActivity"
            android:label="修改联系人"
            android:screenOrientation="portrait"
            >
        </activity>
    </application>
</manifest>