Ansible 入门操作
一、Ansible简介
1、运维自动化发展历程
- 本地部署(On-Premises)
- 基础设施即服务(Iaas)
- 平台及服务(Paas)
- 软件即服务(Saas)
2、实验环境
| 主机名 | IP | 操作系统 |
|---|---|---|
| server1(ansible) | 10.10.1.1 | rhel7.4 |
| server2 | 10.10.1.2 | rhel7.4 |
| server3 | 10.10.1.3 | rhel7.4 |
二、 Ansible安装
selinux firewalld off
百度网盘下载链接:https://pan.baidu.com/s/1oYd0DxAUhx9vauwJyg_rkA 提取码: rhpf
1、安装依赖
(1)yum安装依赖
# yum install -y unzip gcc python-devel openssl-devel libffi-devel
# wget http://mirror.centos.org/centos/7/extras/x86_64/Packages/sshpass-1.06-2.el7.x86_64.rpm
# yum install -y sshpass-1.06-2.el7.x86_64.rpm
(2)setuptools安装
# wget https://files.pythonhosted.org/packages/b0/f3/44da7482ac6da3f36f68e253cb04de37365b3dba9036a3c70773b778b485/setuptools-44.0.0.zip
# unzip setuptools-44.0.0.zip
# cd setuptools-44.0.0/
# python setup.py install
(3)pycparser安装
# wget https://files.pythonhosted.org/packages/68/9e/49196946aee219aead1290e00d1e7fdeab8567783e83e1b9ab5585e6206a/pycparser-2.19.tar.gz
# tar xf pycparser-2.19.tar.gz
# cd pycparser-2.19/
# python setup.py install
(4)cffi安装
# wget https://files.pythonhosted.org/packages/2d/bf/960e5a422db3ac1a5e612cb35ca436c3fc985ed4b7ed13a1b4879006f450/cffi-1.13.2.tar.gz
# tar xf cffi-1.13.2.tar.gz
# cd cffi-1.13.2/
# python setup.py install
(5)PyNaCl安装
# wget https://files.pythonhosted.org/packages/61/ab/2ac6dea8489fa713e2b4c6c5b549cc962dd4a842b5998d9e80cf8440b7cd/PyNaCl-1.3.0.tar.gz
# tar xf PyNaCl-1.3.0.tar.gz
# cd PyNaCl-1.3.0/
# python setup.py install
(6)ipaddress安装
# wget https://files.pythonhosted.org/packages/b9/9a/3e9da40ea28b8210dd6504d3fe9fe7e013b62bf45902b458d1cdc3c34ed9/ipaddress-1.0.23.tar.gz
# tar xf ipaddress-1.0.23.tar.gz
# cd ipaddress-1.0.23/
# python setup.py install
(7)enum34安装
注意:python版本升级为python3.6及以上,不需要安装此模块!!
# wget https://files.pythonhosted.org/packages/bf/3e/31d502c25302814a7c2f1d3959d2a3b3f78e509002ba91aea64993936876/enum34-1.1.6.tar.gz
# tar xf enum34-1.1.6.tar.gz
# cd enum34-1.1.6/
# python setup.py install
(8)cryptography安装
# wget https://files.pythonhosted.org/packages/be/60/da377e1bed002716fb2d5d1d1cab720f298cb33ecff7bf7adea72788e4e4/cryptography-2.8.tar.gz
# tar xf cryptography-2.8.tar.gz
# cd cryptography-2.8/
# python setup.py install
(9)bcrypt安装
# wget https://files.pythonhosted.org/packages/fa/aa/025a3ab62469b5167bc397837c9ffc486c42a97ef12ceaa6699d8f5a5416/bcrypt-3.1.7.tar.gz
# tar xf bcrypt-3.1.7.tar.gz
# cd bcrypt-3.1.7/
# python setup.py install
(10)paramiko安装
# wget https://files.pythonhosted.org/packages/ac/15/4351003352e11300b9f44a13576bff52dcdc6e4a911129c07447bda0a358/paramiko-2.7.1.tar.gz
# tar xf paramiko-2.7.1.tar.gz
# cd paramiko-2.7.1/
# python setup.py install
(11)PyYAML安装
# wget https://files.pythonhosted.org/packages/8d/c9/e5be955a117a1ac548cdd31e37e8fd7b02ce987f9655f5c7563c656d5dcb/PyYAML-5.2.tar.gz
# tar xf PyYAML-5.2.tar.gz
# cd PyYAML-5.2/
# python setup.py install
(12)MarkupSafe安装
# wget https://files.pythonhosted.org/packages/b9/2e/64db92e53b86efccfaea71321f597fa2e1b2bd3853d8ce658568f7a13094/MarkupSafe-1.1.1.tar.gz
# tar xf MarkupSafe-1.1.1.tar.gz
# cd MarkupSafe-1.1.1/
# python setup.py install
(13)Jinja2安装
# wget https://files.pythonhosted.org/packages/7b/db/1d037ccd626d05a7a47a1b81ea73775614af83c2b3e53d86a0bb41d8d799/Jinja2-2.10.3.tar.gz
# tar xf Jinja2-2.10.3.tar.gz
# cd Jinja2-2.10.3/
# python setup.py install
2、安装Ansible
(1)安装
下载链接:https://releases.ansible.com/ansible/
# wget https://releases.ansible.com/ansible/ansible-2.9.0.tar.gz
# tar xf ansible-2.9.0.tar.gz
# cd ansible-2.9.0/
# python setup.py install
(2)查看结果
# ansible --version
ansible 2.9.0
  config file = None
  configured module search path = [u'/root/.ansible/plugins/modules', u'/usr/share/ansible/plugins/modules']
  ansible python module location = /usr/lib/python2.7/site-packages/ansible-2.9.0-py2.7.egg/ansible
  executable location = /usr/bin/ansible
  python version = 2.7.5 (default, Feb 20 2018, 09:19:12) [GCC 4.8.5 20150623 (Red Hat 4.8.5-28)]
三、Ansible操作
1、初始化
# mkdir /etc/ansible && cp ansible-2.9.0/examples/{ansible.cfg,hosts} /etc/ansible
2、自带配置文件
(1)配置文件:
/etc/ansible/ansible.cfg       ###主配置文件,配置ansible工作特性
/etc/ansible/hosts             ###主机清单
/etc/ansible/roles/            ### 存放角色的目录
(2)程序:
/usr/bin/ansible               ###主程序,临时命令执行工具
/usr/bin/ansible-doc           ###查看配置文档,模块功能查看工具
/usr/bin/ansible-galaxy        ###下载/上传优秀的代码或Roles模块的官方平台
/usr/bin/ansible-playbook      ###定制自动化任务,编排剧本工具/usr/bin/ansible-pull远程执行命令的工具
/usr/bin/ansible-vault         ###文件加密工具
/usr/bin/ansible-console       ###基于Console界面与用户交互的执行工具
(3)主机清单inventory:
- 默认的inventory file为/etc/ansible/hosts
- inventory file可以有多个,且也可以通过Dynamic Inventory来动态生成
3、ping命令
(1)单个操作
<1> hosts配置:
# egrep -v '#|^$' /etc/ansible/hosts
10.10.10.2
<2> 命令操作:
# ssh [email protected]
The authenticity of host '10.10.10.2 (10.10.10.2)' can't be established.
ECDSA key fingerprint is SHA256:woOXVY12VXW48k7HzCtsGEfbRevGmpNlZ/hVhzcpyWU.
ECDSA key fingerprint is MD5:9d:43:1a:89:74:2b:31:58:e9:b0:44:87:73:d4:ec:f6.
Are you sure you want to continue connecting (yes/no)? yes
Warning: Permanently added '10.10.10.2' (ECDSA) to the list of known hosts.
[email protected]'s password:
Last failed login: Sat Jan  4 23:32:32 CST 2020 from server1 on ssh:notty
There were 2 failed login attempts since the last successful login.
Last login: Sat Jan  4 23:25:43 2020 from server1

# logout
Connection to 10.10.10.2 closed.

# ansible 10.10.10.2 -m ping -k
SSH password:
10.10.10.2 | SUCCESS => {
    "ansible_facts": {
        "discovered_interpreter_python": "/usr/bin/python"
    },
    "changed": false,
    "ping": "pong"
}
(2) 分组操作
<1> hosts配置:
# egrep -v '#|^$' /etc/ansible/hosts
[test]
10.10.10.2
[test1]
10.10.10.3
<2> 命令操作:
# ansible test -m ping -k
SSH password:
10.10.10.2 | SUCCESS => {
    "ansible_facts": {
        "discovered_interpreter_python": "/usr/bin/python"
    },
    "changed": false,
    "ping": "pong"
}

# ansible test1 -m ping -k
SSH password:
10.10.10.3 | SUCCESS => {
    "ansible_facts": {
        "discovered_interpreter_python": "/usr/bin/python"
    },
    "changed": false,
    "ping": "pong"
}
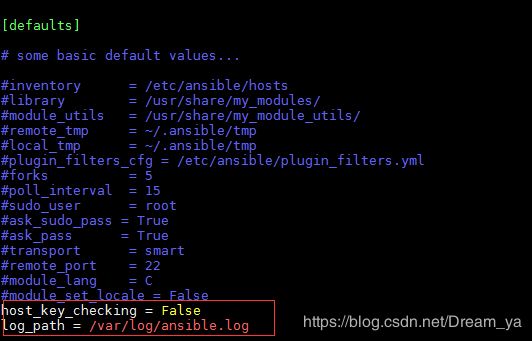
4、ansible配置文件
默认路径:/etc/ansible/ansible.cfg
# vim /etc/ansible/ansible.cfg
[defaults]
#inventory      = /etc/ansible/hosts                  ###主机清单配置文件
#library        = /usr/share/my_modules/              ###库文件存放目录
#module_utils   = /usr/share/my_module_utils/
#remote_tmp     = ~/.ansible/tmp                      ###临时py命令文件存放在远程主机目录
#local_tmp      = ~/.ansible/tmp                      ###本机临时命令执行目录
#plugin_filters_cfg = /etc/ansible/plugin_filters.yml
#forks          = 5                                   ###默认并发数
#poll_interval  = 15
#sudo_user      = root                                ###默认sudo用户
#ask_sudo_pass = True
#ask_pass      = True
#transport      = smart
#remote_port    = 22
#module_lang    = C
#module_set_locale = False
#host_key_checking = False                            ###检查对应服务器的host_key(建议打开,取消注释即可)
#log_path = /var/log/ansible.log                      ###日志文件
5、Ansible系列命令
(1)ansible-doc命令
ansible ansible-doc ansible-playbook ansible-vault ansible-console ansible-galaxy ansible-pull
ansible-doc:显示模板帮助
   ansible-doc [-l|-F|-s] [options] [-t  ] [plugin]
   -a            显示所有模块文档
   -l,--list     列出可用模块
   -s,--snippet  显示指定模块的palybook片段
实例:
ansible-doc -l      列出所有模块
ansible-doc ping    查看指定模块用法
ansible-doc -s ping  查看指定模块帮助用法
(2)ansible命令
<1> 命令
ansible  [options]
  --version                    ###显示版本
  -m module                    ###指定模块,默认为command
  -v                           ###详细过程 -vv -vvv 更详细
  --list-hosts                 ###显示主机列表,可简写成--list
  -k,--ask-pass                ###提示输入ssh链接密码,默认Key验证
  -K,--ask-become-pass         ###提示输入sudo时的口令
  -C,--check                   ###检查,并不执行
  -T,--timneout=TIMEOUT        ###执行命令的超时时间,默认10s
  -u,--user=REMOTE_USER        ###执行远程执行的用户
  -b,--become                  ###代替旧版的sudo切换
<2> 实例:
# ansible all --list              ###查看主机列表
  hosts (2):
    10.10.10.2
    10.10.10.3

[root@server1 ~]# ansible all -m command -a 'useradd test' -k     ###创建用户test
SSH password:
10.10.10.3 | CHANGED | rc=0 >>

10.10.10.2 | CHANGED | rc=0 >>

# ansible all -m command -u test -k -a 'ls /root' -k       ###使用test用户查看root用户,发现无权限查看
SSH password:
10.10.10.2 | UNREACHABLE! => {
    "changed": false,
    "msg": "Invalid/incorrect password: Permission denied, please try again.",
    "unreachable": true
}
10.10.10.3 | UNREACHABLE! => {
    "changed": false,
    "msg": "Invalid/incorrect password: Permission denied, please try again.",
    "unreachable": true
}
<3> ansible Host-pattern:
配置主机的列表:
ALL:表示所有Inventory中 的所有主机
	ansible all -m ping
*:通配符
	ansible "*" -m ping
	ansible 10.10.10.* -m ping -k
	ansible "test*" -m ping -k

或关系:
	ansible 'test:test1' -m ping -k
	ansible "10.10.10.2:10.10.10.3" -m ping -k

逻辑与:
	ansible 'test:&test1' -m ping -k   ###在test中并且在test1中的主机

逻辑非:
	ansible 'test:!test1' -m ping -k   ###在test中,但不在test1中的主机

综合逻辑:
	ansible 'test:test1:&test2:!test3' -m ping -k

正则表达式:
	ansible 'test:&test1' -m ping -k
	ansible '~(test|test1)' -m ping -k
<4> ansible命令执行过程:
我们可以用ansible all -m ping -k -v(-vv或-vvv)来查看过程
1、加载配置文件(默认/etc/ansible/ansible.cfg)
2、加载对应的模块文件,如command
3、通过ansible将模块或命令生成对应的临时py文件,并将该文件传输至远程服务器的对应
执行用户的$HOME/.ansible/tmp/ansible-tmp-数字/xxx.py文件
4、给文件添加执行权限
5、执行并返回结果
6、删除临时py文件,sleep 0 退出
<5> 执行状态:
- 绿色:执行成功并且不需要做改变的操作
- 黄色:执行成功并对目标主机做更改
- 红色:执行失败
6、Ansible常用模块
(1)默认模块(command)
此命令不支持
$VARNAME < > | ; &等,可用shell模块实现
# ansible all -a 'removes=/etc/xx cat /etc/xx'      ###文件不存在就不执行
# ansible all -a 'creates=/etc/xx cat /etc/xx'      ###文件不存在就执行
# ansible all -a 'chdir=/root ls'                   ###切换到/root目录
# ansible all -m command -a 'echo "1"|passwd --stdin test' -k   ###执行失败
(2)shell模块
和commadn相似,用shell执行命令;执行复杂命令还是会失败,操作方式:例如awk命令,可以写入文件在cp过去执行
# ansible all -m shell -a 'echo $HOSTNAME' -k
SSH password:
10.10.10.2 | CHANGED | rc=0 >>
server2

10.10.10.3 | CHANGED | rc=0 >>
server3

# ansible all -m shell -a 'echo "1"|passwd --stdin test' -k
SSH password:
10.10.10.3 | CHANGED | rc=0 >>
Changing password for user test.
passwd: all authentication tokens updated successfully.

10.10.10.2 | CHANGED | rc=0 >>
Changing password for user test.
passwd: all authentication tokens updated successfully.
(3)script模块
# cat /root/host.sh
#!/bin/bash
echo `hostname`

# chmod +x /root/host.sh

# ansible all -m script -a '/root/host.sh' -k
SSH password:
10.10.10.3 | CHANGED => {
    "changed": true,
    "rc": 0,
    "stderr": "Shared connection to 10.10.10.3 closed.\r\n",
    "stderr_lines": [
        "Shared connection to 10.10.10.3 closed."
    ],
    "stdout": "server3\r\n",
    "stdout_lines": [
        "server3"
    ]
}
10.10.10.2 | CHANGED => {
    "changed": true,
    "rc": 0,
    "stderr": "Shared connection to 10.10.10.2 closed.\r\n",
    "stderr_lines": [
        "Shared connection to 10.10.10.2 closed."
    ],
    "stdout": "server2\r\n",
    "stdout_lines": [
        "server2"
    ]
}
(4)copy模块
还有mode、所有者都是可以修改的
# ansible all -m copy -a 'src= dest=<被管理服务器路径> backup=yes' -k
# ansible all -m copy -a 'content="hello\n" dest=/root/hello' -k
SSH password:
10.10.10.3 | CHANGED => {
    "ansible_facts": {
        "discovered_interpreter_python": "/usr/bin/python"
    },
    "changed": true,
    "checksum": "f572d396fae9206628714fb2ce00f72e94f2258f",
    "dest": "/root/hello",
    "gid": 0,
    "group": "root",
    "md5sum": "b1946ac92492d2347c6235b4d2611184",
    "mode": "0644",
    "owner": "root",
    "size": 6,
    "src": "/root/.ansible/tmp/ansible-tmp-1578154213.75-157835604444344/source",
    "state": "file",
    "uid": 0
}
10.10.10.2 | CHANGED => {
    "ansible_facts": {
        "discovered_interpreter_python": "/usr/bin/python"
    },
    "changed": true,
    "checksum": "f572d396fae9206628714fb2ce00f72e94f2258f",
    "dest": "/root/hello",
    "gid": 0,
    "group": "root",
    "md5sum": "b1946ac92492d2347c6235b4d2611184",
    "mode": "0644",
    "owner": "root",
    "size": 6,
    "src": "/root/.ansible/tmp/ansible-tmp-1578154213.75-45204055498416/source",
    "state": "file",
    "uid": 0
}

# ansible all -a 'cat /root/hello' -k
SSH password:
10.10.10.3 | CHANGED | rc=0 >>
hello

10.10.10.2 | CHANGED | rc=0 >>
hello
(5)fetch模块
从客户端取文件至服务器端,copy相反,目录可先tar!!!
<1> 获取单个文件:
# ansible all -m fetch -a 'src=/etc/passwd dest=/mnt' -k
SSH password:
10.10.10.2 | CHANGED => {
    "changed": true,
    "checksum": "09ab83024c9c62d612407b15d1713f4a21af0b8d",
    "dest": "/mnt/10.10.10.2/etc/passwd",
    "md5sum": "487359d8ac4558acaa215197decd951e",
    "remote_checksum": "09ab83024c9c62d612407b15d1713f4a21af0b8d",
    "remote_md5sum": null
}
10.10.10.3 | CHANGED => {
    "changed": true,
    "checksum": "09ab83024c9c62d612407b15d1713f4a21af0b8d",
    "dest": "/mnt/10.10.10.3/etc/passwd",
    "md5sum": "487359d8ac4558acaa215197decd951e",
    "remote_checksum": "09ab83024c9c62d612407b15d1713f4a21af0b8d",
    "remote_md5sum": null
}

# tree /mnt
/mnt
├── 10.10.10.2
│   └── etc
│       └── passwd
└── 10.10.10.3
    └── etc
        └── passwd
<2> 获取多个文件:
# ansible all -m shell -a 'cd /var/log && tar zcf log.tar.gz *.log' -k
SSH password:
10.10.10.2 | CHANGED | rc=0 >>

10.10.10.3 | CHANGED | rc=0 >>

# ansible all -m fetch -a 'src=/var/log/log.tar.gz dest=/mnt' -k
SSH password:
10.10.10.2 | CHANGED => {
    "changed": true,
    "checksum": "cc4de6b63bfb9bd907b7d5775f93bd4d1bb67c4a",
    "dest": "/mnt/10.10.10.2/var/log/log.tar.gz",
    "md5sum": "1c6f154fd211e23a888b9c16132d69b5",
    "remote_checksum": "cc4de6b63bfb9bd907b7d5775f93bd4d1bb67c4a",
    "remote_md5sum": null
}
10.10.10.3 | CHANGED => {
    "changed": true,
    "checksum": "eece1301bda767430484f388d72bc8295fc97692",
    "dest": "/mnt/10.10.10.3/var/log/log.tar.gz",
    "md5sum": "ab9bbbd6e286825235d3b142a65dc6fa",
    "remote_checksum": "eece1301bda767430484f388d72bc8295fc97692",
    "remote_md5sum": null
}

# tree /mnt
/mnt
├── 10.10.10.2
│   ├── etc
│   │   └── passwd
│   └── var
│       └── log
│           └── log.tar.gz
└── 10.10.10.3
    ├── etc
    │   └── passwd
    └── var
        └── log
            └── log.tar.gz
(6)file模块
文件的属性也可以进行设置
<1> 创建文件:
# ansible all -m file -a 'name=/mnt/test state=touch' -k          ###name可以换成dest或者path
SSH password:
10.10.10.2 | CHANGED => {
    "ansible_facts": {
        "discovered_interpreter_python": "/usr/bin/python"
    },
    "changed": true,
    "dest": "/mnt/test",
    "gid": 0,
    "group": "root",
    "mode": "0644",
    "owner": "root",
    "size": 0,
    "state": "file",
    "uid": 0
}
10.10.10.3 | CHANGED => {
    "ansible_facts": {
        "discovered_interpreter_python": "/usr/bin/python"
    },
    "changed": true,
    "dest": "/mnt/test",
    "gid": 0,
    "group": "root",
    "mode": "0644",
    "owner": "root",
    "size": 0,
    "state": "file",
    "uid": 0
}

# ansible all -m shell -a 'ls -l /mnt/test' -k
SSH password:
10.10.10.3 | CHANGED | rc=0 >>
-rw-r--r-- 1 root root 0 Jan  5 15:34 /mnt/test

10.10.10.2 | CHANGED | rc=0 >>
-rw-r--r-- 1 root root 0 Jan  5 15:34 /mnt/test
<2> 删除文件:
# ansible all -m file -a 'path=/mnt/test state=absent' -k
SSH password:
10.10.10.3 | CHANGED => {
    "ansible_facts": {
        "discovered_interpreter_python": "/usr/bin/python"
    },
    "changed": true,
    "path": "/mnt/test",
    "state": "absent"
}
10.10.10.2 | CHANGED => {
    "ansible_facts": {
        "discovered_interpreter_python": "/usr/bin/python"
    },
    "changed": true,
    "path": "/mnt/test",
    "state": "absent"
}

# ansible all -m shell -a 'ls -l /mnt/' -k
SSH password:
10.10.10.3 | CHANGED | rc=0 >>
total 0

10.10.10.2 | CHANGED | rc=0 >>
total 0
<3> 创建目录:
# ansible all -m file -a 'path=/mnt/test state=directory' -k
SSH password:
10.10.10.3 | CHANGED => {
    "ansible_facts": {
        "discovered_interpreter_python": "/usr/bin/python"
    },
    "changed": true,
    "gid": 0,
    "group": "root",
    "mode": "0755",
    "owner": "root",
    "path": "/mnt/test",
    "size": 6,
    "state": "directory",
    "uid": 0
}
10.10.10.2 | CHANGED => {
    "ansible_facts": {
        "discovered_interpreter_python": "/usr/bin/python"
    },
    "changed": true,
    "gid": 0,
    "group": "root",
    "mode": "0755",
    "owner": "root",
    "path": "/mnt/test",
    "size": 6,
    "state": "directory",
    "uid": 0
}

# ansible all -m shell -a 'ls -l /mnt/' -k
SSH password:
10.10.10.2 | CHANGED | rc=0 >>
total 0
drwxr-xr-x 2 root root 6 Jan  5 15:39 test

10.10.10.3 | CHANGED | rc=0 >>
total 0
drwxr-xr-x 2 root root 6 Jan  5 15:39 test
<4> 删除目录:
# ansible all -m file -a 'path=/mnt/test state=absent' -k
SSH password:
10.10.10.2 | CHANGED => {
    "ansible_facts": {
        "discovered_interpreter_python": "/usr/bin/python"
    },
    "changed": true,
    "path": "/mnt/test",
    "state": "absent"
}
10.10.10.3 | CHANGED => {
    "ansible_facts": {
        "discovered_interpreter_python": "/usr/bin/python"
    },
    "changed": true,
    "path": "/mnt/test",
    "state": "absent"
}

# ansible all -m shell -a 'ls -l /mnt/' -k
SSH password:
10.10.10.3 | CHANGED | rc=0 >>
total 0

10.10.10.2 | CHANGED | rc=0 >>
total 0
<5> 软链接:
# ansible all -m file -a 'src=/etc/passwd path=/mnt/test state=link' -k
SSH password:
10.10.10.3 | CHANGED => {
    "ansible_facts": {
        "discovered_interpreter_python": "/usr/bin/python"
    },
    "changed": true,
    "dest": "/mnt/test",
    "gid": 0,
    "group": "root",
    "mode": "0777",
    "owner": "root",
    "size": 11,
    "src": "/etc/passwd",
    "state": "link",
    "uid": 0
}
10.10.10.2 | CHANGED => {
    "ansible_facts": {
        "discovered_interpreter_python": "/usr/bin/python"
    },
    "changed": true,
    "dest": "/mnt/test",
    "gid": 0,
    "group": "root",
    "mode": "0777",
    "owner": "root",
    "size": 11,
    "src": "/etc/passwd",
    "state": "link",
    "uid": 0
}

# ansible all -m shell -a 'ls -l /mnt/test' -k
SSH password:
10.10.10.2 | CHANGED | rc=0 >>
lrwxrwxrwx 1 root root 11 Jan  5 15:43 /mnt/test -> /etc/passwd

10.10.10.3 | CHANGED | rc=0 >>
lrwxrwxrwx 1 root root 11 Jan  5 15:43 /mnt/test -> /etc/passwd
<6> 删除软连接:
# ansible all -m file -a 'path=/mnt/test state=absent' -k
SSH password:
10.10.10.2 | CHANGED => {
    "ansible_facts": {
        "discovered_interpreter_python": "/usr/bin/python"
    },
    "changed": true,
    "path": "/mnt/test",
    "state": "absent"
}
10.10.10.3 | CHANGED => {
    "ansible_facts": {
        "discovered_interpreter_python": "/usr/bin/python"
    },
    "changed": true,
    "path": "/mnt/test",
    "state": "absent"
}

# ansible all -m shell -a 'ls -l /mnt/' -k
SSH password:
10.10.10.2 | CHANGED | rc=0 >>
total 0

10.10.10.3 | CHANGED | rc=0 >>
total 0
(7)hostname模块
# ansible 10.10.10.2 -m hostname -a 'name=test' -k
SSH password:
10.10.10.2 | CHANGED => {
    "ansible_facts": {
        "ansible_domain": "",
        "ansible_fqdn": "test",
        "ansible_hostname": "test",
        "ansible_nodename": "test",
        "discovered_interpreter_python": "/usr/bin/python"
    },
    "changed": true,
    "name": "test"
}

# ansible 10.10.10.2 -m shell -a 'hostname' -k
SSH password:
10.10.10.2 | CHANGED | rc=0 >>
test
(8)cron模块
<1> 添加定时任务:
# ansible all -m cron -a 'minute=* weekday=1,3,6 job="/usr/bin/wall FBI warning" name=warning' -k
SSH password:
10.10.10.3 | CHANGED => {
    "ansible_facts": {
        "discovered_interpreter_python": "/usr/bin/python"
    },
    "changed": true,
    "envs": [],
    "jobs": [
        "warning"
    ]
}
10.10.10.2 | CHANGED => {
    "ansible_facts": {
        "discovered_interpreter_python": "/usr/bin/python"
    },
    "changed": true,
    "envs": [],
    "jobs": [
        "warning"
    ]
}

# ansible all -m shell -a 'crontab -l' -k
SSH password:
10.10.10.3 | CHANGED | rc=0 >>
#Ansible: warning
* * * * 1,3,6 /usr/bin/wall FBI warning

10.10.10.2 | CHANGED | rc=0 >>
#Ansible: warning
* * * * 1,3,6 /usr/bin/wall FBI warning
<2> 关闭定时任务:
disabled后面的参数也可以使用yes
# ansible all -m cron -a 'disabled=true job="/usr/bin/wall FBI warning" name=warning' -k
SSH password:
10.10.10.2 | CHANGED => {
    "ansible_facts": {
        "discovered_interpreter_python": "/usr/bin/python"
    },
    "changed": true,
    "envs": [],
    "jobs": [
        "warning"
    ]
}
10.10.10.3 | CHANGED => {
    "ansible_facts": {
        "discovered_interpreter_python": "/usr/bin/python"
    },
    "changed": true,
    "envs": [],
    "jobs": [
        "warning"
    ]
}

# ansible all -m shell -a 'crontab -l' -k
SSH password:
10.10.10.3 | CHANGED | rc=0 >>
#Ansible: warning
#* * * * * /usr/bin/wall FBI warning

10.10.10.2 | CHANGED | rc=0 >>
#Ansible: warning
#* * * * * /usr/bin/wall FBI warning
<3> 打开定时任务:
disabled后面的参数也可以使用no
# ansible all -m cron -a 'disabled=false job="/usr/bin/wall FBI warning" name=warning' -k
SSH password:
10.10.10.2 | CHANGED => {
    "ansible_facts": {
        "discovered_interpreter_python": "/usr/bin/python"
    },
    "changed": true,
    "envs": [],
    "jobs": [
        "warning"
    ]
}
10.10.10.3 | CHANGED => {
    "ansible_facts": {
        "discovered_interpreter_python": "/usr/bin/python"
    },
    "changed": true,
    "envs": [],
    "jobs": [
        "warning"
    ]
}

# ansible all -m shell -a 'crontab -l' -k
SSH password:
10.10.10.3 | CHANGED | rc=0 >>
#Ansible: warning
* * * * * /usr/bin/wall FBI warning

10.10.10.2 | CHANGED | rc=0 >>
#Ansible: warning
* * * * * /usr/bin/wall FBI warning
<4> 删除定时任务:
# ansible all -m cron -a 'job="/usr/bin/wall FBI warning" name=warning state=absent' -k
SSH password:
10.10.10.2 | CHANGED => {
    "ansible_facts": {
        "discovered_interpreter_python": "/usr/bin/python"
    },
    "changed": true,
    "envs": [],
    "jobs": []
}
10.10.10.3 | CHANGED => {
    "ansible_facts": {
        "discovered_interpreter_python": "/usr/bin/python"
    },
    "changed": true,
    "envs": [],
    "jobs": []
}

# ansible all -m shell -a 'crontab -l' -k
SSH password:
10.10.10.2 | CHANGED | rc=0 >>

10.10.10.3 | CHANGED | rc=0 >>
(9)yum模块
<1> 安装单个软件
# ansible all -m yum -a 'name=httpd' -k        ###默认安装
SSH password:
10.10.10.3 | CHANGED => {
    "ansible_facts": {
        "discovered_interpreter_python": "/usr/bin/python"
    },
    "changed": true,
    "changes": {
        "installed": [
            "httpd"
        ]
    },
    "msg": "",
    "rc": 0,
    "results": [
        "Loaded plugins: product-id, search-disabled-repos, subscription-manager\nThis system is not registered with an entitlement server. You can use subscription-manager to register.\nResolving Dependencies\n--> Running transaction check\n---> Package httpd.x86_64 0:2.4.6-80.el7 will be installed\n--> Finished Dependency Resolution\n\nDependencies Resolved\n\n================================================================================\n Package        Arch            Version                  Repository        Size\n================================================================================\nInstalling:\n httpd          x86_64          2.4.6-80.el7             rhel7.5          1.2 M\n\nTransaction Summary\n================================================================================\nInstall  1 Package\n\nTotal download size: 1.2 M\nInstalled size: 3.7 M\nDownloading packages:\nRunning transaction check\nRunning transaction test\nTransaction test succeeded\nRunning transaction\n  Installing : httpd-2.4.6-80.el7.x86_64                                    1/1 \n  Verifying  : httpd-2.4.6-80.el7.x86_64                                    1/1 \n\nInstalled:\n  httpd.x86_64 0:2.4.6-80.el7                                                   \n\nComplete!\n"
    ]
}
10.10.10.2 | CHANGED => {
    "ansible_facts": {
        "discovered_interpreter_python": "/usr/bin/python"
    },
    "changed": true,
    "changes": {
        "installed": [
            "httpd"
        ]
    },
    "msg": "",
    "rc": 0,
    "results": [
        "Loaded plugins: product-id, search-disabled-repos, subscription-manager\nThis system is not registered with an entitlement server. You can use subscription-manager to register.\nResolving Dependencies\n--> Running transaction check\n---> Package httpd.x86_64 0:2.4.6-80.el7 will be installed\n--> Finished Dependency Resolution\n\nDependencies Resolved\n\n================================================================================\n Package        Arch            Version                  Repository        Size\n================================================================================\nInstalling:\n httpd          x86_64          2.4.6-80.el7             rhel7.5          1.2 M\n\nTransaction Summary\n================================================================================\nInstall  1 Package\n\nTotal download size: 1.2 M\nInstalled size: 3.7 M\nDownloading packages:\nRunning transaction check\nRunning transaction test\nTransaction test succeeded\nRunning transaction\n  Installing : httpd-2.4.6-80.el7.x86_64                                    1/1 \n  Verifying  : httpd-2.4.6-80.el7.x86_64                                    1/1 \n\nInstalled:\n  httpd.x86_64 0:2.4.6-80.el7                                                   \n\nComplete!\n"
    ]
}

# ansible all -m yum -a 'list=installed' -k          ###查看安装好的所有包
# ansible all -m shell -a 'rpm -qa httpd' -k
SSH password:
10.10.10.3 | CHANGED | rc=0 >>
httpd-2.4.6-80.el7.x86_64

10.10.10.2 | CHANGED | rc=0 >>
httpd-2.4.6-80.el7.x86_64
<2> 卸载单个软件
# ansible all -m yum -a 'name=httpd state=absent' -k
SSH password:
10.10.10.3 | CHANGED => {
    "ansible_facts": {
        "discovered_interpreter_python": "/usr/bin/python"
    },
    "changed": true,
    "changes": {
        "removed": [
            "httpd"
        ]
    },
    "msg": "",
    "rc": 0,
    "results": [
        "Loaded plugins: product-id, search-disabled-repos, subscription-manager\nThis system is not registered with an entitlement server. You can use subscription-manager to register.\nResolving Dependencies\n--> Running transaction check\n---> Package httpd.x86_64 0:2.4.6-80.el7 will be erased\n--> Finished Dependency Resolution\n\nDependencies Resolved\n\n================================================================================\n Package        Arch            Version                 Repository         Size\n================================================================================\nRemoving:\n httpd          x86_64          2.4.6-80.el7            @rhel7.5          3.7 M\n\nTransaction Summary\n================================================================================\nRemove  1 Package\n\nInstalled size: 3.7 M\nDownloading packages:\nRunning transaction check\nRunning transaction test\nTransaction test succeeded\nRunning transaction\n  Erasing    : httpd-2.4.6-80.el7.x86_64                                    1/1 \n  Verifying  : httpd-2.4.6-80.el7.x86_64                                    1/1 \n\nRemoved:\n  httpd.x86_64 0:2.4.6-80.el7                                                   \n\nComplete!\n"
    ]
}
10.10.10.2 | CHANGED => {
    "ansible_facts": {
        "discovered_interpreter_python": "/usr/bin/python"
    },
    "changed": true,
    "changes": {
        "removed": [
            "httpd"
        ]
    },
    "msg": "",
    "rc": 0,
    "results": [
        "Loaded plugins: product-id, search-disabled-repos, subscription-manager\nThis system is not registered with an entitlement server. You can use subscription-manager to register.\nResolving Dependencies\n--> Running transaction check\n---> Package httpd.x86_64 0:2.4.6-80.el7 will be erased\n--> Finished Dependency Resolution\n\nDependencies Resolved\n\n================================================================================\n Package        Arch            Version                 Repository         Size\n================================================================================\nRemoving:\n httpd          x86_64          2.4.6-80.el7            @rhel7.5          3.7 M\n\nTransaction Summary\n================================================================================\nRemove  1 Package\n\nInstalled size: 3.7 M\nDownloading packages:\nRunning transaction check\nRunning transaction test\nTransaction test succeeded\nRunning transaction\n  Erasing    : httpd-2.4.6-80.el7.x86_64                                    1/1 \n  Verifying  : httpd-2.4.6-80.el7.x86_64                                    1/1 \n\nRemoved:\n  httpd.x86_64 0:2.4.6-80.el7                                                   \n\nComplete!\n"
    ]
}

# ansible all -m shell -a 'rpm -qa httpd' -k
SSH password:
10.10.10.2 | CHANGED | rc=0 >>

10.10.10.3 | CHANGED | rc=0 >>
<3> 安装多个软件
# ansible all -m yum -a 'name=httpd,vsftpd' -k
SSH password:
10.10.10.3 | CHANGED => {
    "ansible_facts": {
        "discovered_interpreter_python": "/usr/bin/python"
    },
    "changed": true,
    "changes": {
        "installed": [
            "httpd",
            "vsftpd"
        ]
    },
    "msg": "",
    "rc": 0,
    "results": [
        "Loaded plugins: product-id, search-disabled-repos, subscription-manager\nThis system is not registered with an entitlement server. You can use subscription-manager to register.\nResolving Dependencies\n--> Running transaction check\n---> Package httpd.x86_64 0:2.4.6-80.el7 will be installed\n---> Package vsftpd.x86_64 0:3.0.2-22.el7 will be installed\n--> Finished Dependency Resolution\n\nDependencies Resolved\n\n================================================================================\n Package         Arch            Version                 Repository        Size\n================================================================================\nInstalling:\n httpd           x86_64          2.4.6-80.el7            rhel7.5          1.2 M\n vsftpd          x86_64          3.0.2-22.el7            rhel7.5          169 k\n\nTransaction Summary\n================================================================================\nInstall  2 Packages\n\nTotal download size: 1.4 M\nInstalled size: 4.0 M\nDownloading packages:\n--------------------------------------------------------------------------------\nTotal                                               14 MB/s | 1.4 MB  00:00     \nRunning transaction check\nRunning transaction test\nTransaction test succeeded\nRunning transaction\n  Installing : httpd-2.4.6-80.el7.x86_64                                    1/2 \n  Installing : vsftpd-3.0.2-22.el7.x86_64                                   2/2 \n  Verifying  : vsftpd-3.0.2-22.el7.x86_64                                   1/2 \n  Verifying  : httpd-2.4.6-80.el7.x86_64                                    2/2 \n\nInstalled:\n  httpd.x86_64 0:2.4.6-80.el7            vsftpd.x86_64 0:3.0.2-22.el7           \n\nComplete!\n"
    ]
}
10.10.10.2 | CHANGED => {
    "ansible_facts": {
        "discovered_interpreter_python": "/usr/bin/python"
    },
    "changed": true,
    "changes": {
        "installed": [
            "httpd",
            "vsftpd"
        ]
    },
    "msg": "",
    "rc": 0,
    "results": [
        "Loaded plugins: product-id, search-disabled-repos, subscription-manager\nThis system is not registered with an entitlement server. You can use subscription-manager to register.\nResolving Dependencies\n--> Running transaction check\n---> Package httpd.x86_64 0:2.4.6-80.el7 will be installed\n---> Package vsftpd.x86_64 0:3.0.2-22.el7 will be installed\n--> Finished Dependency Resolution\n\nDependencies Resolved\n\n================================================================================\n Package         Arch            Version                 Repository        Size\n================================================================================\nInstalling:\n httpd           x86_64          2.4.6-80.el7            rhel7.5          1.2 M\n vsftpd          x86_64          3.0.2-22.el7            rhel7.5          169 k\n\nTransaction Summary\n================================================================================\nInstall  2 Packages\n\nTotal download size: 1.4 M\nInstalled size: 4.0 M\nDownloading packages:\n--------------------------------------------------------------------------------\nTotal                                               13 MB/s | 1.4 MB  00:00     \nRunning transaction check\nRunning transaction test\nTransaction test succeeded\nRunning transaction\n  Installing : httpd-2.4.6-80.el7.x86_64                                    1/2 \n  Installing : vsftpd-3.0.2-22.el7.x86_64                                   2/2 \n  Verifying  : vsftpd-3.0.2-22.el7.x86_64                                   1/2 \n  Verifying  : httpd-2.4.6-80.el7.x86_64                                    2/2 \n\nInstalled:\n  httpd.x86_64 0:2.4.6-80.el7            vsftpd.x86_64 0:3.0.2-22.el7           \n\nComplete!\n"
    ]
}

# ansible all -m shell -a 'rpm -qa {httpd,vsftpd}' -k
SSH password:
10.10.10.3 | CHANGED | rc=0 >>
vsftpd-3.0.2-22.el7.x86_64
httpd-2.4.6-80.el7.x86_64

10.10.10.2 | CHANGED | rc=0 >>
vsftpd-3.0.2-22.el7.x86_64
httpd-2.4.6-80.el7.x86_64
<4> 卸载多个软件
# ansible all -m yum -a 'name=httpd,vsftpd state=removed' -k
SSH password:
10.10.10.3 | CHANGED => {
    "ansible_facts": {
        "discovered_interpreter_python": "/usr/bin/python"
    },
    "changed": true,
    "changes": {
        "removed": [
            "httpd",
            "vsftpd"
        ]
    },
    "msg": "",
    "rc": 0,
    "results": [
        "Loaded plugins: product-id, search-disabled-repos, subscription-manager\nThis system is not registered with an entitlement server. You can use subscription-manager to register.\nResolving Dependencies\n--> Running transaction check\n---> Package httpd.x86_64 0:2.4.6-80.el7 will be erased\n---> Package vsftpd.x86_64 0:3.0.2-22.el7 will be erased\n--> Finished Dependency Resolution\n\nDependencies Resolved\n\n================================================================================\n Package         Arch            Version                Repository         Size\n================================================================================\nRemoving:\n httpd           x86_64          2.4.6-80.el7           @rhel7.5          3.7 M\n vsftpd          x86_64          3.0.2-22.el7           @rhel7.5          348 k\n\nTransaction Summary\n================================================================================\nRemove  2 Packages\n\nInstalled size: 4.0 M\nDownloading packages:\nRunning transaction check\nRunning transaction test\nTransaction test succeeded\nRunning transaction\n  Erasing    : httpd-2.4.6-80.el7.x86_64                                    1/2 \n  Erasing    : vsftpd-3.0.2-22.el7.x86_64                                   2/2 \n  Verifying  : vsftpd-3.0.2-22.el7.x86_64                                   1/2 \n  Verifying  : httpd-2.4.6-80.el7.x86_64                                    2/2 \n\nRemoved:\n  httpd.x86_64 0:2.4.6-80.el7            vsftpd.x86_64 0:3.0.2-22.el7           \n\nComplete!\n"
    ]
}
10.10.10.2 | CHANGED => {
    "ansible_facts": {
        "discovered_interpreter_python": "/usr/bin/python"
    },
    "changed": true,
    "changes": {
        "removed": [
            "httpd",
            "vsftpd"
        ]
    },
    "msg": "",
    "rc": 0,
    "results": [
        "Loaded plugins: product-id, search-disabled-repos, subscription-manager\nThis system is not registered with an entitlement server. You can use subscription-manager to register.\nResolving Dependencies\n--> Running transaction check\n---> Package httpd.x86_64 0:2.4.6-80.el7 will be erased\n---> Package vsftpd.x86_64 0:3.0.2-22.el7 will be erased\n--> Finished Dependency Resolution\n\nDependencies Resolved\n\n================================================================================\n Package         Arch            Version                Repository         Size\n================================================================================\nRemoving:\n httpd           x86_64          2.4.6-80.el7           @rhel7.5          3.7 M\n vsftpd          x86_64          3.0.2-22.el7           @rhel7.5          348 k\n\nTransaction Summary\n================================================================================\nRemove  2 Packages\n\nInstalled size: 4.0 M\nDownloading packages:\nRunning transaction check\nRunning transaction test\nTransaction test succeeded\nRunning transaction\n  Erasing    : httpd-2.4.6-80.el7.x86_64                                    1/2 \n  Erasing    : vsftpd-3.0.2-22.el7.x86_64                                   2/2 \n  Verifying  : vsftpd-3.0.2-22.el7.x86_64                                   1/2 \n  Verifying  : httpd-2.4.6-80.el7.x86_64                                    2/2 \n\nRemoved:\n  httpd.x86_64 0:2.4.6-80.el7            vsftpd.x86_64 0:3.0.2-22.el7           \n\nComplete!\n"
    ]
}

# ansible all -m shell -a 'rpm -qa {httpd,vsftpd}' -k
SSH password:
10.10.10.2 | CHANGED | rc=0 >>

10.10.10.3 | CHANGED | rc=0 >>
<5> 安装第三方软件
# ll /root/sshpass-1.06-2.el7.x86_64.rpm
-rw-r--r-- 1 root root 21896 Jan  4 23:29 /root/sshpass-1.06-2.el7.x86_64.rpm

# ansible all -m copy -a 'src=/root/sshpass-1.06-2.el7.x86_64.rpm dest=/root/' -k
SSH password:
10.10.10.2 | CHANGED => {
    "ansible_facts": {
        "discovered_interpreter_python": "/usr/bin/python"
    },
    "changed": true,
    "checksum": "b68bc7c12955d93aa8d9c9a2fcc3d848f2c0e350",
    "dest": "/root/sshpass-1.06-2.el7.x86_64.rpm",
    "gid": 0,
    "group": "root",
    "md5sum": "a3731cfdca6b4ac5c312788e9a6ff71c",
    "mode": "0644",
    "owner": "root",
    "size": 21896,
    "src": "/root/.ansible/tmp/ansible-tmp-1578216017.14-94590216791596/source",
    "state": "file",
    "uid": 0
}
10.10.10.3 | CHANGED => {
    "ansible_facts": {
        "discovered_interpreter_python": "/usr/bin/python"
    },
    "changed": true,
    "checksum": "b68bc7c12955d93aa8d9c9a2fcc3d848f2c0e350",
    "dest": "/root/sshpass-1.06-2.el7.x86_64.rpm",
    "gid": 0,
    "group": "root",
    "md5sum": "a3731cfdca6b4ac5c312788e9a6ff71c",
    "mode": "0644",
    "owner": "root",
    "size": 21896,
    "src": "/root/.ansible/tmp/ansible-tmp-1578216017.14-48031892585439/source",
    "state": "file",
    "uid": 0
}

# ansible all -m shell -a 'ls -l /root/sshpass-1.06-2.el7.x86_64.rpm' -k
SSH password:
10.10.10.2 | CHANGED | rc=0 >>
-rw-r--r-- 1 root root 21896 Jan  5 17:20 /root/sshpass-1.06-2.el7.x86_64.rpm

10.10.10.3 | CHANGED | rc=0 >>
-rw-r--r-- 1 root root 21896 Jan  5 17:20 /root/sshpass-1.06-2.el7.x86_64.rpm

# ansible all -m yum -a 'name=/root/sshpass-1.06-2.el7.x86_64.rpm' -k   ###关闭gpgcheck:disable_gpg_check=yes,清空缓存:update_cache=yes
SSH password:
10.10.10.2 | CHANGED => {
    "ansible_facts": {
        "discovered_interpreter_python": "/usr/bin/python"
    },
    "changed": true,
    "changes": {
        "installed": [
            "/root/sshpass-1.06-2.el7.x86_64.rpm"
        ]
    },
    "msg": "",
    "rc": 0,
    "results": [
        "Loaded plugins: product-id, search-disabled-repos, subscription-manager\nThis system is not registered with an entitlement server. You can use subscription-manager to register.\nExamining /root/sshpass-1.06-2.el7.x86_64.rpm: sshpass-1.06-2.el7.x86_64\nMarking /root/sshpass-1.06-2.el7.x86_64.rpm to be installed\nResolving Dependencies\n--> Running transaction check\n---> Package sshpass.x86_64 0:1.06-2.el7 will be installed\n--> Finished Dependency Resolution\n\nDependencies Resolved\n\n================================================================================\n Package      Arch        Version         Repository                       Size\n================================================================================\nInstalling:\n sshpass      x86_64      1.06-2.el7      /sshpass-1.06-2.el7.x86_64       38 k\n\nTransaction Summary\n================================================================================\nInstall  1 Package\n\nTotal size: 38 k\nInstalled size: 38 k\nDownloading packages:\nRunning transaction check\nRunning transaction test\nTransaction test succeeded\nRunning transaction\n  Installing : sshpass-1.06-2.el7.x86_64                                    1/1 \n  Verifying  : sshpass-1.06-2.el7.x86_64                                    1/1 \n\nInstalled:\n  sshpass.x86_64 0:1.06-2.el7                                                   \n\nComplete!\n"
    ]
}
10.10.10.3 | CHANGED => {
    "ansible_facts": {
        "discovered_interpreter_python": "/usr/bin/python"
    },
    "changed": true,
    "changes": {
        "installed": [
            "/root/sshpass-1.06-2.el7.x86_64.rpm"
        ]
    },
    "msg": "",
    "rc": 0,
    "results": [
        "Loaded plugins: product-id, search-disabled-repos, subscription-manager\nThis system is not registered with an entitlement server. You can use subscription-manager to register.\nExamining /root/sshpass-1.06-2.el7.x86_64.rpm: sshpass-1.06-2.el7.x86_64\nMarking /root/sshpass-1.06-2.el7.x86_64.rpm to be installed\nResolving Dependencies\n--> Running transaction check\n---> Package sshpass.x86_64 0:1.06-2.el7 will be installed\n--> Finished Dependency Resolution\n\nDependencies Resolved\n\n================================================================================\n Package      Arch        Version         Repository                       Size\n================================================================================\nInstalling:\n sshpass      x86_64      1.06-2.el7      /sshpass-1.06-2.el7.x86_64       38 k\n\nTransaction Summary\n================================================================================\nInstall  1 Package\n\nTotal size: 38 k\nInstalled size: 38 k\nDownloading packages:\nRunning transaction check\nRunning transaction test\nTransaction test succeeded\nRunning transaction\n  Installing : sshpass-1.06-2.el7.x86_64                                    1/1 \n  Verifying  : sshpass-1.06-2.el7.x86_64                                    1/1 \n\nInstalled:\n  sshpass.x86_64 0:1.06-2.el7                                                   \n\nComplete!\n"
    ]
}

# ansible all -m shell -a 'rpm -qa sshpass' -k
SSH password:
10.10.10.2 | CHANGED | rc=0 >>
sshpass-1.06-2.el7.x86_64

10.10.10.3 | CHANGED | rc=0 >>
sshpass-1.06-2.el7.x86_64
(10)service模块
重启:state=restarted 关闭:state=stopped 平滑:state=reloaded
# ansible all -m yum -a 'name=httpd' -k
# ansible all -m service -a 'name=httpd state=started enabled=yes' -k         ###开启httpd服务,并设置为开机自启
# ansible all -m shell -a 'systemctl is-enabled httpd' -k
SSH password:
10.10.10.3 | CHANGED | rc=0 >>
enabled

10.10.10.2 | CHANGED | rc=0 >>
enabled
(11)user模块
<1> 创建用户
# ansible all -m user -a 'name=testuser shell=/sbin/nologin system=yes home=/mnt/testuser groups=root,bin uid=80' -k
SSH password:
10.10.10.3 | CHANGED => {
    "ansible_facts": {
        "discovered_interpreter_python": "/usr/bin/python"
    },
    "changed": true,
    "comment": "",
    "create_home": true,
    "group": 80,
    "groups": "root,bin",
    "home": "/mnt/testuser",
    "name": "testuser",
    "shell": "/sbin/nologin",
    "state": "present",
    "system": true,
    "uid": 80
}
10.10.10.2 | CHANGED => {
    "ansible_facts": {
        "discovered_interpreter_python": "/usr/bin/python"
    },
    "changed": true,
    "comment": "",
    "create_home": true,
    "group": 80,
    "groups": "root,bin",
    "home": "/mnt/testuser",
    "name": "testuser",
    "shell": "/sbin/nologin",
    "state": "present",
    "system": true,
    "uid": 80
}

# ansible all -m shell -a 'id testuser' -k
SSH password:
10.10.10.3 | CHANGED | rc=0 >>
uid=80(testuser) gid=80(testuser) groups=80(testuser),0(root),1(bin)

10.10.10.2 | CHANGED | rc=0 >>
uid=80(testuser) gid=80(testuser) groups=80(testuser),0(root),1(bin)

# ansible all -m shell -a 'getent passwd testuser' -k
SSH password:
10.10.10.3 | CHANGED | rc=0 >>
testuser:x:80:80::/mnt/testuser:/sbin/nologin

10.10.10.2 | CHANGED | rc=0 >>
testuser:x:80:80::/mnt/testuser:/sbin/nologin
<2> 删除用户
# ansible all -m user -a 'name=testuser state=absent remove=yes' -k       ###remove=yes:删除家目录
SSH password:
10.10.10.3 | CHANGED => {
    "ansible_facts": {
        "discovered_interpreter_python": "/usr/bin/python"
    },
    "changed": true,
    "force": false,
    "name": "testuser",
    "remove": true,
    "state": "absent",
    "stderr": "userdel: testuser mail spool (/var/spool/mail/testuser) not found\n",
    "stderr_lines": [
        "userdel: testuser mail spool (/var/spool/mail/testuser) not found"
    ]
}
10.10.10.2 | CHANGED => {
    "ansible_facts": {
        "discovered_interpreter_python": "/usr/bin/python"
    },
    "changed": true,
    "force": false,
    "name": "testuser",
    "remove": true,
    "state": "absent",
    "stderr": "userdel: testuser mail spool (/var/spool/mail/testuser) not found\n",
    "stderr_lines": [
        "userdel: testuser mail spool (/var/spool/mail/testuser) not found"
    ]
}

# ansible all -m shell -a 'ls -l /mnt' -k
SSH password:
10.10.10.3 | CHANGED | rc=0 >>
total 0

10.10.10.2 | CHANGED | rc=0 >>
total 0
(12)group模块
<1> 创建组:
# ansible all -m group -a 'name=testuser system=yes gid=80' -k
SSH password:
10.10.10.2 | CHANGED => {
    "ansible_facts": {
        "discovered_interpreter_python": "/usr/bin/python"
    },
    "changed": true,
    "gid": 80,
    "name": "testuser",
    "state": "present",
    "system": true
}
10.10.10.3 | CHANGED => {
    "ansible_facts": {
        "discovered_interpreter_python": "/usr/bin/python"
    },
    "changed": true,
    "gid": 80,
    "name": "testuser",
    "state": "present",
    "system": true
}

# ansible all -m shell -a 'getent group testuser' -k
SSH password:
10.10.10.2 | CHANGED | rc=0 >>
testuser:x:80:

10.10.10.3 | CHANGED | rc=0 >>
testuser:x:80:
<2> 删除组:
# ansible all -m group -a 'name=testuser state=absent' -k
SSH password:
10.10.10.2 | CHANGED => {
    "ansible_facts": {
        "discovered_interpreter_python": "/usr/bin/python"
    },
    "changed": true,
    "name": "testuser",
    "state": "absent"
}
10.10.10.3 | CHANGED => {
    "ansible_facts": {
        "discovered_interpreter_python": "/usr/bin/python"
    },
    "changed": true,
    "name": "testuser",
    "state": "absent"
}

# ansible all -m shell -a 'getent group testuser' -k
SSH password:
10.10.10.2 | FAILED | rc=2 >>
non-zero return code

10.10.10.3 | FAILED | rc=2 >>
non-zero return code
7、ansible-galaxy
官网地址:https://galaxy.ansible.com,别人写好的可以直接下载下来使用
nginx:https://galaxy.ansible.com/geerlingguy/nginx
(1)安装galaxy
# ansible-galaxy install geerlingguy.nginx           ###下载,需要能够链接外网
- downloading role 'nginx', owned by geerlingguy
- downloading role from https://github.com/geerlingguy/ansible-role-nginx/archive/2.7.0.tar.gz
- extracting geerlingguy.nginx to /root/.ansible/roles/geerlingguy.nginx
- geerlingguy.nginx (2.7.0) was installed successfully

# ansible-galaxy list geerlingguy.nginx              ###查看刚下载好的信息
	# /root/.ansible/roles
	- geerlingguy.nginx, 2.7.0

# cd /root/.ansible/roles/geerlingguy.nginx
# tree ./
./
├── defaults
│   └── main.yml
├── handlers
│   └── main.yml
├── LICENSE
├── meta
│   └── main.yml
├── molecule
│   └── default
│       ├── molecule.yml
│       ├── playbook.yml
│       └── yaml-lint.yml
├── README.md
├── tasks
│   ├── main.yml
│   ├── setup-Archlinux.yml
│   ├── setup-Debian.yml
│   ├── setup-FreeBSD.yml
│   ├── setup-OpenBSD.yml
│   ├── setup-RedHat.yml
│   ├── setup-Ubuntu.yml
│   └── vhosts.yml
├── templates
│   ├── nginx.conf.j2
│   ├── nginx.repo.j2
│   └── vhost.j2
└── vars
    ├── Archlinux.yml
    ├── Debian.yml
    ├── FreeBSD.yml
    ├── OpenBSD.yml
    └── RedHat.yml
(2)查看所有安装galaxy
# ansible-galaxy list
	# /root/.ansible/roles
	- geerlingguy.nginx, 2.7.0
(3)删除安装galaxy
直接把目录删除了即可!!!
# ansible-galaxy remove geerlingguy.nginx
	- successfully removed geerlingguy.nginx
### 8、ansible-pull
推送命令至远程,效率无限提升,对运维要求较高!!!
8、ansible-vault
管理加密解密yml文件
(1)加密文件
# cat hello.yml
---
- hosts: test
  remote_user: root

  tasks:
    - name: hello
      command: hostname

# ansible-vault encrypt hello.yml        ###加密
New Vault password:
Confirm New Vault password:
Encryption successful

# cat hello.yml
$ANSIBLE_VAULT;1.1;AES256
66356430656465663431613566363738306535613033616132323836633235633738316235336438
3866376431346431383938386165323834333561636338350a353461653135663237373962373533
35613862623433333562396630386430363834623330386537333334663865643665656662303737
6437393664623137620a316237376335373530613232333732396265653334653537353861336463
33613131623839363466393539363635366130653862316637366166616338363539383031373438
33353664633330663764663731343564623135393539383737343466646638636461636565393232
31303437396332633362626666663639306666666334643363643637343366363038616663636662
34303362343235666666333961326136393237623337333837303230366437376235303635313866
6561
(2)解密文件
# ansible-vault decrypt hello.yml
Vault password:
Decryption successful

# cat hello.yml
---
- hosts: test
  remote_user: root

  tasks:
    - name: hello
      command: hostname
(3)直接查看加密文件
# ansible-vault encrypt hello.yml
New Vault password:
Confirm New Vault password:
Encryption successful

# ansible-vault view hello.yml
Vault password:
---
- hosts: test
  remote_user: root

  tasks:
    - name: hello
      command: hostname
(4)编辑加密文件
# ansible-vault edit hello.yml
Vault password:
(5)修改加密文件key
# ansible-vault rekey hello.yml
Vault password:
New Vault password:
Confirm New Vault password:
Rekey successful
(6)创建新加密文件
# ansible-vault create hello1.yml
New Vault password:
Confirm New Vault password:
9、ansible-console
可交互执行命令,支持tab
# ansible-console
Welcome to the ansible console.
Type help or ? to list commands.

root@all (2)[f:5]$                   ###2:总共的机器数量  f:5 ==>> 指的是forks数量,即并发数
root@all (2)[f:5]$ forks 10
root@all (2)[f:10]$ ?                ###查看帮助
root@all (2)[f:10]$ command hostname
10.10.10.3 | CHANGED | rc=0 >>
server3

10.10.10.2 | CHANGED | rc=0 >>
test

root@all (2)[f:10]$ cd 10.10.10.2                   ###切换主机
[email protected] (1)[f:10]$ hostname name=server2    ###修改hostname
10.10.10.2 | CHANGED => {
    "ansible_facts": {
        "ansible_domain": "",
        "ansible_fqdn": "server2",
        "ansible_hostname": "server2",
        "ansible_nodename": "server2"
    },
    "changed": true,
    "name": "server2"
}
10、ansible-palybook
# egrep -v '^#|^$' /etc/ansible/hosts
[test]
10.10.10.2 ansible_ssh_pass='1'
[test1]
10.10.10.3 ansible_ssh_pass='1'

# cat hello.yml
---
- hosts: test
  remote_user: root

  tasks:
    - name: hello
      command: hostname

# ansible-playbook hello.yml
PLAY [test] ***********************************************************************************************************************************************

TASK [Gathering Facts] ************************************************************************************************************************************
ok: [10.10.10.2]

TASK [hello] **********************************************************************************************************************************************
changed: [10.10.10.2]

PLAY RECAP ************************************************************************************************************************************************
10.10.10.2                 : ok=2    changed=1    unreachable=0    failed=0    skipped=0    rescued=0    ignored=0
四、playbook
1、playbook简介
- playbook是由一个或多个"play"组成的列表
- play的主要功能在于将事先归为一组的主机装扮成事先通过ansible中的task定义好的角色。从根本上来讲,所谓task无非是调用ansible的一个module。将多个play组织在一个palybook中,即可以让它们联同起来按事先编排的机制同唱一台大戏
- playbook采用YAML语言编写
2、YAML简介
官方网站:https://yaml.org
(1)简介
- YAML(/ˈjæməl/,尾音类似camel骆驼)是一个可读性高,用来表达数据序列化的格式。YAML参考了其他多种语言,包括:C语言、Python、Perl,并从XML、电子邮件的数据格式(RFC 2822)中获得灵感。Clark Evans在2001年首次发表了这种语言,另外Ingy döt Net与Oren Ben-Kiki也是这语言的共同设计者。当前已经有数种编程语言或脚本语言支持(或者说解析)这种语言。
- YAML是"YAML Ain’t a Markup Language"(YAML不是一种标记语言)的递归缩写。在开发的这种语言时,YAML 的意思其实是:“Yet Another Markup Language”(仍是一种标记语言),但为了强调这种语言以数据做为中心,而不是以标记语言为重点,而用反向缩略语重命名。
(2)特性:
- YAML的可读性好
- YAML和脚本语言的交互好
- YAML使用实现语言的数据类型
- YAML有一个一致的信息模型
- YAML易于实现
- YAML可以基于流来处理
- YAML表达能力强,扩展性好
(3)YAML语法简介
<1> 简介
- 在单一档案中,可用连续三个连字号(—)区分多个档案。另外,还有选择性的连续三个点号(…)用来表示档案结尾
- 次行开始正常些playbook的内容,一般建议写明该playbook的功能
- 使用#号注释代码
- 缩进必须是统一的,不能空格和tab混用
- 缩进的级别也必须一致,同样的缩进代表同样的级别,程序判别配置的级别是用过缩进结合换行来实现的
- YAML文件的内容和Linux系统文件大小判断方式保持一致,是区别大小写的,k/v值均需大小写敏感
- k/v的值可同行写也可以换行写。同行使用:分隔
- v可以是字符串和列表
- 一个完整的代码块功能需最少元素需包括 name: task
- 一个name只能包括一个task
- YAML文件扩展名通常为yml或yaml
<2> List列表
- List:列表,其所有元素都是以"-"开始
示例:
- XXX
<3> Dictionary字典
- 字典,通常由多个key与value构成
示例:
---
name: xxx
skill: xxxxx
---
{name: xxx,skill: xxxxx}
<4> 语法
- YAML的语法和其他高阶语言类似,并且可以简单表达清单、散列表、标量等数据结构。其结构(Structure)通过空格来展示,序列(Sequence)里的项用"-“来代表,Map里的键值对用”:"分隔
name: xxx
age: xx
spouse:
  name: xx
  age: xx
children:
  - name: xxx
  age: xx
  -  name: xxx
  age: xxx
3、playbook核心元素
- Hosts 执行的远程主机列表
- Tasks 任务集自定义
- Varniables 内置变量或自定义变量在playbook中调用
- Templates 模板,可替换模板文件中的变量并实现一些简单逻辑的文件
- Handlers 和 notify结合使用,有特定条件触发的操作,满足条件方才执行,否则不执行
- tags 标签,制定某条任务执行,用于选择运行playbook中的部分代码。ansible具有幂等性,因此会自动跳过没有变化的部分,即便如此,有些代码为测试其确实没有发生变化的时间依然会非常地长。此时,如果确信其没有变化,就可以通过tags跳过此写代码片段
ansible-playbook -t tagname xxx.yml
4、playbook基础组件
(1)Hosts
- palybook中的每一个play的目的都是为了让某个或某些主机以某个指定的用户身份执行任务。hosts用于指定要执行指定任务的主机,须事先定义在主机清单中
# yum install -y httpd
# echo "Dream ya
" >/var/www/html/index.html
# ansible all -m shell -a 'rpm -qa httpd' -k
SSH password:
10.10.10.3 | CHANGED | rc=0 >>
httpd-2.4.6-80.el7.x86_64
10.10.10.2 | CHANGED | rc=0 >>
httpd-2.4.6-80.el7.x86_64
# ansible all -m yum -a 'name=httpd state=absent' -k ###卸载httpd
[root@server1 ~]# cat file.yml
---
- hosts: test
remote_user: root
tasks:
- name: create new file
file: name=/mnt/newfile state=touch
- name: create new user
user: name=test2 system=yes shell=/sbin/nologin
- name: install package
yum: name=httpd
- name: copy html
copy: src=/var/www/html/index.html dest=/var/www/html/
- name: start httpd
service: name=httpd state=started enabled=yes
[root@server1 ~]# ansible-playbook -C file.yml ###检查此yml
...
PLAY RECAP ************************************************************************************************************************************************
10.10.10.2 : ok=6 changed=4 unreachable=0 failed=0 skipped=0 rescued=0 ignored=0
# ansible-playbook file.yml ###开始正式跑
...
PLAY RECAP ************************************************************************************************************************************************
10.10.10.2 : ok=6 changed=5 unreachable=0 failed=0 skipped=0 rescued=0 ignored=0
(2)tasks任务列表
格式:
- (1)action: module arguments
- (2)module: arguments (建议使用)
如果命令或脚本的退出码不为零,可以使用如下方式替代
即使命令执行失败依然继续执行!!!
方式一:
tasks:
  - name: run command
    shell: /usr/bin/command || /bin/true
方式二(使用ignore_errors):
tasks:
  - name: run command
    shell: /usr/bin/command
    ignore_errors: True
5、playbook运行
(1)运行playbook方式
ansible-playbook ...[options]
(2)常用选项
--check(-C)          ###只检测可能发生的变化,但是不操作
--list-hosts         ###列出运行任务的主机
--limit              ###主机列表,只针对主机列表中的主机执行
-v                   ###显示过程 -vv -vvv 更详细
(3)示例
# ansible-playbook file.yml --check
# ansible-playbook file.yml
# ansible-playbook file.yml --limit test
# ansible-playbook file.yml --list-tasks      ##查看任务
playbook: file.yml
  play #1 (test): test  TAGS: []
    tasks:
      create new file   TAGS: []
      create new user   TAGS: []
      install package   TAGS: []
      copy html TAGS: []
      start httpd       TAGS: []
(4)相对路径
# mkdir -p /root/ansible/files
# cp /var/www/html/index.html /root/ansible/files
# ansible test -m shell -a 'rm -f /var/www/html/*test' -k
SSH password:
10.10.10.2 | CHANGED | rc=0 >>

# cat file.yml               ###默认目录为当前用户
---
- hosts: test
  remote_user: root

  tasks:
    - name: create new file
      file: name=/mnt/newfile state=touch
    - name: create new user
      user: name=test2 system=yes shell=/sbin/nologin
    - name: install package
      yum: name=httpd
    - name: copy html
      copy: src=ansible/files/index.html dest=/var/www/html/
    - name: start httpd
      service: name=httpd state=started enabled=yes

# ansible-playbook file.yml
# ansible test -m shell -a 'ls /var/www/html/' -k
SSH password:
10.10.10.2 | CHANGED | rc=0 >>
index.html
6、handlers和notify结合使用触发条件
- Handlers是task列表,这些task与前述的task并没有本质上的不同,用于关注的资源发生改变时,才会采取一定的操作
- Notify此action可用于在每个play的最后被触发,这样可以避免多次有改变发生时每次都执行指定的操作,仅在所有的变化发生完成后一次性地执行指定操作。在notify中列出的操作成为handler,也即notify中调用handler中定义的操作
(1)安装配置httpd
但是此种方法我们会发现httpd.conf 文件修改,httpd服务并不会自动重启,以至于端口不会进行修改!!!
# cat httpd.yml
---
- hosts: test1
  remote_user: root

  tasks:
    - name: install httpd
      yum: name=httpd
    - name: copy conf file
      copy: src=/etc/httpd/conf/httpd.conf dest=/etc/httpd/conf/ backup=yes
    - name: start service
      service: name=httpd state=started enabled=yes

# ansible-playbook httpd.yml -C
...
PLAY RECAP ************************************************************************************************************************************************
10.10.10.3                 : ok=4    changed=3    unreachable=0    failed=0    skipped=0    rescued=0    ignored=0

# ansible-playbook httpd.yml
...
PLAY RECAP ************************************************************************************************************************************************
10.10.10.3                 : ok=4    changed=2    unreachable=0    failed=0    skipped=0    rescued=0    ignored=0

# ansible test1 -m shell -a 'netstat -lntup|grep 80' -k
SSH password:
10.10.10.3 | CHANGED | rc=0 >>
tcp6       0      0 :::80                   :::*                    LISTEN      7949/httpd
(2)解决服务不重启
# cat httpd.yml
---
- hosts: test1
  remote_user: root

  tasks:
    - name: install httpd
      yum: name=httpd
    - name: copy conf file
      copy: src=/etc/httpd/conf/httpd.conf dest=/etc/httpd/conf/ backup=yes
      notify: restart httpd
    - name: start service
      service: name=httpd state=started enabled=yes

  handlers:
    - name: restart httpd
      service: name=httpd state=restarted

# sed -i '/^Listen/c Listen 8080' /etc/httpd/conf/httpd.conf         ###修改端口为8080
# ansible-playbook httpd.yml
PLAY [test1] **********************************************************************************************************************************************

TASK [Gathering Facts] ************************************************************************************************************************************
ok: [10.10.10.3]

TASK [install httpd] **************************************************************************************************************************************
ok: [10.10.10.3]

TASK [copy conf file] *************************************************************************************************************************************
changed: [10.10.10.3]

TASK [start service] **************************************************************************************************************************************
ok: [10.10.10.3]

RUNNING HANDLER [restart httpd] ***************************************************************************************************************************
changed: [10.10.10.3]

PLAY RECAP ************************************************************************************************************************************************
10.10.10.3                 : ok=5    changed=2    unreachable=0    failed=0    skipped=0    rescued=0    ignored=0

# ansible test1 -m shell -a 'netstat -lntup|grep 80' -k
SSH password:
10.10.10.3 | CHANGED | rc=0 >>
tcp6       0      0 :::8080                 :::*                    LISTEN      8441/httpd
多个notify:
# cat httpd.yml
---
- hosts: test1
  remote_user: root

  tasks:
    - name: install httpd
      yum: name=httpd
    - name: copy conf file
      copy: src=/etc/httpd/conf/httpd.conf dest=/etc/httpd/conf/ backup=yes
      notify:
        - restart httpd
        - check httpd enable
    - name: start service
      service: name=httpd state=started enabled=yes

  handlers:
    - name: restart httpd
      service: name=httpd state=restarted
    - name: check httpd enable
      shell: netstat -lntup|grep httpd > /tmp/httpd.log
7、playbook中tags使用
(1)指定单个tags执行
# ansible test1 -m service -a 'name=httpd state=stopped' -k
# cat httpd.yml
---
- hosts: test1
  remote_user: root

  tasks:
    - name: install httpd
      yum: name=httpd
      tags: install_httpd
    - name: copy conf file
      copy: src=/etc/httpd/conf/httpd.conf dest=/etc/httpd/conf/ backup=yes
      notify:
        - restart httpd
    - name: start service
      service: name=httpd state=started enabled=yes
      tags: restart_httpd

  handlers:
    - name: restart httpd
      service: name=httpd state=restarted

# ansible-playbook -t restart_httpd httpd.yml                 ###可以发现就启动了httpd服务
PLAY [test1] **********************************************************************************************************************************************

TASK [Gathering Facts] ************************************************************************************************************************************
ok: [10.10.10.3]

TASK [start service] **************************************************************************************************************************************
changed: [10.10.10.3]

PLAY RECAP ************************************************************************************************************************************************
10.10.10.3                 : ok=2    changed=1    unreachable=0    failed=0    skipped=0    rescued=0    ignored=0
(2)指定多个tags执行
# ansible test1 -m yum -a 'name=httpd state=absent' -k
# ansible test1 -m shell -a 'rpm -qa httpd' -k
SSH password:
10.10.10.3 | CHANGED | rc=0 >>

# ansible-playbook -t install_httpd,restart_httpd httpd.yml
PLAY [test1] **********************************************************************************************************************************************

TASK [Gathering Facts] ************************************************************************************************************************************
ok: [10.10.10.3]

TASK [install httpd] **************************************************************************************************************************************
changed: [10.10.10.3]

TASK [start service] **************************************************************************************************************************************
changed: [10.10.10.3]

PLAY RECAP ************************************************************************************************************************************************
10.10.10.3                 : ok=3    changed=2    unreachable=0    failed=0    skipped=0    rescued=0    ignored=0

# ansible test1 -m shell -a 'netstat -lntup|grep 80' -k
SSH password:
10.10.10.3 | CHANGED | rc=0 >>
tcp6       0      0 :::80                   :::*                    LISTEN      10061/httpd
(3)共用一个标签
# ansible test1 -m yum -a 'name=httpd state=absent' -k
# cat httpd.yml
---
- hosts: test1
  remote_user: root

  tasks:
    - name: install httpd
      yum: name=httpd
      tags: httpd
    - name: copy conf file
      copy: src=/etc/httpd/conf/httpd.conf dest=/etc/httpd/conf/ backup=yes
      notify:
        - restart httpd
    - name: start service
      service: name=httpd state=started enabled=yes
      tags: httpd

  handlers:
    - name: restart httpd
      service: name=httpd state=restarted

# ansible-playbook httpd.yml  --list-tags          ###查看标签信息
playbook: httpd.yml

  play #1 (test1): test1        TAGS: []
      TASK TAGS: [httpd]

# ansible-playbook -t httpd httpd.yml
PLAY [test1] **********************************************************************************************************************************************

TASK [Gathering Facts] ************************************************************************************************************************************
ok: [10.10.10.3]

TASK [install httpd] **************************************************************************************************************************************
changed: [10.10.10.3]

TASK [start service] **************************************************************************************************************************************
changed: [10.10.10.3]

PLAY RECAP ************************************************************************************************************************************************
10.10.10.3                 : ok=3    changed=2    unreachable=0    failed=0    skipped=0    rescued=0    ignored=0

# ansible test1 -m shell -a 'netstat -lntup|grep 80' -k
SSH password:
10.10.10.3 | CHANGED | rc=0 >>
tcp6       0      0 :::80                   :::*                    LISTEN      10515/httpd
8、playbook中变量使用
优先级:命令行 ==>> playbook ==>> 主机列表普通变量 ==>> 主机列表(公共变量)
- 变量名:仅能由字母、数字和下划线组成,且只能以字母开头
- 变量来源:
- 1、ansible setup facts 远程主机的所有变量都可直接调用
- 2、在/etc/ansible/hosts中定义
- 普通变量:在主机组中主机单独定义,优先级高于公共变量
- 公共(组)变量:针对主机组中所有主机定义统一变量
- 3、通过命令行指定变量,优先级最高
ansible-playbook -e varname=value
- 4、在playbook中定义
vars:
-var1: value1
-var2: value2
- 5、在role中定义
(1)查看setup
# ansible all -m setup -a 'filter=ansible_hostname' -k
SSH password:
10.10.10.3 | SUCCESS => {
    "ansible_facts": {
        "ansible_hostname": "server3",
        "discovered_interpreter_python": "/usr/bin/python"
    },
    "changed": false
}
10.10.10.2 | SUCCESS => {
    "ansible_facts": {
        "ansible_hostname": "server2",
        "discovered_interpreter_python": "/usr/bin/python"
    },

# ansible all -m setup -a 'filter=*address*' -k
SSH password:
10.10.10.2 | SUCCESS => {
    "ansible_facts": {
        "ansible_all_ipv4_addresses": [
            "10.10.10.2"
        ],
        "ansible_all_ipv6_addresses": [
            "fe80::20c:29ff:fe7c:b304"
        ],
        "discovered_interpreter_python": "/usr/bin/python"
    },
    "changed": false
}
10.10.10.3 | SUCCESS => {
    "ansible_facts": {
        "ansible_all_ipv4_addresses": [
            "10.10.10.3"
        ],
        "ansible_all_ipv6_addresses": [
            "fe80::20c:29ff:fe1f:7f07"
        ],
        "discovered_interpreter_python": "/usr/bin/python"
    },
    "changed": false
}
(2)命令行指定变量
# cat app.yml
---
- hosts: test
  remote_user: root

  tasks:
    - name: install package
      yum: name={{ pkname }}
    - name: start service
      service: name={{ pkname }} state=started enabled=yes
      tags: httpd

# ansible-playbook -e 'pkname=vsftpd' app.yml              ###多个变量的话在-e参数中接着添加即可
PLAY [test] ***********************************************************************************************************************************************

TASK [Gathering Facts] ************************************************************************************************************************************
ok: [10.10.10.2]

TASK [install package] ************************************************************************************************************************************
changed: [10.10.10.2]

TASK [start service] **************************************************************************************************************************************
changed: [10.10.10.2]

PLAY RECAP ************************************************************************************************************************************************
10.10.10.2                 : ok=3    changed=2    unreachable=0    failed=0    skipped=0    rescued=0    ignored=0

# ansible test -m shell -a 'netstat -lntup|grep 21' -k
SSH password:
10.10.10.2 | CHANGED | rc=0 >>
tcp6       0      0 :::21                   :::*                    LISTEN      10165/vsftpd
(3)在playbook yml中定义
# cat app.yml
---
- hosts: test
  remote_user: root
  vars:
    - pkname: memcached

  tasks:
    - name: install package
      yum: name={{ pkname }}

# ansible-playbook app.yml
PLAY [test] ***********************************************************************************************************************************************

TASK [Gathering Facts] ************************************************************************************************************************************
ok: [10.10.10.2]

TASK [install package] ************************************************************************************************************************************
changed: [10.10.10.2]

PLAY RECAP ************************************************************************************************************************************************
10.10.10.2                 : ok=2    changed=1    unreachable=0    failed=0    skipped=0    rescued=0    ignored=0

# ansible test -m shell -a 'rpm -qa memcached' -k
SSH password:
10.10.10.2 | CHANGED | rc=0 >>
memcached-1.4.15-10.el7_3.1.x86_64
(4)在主机清单中定义
默认/etc/ansible/hosts
<1> 普通变量
# egrep -v '^#|^$' /etc/ansible/hosts
[test]
10.10.10.2 ansible_ssh_pass='1' http_port=8090
[test1]
10.10.10.3 ansible_ssh_pass='1'

# cat hostname.yml
---
- hosts: test
  remote_user: root

  tasks:
    - name: set hostname
      hostname: name=server_{{ http_port }}

# ansible-playbook hostname.yml
PLAY [test] ***********************************************************************************************************************************************

TASK [Gathering Facts] ************************************************************************************************************************************
ok: [10.10.10.2]

TASK [set hostname] ***************************************************************************************************************************************
changed: [10.10.10.2]

PLAY RECAP ************************************************************************************************************************************************
10.10.10.2                 : ok=2    changed=1    unreachable=0    failed=0    skipped=0    rescued=0    ignored=0

# ansible test -m shell -a 'hostname' -k
SSH password:
10.10.10.2 | CHANGED | rc=0 >>
server_8090
<2> 公共(组)变量
# egrep -v '^#|^$' /etc/ansible/hosts
[test]
10.10.10.2 ansible_ssh_pass='1' http_port=8090
[test:vars]
nodename=www
domainname=dreamya.com
[test1]
10.10.10.3 ansible_ssh_pass='1'

# cat hostname.yml
---
- hosts: test
  remote_user: root

  tasks:
    - name: set hostname
      hostname: name={{ nodename }}.{{ http_port }}.{{ domainname }}

# ansible-playbook hostname.yml
PLAY [test] ***********************************************************************************************************************************************

TASK [Gathering Facts] ************************************************************************************************************************************
ok: [10.10.10.2]

TASK [set hostname] ***************************************************************************************************************************************
changed: [10.10.10.2]

PLAY RECAP ************************************************************************************************************************************************
10.10.10.2                 : ok=2    changed=1    unreachable=0    failed=0    skipped=0    rescued=0    ignored=0

# ansible test -m shell -a 'hostname' -k
SSH password:
10.10.10.2 | CHANGED | rc=0 >>
www.8090.dreamya.com
<3> 命令行指定变量优先级更高
# ansible-playbook -e 'nodename=bbs domainname=dream.com' hostname.yml
PLAY [test] ***********************************************************************************************************************************************

TASK [Gathering Facts] ************************************************************************************************************************************
ok: [10.10.10.2]

TASK [set hostname] ***************************************************************************************************************************************
changed: [10.10.10.2]

PLAY RECAP ************************************************************************************************************************************************
10.10.10.2                 : ok=2    changed=1    unreachable=0    failed=0    skipped=0    rescued=0    ignored=0

[root@server1 ~]# ansible test -m shell -a 'hostname' -k
SSH password:
10.10.10.2 | CHANGED | rc=0 >>
bbs.8090.dream.com
(5)使用变量文件
# cat /root/vars.yml
var1: httpd
var2: test

# cat /root/testvar.yml
---
- hosts: test
  remote_user: root
  vars_files:
    - vars.yml

  tasks:
    - name: install package
      yum: name={{ var1 }}
    - name: create file
      file: name=/mnt/{{ var2 }}.log state=touch

# ansible-playbook testvar.yml
PLAY [test] ***********************************************************************************************************************************************

TASK [Gathering Facts] ************************************************************************************************************************************
ok: [10.10.10.2]

TASK [install package] ************************************************************************************************************************************
ok: [10.10.10.2]

TASK [create file] ****************************************************************************************************************************************
changed: [10.10.10.2]

PLAY RECAP ************************************************************************************************************************************************
10.10.10.2                 : ok=3    changed=1    unreachable=0    failed=0    skipped=0    rescued=0    ignored=0

# ansible test -m shell -a 'rpm -qa httpd && ls /mnt' -k
SSH password:
10.10.10.2 | CHANGED | rc=0 >>
httpd-2.4.6-80.el7.x86_64
newfile
test.log
9、template管理
(1)简介
- 文本文件,嵌套有脚本(使用模板变成语言编写)
- Jinja2语言,有如下形式
- 字符串:使用单引号或双引号
- 数字:整数,浮点数
- 列表:[item1,item2,…]
- 元组:(item1,item2,…)
- 字典:{key1:value1,key:value2,…}
- 布尔值:true/false
- 算数运算:+,-,*,/,//,%,**
- 比较操作:==,!=,>,>=,<,<=
- 逻辑运算:and,or,not
- 流表达式:For If When
(2)nginx template
<1> 三台机器都配置好nginx源
# cat /etc/yum.repos.d/nginx.repo
[nginx]
name=nginx repo
baseurl=http://nginx.org/packages/centos/7/$basearch/
gpgcheck=0
enabled=1
<2> ansible那台安装:
可以发现worker process 的个数和cpu有关


<3> 修改server2处理器数量

<4> 配置j2模板
# pwd
/root

# mkdir templates
# cp /etc/nginx/nginx.conf templates/nginx.conf.j2
# ansible all -m setup |grep "cpu"         ###查看机器CPU数量
        "ansible_processor_vcpus": 1,
        "ansible_processor_vcpus": 4,

<5> 配置yml
关闭之前开启的httpd服务,共同使用80端口会冲突!!!
# cat testtmpl.yml
---
- hosts: all
  remote_user: root

  tasks:
    - name: install package
      yum: name=nginx
    - name: copy template
      template: src=nginx.conf.j2 dest=/etc/nginx/nginx.conf
      notify:
        - restart service
    - name: start service
      service: name=nginx state=started enabled=yes

  handlers:
    - name: restart service
      service: name=nginx state=restarted

# ansible-playbook testtmpl.yml
# ansible all -m shell -a 'ps -ef|grep nginx'
10.10.10.3 | CHANGED | rc=0 >>
root      11890      1  0 03:15 ?        00:00:00 nginx: master process /usr/sbin/nginx -c /etc/nginx/nginx.conf
nginx     11891  11890  0 03:15 ?        00:00:00 nginx: worker process
nginx     11892  11890  0 03:15 ?        00:00:00 nginx: worker process
root      12019  12018  0 03:16 pts/1    00:00:00 /bin/sh -c ps -ef|grep nginx
root      12021  12019  0 03:16 pts/1    00:00:00 grep nginx

10.10.10.2 | CHANGED | rc=0 >>
root      12805      1  0 03:16 ?        00:00:00 nginx: master process /usr/sbin/nginx -c /etc/nginx/nginx.conf
nginx     12806  12805  0 03:16 ?        00:00:00 nginx: worker process
nginx     12807  12805  0 03:16 ?        00:00:00 nginx: worker process
nginx     12808  12805  0 03:16 ?        00:00:00 nginx: worker process
nginx     12809  12805  0 03:16 ?        00:00:00 nginx: worker process
nginx     12810  12805  0 03:16 ?        00:00:00 nginx: worker process
nginx     12811  12805  0 03:16 ?        00:00:00 nginx: worker process
nginx     12812  12805  0 03:16 ?        00:00:00 nginx: worker process
nginx     12813  12805  0 03:16 ?        00:00:00 nginx: worker process
root      12941  12940  0 03:17 pts/0    00:00:00 /bin/sh -c ps -ef|grep nginx
root      12943  12941  0 03:17 pts/0    00:00:00 grep nginx
(3)when
# ansible all -m setup -a 'filter=*version'
10.10.10.3 | SUCCESS => {
    "ansible_facts": {
        "ansible_bios_version": "6.00",
        "ansible_distribution_major_version": "7",
        "ansible_distribution_version": "7.5",
        "ansible_kernel_version": "#1 SMP Wed Mar 21 18:14:51 EDT 2018",
        "ansible_product_version": "None",
        "ansible_python_version": "2.7.5",
        "discovered_interpreter_python": "/usr/bin/python"
    },
    "changed": false
}
10.10.10.2 | SUCCESS => {
    "ansible_facts": {
        "ansible_bios_version": "6.00",
        "ansible_distribution_major_version": "7",
        "ansible_distribution_version": "7.5",
        "ansible_kernel_version": "#1 SMP Wed Mar 21 18:14:51 EDT 2018",
        "ansible_product_version": "None",
        "ansible_python_version": "2.7.5",
        "discovered_interpreter_python": "/usr/bin/python"
    },
    "changed": false
}

# cat testtmpl.yml
---
- hosts: all
  remote_user: root

  tasks:
    - name: install package
      yum: name=nginx
    - name: copy template
      template: src=nginx.conf.j2 dest=/etc/nginx/nginx.conf
      when: ansible_distribution_major_version == "7"
      notify:
        - restart service
    - name: start service
      service: name=nginx state=started enabled=yes

  handlers:
    - name: restart service
      service: name=nginx state=restarted

(3)迭代(with_items)
<1> 简介
- 迭代:当有需要重复性执行的任务时,可以使用迭代机制
- 对迭代项的引用,固定变量名为"item"
- 要在task中使用with_items给定要迭代的元素列表
- 列表格式:字符串或字典
<2> 示例
# cat testitem.yml
---
- hosts: all
  remote_user: root

  tasks:
    - name: create some files
      file: name=/mnt/{{ item }} state=touch
      when: ansible_distribution_major_version == "7"
      with_items:
        - file1
        - file2
        - file3
    - name: install some packages
      yum:
        name: ['python-devel', 'dstat']

# ansible-playbook testitem.yml
# ansible all -m shell -a 'ls /mnt'
10.10.10.3 | CHANGED | rc=0 >>
file1
file2
file3

10.10.10.2 | CHANGED | rc=0 >>
file1
file2
file3
newfile
test.log
<3> 嵌套子变量
# cat testitem2.yml
---
- hosts: all
  remote_user: root

  tasks:
    - name: create some groups
      group: name={{ item }}
      when: ansible_distribution_major_version == "7"
      with_items:
        - g1
        - g2
        - g3
    - name: create users
      user: name={{ item.name }} group={{ item.group }}
      with_items:
        - { name: "user1", group: "g1"}
        - { name: "user2", group: "g2"}
        - { name: "user3", group: "g3"}

# ansible-playbook testitem2.yml
PLAY [all] ************************************************************************************************************************************************

TASK [Gathering Facts] ************************************************************************************************************************************
ok: [10.10.10.3]
ok: [10.10.10.2]

TASK [create some groups] *********************************************************************************************************************************
changed: [10.10.10.3] => (item=g1)
changed: [10.10.10.2] => (item=g1)
changed: [10.10.10.3] => (item=g2)
changed: [10.10.10.2] => (item=g2)
changed: [10.10.10.3] => (item=g3)
changed: [10.10.10.2] => (item=g3)

TASK [create users] ***************************************************************************************************************************************
changed: [10.10.10.3] => (item={u'group': u'g1', u'name': u'user1'})
changed: [10.10.10.2] => (item={u'group': u'g1', u'name': u'user1'})
changed: [10.10.10.2] => (item={u'group': u'g2', u'name': u'user2'})
changed: [10.10.10.3] => (item={u'group': u'g2', u'name': u'user2'})
changed: [10.10.10.2] => (item={u'group': u'g3', u'name': u'user3'})
changed: [10.10.10.3] => (item={u'group': u'g3', u'name': u'user3'})

PLAY RECAP ************************************************************************************************************************************************
10.10.10.2                 : ok=3    changed=2    unreachable=0    failed=0    skipped=0    rescued=0    ignored=0
10.10.10.3                 : ok=3    changed=2    unreachable=0    failed=0    skipped=0    rescued=0    ignored=0
(4)template for if
{% if vhost.root is defined %}
root{{ vhost.root }}
{% endif %
<1> for循环:
方式一:
# cat testfor.yml
---
- hosts: all
  remote_user: root
  vars:
    ports:
      - 81
      - 82
      - 83

  tasks:
    - name: copy conf
      template: src=for1.conf.j2 dest=/mnt/for1.conf

# cat templates/for1.conf.j2
{% for port in ports %}
server{
  listen {{ port }}
}
{% endfor %}

# ansible-playbook testfor.yml
# ansible all -m shell -a 'cat /mnt/for1.conf'
10.10.10.3 | CHANGED | rc=0 >>
server{
  listen 81
}
server{
  listen 82
}
server{
  listen 83
}

10.10.10.2 | CHANGED | rc=0 >>
server{
  listen 81
}
server{
  listen 82
}
server{
  listen 83
}
方式二:
# cat testfor2.yml
---
- hosts: all
  remote_user: root
  vars:
    ports:
      - web1:
        port: 81
        name: web1.dream.com
        rootdir: /mnt/web1
      - web2:
        port: 82
        name: web2.dream.com
        rootdir: /mnt/web2
      - web3:
        port: 83
        name: web3.dream.com
        rootdir: /mnt/web3

  tasks:
    - name: copy conf
      template: src=for2.conf.j2 dest=/mnt/for2.conf

# cat templates/for2.conf.j2
{% for p in ports %}
server{
  listen {{ p.port }}
  servername {{ p.name }}
  docoumentroot {{ p.rootdir }}
}
{% endfor %}

# ansible-playbook testfor2.yml
# ansible all -m shell -a 'cat /mnt/for2.conf'
10.10.10.3 | CHANGED | rc=0 >>
server{
  listen 81
  servername web1.dream.com
  docoumentroot /mnt/web1
}
server{
  listen 82
  servername web2.dream.com
  docoumentroot /mnt/web2
}
server{
  listen 83
  servername web3.dream.com
  docoumentroot /mnt/web3
}

10.10.10.2 | CHANGED | rc=0 >>
server{
  listen 81
  servername web1.dream.com
  docoumentroot /mnt/web1
}
server{
  listen 82
  servername web2.dream.com
  docoumentroot /mnt/web2
}
server{
  listen 83
  servername web3.dream.com
  docoumentroot /mnt/web3
}
加上if判断:
# cat testfor3.yml
---
- hosts: all
  remote_user: root
  vars:
    ports:
      - web1:
        port: 81
        rootdir: /mnt/web1
      - web2:
        port: 82
        name: web2.dream.com
        rootdir: /mnt/web2
      - web3:
        port: 83
        rootdir: /mnt/web3

  tasks:
    - name: copy conf
      template: src=for3.conf.j2 dest=/mnt/for3.conf

# cat templates/for3.conf.j2
{% for p in ports %}
server{
  listen {{ p.port }}
{% if p.name is defined %}
  servername {{ p.name }}
{% endif %}
  docoumentroot {{ p.rootdir }}
}
{% endfor %}

# ansible-playbook testfor3.yml

# ansible all -m shell -a 'cat /mnt/for3.conf'
10.10.10.3 | CHANGED | rc=0 >>
server{
  listen 81
  docoumentroot /mnt/web1
}
server{
  listen 82
  servername web2.dream.com
  docoumentroot /mnt/web2
}
server{
  listen 83
  docoumentroot /mnt/web3
}

10.10.10.2 | CHANGED | rc=0 >>
server{
  listen 81
  docoumentroot /mnt/web1
}
server{
  listen 82
  servername web2.dream.com
  docoumentroot /mnt/web2
}
server{
  listen 83
  docoumentroot /mnt/web3
}
10、roles角色
(1)简介
- roles
- ansible自1.2版本引入的新特性,用于层次性、结构化地组织playbook。roles能够根据层次型结构自动装载变量文件、tasks以及handlers等。简单来说,roles就是通过将变量、文件、任务、模板及处理器分别放置于单独的目录中,并可以便捷地include它们的一种机制。角色一般用于基于主机构建服务的场景中,但也可以是用于构建守护进程等场景中
- 复杂场景:建议使用roles,代码复用度高
- 变更制定主机或主机组
- 如命令不规范维护和传承成本大
- 某些功能需多个playbook,通过includes即可实现
(2)roles目录结构
- 每个角色,以特定的层级目录结构进行组织
- roles目录结构:
playbook.yml
roles/
  project/
    tasks/         ###定义task,role的基本元素,至少阴谋刚刚包含一个名为main.yml的文件,其他的文件需要在此文件中通过include进行包含
    files/         ###存放由copy或scripte模块等调用的文件
    vars/          ###定义变量,至少应该包含一个名为main.yml的文件;其他文件需要通过include进行包含
    default/       ###设定默认变量时使用此目录中的main.yml
    templates/     ###template模块查找所需要模板文件的目录
    handlers       ###至少应该包含一个名为main.yml的文件;其他文件需要通过include进行包含
    meta/          ###定义当前角色的特殊设定及依赖关系,至少应该包含一个名为main.yml的文件;其他文件需要通过include进行包含
(3)环境准备
# mkdir /root/ansible/roles/{httpd,mysql,memcache,nginx}
# tree
.
└── roles
    ├── httpd
    ├── memcache
    ├── mysql
    └── nginx

### 卸载之前安装nginx
# ansible all -m yum -a 'name=nginx state=absent'
# ansible all -m shell -a 'rpm -qa nginx'
10.10.10.3 | CHANGED | rc=0 >>

10.10.10.2 | CHANGED | rc=0 >>

# ansible all -m shell -a 'userdel -r nginx'
(4)Nginx配置
# pwd
/root/ansible/roles/nginx

# mkdir {tasks,templates}

# cat templates/nginx.conf.j2
user  nginx;
worker_processes  {{ ansible_processor_vcpus+1 }};

error_log  /var/log/nginx/error.log warn;
pid        /var/run/nginx.pid;

events {
    worker_connections  1024;
}

http {
    include       /etc/nginx/mime.types;
    default_type  application/octet-stream;
    log_format  main  '$remote_addr - $remote_user [$time_local] "$request" '
                      '$status $body_bytes_sent "$http_referer" '
                      '"$http_user_agent" "$http_x_forwarded_for"';
    access_log  /var/log/nginx/access.log  main;
    sendfile        on;
    #tcp_nopush     on;
    keepalive_timeout  65;
    #gzip  on;
    include /etc/nginx/conf.d/*.conf;
}

# cat tasks/main.yml
- include: group.yml
- include: user.yml
- include: yum.yml
- include: templ.yml
- include: start.yml


# cat tasks/group.yml
- name: create group
  group: name=nginx gid=80

# cat tasks/user.yml
- name: create user
  user: name=nginx uid=80 group=nginx system=yes shell=/sbin/nologin

# cat  tasks/yum.yml
- name: install package
  yum: name=nginx

# cat tasks/templ.yml
- name: copy conf
  template: src=nginx.conf.j2 dest=/etc/nginx/nginx.conf

# cat tasks/start.yml
- name: start service
  service: name=nginx state=started enabled=yes

# cat tasks/restart.yml
- name: restart service
  service: name=nginx state=restarted

# pwd
/root/ansible

# cat nginx_role.yml
- hosts: all
  remote_user: root
  roles:
    - role: nginx

# ansible-playbook nginx_role.yml
# ansible all -m shell -a 'rpm -qa nginx && ps -ef|grep nginx'
10.10.10.3 | CHANGED | rc=0 >>
nginx-1.16.1-1.el7.ngx.x86_64
root      18458      1  0 07:25 ?        00:00:00 nginx: master process /usr/sbin/nginx -c /etc/nginx/nginx.conf
nginx     18459  18458  0 07:25 ?        00:00:00 nginx: worker process
root      18526  18525  0 07:31 pts/1    00:00:00 /bin/sh -c rpm -qa nginx && ps -ef|grep nginx
root      18529  18526  0 07:31 pts/1    00:00:00 grep nginx

10.10.10.2 | CHANGED | rc=0 >>
nginx-1.16.1-1.el7.ngx.x86_64
root      19525      1  0 07:25 ?        00:00:00 nginx: master process /usr/sbin/nginx -c /etc/nginx/nginx.conf
nginx     19526  19525  0 07:25 ?        00:00:00 nginx: worker process
nginx     19527  19525  0 07:25 ?        00:00:00 nginx: worker process
nginx     19528  19525  0 07:25 ?        00:00:00 nginx: worker process
nginx     19529  19525  0 07:25 ?        00:00:00 nginx: worker process
root      19596  19595  0 07:31 pts/0    00:00:00 /bin/sh -c rpm -qa nginx && ps -ef|grep nginx
root      19599  19596  0 07:31 pts/0    00:00:00 grep nginx
(5)Http配置
<1> 删除之前httpd
# ansible all -m yum -a 'name=httpd state=absent'
# ansible all -m user -a 'name=apache state=absent'
<2> 配置tasks和files
# mkdir /root/ansible/roles/httpd/{tasks,files}
# pwd
/root/ansible/roles/httpd

# cp /etc/httpd/conf/httpd.conf files/

# cat tasks/main.yml
- include: user.yml
- include: copyfile.yml

# cat tasks/user.yml
- name: create user
  user: name=apache system=yes shell=/sbin/nologin

# cat tasks/copyfile.yml
- name: copy files
  copy: src=httpd.conf dest=/mnt owner=apache
<3> 运行
# pwd
/root/ansible

# cat httpd_role.yml
- hosts: all
  remote_user: root

  roles:
    - httpd

# ansible-playbook httpd_role.yml
# ansible all -m shell -a 'ls /mnt/httpd.conf'
10.10.10.2 | CHANGED | rc=0 >>
/mnt/httpd.conf

10.10.10.3 | CHANGED | rc=0 >>
/mnt/httpd.conf
(5)同时运行二个roles
<1> 删除之前环境
# ansible all -m user -a 'name=apache state=absent'
# ansible all -m shell -a 'rm -rf /mnt/*'
# ansible all -m yum -a 'name=nginx state=absent'
# ansible all -m user -a 'name=nginx state=absent'
<2> 运行
# pwd
/root/ansible

# cat some_role.yml
- hosts: all
  remote_user: root
  roles:
    - role: httpd
    - role: nginx

# ansible-playbook some_role.yml
(6)调用其它roles

![]()
(7)添加tags
# pwd
/root/ansible

# cat some_role.yml
- hosts: all
  remote_user: root
  roles:
    - { role: httpd, tags: ['web', 'httpd']}
    - { role: nginx, tags: ['web', 'nginx']}

# ansible-playbook -t nginx some_role.yml
(8)使用when
# cat some_role.yml
- hosts: all
  remote_user: root
  roles:
    - { role: httpd, tags: ['web', 'httpd']}
    - { role: nginx, tags: ['web', 'nginx'],when: ansible_distribution_major_version == "7"}

# ansible-playbook  some_role.yml
(9)多项同时使用
# tree roles/app/
roles/app/
├── files
│   └── vhosts.conf
├── handlers
│   └── main.yml
├── tasks
│   ├── copyfile.yml
│   ├── group.yml
│   ├── main.yml
│   ├── start.yml
│   ├── templ.yml
│   ├── user.yml
│   └── yum.yml
├── templates
│   └── httpd.conf.j2
└── vars
    └── main.yml

# touch roles/app/files/vhosts.conf
# cat roles/app/tasks/main.yml
- include: group.yml
- include: user.yml
- include: yum.yml
- include: templ.yml
- include: copyfile.yml
- include: start.yml

# cat roles/app/tasks/group.yml
- name: create group
  group: name=app system=yes gid=123

# cat roles/app/tasks/user.yml
- name: create user
  user: name=app group=app system=yes shell=/sbin/nologin uid=123

# cat roles/app/tasks/yum.yml
- name: install package
  yum: name=httpd

# cat roles/app/tasks/templ.yml
- name: copy conf
  template: src=httpd.conf.j2 dest=/etc/httpd/conf/httpd.conf
  notify: restart service

# cat roles/app/tasks/copyfile.yml
- name: copy file
  copy: src=vhosts.conf dest=/etc/httpd/conf.d/ owner=app

# cat roles/app/tasks/start.yml
- name: start service
  service: name=httpd state=started enabled=yes

# cat roles/app/handlers/main.yml
- name: restart service
  service: name=httpd state=restarted

# cat roles/app/vars/main.yml
username: app
groupname: app

# cat app_role.yml
- hosts: all
  remote_user: root

  roles:
    - app

# ansible-playbook app_role.yml
# vim roles/app/templates/httpd.conf.j2
