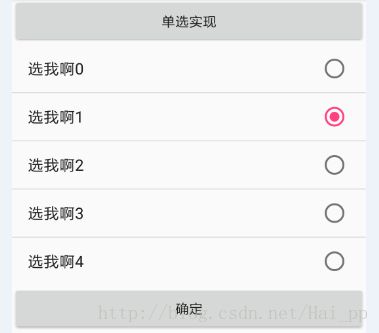
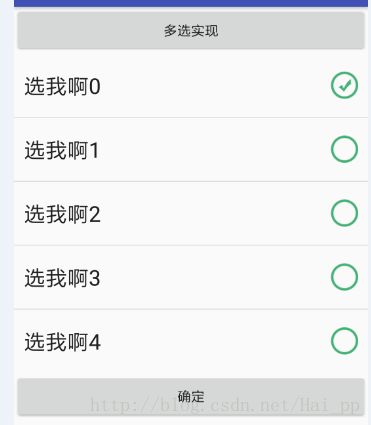
CheckedTextView的使用(结合ListView实现单选、多选效果)
小小码农初成长之—Android基础_CheckedTextView
情景描述:
说到实现单选、多选毫无疑问的我想到了RadioGroup + RadioButton 和 CheckBox。但针对选项个数的不定以及内容的多变,通过RadioButton与CheckBox实现则显得不那么优雅......;
CheckedTextView:
通过CheckedTextView实现的单选与多选适用于选项内容简单的情景下。
好了话不多说——上代码(一些关键信息会在代码中标注)
第二步:通过系统自带效果图实现
代码实现:MainActivity
    /**
    代码比较简单,只截取其中主要的部分
    */
    @Override
    protected void onCreate(Bundle savedInstanceState) {
        super.onCreate(savedInstanceState);
        setContentView(R.layout.activity_main);
        mContext = this;
        //模拟数据
        mData = new ArrayList<>();
        for (int i = 0; i < 5; i++) {
            mData.add("选我啊"+i);
        }
        //初始化ListView
        listView = (ListView) findViewById(R.id.lv_single);
        //重点一:设置选择模式
        //☆☆☆:通过listView设置单选模式
        listView.setChoiceMode(AbsListView.CHOICE_MODE_SINGLE);
        //☆☆☆:通过listView设置多选模式
//        listView.setChoiceMode(AbsListView.CHOICE_MODE_MULTIPLE);


        //重点二:设置单选与多选框的样式
        //☆☆☆:创建adapter,布局加载系统默认的单选框
        ArrayAdapter adapter = new ArrayAdapter(this,android.R.layout.simple_list_item_single_choice);
        //☆☆☆:创建adapter,布局加载系统默认的单选框
//        ArrayAdapter adapter = new ArrayAdapter(this,android.R.layout.simple_list_item_multiple_choice);

        //将模拟数据添加到adapter适配器中
        adapter.addAll(mData);
        listView.setAdapter(adapter);

    }
src\main\res\layout\activity_main.xml的代码:
//很简单,仅仅往布局中添加了个ListView

<LinearLayout xmlns:android="http://schemas.android.com/apk/res/android"
    xmlns:app="http://schemas.android.com/apk/res-auto"
    xmlns:tools="http://schemas.android.com/tools"
    android:layout_width="match_parent"
    android:layout_height="match_parent"
    android:orientation="vertical"
    tools:context="com.seapp.listviewsingle.listviewsingle.MainActivity">

    <Button
        android:layout_width="match_parent"
        android:layout_height="wrap_content"
        android:text="多选实现" />

    <ListView
        android:id="@+id/lv_single"
        android:layout_width="match_parent"
        android:layout_height="wrap_content">ListView>

    <Button
        android:layout_width="match_parent"
        android:layout_height="wrap_content"
        android:onClick="isSingle"
        android:text="确定" />

LinearLayout>
通过上述代码即可实现ListView+CheckedTextView的单选/多选点击事件;
第三步:仅仅如此,肯定不够的啦;对于选项框呢,我们也可以通过自定义实现;
上述实现中分别使用了系统自定义的选项框:
系统单选框:android.R.layout.simple_list_item_single_choice
系统多选框:android.R.layout.simple_list_item_multiple_choice
/**
    单选框系统代码如下
*/
"1.0" encoding="utf-8"?>
-- Copyright (C) 2008 The Android Open Source Project

     Licensed under the Apache License, Version 2.0 (the "License");
     you may not use this file except in compliance with the License.
     You may obtain a copy of the License at

          http://www.apache.org/licenses/LICENSE-2.0

     Unless required by applicable law or agreed to in writing, software
     distributed under the License is distributed on an "AS IS" BASIS,
     WITHOUT WARRANTIES OR CONDITIONS OF ANY KIND, either express or implied.
     See the License for the specific language governing permissions and
     limitations under the License.
-->

"http://schemas.android.com/apk/res/android"
    android:id="@android:id/text1"
    android:layout_width="match_parent"
    android:layout_height="?android:attr/listPreferredItemHeightSmall"
    android:textAppearance="?android:attr/textAppearanceListItemSmall"
    android:gravity="center_vertical"
    android:checkMark="?android:attr/listChoiceIndicatorSingle"
    android:paddingStart="?android:attr/listPreferredItemPaddingStart"
    android:paddingEnd="?android:attr/listPreferredItemPaddingEnd" />


/**
    多选框系统代码如下
*/
"1.0" encoding="utf-8"?>
-- Copyright (C) 2008 The Android Open Source Project

     Licensed under the Apache License, Version 2.0 (the "License");
     you may not use this file except in compliance with the License.
     You may obtain a copy of the License at

          http://www.apache.org/licenses/LICENSE-2.0

     Unless required by applicable law or agreed to in writing, software
     distributed under the License is distributed on an "AS IS" BASIS,
     WITHOUT WARRANTIES OR CONDITIONS OF ANY KIND, either express or implied.
     See the License for the specific language governing permissions and
     limitations under the License.
-->

"http://schemas.android.com/apk/res/android"
    android:id="@android:id/text1"
    android:layout_width="match_parent"
    android:layout_height="?android:attr/listPreferredItemHeightSmall"
    android:textAppearance="?android:attr/textAppearanceListItemSmall"
    android:gravity="center_vertical"
    android:checkMark="?android:attr/listChoiceIndicatorMultiple"
    android:paddingStart="?android:attr/listPreferredItemPaddingStart"
    android:paddingEnd="?android:attr/listPreferredItemPaddingEnd" />
通过上述代码查看,checkMark属性是对选项框的设置项;而我们要实现的自定义就非常简单啦。将系统代码拷贝到我们自己写的xml文件中(app\src\main\res\layout\check_single_box.xml),checkMark属性则是状态选择器啦;具体代码如下:
/**
    自定义的CheckedTextView代码实现
*/

<CheckedTextView
    xmlns:android="http://schemas.android.com/apk/res/android"
    android:id="@android:id/text1"
    android:layout_width="match_parent"
    android:layout_height="wrap_content"
    android:checkMark="@drawable/sigle_backgroud_selector"
    android:minHeight="?android:attr/listPreferredItemHeight"
    android:textAppearance="?android:attr/textAppearanceLarge"
    android:textColor="?android:attr/textColorAlertDialogListItem"
    android:gravity="center_vertical"
    android:ellipsize="marquee">
CheckedTextView>

/**
    checkMark属性指定的状态选择器代码
*/

<selector xmlns:android="http://schemas.android.com/apk/res/android">
    <item android:drawable="@drawable/promise_selected" android:state_selected="true" />
    <item android:drawable="@drawable/promise_selected" android:state_pressed="true" />
    <item android:drawable="@drawable/promise_selected" android:state_checked="true" />
    <item android:drawable="@drawable/promise_select" />
selector>
通过此设定,在MainActivity中指定生产Adapter时,绑定成我们自定义的item布局即可实现对选项框样式的定义
//adapter设置中布局设定为我们自定义的
ArrayAdapter<String> adapter = new ArrayAdapter<String>(this,R.layout.check_single_box);
第四步:最后啦,也是最重要的一步啦。无论是在单选框中还是多选框中,如何获取我们选中的条目呢?废话不多说,看代码——>
/**
实现方式很简单,我们在点击确定的时候获取到我们选中的条目即可;
*/


//单选框代码如下


    /**
     * 确定按钮的监听事件
     * @param v
     */
    public void isSingle(View v){
        //通过listView对象获取到当前listView中被选择的条目position
        int checkedItemPosition = listView.getCheckedItemPosition();
        //获取到对应条目的position后,我们可以do something....
        Toast.makeText(mContext,mData.get(checkedItemPosition),Toast.LENGTH_SHORT).show();
    }


//多选框代码如下


  /**
     * 确定按钮的监听事件
     * @param v
     */
       /**
     * 确定按钮的监听事件
     * @param v
     */
    public void isSingle(View v){
        //通过listView对象获取到当前listView中被选择的条目position;
        //以下方法实现会对返回一个SparseBooleanArray集合,其中对listview的触发过点击事件的每个条目进行
        // 标记(键值对)键==position/值==boolean,若该条目被选中则显示true,否则显示false;
        SparseBooleanArray  checkedItemPositions = listView.getCheckedItemPositions();
        //循环遍历集合中所有的数据,获取每个item是否在SparseBooleanArray存储,以及对应的值;
        for (int i = 0; i < mData.size(); i++) {
            //根据key获取对应的boolean值,没有则返回false
            aBoolean = checkedItemPositions.get(i);
            Log.e("i:"+i , aBoolean +"");
        }
    }
多选情况下的log日志打印:

通过该特性可以有效的获取到我们在listView中选中条目的集合;
总结:
新手一枚,文档描述中有什么出入或有什么更好的用法欢迎各位博主留言;
文档部分内容参照:
    https://www.cnblogs.com/over140/archive/2010/11/04/1869316.html
    http://blog.csdn.net/stzy00/article/details/45035301
    https://www.jianshu.com/p/d0e21d2672fc
    **共勉。。。**


**下面是CheckedTextView的一些其他属性:**
//是否选中。
public boolean isChecked ()

//为一个给定的Drawable设定检查标记。当isChecked()为true时则绘制
public void setCheckMarkDrawable (Drawable d)

//为一个给定的Drawable设定检查标记,使用它的资源id来标识。当isChecked()为true时则绘制
public void setCheckMarkDrawable (int resid)

//改变文本视图的选中状态
public void setChecked (boolean checked)

//设置页边距。视图可能会增加一些必要的空间用于显示滚动条,并依赖滚动条的类型和可见性。因此,设定的值用于回调getPaddingLeft(), getPaddingTop(), getPaddingRight() 和 getPaddingBottom()时则返回不同的值
public void setPadding (int left, int top, int right, int bottom)

//反转当前视图的选中状态
public void toggle ()

