spring-boot_2用纯java代码搭建ssm
上一节回顾了一下用xml的方式搭建ssm,这节我不用一个xml,用纯java来搭建一个ssm,这为了后面学习springboot铺垫
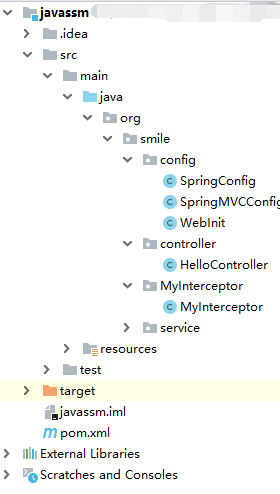
还是用IDEA搭建一个项目
这次可以不用webapp目录
目录结构

首先pom.xml文件
<?xml version="1.0" encoding="UTF-8"?>
<project xmlns="http://maven.apache.org/POM/4.0.0"
         xmlns:xsi="http://www.w3.org/2001/XMLSchema-instance"
         xsi:schemaLocation="http://maven.apache.org/POM/4.0.0 http://maven.apache.org/xsd/maven-4.0.0.xsd">
    <modelVersion>4.0.0</modelVersion>

    <groupId>org.smile</groupId>
    <artifactId>javassm</artifactId>
    <version>1.0-SNAPSHOT</version>
    <packaging>war</packaging>

    <dependencies>
        <dependency>
            <groupId>org.springframework</groupId>
            <artifactId>spring-webmvc</artifactId>
            <version>5.1.1.RELEASE</version>
        </dependency>
        <dependency>
            <groupId>javax.servlet</groupId>
            <artifactId>javax.servlet-api</artifactId>
            <version>4.0.1</version>
            <scope>provided</scope>
        </dependency>
        <dependency>
            <groupId>com.alibaba</groupId>
            <artifactId>fastjson</artifactId>
            <version>1.2.58</version>
        </dependency>
    </dependencies>
</project>
SpringConfig.java
相当于上一节的application.xml文件
package org.smile.config;

import org.springframework.context.annotation.ComponentScan;
import org.springframework.context.annotation.Configuration;
import org.springframework.context.annotation.FilterType;
import org.springframework.stereotype.Controller;

/**
 * @author Smile  博客 https://blog.csdn.net/Smile__1
 * @version 1.0
 * @date 2019/12/3 22:10
 * @description
 */

/*
下面扫描包对应ssm spring-xml配置扫描包
* */
@Configuration
@ComponentScan(basePackages = "org.smile",useDefaultFilters = true,excludeFilters = {
        @ComponentScan.Filter(type = FilterType.ANNOTATION,classes = Controller.class)
})
public class SpringConfig {
}
SpringMVCConfig.java
相当于上一节的spring-mvc.xml文件
package org.smile.config;

import com.alibaba.fastjson.support.spring.FastJsonHttpMessageConverter;
import org.smile.MyInterceptor.MyInterceptor;
import org.springframework.context.annotation.Bean;
import org.springframework.context.annotation.ComponentScan;
import org.springframework.context.annotation.Configuration;
import org.springframework.context.annotation.FilterType;
import org.springframework.http.converter.HttpMessageConverter;
import org.springframework.stereotype.Controller;
import org.springframework.web.servlet.config.annotation.InterceptorRegistry;
import org.springframework.web.servlet.config.annotation.ResourceHandlerRegistry;
import org.springframework.web.servlet.config.annotation.WebMvcConfigurationSupport;

import java.util.List;

/**
 * @author Smile  博客 https://blog.csdn.net/Smile__1
 * @version 1.0
 * @date 2019/12/3 22:10
 * @description
 */

/*
* 对应 ssm  spring-mvc.xml配置文件扫描
*
*       只扫描Controller  Configuration
* */
@Configuration
@ComponentScan(basePackages = "org.smile",useDefaultFilters = false,includeFilters = {
        @ComponentScan.Filter(type = FilterType.ANNOTATION,classes = Controller.class),
        @ComponentScan.Filter(type = FilterType.ANNOTATION,classes = Configuration.class)
})
public class SpringMVCConfig extends WebMvcConfigurationSupport {

    /**
     * 其他配置都类似 下面三个示例
     */

    /*静态资源配置*/
    @Override
    protected void addResourceHandlers(ResourceHandlerRegistry registry) {
        registry.addResourceHandler("/static/**").addResourceLocations("classpath:/static/");
    }
    /*
    * 配置拦截器
    * */
    @Override
    protected void addInterceptors(InterceptorRegistry registry) {
        registry.addInterceptor(myInterceptor());
    }
    @Bean
     MyInterceptor myInterceptor(){
        return new MyInterceptor();
    }
    /**
     * 消息转换器  返回json数据
     */
    @Override
    protected void configureMessageConverters(List<HttpMessageConverter<?>> converters) {
        FastJsonHttpMessageConverter fastJsonHttpMessageConverter = new FastJsonHttpMessageConverter();
        converters.add(fastJsonHttpMessageConverter);
    }
}
webInit.java
相当于上一节的web.xml文件
package org.smile.config;

import org.springframework.context.annotation.Bean;
import org.springframework.context.annotation.Configuration;
import org.springframework.stereotype.Component;
import org.springframework.web.WebApplicationInitializer;
import org.springframework.web.context.support.AnnotationConfigWebApplicationContext;
import org.springframework.web.servlet.DispatcherServlet;

import javax.servlet.ServletContext;
import javax.servlet.ServletException;
import javax.servlet.ServletRegistration;

/**
 * @author  Smile  博客 https://blog.csdn.net/Smile__1
 * @version 1.0
 * @date 2019/12/3 22:20
 * @description
 */

public class WebInit implements WebApplicationInitializer {

    public void onStartup(ServletContext servletContext) throws ServletException {
        AnnotationConfigWebApplicationContext ctx =
                new AnnotationConfigWebApplicationContext();
        ctx.setServletContext(servletContext);
        ctx.register(SpringMVCConfig.class);
        ServletRegistration.Dynamic springmvc = servletContext.addServlet("springmvc", new DispatcherServlet(ctx));
        springmvc.addMapping("/");
        springmvc.setLoadOnStartup(1);
    }
}
最后配置一个拦截器示范…其他所有相关配置都类似
MyInterceptor .java
package org.smile.MyInterceptor;

import org.springframework.context.annotation.Configuration;
import org.springframework.web.servlet.HandlerInterceptor;
import org.springframework.web.servlet.ModelAndView;

import javax.servlet.http.HttpServletRequest;
import javax.servlet.http.HttpServletResponse;

/**
 * @authorSmile  博客 https://blog.csdn.net/Smile__1
 * @version 1.0
 * @date 2019/12/3 23:07
 * @description   拦截器
 */
@Configuration
public class MyInterceptor implements HandlerInterceptor {

    public boolean preHandle(HttpServletRequest request, HttpServletResponse response, Object handler) throws Exception {
        System.out.println("preHandle");
        return true;
    }

    public void postHandle(HttpServletRequest request, HttpServletResponse response, Object handler, ModelAndView modelAndView) throws Exception {
        System.out.println("postHandle");
    }

    public void afterCompletion(HttpServletRequest request, HttpServletResponse response, Object handler, Exception ex) throws Exception {
        System.out.println("afterCompletion");
    }
}
也可以在resource目录下创建静态资源

最后创建controller,service就可以测试了 这里参照上一节的行
测试成功!!!
