pytorch框架学习(7)——模型创建与nn.Module
文章目录
- 1. 网络模型创建步骤
- 2. nn.Module
- 3. 模型容器Containers
- 4. AlexNet网络构建
1. 网络模型创建步骤
机器学习模型训练主要分为以下5个步骤,今天主要学习其中的模型部分

2. nn.Module
nn.torch是pytorch中神经网络模块,其中包含如下比较重要的四个子模块:
-
nn.Parameter:张量子类,表示可学习参数,如weight, bias
-
nn.Module:所有网络层基类,管理网络属性
-
nn.functional:函数具体实现,如卷积,池化,激活函数等
-
nn.init:参数初始化方法。
-
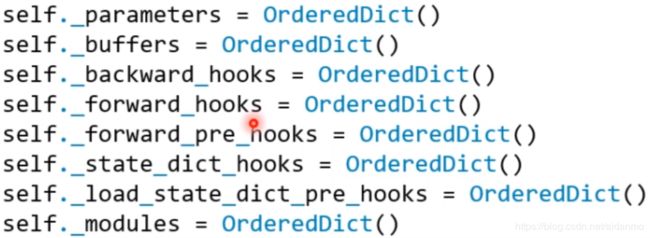
nn.Module中有8个重要的属性来管理网络层基类
-
一个module可以包含多个子module
-
一个module相当于一个运算,必须实现forward()函数
-
每个module都有8个字典管理它的属性
3. 模型容器Containers
-
Containers
- nn.Sequetial:按顺序包装多个网络层,顺序性,常用于block构建
- nn.ModuleList:像python的list一样包装多个网络层,迭代性,常用于大量重复网构建,通过for循环实现重复构建
- nn.ModuleDict:像python的dict一样包装多个网络层,索引性,常用于可选择的网络层
-
nn.Sequential是nn.module的容器,用于按顺序包装一组网络层
- 顺序性:各网络层之间严格按照顺序构建
- 自带forward():自带的forward里,通过for循环一次执行前向传播运算
-
nn.ModuleList是nn.module的容器,用于包装一组网络层,以迭代方式调用网络层。主要方法:
- append():在ModuleList后面添加网络层
- extend():拼接两个ModuleList
- insert():指定ModuleList中位置插入网络层
class ModuleList(nn.Module):
	def __init__(self):
		super(ModuleList, self).__init__()
		self.linears = nn.ModuleList([nn.Linear(10, 10) for i in range(20)])

	def forward(self, x):
		for i, linear in enumerate(self.linears):
			x = linears(x)
		return x

net = ModuleList()
- nn.ModuleDict是nn.module的容器,用于包装一组网络层,以索引方式调用网络层,主要方法:
- clear():清空ModuleDict
- items():返回可迭代的键值对(key-value pairs)
- keys():返回字典的键(key)
- values():返回字典的值(value)
- pop():返回一对键值,并从字典中删除
class ModuleDict(nn.Module):
	def __init__(self):
		super(ModuleDict, self).__init__()
		self.choices = nn.ModuleDict({
			'conv' : nn.Conv2d(10, 10, 3),
			'pool' : nn.MaxPool2d(3)
			})
		self.activations = nn.ModuleDict({
			'relu' : nn.ReLU(),
			'prelu' : nn.PReLU()
			})
	def forward(self, c, choice, act):
		x = self.choices[choice](x)
		x = self.activations[act](x)
		return x

net = ModuleDict()

fake_img = torch.randn((4, 10, 32, 32)) # 模拟数据

output = net(fake_img, 'conv', 'prelu')

print(output)
4. AlexNet网络构建
- AlexNet特点:
class AlexNet(nn.Module):

    def __init__(self, num_classes=1000):
        super(AlexNet, self).__init__()
        self.features = nn.Sequential(
            nn.Conv2d(3, 64, kernel_size=11, stride=4, padding=2),
            nn.ReLU(inplace=True),
            nn.MaxPool2d(kernel_size=3, stride=2),
            nn.Conv2d(64, 192, kernel_size=5, padding=2),
            nn.ReLU(inplace=True),
            nn.MaxPool2d(kernel_size=3, stride=2),
            nn.Conv2d(192, 384, kernel_size=3, padding=1),
            nn.ReLU(inplace=True),
            nn.Conv2d(384, 256, kernel_size=3, padding=1),
            nn.ReLU(inplace=True),
            nn.Conv2d(256, 256, kernel_size=3, padding=1),
            nn.ReLU(inplace=True),
            nn.MaxPool2d(kernel_size=3, stride=2),
        )
        self.avgpool = nn.AdaptiveAvgPool2d((6, 6))
        self.classifier = nn.Sequential(
            nn.Dropout(),
            nn.Linear(256 * 6 * 6, 4096),
            nn.ReLU(inplace=True),
            nn.Dropout(),
            nn.Linear(4096, 4096),
            nn.ReLU(inplace=True),
            nn.Linear(4096, num_classes),
        )

    def forward(self, x):
        x = self.features(x)
        x = self.avgpool(x)
        x = torch.flatten(x, 1)
        x = self.classifier(x)
        return x


