重定向,用户管理,密码管理,权限管理
1.利用自设的vim编辑器,将yaml的TAB设置为两个空格,此设置是针对ymal文件的使用习惯,为了方便写代码
自己设置一个vim编辑器(设置tab为2个空格)
/home/cxg ##在这个普通用户上
[cxg@severe1 ~]$ vim .vimrc ##自定编辑
autocmd FileType yaml setlocal ai ts=2 sw=2 et ##文档输入内容(对yaml类型的高级语言的TAB键设置为两个)
[cxg@severe1 ~]$ vim vimrc.yaml
此时TAB就已经变成两个空格了
PS:其中:autocmd FileType yaml setlocal ai ts=2 sw=2 et 中
autocmd ##自动响应
yaml ##针对调整的文件类型
setlocal ##本地
ts=2 sw=2 ##向前向后2个空格
et ##把TAB转化为空格
也可以直接写进vim编辑器,但是注意使用的用户,针对使用的是普通用户cxg,退出后会自动失效,针对全局的话,在超户上设置就可以。
[cxg@severe1 ~]$ vim
:set ts=2 ##在下方命令框内输入,再返回编辑模式就可以了
![]()
或者
![]()
任意找位置
##任意找输入位置就行
2输入输出重定向
##################重定向主要为了将文件内部的文件信息进行迁移和移动####################
补充:>>重定向不会覆盖原文件
&>c重定向所有的文件(不管正确与否)
<输入重定向
<<输入重定向不会覆盖原文件
![]() ##列出根目录下面所有文件的详细信息
##列出根目录下面所有文件的详细信息
![]() ##列出etc文件下面所有文件的详细信息
##列出etc文件下面所有文件的详细信息
[cxg@localhost ~]$ find /etc -name passwd ##寻找etc目录下名字叫做passwd的文件(下方为输出)
##因为文件有对有错因此,
[cxg@localhost ~]$ find /etc -name passwd 2> /dev/null ` ## 把错误的输出重定向,2> /dev/null 代表把错误的都移动到dev/null(相当于一个回收站)
/etc/pam.d/passwd
/etc/passwd
##剩下的都是正确的
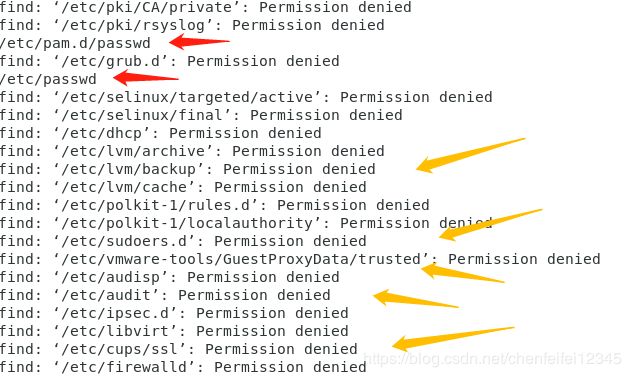
[cxg@localhost ~]$ find /etc -name passwd 1> /dev/null ## 把正确的输出重定向,1> /dev/null 代表把正确的的都移动到dev/null(相当于一个回收站)
find: ‘/etc/pki/CA/private’: Permission denied
find: ‘/etc/pki/rsyslog’: Permission denied
find: ‘/etc/grub.d’: Permission denied
find: ‘/etc/selinux/targeted/active’: Permission denied
find: ‘/etc/selinux/final’: Permission denied
find: ‘/etc/dhcp’: Permission denied
find: ‘/etc/lvm/archive’: Permission denied
find: ‘/etc/lvm/backup’: Permission denied
find: ‘/etc/lvm/cache’: Permission denied
find: ‘/etc/polkit-1/rules.d’: Permission denied
find: ‘/etc/polkit-1/localauthority’: Permission denied
find: ‘/etc/sudoers.d’: Permission denied
find: ‘/etc/vmware-tools/GuestProxyData/trusted’: Permission denied
find: ‘/etc/audisp’: Permission denied
find: ‘/etc/audit’: Permission denied
find: ‘/etc/ipsec.d’: Permission denied
find: ‘/etc/libvirt’: Permission denied
find: ‘/etc/cups/ssl’: Permission denied
find: ‘/etc/firewalld’: Permission
##剩下的都是错误的
[cxg@localhost ~]$ find /etc -name passwd 2> /dev/null 1> test ##正确的移动到test文件
[cxg@localhost ~]$ cat test
/etc/pam.d/passwd
/etc/passwd
[cxg@localhost ~]$ find /etc -name passwd 2> /dev/null 1>> test##1>>不会覆盖原文件
[cxg@localhost ~]$ find /etc -name passwd 2> /dev/null 1>> test
[cxg@localhost ~]$ cat test
/etc/pam.d/passwd
/etc/passwd
/etc/pam.d/passwd
/etc/passwd
/etc/pam.d/passwd
/etc/passwd
##后面输出结果是两个
[cxg@localhost ~]$ find /etc -name passwd &> test##&>错误正确都输出
[cxg@localhost ~]$ cat test
find: ‘/etc/pki/CA/private’: Permission denied
find: ‘/etc/pki/rsyslog’: Permission denied
/etc/pam.d/passwd
find: ‘/etc/grub.d’: Permission denied
/etc/passwd
find: ‘/etc/selinux/targeted/active’: Permission denied
find: ‘/etc/selinux/final’: Permission denied
find: ‘/etc/dhcp’: Permission denied
find: ‘/etc/lvm/archive’: Permission denied
find: ‘/etc/lvm/backup’: Permission denied
find: ‘/etc/lvm/cache’: Permission denied
find: ‘/etc/polkit-1/rules.d’: Permission denied
find: ‘/etc/polkit-1/localauthority’: Permission denied
find: ‘/etc/sudoers.d’: Permission denied
find: ‘/etc/vmware-tools/GuestProxyData/trusted’: Permission denied
find: ‘/etc/audisp’: Permission denied
find: ‘/etc/audit’: Permission denied
find: ‘/etc/ipsec.d’: Permission denied
find: ‘/etc/libvirt’: Permission denied
find: ‘/etc/cups/ssl’: Permission denied
find: ‘/etc/firewalld’: Permission denied
##结果正确和错误的都有
[cxg@localhost ~]$ cat >test <
> casdsad
 > sddsd
> sda
>
> sddsad
> EOF
[cxg@localhost ~]$ cat test
casdsad
sddsd
sda`

sddsad
##针对多行的输出
[cxg@localhost ~]$ echo westos > test ##针对单行输出
[cxg@localhost ~]$ cat test
westos
[cxg@localhost ~]$ tr 'a-z' 'A-Z' < test ##将test文件的转化为大写,tr用于转换文件中的字符
WESTOS
##针对单行输出
[cxg@localhost ~]$ find /etc -name passwd | cat > test## 将含有passwd文件通过管道转送到test文件
find: ‘/etc/pki/CA/private’: Permission denied
find: ‘/etc/pki/rsyslog’: Permission denied
find: ‘/etc/grub.d’: Permission denied
find: ‘/etc/selinux/targeted/active’: Permission denied
find: ‘/etc/selinux/final’: Permission denied
find: ‘/etc/dhcp’: Permission denied
find: ‘/etc/lvm/archive’: Permission denied
find: ‘/etc/lvm/backup’: Permission denied
find: ‘/etc/lvm/cache’: Permission denied
find: ‘/etc/polkit-1/rules.d’: Permission denied
find: ‘/etc/polkit-1/localauthority’: Permission denied
find: ‘/etc/sudoers.d’: Permission denied
find: ‘/etc/vmware-tools/GuestProxyData/trusted’: Permission denied
find: ‘/etc/audisp’: Permission denied
find: ‘/etc/audit’: Permission denied
find: ‘/etc/ipsec.d’: Permission denied
find: ‘/etc/libvirt’: Permission denied
find: ‘/etc/cups/ssl’: Permission denied
find: ‘/etc/firewalld’: Permission denied
[cxg@localhost ~]$ cat test
/etc/pam.d/passwd
/etc/passwd
##我们可以看出通过管道的传输可以自动过滤掉错误的,只保留正确的
[cxg@localhost ~]$ find /etc -name passwd 2>&1| cat > test## 2>&1错误的转化为正确的 输出
[cxg@localhost ~]$ cat test
find: ‘/etc/pki/CA/private’: Permission denied
find: ‘/etc/pki/rsyslog’: Permission denied
/etc/pam.d/passwd
find: ‘/etc/grub.d’: Permission denied
/etc/passwd
find: ‘/etc/selinux/targeted/active’: Permission denied
find: ‘/etc/selinux/final’: Permission denied
find: ‘/etc/dhcp’: Permission denied
find: ‘/etc/lvm/archive’: Permission denied
find: ‘/etc/lvm/backup’: Permission denied
find: ‘/etc/lvm/cache’: Permission denied
find: ‘/etc/polkit-1/rules.d’: Permission denied
find: ‘/etc/polkit-1/localauthority’: Permission denied
find: ‘/etc/sudoers.d’: Permission denied
find: ‘/etc/vmware-tools/GuestProxyData/trusted’: Permission denied
find: ‘/etc/audisp’: Permission denied
find: ‘/etc/audit’: Permission denied
find: ‘/etc/ipsec.d’: Permission denied
find: ‘/etc/libvirt’: Permission denied
find: ‘/etc/cups/ssl’: Permission denied
find: ‘/etc/firewalld’: Permission denied
##通过管道的输出全为错误的
[cxg@localhost ~]$ find /etc -name passwd 2> /dev/null | wc -l##错误的扔到回收站,其中wc -l代表通过管道输出为行数
2
##输出的结果行数为2
[cxg@localhost ~]$ ip addr
1: lo: <LOOPBACK,UP,LOWER_UP> mtu 65536 qdisc noqueue state UNKNOWN group default qlen 1000
    link/loopback 00:00:00:00:00:00 brd 00:00:00:00:00:00
    inet 127.0.0.1/8 scope host lo
       valid_lft forever preferred_lft forever
    inet6 ::1/128 scope host
       valid_lft forever preferred_lft forever
2: ens33: <BROADCAST,MULTICAST,UP,LOWER_UP> mtu 1500 qdisc pfifo_fast state UP group default qlen 1000
    link/ether 00:0c:29:2d:92:fa brd ff:ff:ff:ff:ff:ff
3: virbr0: <NO-CARRIER,BROADCAST,MULTICAST,UP> mtu 1500 qdisc noqueue state DOWN group default qlen 1000
    link/ether 52:54:00:bd:87:59 brd ff:ff:ff:ff:ff:ff
    inet 192.168.122.1/24 brd 192.168.122.255 scope global virbr0
       valid_lft forever preferred_lft forever
4: virbr0-nic: <BROADCAST,MULTICAST> mtu 1500 qdisc pfifo_fast master virbr0 state DOWN group default qlen 1000
    link/ether 52:54:00:bd:87:59 brd ff:ff:ff:ff:ff:ff
[cxg@localhost ~]$ ifconfig virbr0 | grep inet##过滤出inet这行关键字(grep是过滤的关键字的意思)
inet 192.168.122.1 netmask 255.255.255.0 broadcast 192.168.122.255
[cxg@localhost ~]$ ifconfig virbr0 | grep inet| awk '{print $2}'##在过滤inet这行的基础上再过滤第二个空格的内容
192.168.122.1
##因此IP地址就被我们过滤出来了
3.用户管理方面
/etc/psswd ##用户信息
/etc/group ##组
/etc/shadow ##密码管理
/etc/username ##用户主目录
/etc/skel ##用户主目录骨架
usermod ##针对已经存在的用户进行修改
[root@localhost ~]# useradd user1##创建user1
[root@localhost ~]# id user1##user1的信息
uid=1001(user1) gid=1001(user1) groups=1001(user1)
[root@localhost ~]# cat /etc/passwd##查看etc目录下的用户信息(我们主要是查看后面几行)
root:x:0:0:root:/root:/bin/bash
bin:x:1:1:bin:/bin:/sbin/nologin
daemon:x:2:2:daemon:/sbin:/sbin/nologin
adm:x:3:4:adm:/var/adm:/sbin/nologin
lp:x:4:7:lp:/var/spool/lpd:/sbin/nologin
sync:x:5:0:sync:/sbin:/bin/sync
shutdown:x:6:0:shutdown:/sbin:/sbin/shutdown
halt:x:7:0:halt:/sbin:/sbin/halt
mail:x:8:12:mail:/var/spool/mail:/sbin/nologin
operator:x:11:0:operator:/root:/sbin/nologin
games:x:12:100:games:/usr/games:/sbin/nologin
ftp:x:14:50:FTP User:/var/ftp:/sbin/nologin
nobody:x:99:99:Nobody:/:/sbin/nologin
systemd-network:x:192:192:systemd Network Management:/:/sbin/nologin
dbus:x:81:81:System message bus:/:/sbin/nologin
polkitd:x:999:998:User for polkitd:/:/sbin/nologin
libstoragemgmt:x:998:996:daemon account for libstoragemgmt:/var/run/lsm:/sbin/nologin
colord:x:997:995:User for colord:/var/lib/colord:/sbin/nologin
rpc:x:32:32:Rpcbind Daemon:/var/lib/rpcbind:/sbin/nologin
saslauth:x:996:76:Saslauthd user:/run/saslauthd:/sbin/nologin
abrt:x:173:173::/etc/abrt:/sbin/nologin
rtkit:x:172:172:RealtimeKit:/proc:/sbin/nologin
cxg:x:1000:1000:cxg:/home/cxg:/bin/bash
user1:x:1001:1001::/home/user1:/bin/bash
[root@localhost ~]# tail -2 /etc/passwd##查看passwd文件的最后两行(查看最后一行2改为1,tail命令就是查看最后几行)
cxg:x:1000:1000:cxg:/home/cxg:/bin/bash
user1:x:1001:1001::/home/user1:/bin/bash
[root@localhost ~]# head -2 /etc/passwd##查看passwd文件的前两行(查看第一行2改为1,head命令就是查看前几行)
root:x:0:0:root:/root:/bin/bash
bin:x:1:1:bin:/bin:/sbin/nologin
[root@localhost ~]# tail -1 /etc/group
user1:x:1001:
[root@localhost ~]# tail -4 /etc/shadow
cxg:$6$L9IoPznJgPy4EKsu$kmmLaY6dZPlSwrAMPdP34LqLZcyVCymY5sxB32ybkghUfd0KKwPYSe8HSxeNYpvGOigw969Kw7q6A6LSrLHux1::0:99999:7:::
user1:!!:18370:0:99999:7:::
##这两个感叹号!!代表他的密码被锁定,不能直接查看和登录
##默认情况下每创建一个用户同时也把他创建在一个组里面,同时也自动存在一个密码文件里面
##同样的我们也可以使用vim编辑器把passwd,group,shadow的信息都编辑进去,也可以生成一个user1,但是远不如,useradd user1简单方便。
[root@localhost ~]# groupadd group1##创建一个名为group1的组
[root@localhost ~]# tail -1 /etc/group
group1:x:1005:
[root@localhost ~]# tail -1 /etc/passwd##passwd里面不存在group1这个组
[root@localhost ~]# tail -1 /etc/shadow##shadow里面也不存在group1这个组
[root@localhost ~]# useradd -g group1 user2##创建一个user2在组group1里面
[root@localhost ~]# tail -1 /etc/group
uid=1004(user5) gid=1005(group1) groups=1005(group1)
##可以明显看到1005是group1的编号,1004是user5的编号
[root@localhost ~]# tail -1 /etc/passwd
user5:x:1004:1005::/home/user5:/bin/bash
##这个1004是用户编号user5,1005是代表他所属的组的编号group1(1005),/home/user5,代表用户位置。
----------------------------------------------------------usermod命令的使用---------------------------------------
[root@localhost ~]# id user1
uid=1001(user1) gid=1001(user1) groups=1001(user1)
##此时我们可以看到user1从属于user1这个组里面
[root@localhost ~]# usermod -G group1 user1##把user1用户附加到group1这个组里面(其中usermod针对已经存在的用户进行修改,-G代表附加进去的意思)
[root@localhost ~]# id user1
uid=1001(user1) gid=1001(user1) groups=1001(user1),1005(group1)
##此时我们可以看出user1不但从属于user1这个组,还从属于group1这个组
总结:这个我们一般用来usermod主要应用于我们对用户权限的管理,一般情况下用户的权限是通过组来赋予的,我们给了组的足够的权限,然后添加同样权限的用户,我们只需要进行迁移就可以
[root@localhost ~]# usermod -s /sbin/nologin user1##将user1移动到sbin/nologin目录下
[root@localhost ~]# tail -5 /etc/passwd
cxg:x:1000:1000:cxg:/home/cxg:/bin/bash
user1:x:1001:1001::/home/user1:/sbin/nologin
user:x:1002:1002::/home/user:/bin/bash
user2:x:1003:1004::/home/user2:/bin/bash
user5:x:1004:1005::/home/user5:/bin/bash
##此时我们可以看到user1已经不在我们的bash内核里面,所以后面用户切换的时候就不能进行切换,用户的交互必须在内核里面
[root@localhost ~]# su - user1
Last login: Sat Apr 18 19:09:15 CST 2020 on pts/0
This account is currently not available.
[root@localhost ~]# userdel -r user1
[root@localhost ~]# userdel -r user2
[root@localhost ~]# userdel -r user3##删除掉user1,2,3
也可以直接删除
[root@localhost ~]# userdel user1
[root@localhost ~]# userdel user2
[root@localhost ~]# userdel user3##和前面的区别就是-r这个删除的是用户还有用户的主目录,而后者只删除用户,其的主目录还依然存在
也可以使用下面的和上方的userdel -r user1是一个功能
[root@localhost ~]# rm -fr user1##完成对用户1的彻底删除
[[root@localhost home]# cat /etc/group##查看组信息
[[root@localhost home]# groupdel group1##完成对组的删除,(一般情况下,删除主目录的时候也自动删除组,但是向我们附加的这种groupadd这种组,需要自己删除)
[root@localhost home]# cat /etc/passwd ##
root:x:0:0:root:/root:/bin/bash
bin:x:1:1:bin:/bin:/sbin/nologin
daemon:x:2:2:daemon:/sbin:/sbin/nologin
adm:x:3:4:adm:/var/adm:/sbin/nologin
lp:x:4:7:lp:/var/spool/lpd:/sbin/nologin
sync:x:5:0:sync:/sbin:/bin/sync
shutdown:x:6:0:shutdown:/sbin:/sbin/shutdown
halt:x:7:0:halt:/sbin:/sbin/halt
mail:x:8:12:mail:/var/spool/mail:/sbin/nologin
operator:x:11:0:operator:/root:/sbin/nologin
games:x:12:100:games:/usr/games:/sbin/nologin
ftp:x:14:50:FTP User:/var/ftp:/sbin/nologin
nobody:x:99:99:Nobody:/:/sbin/nologin
systemd-network:x:192:192:systemd Network Management:/:/sbin/nologin
dbus:x:81:81:System message bus:/:/sbin/nologin
polkitd:x:999:998:User for polkitd:/:/sbin/nologin
libstoragemgmt:x:998:996:daemon account for libstoragemgmt:/var/run/lsm:/sbin/nologin
colord:x:997:995:User for colord:/var/lib/colord:/sbin/nologin
rpc:x:32:32:Rpcbind Daemon:/var/lib/rpcbind:/sbin/nologin
saslauth:x:996:76:Saslauthd user:/run/saslauthd:/sbin/nologin
abrt:x:173:173::/etc/abrt:/sbin/nologin
rtkit:x:172:172:RealtimeKit:/proc:/sbin/nologin
pulse:x:171:171:PulseAudio System Daemon:/var/run/pulse:/sbin/nologin
chrony:x:995:990::/var/lib/chrony:/sbin/nologin
radvd:x:75:75:radvd user:/:/sbin/nologin
rpcuser:x:29:29:RPC Service User:/var/lib/nfs:/sbin/nologin
nfsnobody:x:65534:65534:Anonymous NFS User:/var/lib/nfs:/sbin/nologin
unbound:x:994:989:Unbound DNS resolver:/etc/unbound:/sbin/nologin
gluster:x:993:988:GlusterFS daemons:/run/gluster:/sbin/nologin
qemu:x:107:107:qemu user:/:/sbin/nologin
tss:x:59:59:Account used by the trousers package to sandbox the tcsd daemon:/dev/null:/sbin/nologin
usbmuxd:x:113:113:usbmuxd user:/:/sbin/nologin
geoclue:x:992:986:User for geoclue:/var/lib/geoclue:/sbin/nologin
setroubleshoot:x:991:985::/var/lib/setroubleshoot:/sbin/nologin
saned:x:990:984:SANE scanner daemon user:/usr/share/sane:/sbin/nologin
gdm:x:42:42::/var/lib/gdm:/sbin/nologin
gnome-initial-setup:x:989:983::/run/gnome-initial-setup/:/sbin/nologin
sshd:x:74:74:Privilege-separated SSH:/var/empty/sshd:/sbin/nologin
avahi:x:70:70:Avahi mDNS/DNS-SD Stack:/var/run/avahi-daemon:/sbin/nologin
postfix:x:89:89::/var/spool/postfix:/sbin/nologin
ntp:x:38:38::/etc/ntp:/sbin/nologin
tcpdump:x:72:72::/:/sbin/nologin
cxg:x:1000:1000:cxg:/home/cxg:/bin/bash
##在passwd里面存在很多用户,但是只有bin/bash结尾的才能运行,其他的用户相当于把他隔离起来,每个用户都有一个独立的内存,如何有黑客进来,也可以保证系统的安全性
[root@localhost home]# ps aux##相当于任务管理器一样
USER PID %CPU %MEM VSZ RSS TTY STAT START TIME COMMAND
root 1 0.0 0.3 195064 6912 ? Ss 17:23 0:04 /usr/lib/systemd/systemd --switched-root --system --deserialize 22
root 2 0.0 0.0 0 0 ? S 17:23 0:00 [kthreadd]
root 3 0.0 0.0 0 0 ? S 17:23 0:00 [ksoftirqd/0]
root 5 0.0 0.0 0 0 ? S< 17:23 0:00 [kworker/0:0H]
root 7 0.0 0.0 0 0 ? S 17:23 0:00 [migration/0]
root 8 0.0 0.0 0 0 ? S 17:23 0:00 [rcu_bh]
root 9 0.0 0.0 0 0 ? S 17:23 0:02 [rcu_sched]
root 10 0.0 0.0 0 0 ? S< 17:23 0:00 [lru-add-drain]
root 11 0.0 0.0 0 0 ? S 17:23 0:00 [watchdog/0]
root 12 0.0 0.0 0 0 ? S 17:23 0:00 [watchdog/1]
root 13 0.0 0.0 0 0 ? S 17:23 0:00 [migration/1]
root 14 0.0 0.0 0 0 ? S 17:23 0:00 [ksoftirqd/1]
root 16 0.0 0.0 0 0 ? S< 17:23 0:00 [kworker/1:0H]
root 18 0.0 0.0 0 0 ? S 17:23 0:00 [kdevtmpfs]
root 19 0.0 0.0 0 0 ? S< 17:23 0:00 [netns]
root 20 0.0 0.0 0 0 ? S 17:23 0:00 [khungtaskd]
root 21 0.0 0.0 0 0 ? S< 17:23 0:00 [writeback]
root 22 0.0 0.0 0 0 ? S< 17:23 0:00 [kintegrityd]
root 23 0.0 0.0 0 0 ? S< 17:23 0:00 [bioset]
root 24 0.0 0.0 0 0 ? S< 17:23 0:00 [bioset]
root 25 0.0 0.0 0 0 ? S< 17:23 0:00 [bioset]
root 26 0.0 0.0 0 0 ? S< 17:23 0:00 [kblockd]
root 27 0.0 0.0 0 0 ? S< 17:23 0:00 [md]
root 28 0.0 0.0 0 0 ? S< 17:23 0:00 [edac-poller]
root 29 0.0 0.0 0 0 ? S< 17:23 0:00 [watchdogd]
root 35 0.0 0.0 0 0 ? S 17:23 0:00 [kswapd0]
root 36 0.0 0.0 0 0 ? SN 17:23 0:00 [ksmd]
root 37 0.0 0.0 0 0 ? SN 17:23 0:00 [khugepaged]
root 38 0.0 0.0 0 0 ? S< 17:23 0:00 [crypto]
root 46 0.0 0.0 0 0 ? S< 17:23 0:00 [kthrotld]
root 49 0.0 0.0 0 0 ? S< 17:23 0:00 [kmpath_rdacd]
root 50 0.0 0.0 0 0 ? S< 17:23 0:00 [kaluad]
root 51 0.0 0.0 0 0 ? S< 17:23 0:00 [kpsmoused]
root 53 0.0 0.0 0 0 ? S< 17:23 0:00 [ipv6_addrconf]
root 66 0.0 0.0 0 0 ? S< 17:23 0:00 [deferwq]
root 97 0.0 0.0 0 0 ? S 17:23 0:00 [kauditd]
root 723 0.0 0.0 0 0 ? S< 17:23 0:00 [ata_sff]
root 734 0.0 0.0 0 0 ? S 17:23 0:00 [scsi_eh_0]
root 740 0.0 0.0 0 0 ? S< 17:23 0:00 [scsi_tmf_0]
root 745 0.0 0.0 0 0 ? S 17:23 0:00 [scsi_eh_1]
root 747 0.0 0.0 0 0 ? S< 17:23 0:00 [scsi_tmf_1]
root 892 0.0 0.0 0 0 ? S< 17:23 0:00 [ttm_swap]
root 894 0.0 0.0 0 0 ? S 17:23 0:00 [irq/16-vmwgfx]
root 1767 0.0 0.0 0 0 ? S< 17:23 0:00 [nfit]
root 1771 0.0 0.0 0 0 ? S< 17:23 0:00 [mpt_poll_0]
root 1779 0.0 0.0 0 0 ? S< 17:23 0:00 [mpt/0]
root 1824 0.0 0.0 0 0 ? S 17:23 0:00 [scsi_eh_2]
root 1829 0.0 0.0 0 0 ? S< 17:23 0:00 [scsi_tmf_2]
root 1836 0.0 0.0 0 0 ? S 17:23 0:00 [scsi_eh_3]
root 1837 0.0 0.0 0 0 ? S< 17:23 0:00 [scsi_tmf_3]
root 1840 0.0 0.0 0 0 ? S 17:23 0:00 [scsi_eh_4]
root 1844 0.0 0.0 0 0 ? S 17:23 0:00 [scsi_eh_5]
root 1846 0.0 0.0 0 0 ? S< 17:23 0:00 [scsi_tmf_4]
root 1853 0.0 0.0 0 0 ? S< 17:23 0:00 [scsi_tmf_5]
root 1856 0.0 0.0 0 0 ? S 17:23 0:00 [scsi_eh_6]
root 1863 0.0 0.0 0 0 ? S< 17:23 0:00 [scsi_tmf_6]
root 1864 0.0 0.0 0 0 ? S 17:23 0:00 [scsi_eh_7]
root 1871 0.0 0.0 0 0 ? S< 17:23 0:00 [scsi_tmf_7]
root 1878 0.0 0.0 0 0 ? S 17:23 0:00 [scsi_eh_8]
root 1883 0.0 0.0 0 0 ? S< 17:23 0:00 [scsi_tmf_8]
root 1886 0.0 0.0 0 0 ? S 17:23 0:00 [scsi_eh_9]
root 1894 0.0 0.0 0 0 ? S< 17:23 0:00 [scsi_tmf_9]
root 1896 0.0 0.0 0 0 ? S 17:23 0:00 [scsi_eh_10]
root 1898 0.0 0.0 0 0 ? S< 17:23 0:00 [scsi_tmf_10]
root 1902 0.0 0.0 0 0 ? S 17:23 0:00 [scsi_eh_11]
root 1917 0.0 0.0 0 0 ? S< 17:23 0:00 [scsi_tmf_11]
root 1921 0.0 0.0 0 0 ? S 17:23 0:00 [scsi_eh_12]
root 1927 0.0 0.0 0 0 ? S< 17:23 0:00 [scsi_tmf_12]
root 1931 0.0 0.0 0 0 ? S 17:23 0:00 [scsi_eh_13]
root 1940 0.0 0.0 0 0 ? S< 17:23 0:00 [scsi_tmf_13]
root 1944 0.0 0.0 0 0 ? S 17:23 0:00 [scsi_eh_14]
root 1952 0.0 0.0 0 0 ? S< 17:23 0:00 [scsi_tmf_14]
root 1957 0.0 0.0 0 0 ? S 17:23 0:00 [scsi_eh_15]
root 1964 0.0 0.0 0 0 ? S< 17:23 0:00 [scsi_tmf_15]
root 1966 0.0 0.0 0 0 ? S 17:23 0:00 [scsi_eh_16]
root 1969 0.0 0.0 0 0 ? S< 17:23 0:00 [scsi_tmf_16]
root 1977 0.0 0.0 0 0 ? S 17:23 0:00 [scsi_eh_17]
root 1986 0.0 0.0 0 0 ? S< 17:23 0:00 [scsi_tmf_17]
root 1989 0.0 0.0 0 0 ? S 17:23 0:00 [scsi_eh_18]
root 1995 0.0 0.0 0 0 ? S< 17:23 0:00 [scsi_tmf_18]
root 1998 0.0 0.0 0 0 ? S 17:23 0:00 [scsi_eh_19]
root 2007 0.0 0.0 0 0 ? S< 17:23 0:00 [scsi_tmf_19]
root 2013 0.0 0.0 0 0 ? S 17:23 0:00 [scsi_eh_20]
root 2019 0.0 0.0 0 0 ? S< 17:23 0:00 [scsi_tmf_20]
root 2020 0.0 0.0 0 0 ? S 17:23 0:00 [scsi_eh_21]
root 2032 0.0 0.0 0 0 ? S< 17:23 0:00 [scsi_tmf_21]
root 2036 0.0 0.0 0 0 ? S 17:23 0:00 [scsi_eh_22]
root 2043 0.0 0.0 0 0 ? S< 17:23 0:00 [scsi_tmf_22]
root 2049 0.0 0.0 0 0 ? S 17:23 0:00 [scsi_eh_23]
root 2058 0.0 0.0 0 0 ? S< 17:23 0:00 [scsi_tmf_23]
root 2061 0.0 0.0 0 0 ? S 17:23 0:00 [scsi_eh_24]
root 2066 0.0 0.0 0 0 ? S< 17:23 0:00 [scsi_tmf_24]
root 2074 0.0 0.0 0 0 ? S 17:23 0:00 [scsi_eh_25]
root 2079 0.0 0.0 0 0 ? S< 17:23 0:00 [scsi_tmf_25]
root 2082 0.0 0.0 0 0 ? S 17:23 0:00 [scsi_eh_26]
root 2096 0.0 0.0 0 0 ? S< 17:23 0:00 [scsi_tmf_26]
root 2100 0.0 0.0 0 0 ? S 17:23 0:00 [scsi_eh_27]
root 2106 0.0 0.0 0 0 ? S< 17:23 0:00 [scsi_tmf_27]
root 2112 0.0 0.0 0 0 ? S 17:23 0:00 [scsi_eh_28]
root 2120 0.0 0.0 0 0 ? S< 17:23 0:00 [scsi_tmf_28]
root 2124 0.0 0.0 0 0 ? S 17:23 0:00 [scsi_eh_29]
root 2130 0.0 0.0 0 0 ? S< 17:23 0:00 [scsi_tmf_29]
root 2132 0.0 0.0 0 0 ? S 17:23 0:00 [scsi_eh_30]
root 2142 0.0 0.0 0 0 ? S< 17:23 0:00 [scsi_tmf_30]
root 2145 0.0 0.0 0 0 ? S 17:23 0:00 [scsi_eh_31]
root 2152 0.0 0.0 0 0 ? S< 17:23 0:00 [scsi_tmf_31]
root 2156 0.0 0.0 0 0 ? S 17:23 0:00 [scsi_eh_32]
root 2158 0.0 0.0 0 0 ? S< 17:23 0:00 [scsi_tmf_32]
root 2286 0.0 0.0 0 0 ? S 17:23 0:00 [kworker/u256:28]
root 3403 0.0 0.0 0 0 ? S< 17:23 0:00 [kdmflush]
root 3406 0.0 0.0 0 0 ? S< 17:23 0:00 [bioset]
root 3418 0.0 0.0 0 0 ? S< 17:23 0:00 [kdmflush]
root 3421 0.0 0.0 0 0 ? S< 17:23 0:00 [bioset]
root 3440 0.0 0.0 0 0 ? S< 17:23 0:00 [bioset]
root 3447 0.0 0.0 0 0 ? S< 17:23 0:00 [xfsalloc]
root 3451 0.0 0.0 0 0 ? S< 17:23 0:00 [xfs_mru_cache]
root 3453 0.0 0.0 0 0 ? S< 17:23 0:00 [xfs-buf/dm-0]
root 3456 0.0 0.0 0 0 ? S< 17:23 0:00 [xfs-data/dm-0]
root 3457 0.0 0.0 0 0 ? S< 17:23 0:00 [xfs-conv/dm-0]
root 3458 0.0 0.0 0 0 ? S< 17:23 0:00 [xfs-cil/dm-0]
root 3459 0.0 0.0 0 0 ? S< 17:23 0:00 [xfs-reclaim/dm-]
root 3460 0.0 0.0 0 0 ? S< 17:23 0:00 [xfs-log/dm-0]
root 3461 0.0 0.0 0 0 ? S< 17:23 0:00 [xfs-eofblocks/d]
root 3462 0.0 0.0 0 0 ? S 17:23 0:01 [xfsaild/dm-0]
root 3465 0.0 0.0 0 0 ? S< 17:23 0:00 [kworker/0:1H]
root 3521 0.0 0.0 0 0 ? S< 17:23 0:00 [kworker/1:1H]
root 3539 0.0 0.1 39800 4056 ? Ss 17:23 0:00 /usr/lib/systemd/systemd-journald
root 3565 0.0 0.1 193628 3620 ? Ss 17:23 0:00 /usr/sbin/lvmetad -f
root 3576 0.0 0.1 46728 2800 ? Ss 17:23 0:01 /usr/lib/systemd/systemd-udevd
root 5669 0.0 0.0 0 0 ? S< 17:23 0:00 [xfs-buf/sda1]
root 5672 0.0 0.0 0 0 ? S< 17:23 0:00 [xfs-data/sda1]
root 5677 0.0 0.0 0 0 ? S< 17:23 0:00 [xfs-conv/sda1]
root 5686 0.0 0.0 0 0 ? S< 17:23 0:00 [xfs-cil/sda1]
root 5691 0.0 0.0 0 0 ? S< 17:23 0:00 [xfs-reclaim/sda]
root 5697 0.0 0.0 0 0 ? S< 17:23 0:00 [xfs-log/sda1]
root 5703 0.0 0.0 0 0 ? S< 17:23 0:00 [xfs-eofblocks/s]
root 5711 0.0 0.0 0 0 ? S 17:23 0:00 [xfsaild/sda1]
root 6978 0.0 0.0 0 0 ? S< 17:23 0:00 [rpciod]
root 6979 0.0 0.0 0 0 ? S< 17:23 0:00 [xprtiod]
root 6985 0.0 0.0 62044 1084 ? S<sl 17:23 0:00 /sbin/auditd
root 6987 0.0 0.0 84552 904 ? S<sl 17:23 0:00 /sbin/audispd
root 6989 0.0 0.0 55628 1404 ? S< 17:23 0:00 /usr/sbin/sedispatch
rtkit 7010 0.0 0.0 198792 1800 ? SNsl 17:23 0:00 /usr/libexec/rtkit-daemon
root 7011 0.0 0.0 16892 1404 ? SNs 17:23 0:00 /usr/sbin/alsactl -s -n 19 -c -E ALSA_CONFIG_PATH=/etc/alsa/alsactl.conf --initfile=/lib/alsa/init/00main rdaemon
root 7012 0.0 0.2 228060 5628 ? Ss 17:23 0:00 /usr/sbin/abrtd -d -s
root 7014 0.0 0.1 90392 3204 ? Ss 17:23 0:02 /sbin/rngd -f
dbus 7016 0.0 0.2 70136 4248 ? Ssl 17:23 0:01 /usr/bin/dbus-daemon --system --address=systemd: --nofork --nopidfile --systemd-activation
rpc 7018 0.0 0.0 73648 1372 ? Ss 17:23 0:00 /sbin/rpcbind -w
root 7019 0.0 0.0 207828 1480 ? Ssl 17:23 0:00 /usr/sbin/gssproxy -D
root 7035 0.0 0.3 99568 6116 ? Ss 17:23 0:00 /usr/bin/VGAuthService -s
root 7036 0.0 0.1 24492 2280 ? Ss 17:23 0:00 /usr/sbin/smartd -n -q never
polkitd 7037 0.0 0.6 616572 13040 ? Ssl 17:23 0:02 /usr/lib/polkit-1/polkitd --no-debug
root 7038 0.0 0.0 26424 1844 ? Ss 17:23 0:00 /usr/lib/systemd/systemd-logind
libstor+ 7040 0.0 0.0 8576 824 ? Ss 17:23 0:00 /usr/bin/lsmd -d
root 7041 0.0 0.2 225728 4820 ? Ss 17:23 0:00 /usr/bin/abrt-watch-log -F BUG: WARNING: at WARNING: CPU: INFO: possible recursive locking detected ernel BUG at list_del c
root 7042 0.0 0.2 396360 4116 ? Ssl 17:23 0:00 /usr/libexec/accounts-daemon
root 7043 0.0 0.3 320028 6740 ? Ssl 17:23 0:03 /usr/bin/vmtoolsd
root 7056 0.0 0.0 21676 1300 ? Ss 17:23 0:01 /usr/sbin/irqbalance --foreground
root 7057 0.0 0.3 453540 6708 ? Ssl 17:23 0:00 /usr/libexec/udisks2/udisksd
root 7059 0.0 0.3 430576 7536 ? Ssl 17:23 0:00 /usr/sbin/ModemManager
root 7060 0.0 0.2 225728 4824 ? Ss 17:23 0:00 /usr/bin/abrt-watch-log -F Backtrace /var/log/Xorg.0.log -- /usr/bin/abrt-dump-xorg -xD
avahi 7061 0.0 0.1 62144 2076 ? Ss 17:23 0:00 avahi-daemon: running [linux.local]
root 7101 0.0 0.0 6608 296 ? Ss 17:23 0:00 /usr/sbin/mcelog --ignorenodev --daemon --syslog
root 7108 0.0 0.0 115304 964 ? S 17:23 0:00 /bin/bash /usr/sbin/ksmtuned
avahi 7115 0.0 0.0 62144 396 ? S 17:23 0:00 avahi-daemon: chroot helper
root 7158 0.0 1.4 358192 29124 ? Ssl 17:23 0:01 /usr/bin/python -Es /usr/sbin/firewalld --nofork --nopid
root 7177 0.0 0.4 478132 8832 ? Ssl 17:23 0:00 /usr/sbin/NetworkManager --no-daemon
root 7527 0.0 0.2 199956 4444 ? Ss 17:23 0:00 /usr/sbin/cupsd -f
root 7533 0.0 0.2 112756 4312 ? Ss 17:23 0:00 /usr/sbin/sshd -D
root 7534 0.0 0.8 573824 17248 ? Ssl 17:23 0:00 /usr/bin/python2 -Es /usr/sbin/tuned -l -P
root 7537 0.0 0.3 281944 6392 ? Ssl 17:23 0:00 /usr/sbin/rsyslogd -n
root 7542 0.0 0.8 1005944 17340 ? Ssl 17:23 0:00 /usr/sbin/libvirtd
root 7544 0.0 0.0 115708 728 ? Ss 17:23 0:00 /usr/bin/rhsmcertd
root 7548 0.0 0.2 481312 4648 ? Ssl 17:23 0:00 /usr/sbin/gdm
root 7553 0.0 0.0 126284 1696 ? Ss 17:23 0:00 /usr/sbin/crond -n
root 7556 0.0 0.0 107940 300 ? Ss 17:23 0:00 rhnsd
root 7557 0.0 0.0 25904 948 ? Ss 17:23 0:00 /usr/sbin/atd -f
root 7744 0.0 0.1 91624 2120 ? Ss 17:23 0:00 /usr/libexec/postfix/master -w
postfix 7746 0.0 0.2 91728 4080 ? S 17:23 0:00 pickup -l -t unix -u
postfix 7747 0.0 0.2 91796 4100 ? S 17:23 0:00 qmgr -l -t unix -u
root 7921 0.2 1.7 353500 34984 tty1 Ssl+ 17:23 0:10 /usr/bin/X :0 -background none -noreset -audit 4 -verbose -auth /run/gdm/auth-for-gdm-hXxDQz/database -seat seat0 vt1
nobody 8011 0.0 0.0 53884 1112 ? S 17:23 0:00 /usr/sbin/dnsmasq --conf-file=/var/lib/libvirt/dnsmasq/default.conf --leasefile-ro --dhcp-script=/usr/libexec/libvirt_lease
root 8012 0.0 0.0 53856 376 ? S 17:23 0:00 /usr/sbin/dnsmasq --conf-file=/var/lib/libvirt/dnsmasq/default.conf --leasefile-ro --dhcp-script=/usr/libexec/libvirt_lease
root 8130 0.0 0.3 430252 7244 ? Ssl 17:23 0:00 /usr/libexec/upowerd
root 8195 0.0 0.1 398376 3972 ? Ssl 17:24 0:00 /usr/libexec/boltd
root 8200 0.0 0.4 486776 8204 ? Ssl 17:24 0:00 /usr/libexec/packagekitd
root 8210 0.0 0.1 78560 3352 ? Ss 17:24 0:00 /usr/sbin/wpa_supplicant -u -f /var/log/wpa_supplicant.log -c /etc/wpa_supplicant/wpa_supplicant.conf -P /var/run/wpa_suppl
colord 8285 0.0 0.3 419380 6232 ? Ssl 17:24 0:00 /usr/libexec/colord
root 8440 0.0 0.2 535476 5796 ? Sl 17:30 0:00 gdm-session-worker [pam/gdm-password]
cxg 8456 0.0 0.1 317316 3868 ? Sl 17:30 0:00 /usr/bin/gnome-keyring-daemon --daemonize --login
cxg 8462 0.0 0.5 818740 11456 ? Ssl 17:30 0:00 /usr/libexec/gnome-session-binary --session gnome-classic
cxg 8471 0.0 0.0 58892 964 ? S 17:30 0:00 dbus-launch --sh-syntax --exit-with-session
cxg 8472 0.0 0.1 69340 2656 ? Ssl 17:30 0:00 /usr/bin/dbus-daemon --fork --print-pid 5 --print-address 7 --session
cxg 8550 0.0 0.2 388616 6000 ? Sl 17:30 0:00 /usr/libexec/gvfsd
cxg 8558 0.0 0.3 417808 7496 ? Sl 17:30 0:00 /usr/libexec/gvfsd-fuse /run/user/1000/gvfs -f -o big_writes
cxg 8660 0.0 0.0 72308 776 ? Ss 17:30 0:00 /usr/bin/ssh-agent /bin/sh -c exec -l /bin/bash -c "env GNOME_SHELL_SESSION_MODE=classic gnome-session --session gnome-clas
cxg 8678 0.0 0.1 346752 3700 ? Sl 17:30 0:00 /usr/libexec/at-spi-bus-launcher
cxg 8683 0.0 0.1 68400 2484 ? Sl 17:30 0:00 /usr/bin/dbus-daemon --config-file=/usr/share/defaults/at-spi2/accessibility.conf --nofork --print-address 3
cxg 8686 0.0 0.1 233096 3944 ? Sl 17:30 0:00 /usr/libexec/at-spi2-registryd --use-gnome-session
cxg 8715 0.5 7.0 3471484 143428 ? Sl 17:30 0:22 /usr/bin/gnome-shell
cxg 8725 0.0 0.3 1285300 7240 ? S<l 17:30 0:00 /usr/bin/pulseaudio --start --log-target=syslog
cxg 8741 0.0 0.3 453012 7440 ? Sl 17:30 0:00 ibus-daemon --xim --panel disable
cxg 8745 0.0 0.1 375848 3576 ? Sl 17:30 0:00 /usr/libexec/ibus-dconf
cxg 8749 0.0 0.6 464696 13584 ? Sl 17:30 0:00 /usr/libexec/ibus-x11 --kill-daemon
cxg 8752 0.0 0.1 375848 3316 ? Sl 17:30 0:00 /usr/libexec/ibus-portal
cxg 8761 0.0 0.1 364592 2644 ? Sl 17:30 0:00 /usr/libexec/xdg-permission-store
cxg 8766 0.0 0.5 649684 11588 ? Sl 17:30 0:00 /usr/libexec/gnome-shell-calendar-server
geoclue 8771 0.0 0.3 433424 6204 ? Ssl 17:30 0:00 /usr/libexec/geoclue -t 5
cxg 8783 0.0 0.7 985204 16016 ? Sl 17:30 0:00 /usr/libexec/evolution-source-registry
cxg 8785 0.0 0.5 485256 11720 ? Sl 17:30 0:00 /usr/libexec/mission-control-5
cxg 8790 0.0 0.3 563256 7352 ? Sl 17:30 0:00 /usr/libexec/gvfs-udisks2-volume-monitor
cxg 8795 0.0 0.1 391480 3372 ? Sl 17:30 0:00 /usr/libexec/gvfs-mtp-volume-monitor
cxg 8800 0.0 1.2 101566680 25712 ? Sl 17:30 0:00 /usr/libexec/goa-daemon
cxg 8806 0.0 0.1 371444 3128 ? Sl 17:30 0:00 /usr/libexec/gvfs-goa-volume-monitor
cxg 8854 0.0 0.5 531980 10544 ? Sl 17:30 0:00 /usr/libexec/goa-identity-service
cxg 8862 0.0 0.2 478400 4404 ? Sl 17:30 0:00 /usr/libexec/gvfs-afc-volume-monitor
cxg 8868 0.0 0.1 400568 3620 ? Sl 17:30 0:00 /usr/libexec/gvfs-gphoto2-volume-monitor
cxg 8876 0.0 0.8 631552 16812 ? Sl 17:30 0:00 /usr/libexec/gsd-power
cxg 8879 0.0 0.2 438964 5528 ? Sl 17:30 0:00 /usr/libexec/gsd-print-notifications
cxg 8881 0.0 0.2 521548 4976 ? Sl 17:30 0:00 /usr/libexec/gsd-rfkill
cxg 8884 0.0 0.1 374072 2964 ? Sl 17:30 0:00 /usr/libexec/gsd-screensaver-proxy
cxg 8887 0.0 0.3 558720 6956 ? Sl 17:30 0:00 /usr/libexec/gsd-sharing
cxg 8895 0.0 0.2 454840 4736 ? Sl 17:30 0:00 /usr/libexec/gsd-sound
cxg 8898 0.0 0.7 614996 14752 ? Sl 17:30 0:00 /usr/libexec/gsd-xsettings
cxg 8901 0.0 0.7 549132 16132 ? Sl 17:30 0:00 /usr/libexec/gsd-wacom
cxg 8904 0.0 0.2 472032 5036 ? Sl 17:30 0:00 /usr/libexec/gsd-smartcard
cxg 8905 0.0 0.1 456656 3372 ? Sl 17:30 0:00 /usr/libexec/gsd-account
cxg 8917 0.0 0.1 376328 3236 ? Sl 17:30 0:00 /usr/libexec/gsd-a11y-settings
cxg 8918 0.0 0.6 464336 13308 ? Sl 17:30 0:00 /usr/libexec/gsd-clipboard
cxg 8921 0.0 0.7 713940 14564 ? Sl 17:30 0:00 /usr/libexec/gsd-color
cxg 8922 0.0 0.5 545772 10856 ? Sl 17:30 0:00 /usr/libexec/gsd-datetime
cxg 8923 0.0 0.1 463216 3896 ? Sl 17:30 0:00 /usr/libexec/gsd-housekeeping
cxg 8925 0.0 0.7 614056 15560 ? Sl 17:30 0:00 /usr/libexec/gsd-keyboard
cxg 8933 0.0 0.8 1011680 17272 ? Sl 17:30 0:00 /usr/libexec/gsd-media-keys
cxg 8936 0.0 0.1 376332 3232 ? Sl 17:30 0:00 /usr/libexec/gsd-mouse
cxg 8962 0.0 0.3 608400 7764 ? Sl 17:30 0:00 /usr/libexec/gsd-printer
cxg 8978 0.0 1.3 994452 28308 ? Sl 17:30 0:00 nautilus-desktop --force
cxg 9001 0.0 0.8 916316 17984 ? Sl 17:30 0:00 /usr/libexec/evolution-calendar-factory
cxg 9004 0.0 0.2 464652 4588 ? Sl 17:30 0:00 /usr/libexec/gvfsd-trash --spawner :1.3 /org/gtk/gvfs/exec_spaw/0
cxg 9029 0.0 0.6 468436 13412 ? Sl 17:30 0:00 rhsm-icon
cxg 9033 0.0 0.9 1142924 19884 ? Sl 17:30 0:00 /usr/libexec/evolution-calendar-factory-subprocess --factory all --bus-name org.gnome.evolution.dataserver.Subprocess.Backe
cxg 9035 0.0 0.1 273044 3264 ? Sl 17:30 0:00 /usr/libexec/gsd-disk-utility-notify
cxg 9050 0.0 0.4 309880 9680 ? S 17:30 0:00 /usr/bin/seapplet
cxg 9055 0.0 2.6 1433124 54744 ? Sl 17:30 0:01 /usr/bin/gnome-software --gapplication-service
cxg 9057 0.0 0.1 302184 3448 ? Sl 17:30 0:00 /usr/libexec/ibus-engine-simple
cxg 9064 0.0 0.8 903044 17440 ? Sl 17:30 0:00 /usr/libexec/evolution-addressbook-factory
cxg 9065 0.0 0.1 187384 2868 ? Sl 17:30 0:00 /usr/libexec/dconf-service
cxg 9067 0.0 0.1 181792 3116 ? S 17:30 0:00 /usr/libexec/gconfd-2
cxg 9084 0.0 0.8 742452 17112 ? SNl 17:30 0:00 /usr/libexec/tracker-extract
cxg 9092 0.0 0.8 632100 16484 ? SNl 17:30 0:00 /usr/libexec/tracker-miner-apps
cxg 9097 0.0 0.6 649020 13604 ? SNl 17:30 0:00 /usr/libexec/tracker-miner-fs
cxg 9111 0.0 0.4 561752 9776 ? SNl 17:30 0:00 /usr/libexec/tracker-miner-user-guides
cxg 9119 0.0 0.9 1119744 19088 ? Sl 17:30 0:00 /usr/libexec/evolution-addressbook-factory-subprocess --factory all --bus-name org.gnome.evolution.dataserver.Subprocess.Ba
cxg 9154 0.0 0.8 529844 16592 ? Sl 17:30 0:00 abrt-applet
cxg 9157 0.0 0.7 525204 14552 ? Sl 17:30 0:00 /usr/libexec/tracker-store
cxg 9180 0.0 1.2 566548 25892 ? Sl 17:30 0:04 /usr/bin/vmtoolsd -n vmusr
root 9305 0.0 0.4 586136 8496 ? Ssl 17:30 0:00 /usr/libexec/fwupd/fwupd
cxg 9365 0.0 1.5 680868 32196 ? Rl 17:31 0:03 /usr/libexec/gnome-terminal-server
cxg 9371 0.0 0.0 8532 724 ? S 17:31 0:00 gnome-pty-helper
cxg 9373 0.0 0.1 116348 2960 pts/0 Ss 17:31 0:00 bash
root 9434 0.0 0.2 232652 4836 pts/0 S 17:32 0:00 su -
root 9445 0.0 0.1 116232 2920 pts/0 S 17:32 0:00 -bash
root 9730 0.0 0.2 385768 4540 ? Sl 17:51 0:00 gdm-session-worker [pam/gdm-password]
root 9744 0.0 0.0 0 0 ? S 17:51 0:00 [kworker/u256:0]
cxg 9803 0.0 0.1 317740 3308 ? Sl 17:55 0:00 /usr/libexec/gvfsd-metadata
root 9931 0.0 0.0 0 0 ? S 18:01 0:01 [kworker/1:2]
root 10226 0.0 0.0 0 0 ? S 18:21 0:00 [kworker/0:0]
root 10371 0.0 0.0 0 0 ? S 18:30 0:00 [kworker/1:0]
root 10410 0.0 0.0 0 0 ? S 18:32 0:00 [kworker/0:2]
root 10454 0.0 0.0 0 0 ? S 18:37 0:00 [kworker/0:1]
root 10478 0.0 0.0 107952 356 ? S 18:39 0:00 sleep 60
root 10501 0.0 0.0 0 0 ? R 18:40 0:00 [kworker/0:3]
root 10502 0.0 0.1 151288 3600 ? Ssl 18:40 0:00 /usr/libexec/fprintd
root 10527 0.3 0.0 23512 1536 ? Ss 18:40 0:00 /usr/lib/systemd/systemd-hostnamed
root 10545 0.0 0.0 155360 1884 pts/0 R+ 18:40 0:00 ps aux
##可以看出里面就存在很多不能运行的用户的进程
[root@localhost home]# cd /etc/skel##进入骨架目录
[root@localhost skel]# useradd user1
[root@localhost skel]# ll
total 0
##user1空文件
[root@localhost skel]# ls
[root@localhost skel]# cd /home/user1
[root@localhost user1]# ll
total 0
[root@localhost user1]# ls
[root@localhost user1]# ls -a##显示出来所有的数据保活隐藏的
. .. .bash_logout .bash_profile .bashrc .mozilla
##文件的.mozilla这些都是隐藏文件
[root@localhost home]# cd /etc/skel
[root@localhost skel]# ls
[root@localhost skel]# touch test
[root@localhost skel]# ll##我们在skel里面创建文件test
total 0
-rw-r--r--. 1 root root 0 Apr 23 18:59 test
[root@localhost skel]# ls
test
[root@localhost skel]# useradd user2
[root@localhost skel]# su - user2
[user2@localhost ~]$ ls
test
##我们在骨架目录上创建test,而后创建用户user2后,用户里面就自带test文件
[user2@localhost ~]$ exit
logout
[root@localhost skel]# mkdir wests##创建目录wests
[root@localhost skel]# su - user2
Last login: Thu Apr 23 19:00:06 CST 2020 on pts/0
[user2@localhost ~]$ ls##此时user2的数据中只有test ,没有wests
test
[root@localhost skel]# useradd user3
[root@localhost skel]# su - user3
[user3@localhost ~]$ ls##此时的user3里面就有我们刚刚创建的wests
test wests
[root@localhost skel]# userdel -r user2
[root@localhost skel]# userdel -r user3##删除骨架里面创建的用户
[root@localhost skel]# rm -fr *##删除用户骨架里面的数据信息
[root@localhost skel]# ll
total 0
##最后记得删除创建的用户还有数据信息
总结:必须先创建skel里面的数据,然后再创建的用户才有其骨架信息
[root@localhost skel]# cd /home/
[root@localhost home]# ls ##查看系统都存在哪些用户
cxg user1
root@localhost home]# su - user1##切换到user1
Last login: Thu Apr 23 19:09:59 CST 2020 on pts/0
[user1@localhost ~]$ passwd user1##给user1设置个密码
passwd: Only root can specify a user name.
[root@localhost ~]# passwd user1
Changing password for user user1.
New password:
BAD PASSWORD: The password is shorter than 8 characters
Retype new password:
passwd: all authentication tokens updated successfully.
[root@localhost ~]# tail -1 /etc/shadow##查看user1的密码
user1:$6$MaUnI7r1$xUjaKrMpbPgsv6e/5Hn/oLgCp9fJUIeG.qosMEgCrrsvRqylJF.zK7B5ygN2pd64qS8sMSxOgaLRF2ThEAEJB.:18375:0:99999:7:::
[root@localhost ~]# passwd -l user1##给user1进行限制,不让user1登录了
Locking password for user user1.
passwd: Success
[cxg@localhost ~]$ su - user1##此时输入密码后就无法登录了
Password:

su: Authentication failure
[root@localhost ~]# passwd -u user1##取消限制,让user1又可以登录了
Unlocking password for user user1.
passwd: Success
[root@localhost ~]# passwd -l user1##我们又继续再一次给user1锁定上
Locking password for user user1.
passwd: Success
[root@localhost ~]# tail -1 /etc/shadow##查看user1的密码信息,我们可以看到user1后面又两个!!代表锁定状态,此时我们是锁定状态
user1:!!$6$MaUnI7r1$xUjaKrMpbPgsv6e/5Hn/oLgCp9fJUIeG.qosMEgCrrsvRqylJF.zK7B5ygN2pd64qS8sMSxOgaLRF2ThEAEJB.:18375:0:99999:7:::
[root@localhost ~]# passwd -u user1
Unlocking password for user user1.
passwd: Success
[root@localhost ~]# tail -1 /etc/shadow##此时下面的user1就不存在!!,所以他是解锁状态
user1:$6$MaUnI7r1$xUjaKrMpbPgsv6e/5Hn/oLgCp9fJUIeG.qosMEgCrrsvRqylJF.zK7B5ygN2pd64qS8sMSxOgaLRF2ThEAEJB.:18375:0:99999:7:::
也可以用
[root@localhost ~]# vim /etc/shadow
手动用编辑器加进去两个!!也可以达到锁定的功能
[root@localhost ~]# cat /etc/passwd##通过查看用户信息我们可以看到每一个用户都有一个节点,cxg的节点是1000,user1是1001(默认用户的节点是从1000开始的)
root:x:0:0:root:/root:/bin/bash
bin:x:1:1:bin:/bin:/sbin/nologin
daemon:x:2:2:daemon:/sbin:/sbin/nologin
adm:x:3:4:adm:/var/adm:/sbin/nologin
lp:x:4:7:lp:/var/spool/lpd:/sbin/nologin
sync:x:5:0:sync:/sbin:/bin/sync
shutdown:x:6:0:shutdown:/sbin:/sbin/shutdown
halt:x:7:0:halt:/sbin:/sbin/halt
mail:x:8:12:mail:/var/spool/mail:/sbin/nologin
operator:x:11:0:operator:/root:/sbin/nologin
games:x:12:100:games:/usr/games:/sbin/nologin
ftp:x:14:50:FTP User:/var/ftp:/sbin/nologin
nobody:x:99:99:Nobody:/:/sbin/nologin
systemd-network:x:192:192:systemd Network Management:/:/sbin/nologin
dbus:x:81:81:System message bus:/:/sbin/nologin
polkitd:x:999:998:User for polkitd:/:/sbin/nologin
libstoragemgmt:x:998:996:daemon account for libstoragemgmt:/var/run/lsm:/sbin/nologin
colord:x:997:995:User for colord:/var/lib/colord:/sbin/nologin
rpc:x:32:32:Rpcbind Daemon:/var/lib/rpcbind:/sbin/nologin
saslauth:x:996:76:Saslauthd user:/run/saslauthd:/sbin/nologin
abrt:x:173:173::/etc/abrt:/sbin/nologin
rtkit:x:172:172:RealtimeKit:/proc:/sbin/nologin
pulse:x:171:171:PulseAudio System Daemon:/var/run/pulse:/sbin/nologin
chrony:x:995:990::/var/lib/chrony:/sbin/nologin
radvd:x:75:75:radvd user:/:/sbin/nologin
rpcuser:x:29:29:RPC Service User:/var/lib/nfs:/sbin/nologin
nfsnobody:x:65534:65534:Anonymous NFS User:/var/lib/nfs:/sbin/nologin
unbound:x:994:989:Unbound DNS resolver:/etc/unbound:/sbin/nologin
gluster:x:993:988:GlusterFS daemons:/run/gluster:/sbin/nologin
qemu:x:107:107:qemu user:/:/sbin/nologin
tss:x:59:59:Account used by the trousers package to sandbox the tcsd daemon:/dev/null:/sbin/nologin
usbmuxd:x:113:113:usbmuxd user:/:/sbin/nologin
geoclue:x:992:986:User for geoclue:/var/lib/geoclue:/sbin/nologin
setroubleshoot:x:991:985::/var/lib/setroubleshoot:/sbin/nologin
saned:x:990:984:SANE scanner daemon user:/usr/share/sane:/sbin/nologin
gdm:x:42:42::/var/lib/gdm:/sbin/nologin
gnome-initial-setup:x:989:983::/run/gnome-initial-setup/:/sbin/nologin
sshd:x:74:74:Privilege-separated SSH:/var/empty/sshd:/sbin/nologin
avahi:x:70:70:Avahi mDNS/DNS-SD Stack:/var/run/avahi-daemon:/sbin/nologin
postfix:x:89:89::/var/spool/postfix:/sbin/nologin
ntp:x:38:38::/etc/ntp:/sbin/nologin
tcpdump:x:72:72::/:/sbin/nologin
cxg:x:1000:1000:cxg:/home/cxg:/bin/bash
user1:x:1001:1001::/home/user1:/bin/bash
[root@localhost ~]# useradd -u 2000 hadoop##此时我们创建一个节点从2000开始的hadoop的用户
[root@localhost ~]# id hadoop##可以看到此时hadoop的节点就从2000开始了,而不是接着uesr1是1003
uid=2000(hadoop) gid=2000(hadoop) groups=2000(hadoop)
[root@localhost ~]# userdel -r hadoop##使用完后记得删除用户,这是个好习惯
[root@localhost ~]# userdel -r user1##当我们删除user1的时候显示有进程在占用,无法删除
userdel: user user1 is currently used by process 9300
[root@localhost ~]# su - user1##这时我们就先切换到user1用户
Last login: Fri Apr 24 21:00:29 CST 2020 on pts/0
[user1@localhost ~]$ logout##CTRL+D将用户关闭
[root@localhost ~]# userdel -r user1##此时我们就可以删除user1了
4.密码管理
[root@localhost ~]# chage --help ##查看chage命令的帮助
Usage: chage [options] LOGIN

Options:
  -d, --lastday LAST_DAY        set date of last password change to LAST_DAY
  -E, --expiredate EXPIRE_DATE  set account expiration date to EXPIRE_DATE
  -h, --help                    display this help message and exit
  -I, --inactive INACTIVE       set password inactive after expiration
                                to INACTIVE
  -l, --list                    show account aging information
  -m, --mindays MIN_DAYS        set minimum number of days before password
                                change to MIN_DAYS
  -M, --maxdays MAX_DAYS        set maximim number of days before password
                                change to MAX_DAYS
  -R, --root CHROOT_DIR         directory to chroot into
  -W, --warndays WARN_DAYS      set expiration warning days to WARN_DAYS
##可以看到helo 针对不同的-d,eE,-h,-I等等都有不同的注释意思
[root@localhost ~]# tail -1 /etc/shadow##我们查看用户信息,以前可学习到了,第一个冒号之前的都是密码加密的信息(可以通过psswd进行修改),然后后面每一个冒号都有他要表达的意思
cxg:$6$L9IoPznJgPy4EKsu$kmmLaY6dZPlSwrAMPdP34LqLZcyVCymY5sxB32ybkghUfd0KKwPYSe8HSxeNYpvGOigw969Kw7q6A6LSrLHux1::0:99999:7:::
[root@localhost ~]# man 5 shadow##查看shadow里面每个不同冒号后面都代表的具体内容是啥
我们举例
[root@localhost ~]# chage -m 30 -M 90 -W 7 -I 15 cxg##改变用户cxg,使他最少使用30天,最多使用90天,7天警告期,15天过期保留(记得最后加上用户名,确实设置的用户对象)
[root@localhost ~]# tail -1 /etc/shadow
cxg:$6$L9IoPznJgPy4EKsu$kmmLaY6dZPlSwrAMPdP34LqLZcyVCymY5sxB32ybkghUfd0KKwPYSe8HSxeNYpvGOigw969Kw7q6A6LSrLHux1::30:90:7:15::
##此时我们就可以看到修改后的结果
[root@localhost ~]# chage d0 cxg##这个命令可以修改cxg的密码
[root@localhost ~]# tail /etc/shadow/
cxg:$6$L9IoPznJgPy4EKsu$kmmLaY6dZPlSwrAMPdP34LqLZcyVCymY5sxB32ybkghUfd0KKwPYSe8HSxeNYpvGOigw969Kw7q6A6LSrLHux1:18342:30:90:7:15::
##这个命令可以让我们知道修改cxg的密码的时候,距离1970年1月1日差多少天(18342就是差的天数)
用户授权
sudo
su-
visudo
[root@localhost ~]# su - cxg##切换到cxg
Last login: Fri Apr 24 20:55:18 CST 2020 on pts/0
[cxg@localhost ~]$ ll
total 0
-rw-rw-r--. 1 cxg cxg 0 Apr 18 05:05 1
drwxr-xr-x. 2 cxg cxg 6 Mar 31 18:24 Desktop
drwxr-xr-x. 2 cxg cxg 6 Mar 31 18:24 Documents
drwxr-xr-x. 2 cxg cxg 6 Mar 31 18:24 Downloads
drwxr-xr-x. 2 cxg cxg 6 Mar 31 18:24 Music
drwxr-xr-x. 2 cxg cxg 6 Mar 31 18:24 Pictures
drwxr-xr-x. 2 cxg cxg 6 Mar 31 18:24 Public
drwxr-xr-x. 2 cxg cxg 6 Mar 31 18:24 Templates
-rw-rw-r--. 1 cxg cxg 0 Apr 23 05:07 test
drwxr-xr-x. 2 cxg cxg 6 Mar 31 18:24 Videos
[cxg@localhost ~]$ ip addr
1: lo: <LOOPBACK,UP,LOWER_UP> mtu 65536 qdisc noqueue state UNKNOWN group default qlen 1000
    link/loopback 00:00:00:00:00:00 brd 00:00:00:00:00:00
    inet 127.0.0.1/8 scope host lo
       valid_lft forever preferred_lft forever
    inet6 ::1/128 scope host
       valid_lft forever preferred_lft forever
2: ens33: <BROADCAST,MULTICAST,UP,LOWER_UP> mtu 1500 qdisc pfifo_fast state UP group default qlen 1000
    link/ether 00:0c:29:2d:92:fa brd ff:ff:ff:ff:ff:ff
3: virbr0: <NO-CARRIER,BROADCAST,MULTICAST,UP> mtu 1500 qdisc noqueue state DOWN group default qlen 1000
    link/ether 52:54:00:bd:87:59 brd ff:ff:ff:ff:ff:ff
    inet 192.168.122.1/24 brd 192.168.122.255 scope global virbr0
       valid_lft forever preferred_lft forever
4: virbr0-nic: <BROADCAST,MULTICAST> mtu 1500 qdisc pfifo_fast master virbr0 state DOWN group default qlen 1000
    link/ether 52:54:00:bd:87:59 brd ff:ff:ff:ff:ff:ff
[cxg@localhost ~]$ ifdown ens33##我们想对ens33对这个接口设置密码,发现没有权限
Users cannot control this device.
`[cxg@localhost ~]$ ifup ens33``##我们想对ens33对这个接口设置密码,发现没有权限
Users cannot control this device.
##生产环境中我们很容易遇到这个问题,因为刚去一个部门,不会直接给一个管理员的权限,但是我们要设置端口的时候,每次去找管理员要密码都很麻烦,这时候我们就可以下面这样
[root@localhost ~]# id cxg
uid=1000(cxg) gid=1000(cxg) groups=1000(cxg)
[root@localhost ~]# visudo^C##下面的路径告诉我们visudo修改的文件位置
[root@localhost ~]# ll /etc/sudoers
-r–r-----. 1 root root 4328 Sep 25 2018 /etc/sudoers
[root@localhost ~]# visudo##给里面root下方加入我们的用户,后面ALL=(ALL) NOPASSWD:ALL 这个相当于给了cxg管理员一样的权限,我们也可以只给部分权限(劝降怎么给可以查看visudo的上方内容),如下:
root    ALL=(ALL)       ALL
cxg     ALL=(ALL)       NOPASSWD:ALL
## Allows members of the 'sys' group to run networking, software,
## service management apps and more.
# %sys ALL = NETWORKING, SOFTWARE, SERVICES, STORAGE, DELEGATING, PROCESSES, LOCATE, DRIVERS

## Allows people in group wheel to run all commands
%wheel  ALL=(ALL)       ALL

## Same thing without a password
# %wheel        ALL=(ALL)       NOPASSWD: ALL

## Allows members of the users group to mount and unmount the
## cdrom as root
# %users  ALL=/sbin/mount /mnt/cdrom, /sbin/umount /mnt/cdrom

## Allows members of the users group to shutdown this system
# %users  localhost=/sbin/shutdown -h now

## Read drop-in files from /etc/sudoers.d (the # here does not mean a comment)
#includedir /etc/sudoers.d
[root@localhost ~]# which ifdown##which查找bash的绝对路径
/sbin/ifdown
[root@localhost ~]# which ifup
/sbin/ifup
[root@localhost ~]# visudo##将权限设置为只有ifup和ifdown权限
root    ALL=(ALL)       ALL
cxg     ALL=(ALL)       NOPASSWD:/sbin/ifup,/sbin/ifdown
## Allows members of the 'sys' group to run networking, software,
## service management apps and more.
# %sys ALL = NETWORKING, SOFTWARE, SERVICES, STORAGE, DELEGATING, PROCESSES, LOCATE, DRIVERS

## Allows people in group wheel to run all commands
%wheel  ALL=(ALL)       ALL

## Same thing without a password
# %wheel        ALL=(ALL)       NOPASSWD: ALL

## Allows members of the users group to mount and unmount the
## cdrom as root
# %users  ALL=/sbin/mount /mnt/cdrom, /sbin/umount /mnt/cdrom

## Allows members of the users group to shutdown this system
# %users  localhost=/sbin/shutdown -h now

## Read drop-in files from /etc/sudoers.d (the # here does not mean a comment)
#includedir /etc/sudoers.d
也可以使用vim编辑器对其文件路径的文件进行编辑,输入我们给他的权限就行
[root@localhost ~]# vim /etc/sudoers
##这样可以赋予部分用户他所需要的一定的少量的权限
[root@localhost ~]# su - cxg
Last login: Sat Apr 25 00:17:01 CST 2020 on pts/0
[cxg@localhost ~]$ ifdown ens33##我们直接输入ifdown ens33想直接设置端口发现没有权限。
Users cannot control this device.
[cxg@localhost ~]$ sudo ifdown ens33##因此我们必须在前方输入sudo,加上这个sudo指令才能读取我们授权的目录的文件
>>> /etc/sudoers: syntax error near line 101 <<<
sudo: parse error in /etc/sudoers near line 101
sudo: no valid sudoers sources found, quitting
sudo: unable to initialize policy plugin
[cxg@localhost ~]$ sudo ifup ens33
[cxg@localhost ~]$ ip addr
1: lo: <LOOPBACK,UP,LOWER_UP> mtu 65536 qdisc noqueue state UNKNOWN group default qlen 1000
    link/loopback 00:00:00:00:00:00 brd 00:00:00:00:00:00
    inet 127.0.0.1/8 scope host lo
       valid_lft forever preferred_lft forever
    inet6 ::1/128 scope host
       valid_lft forever preferred_lft forever
2: ens33: <BROADCAST,MULTICAST,UP,LOWER_UP> mtu 1500 qdisc pfifo_fast state UP group default qlen 1000
    link/ether 00:0c:29:2d:92:fa brd ff:ff:ff:ff:ff:ff
3: virbr0: <NO-CARRIER,BROADCAST,MULTICAST,UP> mtu 1500 qdisc noqueue state DOWN group default qlen 1000
    link/ether 52:54:00:bd:87:59 brd ff:ff:ff:ff:ff:ff
    inet 192.168.122.1/24 brd 192.168.122.255 scope global virbr0
       valid_lft forever preferred_lft forever
4: virbr0-nic: <BROADCAST,MULTICAST> mtu 1500 qdisc pfifo_fast master virbr0 state DOWN group default qlen 1000
    link/ether 52:54:00:bd:87:59 brd ff:ff:ff:ff:ff:ff
##已经完成,
[cxg@localhost ~]$ sudo fdisk -l
##因为前面我们只给了ifdown和ifup的权限,所以对于fdisk的指令cxg用户是没有权限的,如果想有权限,可以将NOPSSWD:ALL,或者找出fdisk的路径文件,单独把他的权限加进去
>>> /etc/sudoers: syntax error near line 101 <<<
sudo: parse error in /etc/sudoers near line 101
sudo: no valid sudoers sources found, quitting
sudo: unable to initialize policy plugin
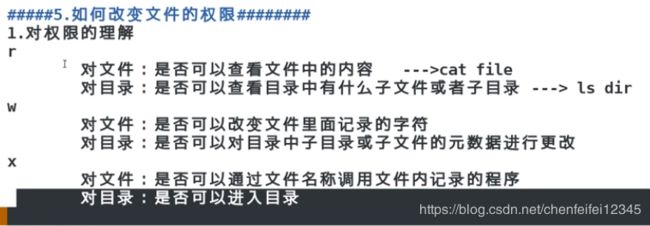
5.权限管理
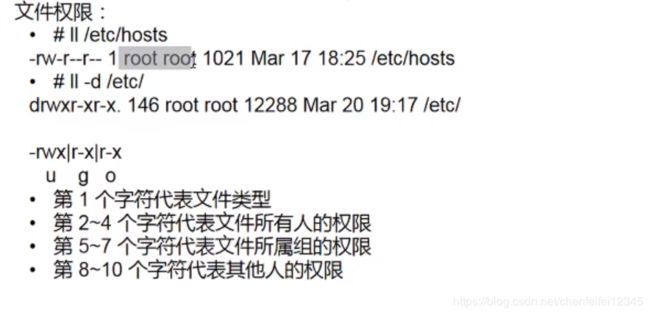
1.##第一个字符要是是:
-只代表他是个普通文件
c代表他是个字符
b代表是一个块设备
d代表是一个目录
l代表链接,类似于快捷方式
s套接字
2.##第2-4的字符:
r代表读
w代表写
x代表执行
他们都代表的是用户的权限,和下面etc/hosts的第一个root匹配
3.##第5-7的字符
他们都代表的是组的权限
3.##第8-10的字符
他们都代表的是其他用户的权限的权限(比如我们的cxg,user1),和etc/hosts下面的第二个root相匹配
4.##后面两个文件大小,文件最后一次被修改时间
例如:[root@localhost ~]# ll /etc/hosts
-rw-r--r--. 1 root root 158 Jun 7 2013 /etc/hosts
##这个代码第一个root代表目标文件/etc/hosts所属于的权限是root用户, 前面的第二位的r和第三位的w分别代表读和写,第二个root代表是组同时第5-7个字符只有r,代表他只有读的权限
[root@localhost ~]# ll /dev/nume0
crw-------. 1 root root 242 Jun 7 2013 /dev/nvme0
root@localhost ~]# ll -d /etc/
drwxr-xr-x. 144 root root 8192 Apr 25 00:59 /etc/
[cxg@localhost ~]$ ll
total 0
-rw-rw-r--. 1 cxg cxg 0 Apr 18 05:05 1
drwxr-xr-x. 2 cxg cxg 6 Mar 31 18:24 Desktop
drwxr-xr-x. 2 cxg cxg 6 Mar 31 18:24 Documents
drwxr-xr-x. 2 cxg cxg 6 Mar 31 18:24 Downloads
drwxr-xr-x. 2 cxg cxg 6 Mar 31 18:24 Music
drwxr-xr-x. 2 cxg cxg 6 Mar 31 18:24 Pictures
drwxr-xr-x. 2 cxg cxg 6 Mar 31 18:24 Public
drwxr-xr-x. 2 cxg cxg 6 Mar 31 18:24 Templates
-rw-rw-r--. 1 cxg cxg 0 Apr 23 05:07 test
drwxr-xr-x. 2 cxg cxg 6 Mar 31 18:24 Videos
##cxg用户下的都是cxg用户和cxg组的权限了
##1)权限修改和用户属性修改

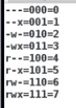
##这个其实就是r=4,w=2,x=1,其实就是二进制转化为八进制
[cxg@localhost ~]$ cd
[cxg@localhost ~]$ cd /mnt/##我们任意找一个mnt里面的文件查看
[cxg@localhost mnt]$ pwd
/mnt
[cxg@localhost mnt]$ ls
passwd test
[cxg@localhost mnt]$ ll
total 0
-rw-r--r--. 1 root root 0 Apr 25 01:51 passwd
-rw-r--r--. 1 root root 0 Apr 25 01:50 test
##test文件再other上拥有r权限
[cxg@localhost mnt]$ ll -d ##目录列表目录本身
drwxr-xr-x. 2 root root 32 Apr 25 01:51 .##目录里面的x代表的是可以进目录里面操作得意思
[root@localhost mnt]# chmod o-r test##chmod命令是修改用户的权限,o代表的是other的意思,-r就是取消r权限,test代表针对test文件,(连起来就是取消test文件的other的读的权限)
[root@localhost mnt]# ll
total 0
-rw-r--r--. 1 root root 0 Apr 25 01:51 passwd
-rw-r-----. 1 root root 0 Apr 25 01:50 test
##此时我们可以看出来test文件的other上已经不存在读的权限了
[cxg@localhost mnt]$ cat test##我们切换回other用户cxg 查看test文件就显示被拒绝,没有权限了
cat: test: Permission denied
[root@localhost mnt]# chown cxg test##因为实在root权限上运行的,所以chown就是在cxg用户上运行的test文件追加进去root一样权限,因为root本来就有r和w的权限,此时,cxg的test文件就爷拥有r和w权限
[root@localhost mnt]# ll test
-rw-r-----. 1 cxg root 0 Apr 25 01:50 test
##因为附加权限进去,原本root用户的位置变成cxg,cxg拥有的权限是r和w
[cxg@localhost mnt]$ cat test##拥有查看权限
[cxg@localhost mnt]$ echo westos> test##有用插入一行话的权限,(在test文件输入个westos)
[cxg@localhost mnt]$ cat test
westos
[root@localhost mnt]# chown root test##在test上追加root权限,相当于收回前面追加的权限
[root@localhost mnt]# ll test
-rw-r-----. 1 root root 7 Apr 25 02:17 test
##此时上方cxg用户的位置已经变回cxg了
[cxg@localhost mnt]$ cat test##收回后cxg的test就没有r和w的权限了
cat: test: Permission denied
[root@localhost mnt]# chown cxg:westos test##这个命令是修改这个命令是修改用户匹配权限的同时也修改组匹配权限
-rw-r-----. 1 cxg westos 7 Apr 25 02:17 test
[root@localhost mnt]# chmod o+r test ##o代表other的意思,other加一个r权限
[root@localhost mnt]# ll test##可以看到other已经有r权限了
-rw-r--r--. 1 root root 7 Apr 25 02:17 test
[root@localhost mnt]# chmod g-r test##group减一个r权限
[root@localhost mnt]# ll test##可以看到group上已经少了r权限了
-rw----r--. 1 root root 7 Apr 25 02:17 test
[root@localhost mnt]# chmod u-r test##user上减一个r权限
[root@localhost mnt]# ll test##可以看到user上已经少一个r权限了
--w----r--. 1 root root 7 Apr 25 02:17 test
[root@localhost mnt]# chmod a-r test##a代表all,所有的都减少一个r权限
[root@localhost mnt]# ll test##可以看到不存在r权限了
--w-------. 1 root root 7 Apr 25 02:17 test
[root@localhost mnt]# chmod a+r test##a代表all,所有的都加上一个r权限
[root@localhost mnt]# ll test##可以看到不存在r权限了
-rw-r--r--. 1 root root 7 Apr 25 02:17 test
[root@localhost mnt]# chmod u+x,go-r test##user上加一个x运行权限,group和other上减少一个r权限
[root@localhost mnt]# ll test##可以看到结果
-rwx------. 1 root root 7 Apr 25 02:17 test
[root@localhost mnt]# chmod 664 test
[root@localhost mnt]# ll test
-rw-rw-r--. 1 root root 7 Apr 25 02:17 test
##因为在权限里面r=4,w=2,x=1,所以上面664的含义就是user和group有r+w权限,other上有r权限
[root@localhost mnt]# chmod 667 test##主要是赋予other写和运行的权限
[root@localhost mnt]# vim test##因为有写的权限,所以我们可以用vim编辑器进行编辑
#!/bin/bash
echo "hello world"
##输入一个bash hello word
[cxg@localhost mnt]$ ./test## linux里面 ./test代表运行这个文件test
hello world
[root@localhost mnt]# chmod o-x test##当我们取消运行权限x后
[cxg@localhost mnt]$ ./test##就不能运行了
-bash: ./test: Permission denied
[root@localhost mnt]# chown cxg test ##修改用户属性(上面已经具体用过),把root的权限追加给cxg
[root@localhost mnt]# ll test
-rw-rw-rwx. 1 cxg root 22 Apr 25 04:00 test
[root@localhost mnt]# chgrp cxg test##修改组的属性
[root@localhost mnt]# ll test
-rw-rw-rwx. 1 cxg cxg 22 Apr 25 04:00 test
[root@localhost mnt]# touch file##在root下可以创建文件
[root@localhost mnt]# cd ..
[root@localhost /]# ll
total 24
lrwxrwxrwx.   1 root root    7 Mar 31 18:09 bin -> usr/bin
dr-xr-xr-x.   4 root root 4096 Mar 31 18:21 boot
drwxr-xr-x.  20 root root 3300 Apr 24 20:49 dev
drwxr-xr-x. 144 root root 8192 Apr 25 00:59 etc
drwxr-xr-x.   4 root root   30 Apr 24 23:30 home
lrwxrwxrwx.   1 root root    7 Mar 31 18:09 lib -> usr/lib
lrwxrwxrwx.   1 root root    9 Mar 31 18:09 lib64 -> usr/lib64
drwxr-xr-x.   2 root root    6 Dec 15  2017 media
drwxr-xr-x.   2 root root   44 Apr 25 04:10 mnt
drwxr-xr-x.   3 root root   16 Mar 31 18:15 opt
dr-xr-xr-x. 298 root root    0 Apr 24 20:48 proc
dr-xr-x---.   5 root root 4096 Apr 25 01:30 root
drwxr-xr-x.  41 root root 1280 Apr 24 20:51 run
lrwxrwxrwx.   1 root root    8 Mar 31 18:09 sbin -> usr/sbin
drwxr-xr-x.   2 root root    6 Dec 15  2017 srv
dr-xr-xr-x.  13 root root    0 Apr 24 20:49 sys
drwxrwxrwt.  30 root root 4096 Apr 25 04:07 tmp
drwxr-xr-x.  13 root root  155 Mar 31 18:09 usr
drwxr-xr-x.  20 root root  282 Mar 31 18:22 var
##我们可以看到在root下的mnt权限是rwx,拥有w权限,所以可以创建文件,但是在other上没有w的权限,因此不能创建文件
[cxg@localhost mnt]$ touch file##可以看到没有权限创建文件
touch: cannot touch ‘file’: Permission denied
[root@localhost mnt]# ll file
-rw-r--r--. 1 root root 0 Apr 25 04:10 file
[root@localhost mnt]# umask
0022
[cxg@localhost ~]$ ll test
-rw-rw-r--. 1 cxg cxg 0 Apr 23 05:07 test
[root@localhost mnt]# umask
0002
##我么接下来解释下为什么root用户和cxg默认创建的文件权限不一样,因为umak在root和cxg上默认数字不一样,root是0022,cxg是0002,所以root和cxg下创建的文件的权限是这样的(这个只针对文件,组合目录是其他算法)
root :777-022=755-111=644 ##777是满权限,减去umask的后三位022等于755,然后root用户为了保证系统安全,然后还会默认减去111,最终就等于664 也就是 -rw-r–r--
cxg:777-002-111=664##777是满权限,减去umask的后三位002再减去111等于664,所以为-rw-rw-r–
####因为umak的原因我们可以对umask的默认数值进行修改,让在一个文件内创建的文件的权限进行设置
##比如我们要让创建的文件他们都没有权限看,就是没有r权限
[cxg@localhost ~]$ umask 0007##将cxg的umask修改为0007
[cxg@localhost ~]$ touch file2
[cxg@localhost ~]$ ll file2##此时创建的文件file2就other上就没有w权限
-rw-rw----. 1 cxg cxg 0 Apr 25 04:37 file2
##创建目录合组让他们都没有权限看,就是没有r权限
cxg@localhost ~]$ umask 007
[cxg@localhost ~]$ mkdir file2
[cxg@localhost ~]$ ll -d file2
drwxrwx---. 2 cxg cxg 6 Apr 25 04:50 file2
##目录的运算是777-007=770,other上依然是空的,自然也没有w权限,在这个目录上再创建文件,就是770-111=660,所以创建的文件依然other没有权限
[root@localhost ~]# mkdir westos
[root@localhost ~]# ll
total 8
-rw-------. 1 root root 1864 Mar 31 18:21 anaconda-ks.cfg
-rw-r--r--. 1 root root 1940 Mar 31 18:23 initial-setup-ks.cfg
-rw-r--r--. 1 root root    0 Apr 19 22:01 test
drwxr-xr-x. 2 root root    6 Apr 25 05:00 westos
##umask命令只能更改在当前这个bash的初始文件的状态,关闭bash后,就又返回到原来的情况,我们怎么修改umask来达到一劳永逸的效果呢,如下
[root@localhost Desktop]# vim /etc/bashrc##在etc下的bashrc里面 搜索/umask找到信息我们可以看到解释,suid大于199,并且匹配的用户和组是相同的时候,umsk为002,否则为022,所以超级用户为022
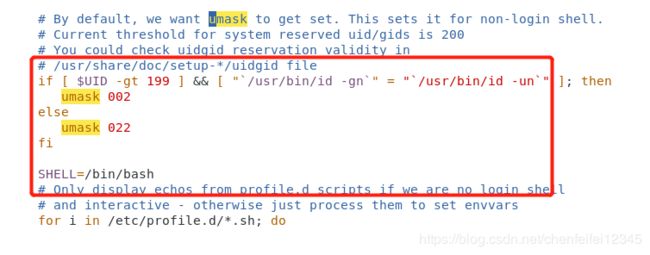
[root@localhost ~]$ vim /etc/profile##在profile里面也进行修改
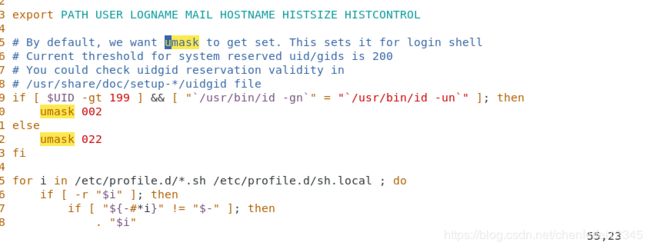
最后在进行重启,就修改完毕
[root@localhost ~]$ source /etc/profile
[root@localhost ~]$ source /etc/bashrc
##总结: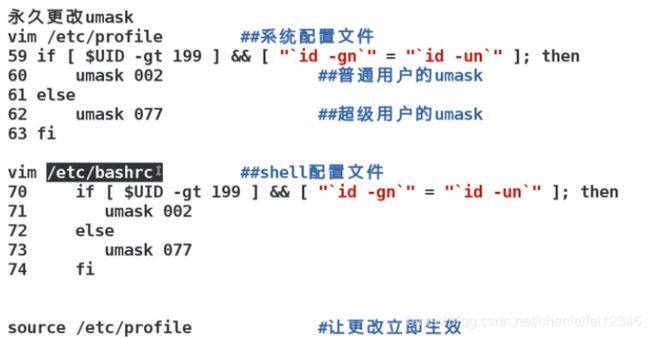
[root@localhost ~]# chmod 777 westos
[root@localhost ~]# ls
anaconda-ks.cfg initial-setup-ks.cfg test westos
[root@localhost ~]# ll
total 8
-rw-------. 1 root root 1864 Mar 31 18:21 anaconda-ks.cfg
-rw-r--r--. 1 root root 1940 Mar 31 18:23 initial-setup-ks.cfg
-rw-r--r--. 1 root root    0 Apr 19 22:01 test
drwxrwxrwx. 2 root root    6 Apr 25 05:00 westos
[root@localhost ~]# mv test westos
[root@localhost ~]# ls
anaconda-ks.cfg initial-setup-ks.cfg westos
[root@localhost ~]# cd westos
[root@localhost westos]# ls
test
[root@localhost westos]# ll
total 0
-rw-------. 1 root root 0 Apr 19 22:01 test
[root@localhost westos]# ll -d /tmp/##可以看到已经拥有t权限了
drwxrwxrwt. 28 root root 4096 Apr 25 05:01 /tmp/
##权限t意味着只能修改本文件的内容
因此为了避免删除别人用户的文件情况,

####这个第二个chmod 1xxx 这个xxx是看原始权限是多少,和chmod o+t是一个效果
[root@localhost westos]# chmodo+t westos##给westos用户加上t权限
[root@localhost ~]# cd /mnt/
[root@localhost mnt]# ll
total 4
-rw-r--r--. 1 root root 24 Apr 19 22:12 test
#存在这个test在other位置上存在r权限
[cxg@localhost mnt]$ cat test
ddsadasd
dsadsad
dsadas
[user3@localhost mnt]$ cat test
ddsadasd
dsadsad
dsadas
因此我们用cxg和user3都可以查看,但是我们现在只想让cxg看,不想让user3看怎么办
[root@localhost mnt]# setfacl -m u:cxg:-test ## cxg是用户,test是文件
[root@localhost mnt]# ll test
-rw-r--r--+ 1 root root 24 Apr 19 22:12 test
##这个上面有一个+1,他的意思是只有部分other用有权限查看
[root@localhost mnt]# getfacl test##test所属的user是cxg,只有cxg才可以查看
# file: test
# owner: root
# group: root
user::rw-
user:cxg:---
group::r--
mask::r--
other::r--
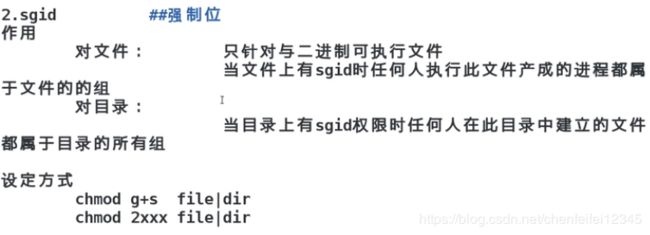
##sgid只适合于二进制的文件:
[tom@localhost sc]$ file /bin/watch
/bin/watch: ELF 64-bit LSB executable, x86-64, version 1 (SYSV), dynamically linked (uses shared libs), for GNU/Linux 2.6.32, BuildID[sha1]=173dc9e5560fe3e27dbf5fa1413b307d64f410d8, stripped
##可以看到这个watch就属于二进制
[root@localhost mnt]# ls -ld sc/##可以看到我们的sc目录属于生产这个组,但是
drwxr-xr-x. 2 root shengchan 6 May 27 22:09 sc
[cxg@localhost sc]$ ls -ld file##但是我们用cxg用户在sc创建的文件是属于cxg的,cxg不属于shengchan这个组,这样不合适,因此我们就可以设置,在sc目录霞创建的文件都属于shengchan这个组
-rw-rw-r--. 1 cxg cxg 0 May 27 22:23 file
[root@localhost mnt]# chmod g+s /sc##输入这个命令后,我们sc目录再创建的文件都会属于目录文件的组,虽然创建它的可能是其他的用户,如下
[tom@localhost sc]$ ls -ld /sc##可以看到sc目录上已经加上了s命令
drwxr-sr-x. 2 root root 6 May 27 22:07 /sc
[cxg@localhost ~]$ cd /mnt/sc
[cxg@localhost sc]$ touch file2
[cxg@localhost sc]$ ls -l
total 0
-rw-rw-r--. 1 cxg cxg 0 May 27 22:23 file
-rw-rw-r--. 1 cxg shengchan 0 May 27 22:30 file2
##suid命令
[tom@localhost sc]$ watch -n 1 date##我们先运行一个watch命令

[cxg@localhost ~]$ ps ax -o user,group,comm | grep watch##进程筛选用户合组,输出到筛选(grep)watch命令
root     root     watchdog/0
root     root     watchdog/1
root     root     watchdogd
root     root     abrt-watch-log
root     root     abrt-watch-log
tom      tom      watch
##可以看到我们的watch的进程的用户合组都是属于tom的,因为我们watch命令是在tom用户下进行的,我们现在想让任何用户例如cxg用户运行watch命令的时候拥有root一样的权限,怎么做?
[root@localhost ~]# chmod 4755 /bin/watch##使用suid命令
[root@localhost ~]# ls -ld /bin/watch##可以看到我们的/bin/watch命令已经有一个s命令了
-rwsr-xr-x. 1 root root 24800 May 15 2018 /bin/watch
[cxg@localhost sc]$ watch -n 1 date##我们用新的用户cxg再重新运行一次watch
[cxg@localhost ~]$ ps ax -o user,group,comm | grep watch##查看进程,可以看到cxg用户运行的watch已经拥有root的权限了
root     root     watchdog/0
root     root     watchdog/1
root     root     watchdogd
root     root     abrt-watch-log
root     root     abrt-watch-log
root     tom      watch
##如果进程结束了,我们的watch命令,就又会返回到原本的tom用户和tom组了,就是回到原本的情况了。这个情况我们一般应用于针对提高部分用户在特定的命令的权限。
##我们现在尝试设置让系统任何用户都自由的新建用户
[root@localhost ~]# ls -l /usr/sbin/useradd##我们查看useradd的命令权限
-rwxr-x---. 1 root root 118232 Apr 26 2018 /usr/sbin/useradd
[root@localhost ~]# chmod u+s /usr/sbin/useradd##给useradd的u位置上加上s命令,相当于授权他root的命令
[root@localhost ~]# ls -l /usr/sbin/useradd##可以看到已经有s命令了
-rwsr-x---. 1 root root 118232 Apr 26 2018 /usr/sbin/useradd
[cxg@localhost ~]$ useradd haha##我们还不能用普通用户创建普通用户,原来是other位置上没有x权限
bash: /usr/sbin/useradd: Permission denied
[root@localhost ~]# chmod o+x /usr/sbin/useradd##加上x权限
[root@localhost ~]# ls -l /usr/sbin/useradd
-rwsr-x--x. 1 root root 118232 Apr 26 2018 /usr/sbin/useradd
[root@localhost ~]# chmod u-s /usr/sbin/useradd##我们先取消u上面的s权限
[root@localhost ~]# ls -l /usr/sbin/useradd
-rwxr-x--x. 1 root root 118232 Apr 26 2018 /usr/sbin/useradd
[cxg@localhost ~]$ useradd haha##出现报错,这个提示我们不能修改etc/passwd文件,是因为passwd文件属于root,必须得root才能修改,因此我们给useradd加上s权限让他cxg用户暂时拥有root的权限就可以创建了
useradd: Permission denied.
useradd: cannot lock /etc/passwd; try again later.
[root@localhost ~]# chmod u+s /usr/sbin/useradd##我们给useradd加上s权限
[root@localhost ~]# ls -l /usr/sbin/useradd
-rwsr-x--x. 1 root root 118232 Apr 26 2018 /usr/sbin/useradd
[cxg@localhost ~]$ useradd haha##可以看到普通用户cxg已经可以新建普通用户haha了
[cxg@localhost ~]$ userdel haha##我们不能删除haha,因为我们只给useradd了普通用户在执行时候拥有root身份
bash: /usr/sbin/userdel: Permission denied
##我们除了提升权限,还可以下降权限来达到保护我们系统的目的:
[root@localhost ~]# ls -l /bin/rm##这个是我们rm命令的运行的目录
-rwxr-xr-x. 1 root root 62952 Jun 15 2018 /bin/rm
[root@localhost ~]# chown 1000 /bin/rm##我们这里也可以用cxg,因为cxg用户uid为1000,
[root@localhost ~]# ls -l /bin/rm##可以看到rm的匹配用户已经变为cxg了
-rwxr-xr-x. 1 cxg root 62952 Jun 15 2018 /bin/rm
[root@localhost ~]# chmod u+s /bin/rm##我们给rm的user上加上s命令
[root@localhost ~]# ls -l /bin/rm
-rwsr-xr-x. 1 cxg root 62952 Jun 15 2018 /bin/rm
[root@localhost ~]# rm -fr /bin##这个时候我们用root运行rm命令的时候相当于cxg用户,cxg用户是不能删除跟下面的文件的,这就达到了我们所说的下降权限,对系统进行保护
rm: cannot remove ‘/bin’: Permission denied
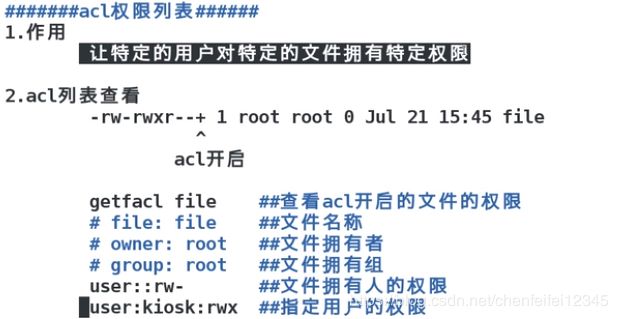
##facl的理解和设定
[root@localhost ~]# cd /mnt/
[root@localhost mnt]# touch file##我们用root用户创建一个file
[root@localhost mnt]# ll
total 0
-rw-r--r--. 1 root root       0 May 28 12:51 file
##这个文件的user是root是属于root用户的
[cxg@localhost ~]$ vim /mnt/file##我们用普通用户cxg编辑它,发现没有权限,现在我们就像设置一个文件只让cxg和root对他拥有写的权限,其他用户都没有写的权限怎么设置
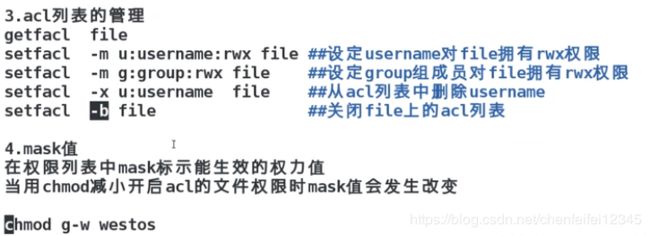
[root@localhost mnt]# setfacl -m u:cxg:rw file##setfacl命令对u位置上的cxg用户拥有rw权限针对file文件
[root@localhost mnt]# ls -l##可以看到我们的file文件权限后面有+,这个时候ls -l命令查看文件的属性已经不准了,需要查看+里面的内容
total 0
-rw-rw-r--+ 1 root root       0 May 28 12:51 file
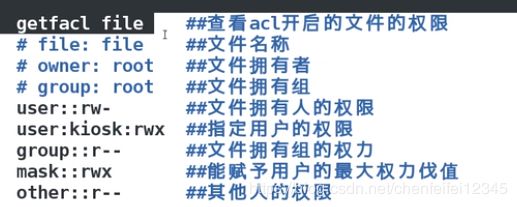
[root@localhost mnt]# getfacl file##这个命令就是查看file文件的真实权限属性
# file: file
# owner: root
# group: root
user::rw-
user:cxg:rw-
group::r--
mask::rw-
other::r--
##可以看到针对其他用户other只拥有r权限,但是user是cxg的时候它拥有rw权限,这样就达到我们的要求了
[cxg@localhost ~]$ vim /mnt/file
[cxg@localhost ~]$ cat /mnt/file
dadsadas:wq
##可以验证看到我们用cxg用户对file文件进行编辑了
[root@localhost mnt]# setfacl -m u:westos1:rwx file
[root@localhost mnt]# getfacl file
# file: file
# owner: root
# group: root
user::rw-
user:cxg:rw-
user:westos1:rwx
group::r--
mask::rwx
other::r--
[root@localhost mnt]# ls -l##需要注意的是我们增加单个用户的权限,ls-l 的组权限由上面的rw变成rwx,这是为什么?我们等下在下面解释
total 1
-rw-rwxr--+ 1 root root      13 May 28 22:56 file
[root@localhost mnt]# setfacl -x u:westos1 file##这个命令是取消westos1我们赋予他的权限
[root@localhost mnt]# getfacl file##可以看到已经不存在westos1的权限了
# file: file
# owner: root
# group: root
user::rw-
user:cxg:rw-
group::r--
mask::rw-
other::r--
[root@localhost mnt]# setfacl -b file##这个是关闭附加权限(在文件属性上的+去掉),不管原本存不存在赋予的权限,都一并取消删除
[root@localhost mnt]# ls -l file##可以看到已经不存在+附加权限了
-rw-r--r--. 1 root root 13 May 28 22:56 file
##这里我们解释下上面那个组权限更改的问题
[root@localhost mnt]# setfacl -m u:cxg:rwx file##我们重新赋予cxg用户rwx权限在file上
[root@localhost mnt]# getfacl file
# file: file
# owner: root
# group: root
user::rw-
user:cxg:rwx
group::r--
mask::rwx
other::r--
[root@localhost mnt]# ll
total 1
-rw-rwxr--+ 1 root root      13 May 28 22:56 file
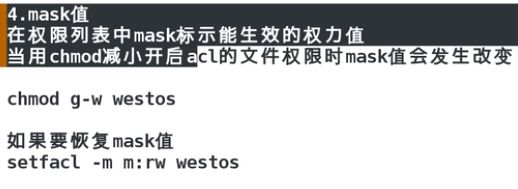
[root@localhost mnt]# chmod g-wx file##我们用chmod命令卸掉group的wx权限
[root@localhost mnt]# getfacl file##但是和上面没卸载之前对比,group的权限没有发生改变,但是mask上面没有wx权限了,并且提示cxg用户上只生效r权限
# file: file
# owner: root
# group: root
user::rw-
user:cxg:rwx			#effective:r--
group::r--
mask::r--
other::r--
[root@localhost mnt]# ls -l##所以我们现在理解ls-l里面的group位置的显示的不是group的属性而是mask的属性
total 1
-rw-r--r--+ 1 root root      13 May 28 22:56 file
[cxg@localhost ~]$ cd /mnt/
[cxg@localhost mnt]$ echo >hello file##可以看到确实只生效了r权限,不能写内容进去
bash: hello: Permission denied
[root@localhost mnt]# setfacl -m m:rwx file##这个是恢复mask的值
[root@localhost mnt]# getfacl file
# file: file
# owner: root
# group: root
user::rw-
user:cxg:rwx
group::r--
mask::rwx
other::r--

[root@localhost mnt]# mkdir westos##先创建个目录和文件
[root@localhost mnt]# touch westos/file
[root@localhost mnt]# ls -l westos/file##设置westos目录的特殊权限
-rw-r--r--. 1 root root 0 May 29 01:15 westos/file
[root@localhost mnt]# setfacl -m u:cxg:rwx westos
[root@localhost mnt]# ls -l westos/file##可以看到我们给目录westos设置特殊权限后,它内部的文件并没有继承他这个目录的文件,因此我们需要使用递归让她内部的文件也继承目录的权限
-rw-r--r--. 1 root root 0 May 29 01:15 westos/file
[root@localhost mnt]# ls -l
total 1
drwxrwxr-x+ 2 root root      18 May 29 01:15 westos
[root@localhost mnt]# setfacl -R -m u:cxg:rwx westos##使用递归让westos里面的文件都拥有和目录一样的权限
[root@localhost mnt]# ls -l westos/file
-rw-rwxr--+ 1 root root 0 May 29 01:15 westos/file
[root@localhost mnt]# getfacl westos/file
# file: westos/file
# owner: root
# group: root
user::rw-
user:cxg:rwx
group::r--
mask::rwx
other::r--
[root@localhost mnt]# touch westos/westosfile##我们再重新在westos里面新建个文件
[root@localhost mnt]# ls -l westos/westosfile##新建的文件没有特殊权限,这就说明递归只能递归以前已经存在的文件,因此我们需要设置让新创建的文件也继承westos目录的文件
-rw-r--r--. 1 root root 0 May 29 01:23 westos/westosfile
[root@localhost mnt]# setfacl -m d:u:cxg:rwx westos/##原本的命令前面加上d:
[root@localhost mnt]# touch westos/file1
[root@localhost mnt]# ls -l westos/file1##新建的文件已经继承westos的权限了
-rw-rw-r--+ 1 root root 0 May 29 01:26 westos/file1
[root@localhost mnt]# getfacl westos##可以看到westos的属性权限详情,可以看到比以前的详情多了个default(系统默认),就是让系统默认的新建的文件继承的权限都有的内容
# file: westos
# owner: root
# group: root
user::rwx
user:cxg:rwx
group::r-x
mask::rwx
other::r-x
default:user::rwx
default:user:cxg:rwx
default:group::r-x
default:mask::rwx
default:other::r-x
[root@localhost mnt]# ls -l westos##看看我们没有设置新建继承之前的文件查看他是否拥有特殊权限,发现并没有,也就是说我们的命令并不能修改已经存在的文件,因此我们就需要先利用递归修改已经存在的文件,再利用新建继承来达到修改所有文件权限的目的
total 0
-rw-rwxr--+ 1 root root 0 May 29 01:15 file
-rw-rw-r--+ 1 root root 0 May 29 01:26 file1
-rw-r--r--. 1 root root 0 May 29 01:23 westosfile
[root@localhost mnt]# setfacl -k /mnt/westos##这个命令是关闭新建继承命令
[root@localhost mnt]# ls -l westos##可以看到我们之前创建的文件权限已经存在了,需要我们自己关闭
total 0
-rw-rwxr--+ 1 root root 0 May 29 01:15 file
-rw-rw-r--+ 1 root root 0 May 29 01:26 file1
-rw-r--r--. 1 root root 0 May 29 01:23 westosfile
[root@localhost mnt]# touch /mnt/westos/file2##新建的已经不存在新建继承权限了
[root@localhost mnt]# ls -l westos
total 0
-rw-rwxr--+ 1 root root 0 May 29 01:15 file
-rw-rw-r--+ 1 root root 0 May 29 01:26 file1
-rw-r--r--. 1 root root 0 May 29 01:44 file2
-rw-r--r--. 1 root root 0 May 29 01:23 westosfile
###各种权限匹配优先级
##userperm>groupperm>otherperm
acluser aclgroup
userperm优先级高于groupperm高于otherperm,那么acluser和userperm优先级哪个高?
那我们就将userperm的权限写满,acluser的全线设为0,看结果
[root@localhost mnt]# touch file
[root@localhost mnt]# ll
total 0
-rw-r--r--. 1 root root 0 May 29 01:59 file
[root@localhost mnt]# chown cxg file##给file文件一个facluser为cxg
[cxg@localhost mnt]$ setfacl -m u:cxg:0 file
[cxg@localhost mnt]$ getfacl file
# file: file
# owner: cxg
# group: root
user::rw-
user:cxg:---
group::r--
mask::r--
other::r--
##可以看到user上的权限为rw,user:cxg(facluser)上的权限为空,那么我们执行w命令看能否执行
[cxg@localhost mnt]$ echo hello> file
[cxg@localhost mnt]$ cat file
hello
##可以看到可以执行w命令。
##因此用户userperm权力大于acluser
##那么acluser和aclgroup哪个权力高呢?
[root@localhost mnt]# chgrp cxg file##file的组设为cxg,也就是给一个faclgroup组为cxg
[root@localhost mnt]# chown root file##user改回root
[cxg@localhost mnt]$ ll
total 4
-rw-r--r--+ 1 root cxg 6 May 29 02:01 file
[root@localhost mnt]# setfacl -m u:cxg:rwx file
[root@localhost mnt]# getfacl file
# file: file
# owner: root
# group: cxg
user::rw-
user:cxg:rwx
group::r--
mask::rwx
other::r--
##给faclgroup组权限为r,userperm和facluser的权限都为拥有w权限
[cxg@localhost mnt]$ echo hello > file
[cxg@localhost mnt]$ cat file
hello
##可以看到userperm和facluser都优先级高于faclgroup
##现在查看faclgroup和groupperm哪个优先级高
[root@localhost mnt]# setfacl -m g:cxg:rwx file##给faclgroup为cxg权限为rwx
[root@localhost mnt]# getfacl file
# file: file
# owner: root
# group: cxg
user::rw-
user:cxg:rwx
group::r--
group:cxg:rwx
mask::rwx
other::r--
##faclgroup 的权限为rwx,groupperm的权限为r
[cxg@localhost mnt]$ echo hello > file
[cxg@localhost mnt]$ cat file
hello
##可以进行w权限
##所以faclgroup优先级高于groupperm
##总结:优先级的排序为
![]()
##我们上面说了+号是增加权限,那么我们可以降低权限吗? root作为我们的超级用户,权力最大,那我们可以下降root的权限吗?上面我们通过修改userperm可以下降root的权限,下面我们利用其它方法也可以下降root的权限
[root@localhost mnt]# mkdir westos
[root@localhost mnt]# chmod 777 westos##给westos满权限,方便后面使用
[root@localhost mnt]# ll
total 0
drwxrwxrwx. 2 root root 6 May 29 12:05 westos
[root@localhost mnt]# touch westos/file
[root@localhost mnt]# lsattr westos -d##查看westos的attr权限是否打开,没有内容就是没有打开
---------------- westos
[root@localhost mnt]# chattr +i westos##i就是不让用户修改里面的内容,这个命令就是任何用户不可以修改westos目录里面的内容,只允许查看
[root@localhost mnt]# lsattr westos -d##可以看到i权限已经加上了
----i----------- westos
[root@localhost mnt]# touch westos/file1##我们不能修改westos目录里面的内容,所以创建文件失败即使他是root用户
touch: cannot touch ‘westos/file1’: Permission denied
[root@localhost mnt]# ls westos/
file
[root@localhost mnt]# chattr -i westos##这个命令取消i权限
[root@localhost mnt]# touch westos/file1##这样我们就又可以修改westos里面的内容了
[root@localhost mnt]# ls westos
file file1
##因此我们可以利用这个命令对系统进行优化,比如我们跟下的bin文件里面放的都是运行的命令,我们对其查看,不对其修改,因此我们为了让root用户不至于误删除/bin/里面的命令,可以对bin目录加上一个i命令,优化系统
[root@localhost ~]# ls /bin/ -d##
/bin/
[root@localhost ~]# lsattr /bin/ -d##bin目录没有attr权限
---------------- /bin/
[root@localhost ~]# chattr =i /bin/##等于i与+i和-i的区别就是:=i是将原来的设定全部抹除,让他变为i,+1就是原来的保留的情况下加上歌i,-i同理
[root@localhost ~]# lsattr /bin/ -d
----i----------- /bin/
[root@localhost ~]# rm -fr /bin/##这下我们bin里面的内容不能被修改了,即使他是root用户
rm: cannot remove ‘/bin/xzdec’: Permission denied
rm: cannot remove ‘/bin/catchsegv’: Permission denied
rm: cannot remove ‘/bin/xzdiff’: Permission denied
rm: cannot remove ‘/bin/gencat’: Permission denied
rm: cannot remove ‘/bin/xzfgrep’: Permission denied
rm: cannot remove ‘/bin/getent’: Permission denied
rm: cannot remove ‘/bin/xzegrep’: Permission denied
rm: cannot remove ‘/bin/iconv’: Permission denied
rm: cannot remove ‘/bin/geoiplookup’: Permission denied
rm: cannot remove ‘/bin/ldd’: Permission denied
##这样我们删除系统的运行文件删除不了,保护了系统
##我们也可以设置只让添加东西,不让删除东西,一般应用于我们想保留一些操作修改的过程,
[root@localhost ~]# lsattr /mnt/westos##应该查看目录的不是查看里面的文件,加上d
---------------- /mnt/westos/file
---------------- /mnt/westos/file1
[root@localhost ~]# lsattr /mnt/westos -d
---------------- /mnt/westos
[root@localhost ~]# chattr +a /mnt/westos##加上a命令
[root@localhost ~]# lsattr /mnt/westos -d
-----a---------- /mnt/westos
[root@localhost ~]# cd /mnt/westos/
[root@localhost westos]# ls
file file1
[root@localhost westos]# ll
total 0
-rw-r--r--. 1 root root 0 May 29 12:05 file
-rw-r--r--. 1 root root 0 May 29 12:09 file1
[root@localhost westos]# touch file2##我们可以创建file2
[root@localhost westos]# rm -fr file2##但是却不能删除file2
rm: cannot remove ‘file2’: Operation not permitted
[root@localhost westos]# man chattr##除了i和a命令,我们还可以利用man命令查看chattr的其他功能