Spring Cloud Netflix Eureka Server 搭建服务注册中心
文章目录
- 1 单机模式
- 2 集群模式
学习在 Spring Cloud 中使用 Eureka Server 搭建服务注册中心,手把手带你实现单机和集群两种模式。
Eureka 本身是使用 Java 来开发的, Spring Cloud 使用 Spring Boot 技术对 Eureka 进行了封装,所以,在 Spring Cloud 中使用 Eureka 非常方便,只需要引入 spring-cloud-starter-netflix-eureka-server 这个依赖即可,然后就可以像启动一个普通的 Spring Boot 项目一样启动 Eureka 。
1 单机模式
创建 Spring Boot 项目 eureka-server ,添加 Eureka Server 依赖,如下:
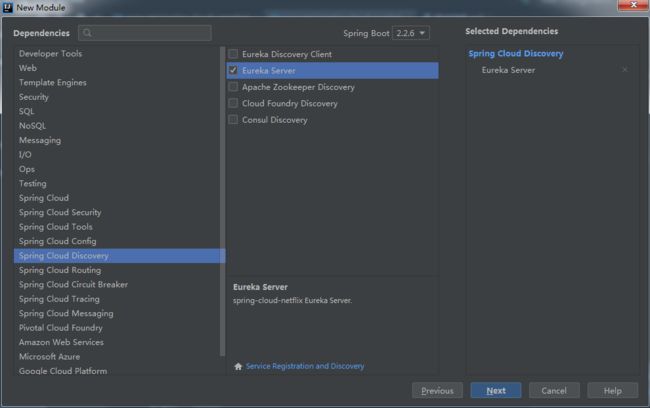
最终的依赖如下:
<dependencies>
      <dependency>
          <groupId>org.springframework.cloudgroupId>
          <artifactId>spring-cloud-starter-netflix-eureka-serverartifactId>
      dependency>

      <dependency>
          <groupId>org.springframework.bootgroupId>
          <artifactId>spring-boot-starter-testartifactId>
          <scope>testscope>
          <exclusions>
              <exclusion>
                  <groupId>org.junit.vintagegroupId>
                  <artifactId>junit-vintage-engineartifactId>
              exclusion>
          exclusions>
      dependency>
  dependencies>
项目创建成功后,在项目启动类上添加 @EnableEurekaServer 注解,标记该项目是一个 Eureka Server ,如下:
@SpringBootApplication
@EnableEurekaServer
public class EurekaServerApplication {

    public static void main(String[] args) {
        SpringApplication.run(EurekaServerApplication.class, args);
    }

}
接下来,在 application.properties 配置文件中添加基本配置信息,如下:
# 给当前服务取一个名字
spring.application.name=eureka
# 设置端口号
server.port=1111

# Eureka Server 也是一个普通的微服务,所以当它还是一个注册中心的时候,他会有两层身份:1.注册中心;2.普通服务。
# 默认情况下,会把自己注册到自己上面来,设置为 false 时,表示当前项目不要注册到注册中心上
eureka.client.register-with-eureka=false
# 表示是否从 Eureka Server 上获取注册信息
eureka.client.fetch-registry=false
配置完成后,就可以启动项目了。如果在项目启动时,遇到 java.lang.TypeNotPresentException: Type javax.xml.bind.JAXBContext not present 异常,这是因为 JDK9 以上,移除了 JAXB ,只需要我们手动引入 JAXB 即可。
<dependency>
  <groupId>javax.xml.bindgroupId>
  <artifactId>jaxb-apiartifactId>
  <version>2.3.0version>
dependency>
<dependency>
  <groupId>com.sun.xml.bindgroupId>
  <artifactId>jaxb-implartifactId>
  <version>2.3.0version>
dependency>
<dependency>
  <groupId>org.glassfish.jaxbgroupId>
  <artifactId>jaxb-runtimeartifactId>
  <version>2.3.0version>
dependency>
<dependency>
  <groupId>javax.activationgroupId>
  <artifactId>activationartifactId>
  <version>1.1.1version>
dependency>
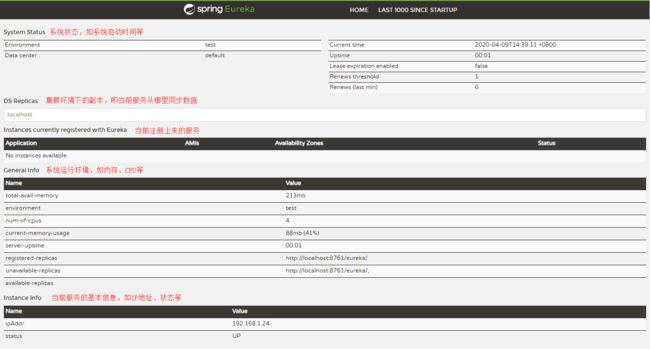
项目启动成功后,访问 http://127.0.0.1:1111 就可以查看 Eureka 后台管理页面了:
2 集群模式
使用了注册中心之后,所有的服务都要通过服务注册中心来进行信息交换。服务注册中心的稳定性就非常重要了,一旦服务注册中心掉线,会影响到整个系统的稳定性。所以,在实际开发中,服务注册中心一般都是以集群的形式出现的。Eureka 集群,实际上就是启动多个 Eureka 实例,多个 Eureka 实例之间,互相注册,互相同步数据,共同组成一个 Eureka 集群。
搭建 Eureka 集群,首先我们需要一点准备工作,修改电脑的 hosts 文件( C:\Windows\System32\drivers\etc\hosts ):
127.0.0.1 eureka-a eureka-b
创建 Spring Boot 项目 eureka-servercluster ,添加 Eureka Server 依赖,如下:
最终的依赖如下:
<dependencies>
      <dependency>
          <groupId>org.springframework.cloudgroupId>
          <artifactId>spring-cloud-starter-netflix-eureka-serverartifactId>
      dependency>

      <dependency>
          <groupId>org.springframework.bootgroupId>
          <artifactId>spring-boot-starter-testartifactId>
          <scope>testscope>
          <exclusions>
              <exclusion>
                  <groupId>org.junit.vintagegroupId>
                  <artifactId>junit-vintage-engineartifactId>
              exclusion>
          exclusions>
      dependency>
  dependencies>
项目创建成功后,在项目启动类上添加 @EnableEurekaServer 注解,标记该项目是一个 Eureka Server ,如下:
@SpringBootApplication
@EnableEurekaServer
public class EurekaServerclusterApplication {

    public static void main(String[] args) {
        SpringApplication.run(EurekaServerclusterApplication.class, args);
    }

}
在 src/main/resources 目录下,新增两个配置文件,分别如下:
application-a.properties:
# 给当前服务取一个名字
spring.application.name=eureka
# 设置端口号
server.port=1111

eureka.instance.hostname=eureka-a
# Eureka Server 也是一个普通的微服务,所以当它还是一个注册中心的时候,他会有两层身份:1.注册中心;2.普通服务。
# 默认情况下,会把自己注册到自己上面来,设置为 false 时,表示当前项目不要注册到注册中心上
eureka.client.register-with-eureka=true
# 表示是否从 Eureka Server 上获取注册信息
eureka.client.fetch-registry=true
# a 服务要注册到 b 上面
eureka.client.service-url.defaultZone=http://eureka-b:1112/eureka
application-b.properties:
# 给当前服务取一个名字
spring.application.name=eureka
# 设置端口号
server.port=1112

eureka.instance.hostname=eureka-b
# Eureka Server 也是一个普通的微服务,所以当它还是一个注册中心的时候,他会有两层身份:1.注册中心;2.普通服务。
# 默认情况下,会把自己注册到自己上面来,设置为 false 时,表示当前项目不要注册到注册中心上
eureka.client.register-with-eureka=true
# 表示是否从 Eureka Server 上获取注册信息
eureka.client.fetch-registry=true
# b 服务要注册到 a 上面
eureka.client.service-url.defaultZone=http://eureka-a:1111/eureka
配置完成后,对当前项目打包,在命令行启动两个 Eureka 实例。两个启动命令分别如下:
java -jar eureka-servercluster-0.0.1-SNAPSHOT.jar --spring.profiles.active=a
java -jar eureka-servercluster-0.0.1-SNAPSHOT.jar --spring.profiles.active=b
项目启动成功后,就可以查看 Eureka 后台管理页面了,两个服务之间互相注册,共同给组成一个集群。
eureka-a:http://127.0.0.1:1111

eureka-b:http://127.0.0.1:1112

- Spring Cloud 教程合集(微信左下方阅读全文可直达)。
- Spring Cloud 教程合集示例代码:https://github.com/cxy35/spring-cloud-samples
- 本文示例代码:https://github.com/cxy35/spring-cloud-samples/tree/master/spring-cloud-eureka
扫码关注微信公众号 程序员35 ,获取最新技术干货,畅聊 #程序员的35,35的程序员# 。独立站点:https://cxy35.com