布局技巧,直接拿来用(上)
坚持看视频,忘记的东西只能铭记
天天防腐视频的总结(上)
学到很多知识,里面老师讲的很好的,先谢谢老师。
十大布局技巧
(1)六方格的布局(两套文字说明+一个图片),可以直接拿来用
<LinearLayout xmlns:android="http://schemas.android.com/apk/res/android"
    android:layout_width="match_parent"
    android:layout_height="match_parent"
    android:orientation="vertical">

    <LinearLayout
        android:layout_width="match_parent"
        android:layout_height="wrap_content" >

        <LinearLayout
            android:id="@+id/labour_service"
            android:layout_width="0dp"
            android:layout_height="wrap_content"
            android:layout_weight="1"
            android:background="@color/white"
            android:gravity="center_horizontal"
            android:orientation="vertical" >

            <ImageView
                android:layout_width="wrap_content"
                android:layout_height="wrap_content"
                android:layout_marginTop="7dp"
                android:contentDescription="@string/app_name"
                android:src="@drawable/labour_icon" />

            <TextView
                android:layout_width="wrap_content"
                android:layout_height="wrap_content"
                android:layout_marginTop="5dp"
                android:text="劳务"
                android:textColor="@color/title_black" />

            <TextView
                style="@style/width_match_height_wrap"
                android:layout_margin="10dp"
                android:gravity="center"
                android:maxLines="2"
                android:text="找信息、找团队、\n找工人"
                android:textColor="#B4B4B4"
                android:textSize="10dp" />
        LinearLayout>

        <LinearLayout
            android:id="@+id/insurance_view"
            style="@style/height_wrap_width_weight"
            android:layout_alignParentRight="true"
            android:layout_marginLeft="1dp"
            android:background="@color/white"
            android:gravity="center_horizontal"
            android:orientation="vertical" >

            <ImageView
                style="@style/wrap_content"
                android:layout_marginTop="7dp"
                android:contentDescription="@string/app_name"
                android:src="@drawable/insurance_icon" />

            <TextView
                style="@style/wrap_content"
                android:layout_marginTop="5dp"
                android:text="保险"
                android:textColor="@color/title_black"
                android:textSize="14sp" />

            <TextView
                style="@style/width_match_height_wrap"
                android:layout_margin="10dp"
                android:gravity="center"
                android:maxLines="2"
                android:text="按天买的意外\n保险"
                android:textColor="#B4B4B4"
                android:textSize="10dp" />
        LinearLayout>

        <LinearLayout
            android:id="@+id/technology_view"
            style="@style/height_wrap_width_weight"
            android:layout_alignParentRight="true"
            android:layout_marginLeft="1dp"
            android:background="@color/white"
            android:gravity="center_horizontal"
            android:orientation="vertical" >

            <ImageView
                style="@style/wrap_content"
                android:layout_marginTop="7dp"
                android:contentDescription="@string/app_name"
                android:src="@drawable/technology_icon" />

            <TextView
                style="@style/wrap_content"
                android:layout_marginTop="5dp"
                android:text="技术"
                android:textColor="@color/title_black"
                android:textSize="14sp" />

            <TextView
                style="@style/width_match_height_wrap"
                android:layout_margin="10dp"
                android:gravity="center"
                android:lines="2"
                android:text="找技术专家\n解决技术难题"
                android:textColor="#B4B4B4"
                android:textSize="10dp" />
        LinearLayout>
    LinearLayout>

    <LinearLayout
        style="@style/width_match_height_wrap"
        android:layout_marginTop="1dp" >

        <LinearLayout
            android:id="@+id/equipment_view"
            style="@style/height_wrap_width_weight"
            android:layout_centerInParent="true"
            android:layout_marginRight="1dp"
            android:background="@color/white"
            android:gravity="center_horizontal"
            android:orientation="vertical" >

            <ImageView
                style="@style/wrap_content"
                android:layout_marginTop="7dp"
                android:contentDescription="@string/app_name"
                android:src="@drawable/equipment_icon" />

            <TextView
                style="@style/wrap_content"
                android:layout_marginTop="5dp"
                android:text="设备"
                android:textColor="@color/title_black"
                android:textSize="14sp" />

            <TextView
                style="@style/width_match_height_wrap"
                android:layout_margin="10dp"
                android:gravity="center"
                android:text="闲置设备租\n赁,买卖"
                android:textColor="#B4B4B4"
                android:textSize="10dp" />
        LinearLayout>

        <LinearLayout
            android:id="@+id/league_view"
            style="@style/height_wrap_width_weight"
            android:background="@color/white"
            android:layout_marginRight="1dp"
            android:gravity="center_horizontal"
            android:orientation="vertical" >

            <ImageView
                style="@style/wrap_content"
                android:layout_marginTop="7dp"
                android:contentDescription="@string/app_name"
                android:src="@drawable/league_icon" />

            <TextView
                style="@style/wrap_content"
                android:layout_marginTop="5dp"
                android:text="加盟"
                android:textColor="@color/title_black"
                android:textSize="14sp" />

            <TextView
                style="@style/width_match_height_wrap"
                android:layout_margin="10dp"
                android:gravity="center"
                android:maxLines="2"
                android:text="个人加盟,企业聘证,\n联营企业"
                android:textColor="#B4B4B4"
                android:textSize="10dp" />
        LinearLayout>

        <LinearLayout
            android:id="@+id/cost_comm"
            style="@style/height_wrap_width_weight"
            android:layout_alignParentRight="true"
            android:background="@color/white"
            android:gravity="center_horizontal"
            android:orientation="vertical" >

            <ImageView
                style="@style/wrap_content"
                android:layout_marginTop="7dp"
                android:contentDescription="@string/app_name"
                android:src="@drawable/cost_exchange" />

            <TextView
                style="@style/wrap_content"
                android:layout_marginTop="5dp"
                android:text="成本交流"
                android:textColor="@color/title_black"
                android:textSize="14sp" />

            <TextView
                style="@style/width_match_height_wrap"
                android:layout_margin="10dp"
                android:gravity="center"
                android:lines="2"
                android:text="工程成本讨\n论"
                android:textColor="#B4B4B4"
                android:textSize="10dp" />
        LinearLayout>
    LinearLayout>

LinearLayout>
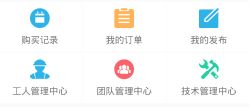
(2)六方格的布局(一套文字说明+一个图片),可以直接拿来用
<LinearLayout xmlns:android="http://schemas.android.com/apk/res/android"
    android:layout_width="match_parent"
    android:layout_height="match_parent"
    android:orientation="vertical">

    <LinearLayout
        android:layout_width="match_parent"
        android:layout_marginTop="20dp"
        android:layout_height="wrap_content">
        <TextView
            android:padding="10dp"
            android:layout_width="0dp"
            android:layout_weight="1"
            android:drawableTop="@drawable/purchase_records"
            android:text="购买记录"
            android:background="@color/white"
            android:drawablePadding="10dp"
            android:gravity="center_horizontal"
            android:layout_height="wrap_content" />

        <TextView
            android:padding="10dp"
            android:layout_width="0dp"
            android:layout_weight="1"
            android:drawableTop="@drawable/my_order"
            android:text="我的订单"
            android:layout_marginLeft="1dp"
            android:background="@color/white"
            android:drawablePadding="10dp"
            android:gravity="center_horizontal"
            android:layout_height="wrap_content" />

        <TextView
            android:padding="10dp"
            android:layout_width="0dp"
            android:background="@color/white"
            android:layout_weight="1"
            android:layout_marginLeft="1dp"
            android:drawableTop="@drawable/my_publish"
            android:text="我的发布"
            android:drawablePadding="10dp"
            android:gravity="center_horizontal"
            android:layout_height="wrap_content" />
    LinearLayout>


    <LinearLayout
        android:layout_width="match_parent"
        android:layout_marginTop="1dp"
        android:layout_height="wrap_content">
        <TextView
            android:padding="10dp"
            android:layout_width="0dp"
            android:layout_weight="1"
            android:drawableTop="@drawable/worker_manage_center"
            android:text="工人管理中心"
            android:background="@color/white"
            android:drawablePadding="10dp"
            android:gravity="center_horizontal"
            android:layout_height="wrap_content" />

        <TextView
            android:padding="10dp"
            android:layout_width="0dp"
            android:layout_weight="1"
            android:drawableTop="@drawable/team_manage_center"
            android:text="团队管理中心"
            android:layout_marginLeft="1dp"
            android:background="@color/white"
            android:drawablePadding="10dp"
            android:gravity="center_horizontal"
            android:layout_height="wrap_content" />

        <TextView
            android:padding="10dp"
            android:layout_width="0dp"
            android:background="@color/white"
            android:layout_weight="1"
            android:layout_marginLeft="1dp"
            android:drawableTop="@drawable/expert_manage_center"
            android:text="技术管理中心"
            android:drawablePadding="10dp"
            android:gravity="center_horizontal"
            android:layout_height="wrap_content" />
    LinearLayout>
LinearLayout>
(3)三方格的布局(两套文字说明),可以直接拿来用
<LinearLayout xmlns:android="http://schemas.android.com/apk/res/android"
    android:layout_width="match_parent"
    android:layout_height="match_parent">

    <LinearLayout
        android:layout_width="match_parent"
        android:layout_height="wrap_content">

        <LinearLayout
            android:background="@color/white"
            android:layout_width="0dp"
            android:layout_height="wrap_content"
            android:layout_weight="1"
            android:gravity="center"
            android:orientation="vertical"
            android:padding="20dp">

            <TextView
                android:layout_width="wrap_content"
                android:layout_height="wrap_content"
                android:text="未签到" />

            <TextView
                android:layout_width="wrap_content"
                android:layout_height="wrap_content"
                android:layout_marginTop="10dp"
                android:text="我的任务"
                android:textSize="@dimen/default_text_size" />
        LinearLayout>

        <LinearLayout
            android:background="@color/white"
            android:layout_width="0dp"
            android:layout_marginLeft="1dp"
            android:layout_height="wrap_content"
            android:layout_weight="1"
            android:gravity="center"
            android:orientation="vertical"
            android:padding="20dp">

            <TextView
                android:layout_width="wrap_content"
                android:layout_height="wrap_content"
                android:text="0.00" />

            <TextView
                android:layout_width="wrap_content"
                android:layout_height="wrap_content"
                android:layout_marginTop="10dp"
                android:text="我的钱包"
                android:textSize="@dimen/default_text_size" />
        LinearLayout>

        <LinearLayout
            android:id="@+id/recharge_coin_ll"
            android:layout_width="0dp"
            android:layout_height="wrap_content"
            android:layout_weight="1"
            android:background="@color/white"
            android:gravity="center"
            android:layout_marginLeft="1dp"
            android:orientation="vertical"
            android:padding="20dp">

            <TextView
                android:layout_width="wrap_content"
                android:layout_height="wrap_content"
                android:text="0" />

            <TextView
                android:layout_width="wrap_content"
                android:layout_height="wrap_content"
                android:layout_marginTop="10dp"
                android:text="我的金币"
                android:textSize="@dimen/default_text_size" />
        LinearLayout>
    LinearLayout>

LinearLayout>
<dimen name="default_text_size">12spdimen>(4)一个TextView(包含两个图片)
![]()
 "match_parent"
            android:padding="10dp"
            android:layout_marginTop="1dp"
            android:text="个人设置"
            android:drawableLeft="@drawable/common_problem"
            android:background="@color/white"
            android:gravity="center_vertical"
            android:drawablePadding="10dp"
            android:layout_marginBottom="10dp"
            android:drawableRight="@drawable/right_arrow"
            android:layout_height="wrap_content"
            android:clickable="true"/>
(5)密码框
<LinearLayout xmlns:android="http://schemas.android.com/apk/res/android"
    android:layout_width="match_parent"
    android:layout_height="match_parent"
    android:background="@color/main_gray">

    <LinearLayout
        android:layout_width="match_parent"
        android:layout_marginLeft="15dp"
        android:background="@drawable/corner_login_bg"
        android:layout_marginRight="15dp"
        android:layout_marginTop="15dp"
        android:padding="10dp"
        android:gravity="center_vertical"
        android:layout_height="wrap_content">
        <ImageView
            android:src="@drawable/login_user_password_icon"
            android:layout_width="wrap_content"
            android:layout_height="wrap_content" />

        <EditText
            android:id="@+id/user_password_et"
            android:hint="密码"
            android:inputType="textPassword"
            android:padding="10dp"
            android:textSize="12sp"
            android:background="@null"
            android:layout_width="0dp"
            android:layout_weight="1"
            android:layout_height="wrap_content" />

        <CheckBox
            android:id="@+id/check_password_cb"
            android:layout_width="wrap_content"
            android:button="@drawable/check_user_password_selector"
            android:layout_height="wrap_content" />
    LinearLayout>
LinearLayout>
设置圆角
<shape
    xmlns:android="http://schemas.android.com/apk/res/android"
    android:shape="rectangle"
    >
    <solid
        android:color="@color/white"
        />
    <corners
        android:bottomRightRadius="5dp"
        android:bottomLeftRadius="5dp"
        android:topRightRadius="5dp"
        android:topLeftRadius="5dp"
        />
shape>
设置密码可见不可见
<selector xmlns:android="http://schemas.android.com/apk/res/android">

    <item android:drawable="@drawable/show_password" android:state_checked="true"/>
    <item android:drawable="@drawable/hide_passsword" android:state_checked="false"/>

selector>
(6)验证码框
布局中timing_background是自己自定义的,在倒计时的时候将按钮设置为灰色,只需要把圆角的代码颜色改成要设置的颜色就可以
<LinearLayout xmlns:android="http://schemas.android.com/apk/res/android"
    android:layout_width="match_parent"
    android:layout_height="match_parent"
    xmlns:xiong="http://schemas.android.com/apk/res-auto"
    android:background="@color/main_gray">

    <LinearLayout
        android:layout_width="match_parent"
        android:layout_marginTop="15dp"
        android:orientation="horizontal"
        android:layout_height="wrap_content">
        <EditText
            android:id="@+id/user_code_et"
            android:layout_marginLeft="15dp"
            android:layout_width="0dp"
            android:layout_weight="1"
            android:background="@drawable/corner_login_bg"
            android:hint="验证码"
            android:textSize="12dp"
            android:padding="20dp"
            android:layout_height="wrap_content" />

        <com.gzucm.daydayfanfu.ui.VerificationCodeButton
            android:id="@+id/send_code_bt"
            android:layout_marginLeft="5dp"
            android:layout_width="wrap_content"
            xiong:timing_background="@drawable/corners_login_begin_nomral"
            xiong:timing_textColor="@color/white"
            android:text="发送验证码"
            android:padding="18dp"
            android:textColor="@color/white"
            android:background="@drawable/corners_login_nomral"
            android:layout_marginRight="15dp"
            android:layout_height="wrap_content" />
    LinearLayout>
LinearLayout>
corners_login_begin_nomral
<shape xmlns:android="http://schemas.android.com/apk/res/android" >

    <solid android:color="#CCCCCC" />

    <corners
        android:bottomLeftRadius="5dp"
        android:bottomRightRadius="5dp"
        android:topLeftRadius="5dp"
        android:topRightRadius="5dp" />

shape>
corners_login_nomral
<shape
  xmlns:android="http://schemas.android.com/apk/res/android">
    <solid android:color="@color/main_color" />
    <corners
        android:topLeftRadius="5.0dip"
        android:topRightRadius="5.0dip"
        android:bottomLeftRadius="5.0dip"
        android:bottomRightRadius="5.0dip" />
shape>
package com.gzucm.daydayfanfu.ui;
import android.annotation.SuppressLint;
import android.content.Context;
import android.content.res.ColorStateList;
import android.content.res.TypedArray;
import android.graphics.drawable.Drawable;
import android.os.Handler;
import android.os.Message;
import android.text.Editable;
import android.text.TextWatcher;
import android.util.AttributeSet;
import android.widget.Button;
import android.widget.EditText;
import com.gzucm.daydayfanfu.R;
import com.gzucm.daydayfanfu.Util.GeneralUtil;
@SuppressLint("HandlerLeak")
public class VerificationCodeButton extends Button {
private int mTime;
private String mNormalStr;
private ColorStateList mNormalColorList;
private Drawable mNormalDrawable;
private int mTimerBackground;
private int mTimerColor;
// Bind input box
private EditText mBindPhoneEt;
// 是否开始加载
private boolean mStartLoad = false;
/**
* 利用handler做计时器
*/
private Handler mHandler = new Handler() {
public void handleMessage(Message msg) {
if (mTime > 0) {
mTime -= 1;
timer();
} else {
stopRequest();
}
};
};
public VerificationCodeButton(Context context) {
this(context, null);
}
public VerificationCodeButton(Context context, AttributeSet attrs) {
this(context, attrs, 0);
}
public VerificationCodeButton(Context context, AttributeSet attrs,
int defStyle) {
super(context, attrs, defStyle);
// 获取之前的属性(方便将它设置为正常状态)
mNormalStr = getText().toString();
mNormalColorList = getTextColors();
mNormalDrawable = getBackground();
TypedArray array = context.obtainStyledAttributes(attrs,
R.styleable.VerificationCodeButton);
// 计时的时候背景
mTimerBackground = array.getResourceId(
R.styleable.VerificationCodeButton_timing_background, 0);
mTimerColor = array.getColor(
R.styleable.VerificationCodeButton_timing_textColor, 0);
array.recycle();
}
/**
* 设置一个正常状态
*/
@SuppressLint("NewApi")
public void setNormal() {
this.setEnabled(true);
this.setText(mNormalStr);
this.setTextColor(mNormalColorList);
this.setBackground(mNormalDrawable);
}
/**
* 向后台请求数据呈现的样子
*/
public void startLoad() {
mStartLoad = true;
this.setEnabled(false);
setAttribute();
this.setText(" 请稍后... ");
}
private void setAttribute() {
if (mTimerBackground != 0) {
this.setBackgroundResource(mTimerBackground);
}
if (mTimerColor != 0) {
this.setTextColor(mTimerColor);
}
}
/**
* 多久之后可以再次获取
*
* @param time
*/
public void aginAfterTime(int time) {
setAttribute();
this.mTime = time;
// 一旦开始计时,这个按钮就不能点击了
this.setEnabled(false);
timer();
}
/**
* 停止获取验证码
*/
private void stopRequest() {
mStartLoad = false;
setNormal();
}
/**
* 计时开始获取
*/
private void timer() {
this.setText(formatDuring(mTime));
mHandler.sendEmptyMessageDelayed(0, 1000);
}
private CharSequence formatDuring(int mTime) {
if (mTime < 10) {
return "0" + mTime + "秒后重获";
}
return mTime + "秒后重获";
}
/**
* Binding a telephone box
*/
public void bindPhoneEditText(EditText editText) {
this.mBindPhoneEt = editText;
this.setEnabled(false);
setAttribute();
// 监听输入框的状态改变
this.mBindPhoneEt
.addTextChangedListener(phoneNumbersAddSpacesTextWatcher);
}
/**
* 自动添加空格的TextWatcher
*/
private TextWatcher phoneNumbersAddSpacesTextWatcher = new TextWatcher() {
@Override
public void beforeTextChanged(CharSequence s, int start, int count,
int after) {
}
@Override
public void onTextChanged(CharSequence s, int start, int before,
int count) {
if (s == null || s.length() == 0)
return;
StringBuilder sb = new StringBuilder();
for (int i = 0; i < s.length(); i++) {
if (i != 3 && i != 8 && s.charAt(i) == ' ') {
continue;
} else {
sb.append(s.charAt(i));
if ((sb.length() == 4 || sb.length() == 9)
&& sb.charAt(sb.length() - 1) != ' ') {
sb.insert(sb.length() - 1, ' ');
}
}
}
if (!sb.toString().equals(s.toString())) {
int index = start + 1;
if (sb.charAt(start) == ' ') {
if (before == 0) {
index++;
} else {
index--;
}
} else {
if (before == 1) {
index--;
}
}
mBindPhoneEt.setText(sb.toString());
mBindPhoneEt.setSelection(index);
}
// 上面就是加空格的逻辑
// Number is correct first, and then control VerificationCodeButton this is available
String trimStr = removeAllSpace(sb.toString());
if(GeneralUtil.judgePhoneQual(trimStr) && !mStartLoad){
// If is phone VerificationCodeButton is able
setNormal();
}else{
// Else VerificationCodeButton is enable
VerificationCodeButton.this.setEnabled(false);
setAttribute();
}
}
@Override
public void afterTextChanged(Editable s) {
}
};
public static String removeAllSpace(String str) {
String tmpstr = str.replace(" ", "");
return tmpstr;
}
}添加自定义属性
    <declare-styleable name="VerificationCodeButton">
        <attr name="timing_background" format="reference" />
        <attr name="timing_textColor" format="color" />
    declare-styleable>
调用控件
private VerificationCodeButton mSendCodeBt;
    mSendCodeBt.setOnClickListener(this);
    // mSendCodeBt 验证码和输入框绑定
    mSendCodeBt.bindPhoneEditText(mUserPhoneEt);
    // 按钮点击,向后台发送请求
    // 1.把按钮置为请稍后状态
    mSendCodeBt.startLoad();
    // 2.向后台发送请求的方法
    requestUserCode();//省略该方法
    // 3.获取后台返回值之后判断后台反馈,如果成功倒计时,否则你要把按钮的状态置又可以点
将请求加入队列后监听CallBack方法,在成功的方法中获取结果即JSON字符串,我们去解析这个字符串,将它传入dealCodeResult()
/** *  开启handler去处理 "按钮的状态置又可以点” 的事件
     * 处理请求验证码的返回接口
     * @param codeResult
     */
    private void dealCodeResult(final UserRequestCodeResult codeResult) {
        mHandler.post(new Runnable() {
            @Override
            public void run() {
                // 3.获取后台返回值之后判断后台反馈,如果成功倒计时,否则你要把按钮的状态置又可以点
                if(codeResult.errcode == 1){
                    mSendCodeBt.aginAfterTime(60);
                }else{
                    Toast.makeText(UserRegisterActivity.this,codeResult.errmsg,Toast.LENGTH_LONG).show();
                    mSendCodeBt.setNormal();// 按钮恢复默认
                }
            }
        });
    }
// 把光标移动到最后的用法
Editable etext = mUserPasswordEt.getText();
Selection.setSelection(etext, etext.length());
<LinearLayout xmlns:android="http://schemas.android.com/apk/res/android"
    android:layout_width="match_parent"
    android:layout_height="match_parent"

    android:background="@color/root_bg_color">

    <LinearLayout
        android:id="@id/user_name_rl"
        style="@style/width_match_height_wrap"
        android:gravity="center_vertical"
        android:padding="10.0dip">

        <TextView
            style="@style/wrap_content"
            android:layout_marginLeft="5.0dip"
            android:contentDescription="@string/app_name"
            android:text="姓名:"
            android:textSize="@dimen/ts4" />

        <EditText
            android:id="@id/user_name"
            style="@style/height_wrap_width_weight"
            android:background="@null"
            android:gravity="right"
            android:hint="输入姓名"
            android:padding="5.0dip"
            android:textColor="#ff424242"
            android:textSize="@dimen/ts4" />

        <ImageView
            style="@style/wrap_content"
            android:layout_marginRight="5.0dip"
            android:contentDescription="@string/app_name"
            android:src="@drawable/right_arrow" />
    LinearLayout>
LinearLayout>
<LinearLayout xmlns:android="http://schemas.android.com/apk/res/android"
    android:layout_width="match_parent"
    android:layout_height="match_parent"

    android:background="@color/root_bg_color">
    <LinearLayout
        android:layout_marginTop="5dp"
        android:layout_marginBottom="5dp"
        style="@style/width_match_height_wrap"
        android:gravity="center_vertical"
        android:padding="10dp" >

        <View
            android:layout_width="0dp"
            android:layout_height="1dp"
            android:layout_weight="1"
            android:background="#DBDEE2" />

        <TextView
            style="@style/wrap_content"
            android:layout_marginLeft="10dp"
            android:layout_marginRight="10dp"
            android:text="选择金币数量"
            android:textColor="@color/defualt_text_color"
            android:textSize="@dimen/text_size_oversize" />

        <View
            android:layout_width="0dp"
            android:layout_height="1dp"
            android:layout_weight="1"
            android:background="#DBDEE2" />
    LinearLayout>
LinearLayout>
<LinearLayout xmlns:android="http://schemas.android.com/apk/res/android"
    android:layout_width="match_parent"
    android:layout_height="match_parent"

    android:background="@color/root_bg_color">
    <LinearLayout
        android:id="@+id/alipay_ll"
        style="@style/width_match_height_wrap"
        android:background="@color/white"
        android:padding="10dp" >

        <TextView
            style="@style/width_weight"
            android:drawableLeft="@drawable/alipay_icon"
            android:drawablePadding="10dp"
            android:gravity="center_vertical"
            android:text="支付宝支付" />

        <CheckBox
            android:id="@+id/alipay_cb"
            style="@style/wrap_content"
            android:checked="true"
            android:button="@drawable/checkbox_choose" />
    LinearLayout>
LinearLayout>
<selector xmlns:android="http://schemas.android.com/apk/res/android">

    <item android:drawable="@drawable/collect_delete_on" android:state_checked="true"/>
    <item android:drawable="@drawable/collect_delete_off" android:state_checked="false"/>
    <item android:drawable="@drawable/collect_delete_off"/>

selector>
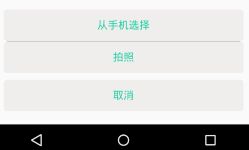
<LinearLayout xmlns:android="http://schemas.android.com/apk/res/android"
    android:layout_width="match_parent"
    android:layout_height="match_parent"
    android:gravity="bottom"
    android:orientation="vertical"
    android:paddingLeft="10dp"
    android:paddingRight="10dp"
    android:paddingBottom="20dp" >

    <Button
        android:id="@+id/image_depot"
        android:layout_width="match_parent"
        android:layout_height="wrap_content"
        android:background="@drawable/photo_camera_selector"
        android:paddingBottom="10dip"
        android:paddingTop="10dip"
        android:textColor="@color/main_color"
        android:text="@string/photo_select_image"
        android:textSize="16sp" />

    <View
        android:layout_marginLeft="5dip"
        android:layout_marginRight="5dip"
        android:background="@color/main_gray"
        android:layout_width="match_parent"
        android:layout_height="0.5dip"
        />

    <Button
        android:id="@+id/photo_camre"
        android:layout_width="match_parent"
        android:layout_height="wrap_content"
        android:background="@drawable/photo_camera_selector"
        android:paddingBottom="10dip"
        android:paddingTop="10dip"
        android:text="@string/photo_select_camre"
        android:textColor="@color/main_color"
        android:textSize="16sp" />

    <Button
        android:id="@+id/user_cancel"
        android:layout_width="match_parent"
        android:layout_height="wrap_content"
        android:layout_marginTop="10dip"
        android:background="@drawable/photo_camera_selector"
        android:paddingBottom="10dip"
        android:textColor="@color/main_color"
        android:paddingTop="10dip"
        android:text="@string/photo_select_cancle"
        android:textSize="16sp" />

LinearLayout>
存放变量
private static final int ALBUM_OK = 0x0011;
private static final int CUT_OK = 0x0013;
private static final int CAMERA_REQUEST = 0x0012;
private File tempFile;
// 临时存放拍照的文件
tempFile = new File(Environment.getExternalStorageDirectory(),”temp.png”);
private ImageView mUserLogoIv;
/**
     * 弹出一个弹出框
     */
    private void showDialog() {

        // 4.因为有头部  , 那么需要给他设置一些参数    ,用style 来配置
        // 1.利用Dialog
        final Dialog dialog = new Dialog(this,R.style.dialog);

        // 3.利用View.inflate 获取dialog需要显示的布局
        View dialogView = View.inflate(this,R.layout.photo_choose_dialog,null);

        // 2.设置dialog的显示布局  Java里面的思想要什么你就给什么
        dialog.setContentView(dialogView);

        // 5.从底部弹出 这是一个动画   控制动画我们都是用View
        // 5.1 获取弹出框的View
        Window window = dialog.getWindow();
        // 5.2 设置动画  resouceId 又是一个style
        window.setWindowAnimations(R.style.main_menu_animstyle);

        // 5.3 固定在底部
        window.setGravity(Gravity.BOTTOM);

        // 5.4宽度全屏
        window.setLayout(ViewGroup.LayoutParams.MATCH_PARENT, ViewGroup.LayoutParams.WRAP_CONTENT);


        // 6.处理点击事件
        Button cancelBt = (Button) dialogView.findViewById(R.id.user_cancel);
        cancelBt.setOnClickListener(new View.OnClickListener() {
            @Override
            public void onClick(View view) {
                // 关闭dialog
                dialog.dismiss();
            }
        });

        Button imageDepotBt = (Button) dialogView.findViewById(R.id.image_depot);
        imageDepotBt.setOnClickListener(new View.OnClickListener() {
            @Override
            public void onClick(View view) {
                // 选择照片   利用系统   隐示意图
                Intent albumIntent = new Intent(Intent.ACTION_PICK);
                // 匹配类型 只需要匹配一个就可以了
                albumIntent.setDataAndType(MediaStore.Images.Media.EXTERNAL_CONTENT_URI, "image/*");
                // 为什么不是直接开启  选完相片之后 startActivityForResult 需要获取图片信息
                startActivityForResult(albumIntent, ALBUM_OK);
                dialog.dismiss();
            }
        });

        Button photoCamreBt = (Button) dialogView.findViewById(R.id.photo_camre);
        photoCamreBt.setOnClickListener(new View.OnClickListener() {
            @Override
            public void onClick(View view) {
                // 拍照
                Intent getImageByCamera = new Intent("android.media.action.IMAGE_CAPTURE");
                // MediaStore.EXTRA_OUTPUT 调用系统拍完之后的照片,就会放到这个tempFile文件
                getImageByCamera.putExtra(MediaStore.EXTRA_OUTPUT,Uri.fromFile(tempFile));
                startActivityForResult(getImageByCamera, CAMERA_REQUEST);
                dialog.cancel();
            }
        });


        // 显示dialog
        dialog.show();
    }
@Override
protected void onActivityResult(int requestCode, int resultCode, Intent data) {
super.onActivityResult(requestCode, resultCode, data);
if(resultCode == RESULT_OK){// resultCode是相册应用Activity给我们 RESULT_OK -1
//进入相册成功
if(requestCode == ALBUM_OK){
// 相片选择成功之后 数据在data里面
Uri uri = data.getData(); // 其实就是一个路径 可以通过uri去获取文件路径 , BitmapFactory解析Bitmap
// 一定要裁剪 并且需要裁剪成为 1:1 调用系统的裁剪方法
clipImage(uri);
}
// 拍照成功 我们照片 给他设置了一个临时文件
if(requestCode == CAMERA_REQUEST){
clipImage(Uri.fromFile(tempFile));
}
//裁剪图片
if(requestCode == CUT_OK){
// 获取裁剪的图片数据
Bundle extras = data.getExtras();
if (extras != null) {
Bitmap bitmap = extras.getParcelable("data");
mUserLogoIv.setImageBitmap(bitmap);
// 提交到服务器 上传提交到服务器 File
// 需要把裁剪完后的图片传到服务器 Bitmap -- > File
// 1.把bitmap保存到文件 tempFile
saveBitmapToFile(bitmap);
// 2.把图片文件file上传到服务器
upLoadImage();
}
}
}
} private void saveBitmapToFile(Bitmap bitmap) {
try {
OutputStream os = new FileOutputStream(tempFile);
bitmap.compress(Bitmap.CompressFormat.PNG,100,os);
} catch (FileNotFoundException e) {
e.printStackTrace();
}
}
/**
* 调用系统的裁剪方法
*/
private void clipImage(Uri uri){
Intent intent = new Intent("com.android.camera.action.CROP");
// 数据 uri 代表裁剪哪一张
intent.setDataAndType(uri, "image/*");
// 传递数据
intent.putExtra("crop", "true");
// aspectX aspectY 是宽高的比例,这里设置的是正方形(长宽比为1:1)
intent.putExtra("aspectX", 1);
intent.putExtra("aspectY", 1);
// outputX outputY 是裁剪图片宽高
intent.putExtra("outputX", 150);
intent.putExtra("outputY", 150);
intent.putExtra("return-data", true);
// 你待会裁剪完之后需要获取数据 startActivityForResult
startActivityForResult(intent, CUT_OK);
}


