在我们刚开始学数据结构的时候,都接触过一种先进先出(first in first out,简称“FIFO”)的数据结构,叫队列。阻塞队列从名字看也是队列的一种,因此满足队列的特性,然后这个队列是可阻塞的!这个阻塞怎么理解呢?就是当我们一个线程往阻塞队列里面添加元素的时候,如果队列满了,那这个线程不会直接返回,而是会被阻塞,直到元素添加成功!当我们一个线程从阻塞队列里面获取元素的时候,如果队列是空的,那这个线程不会直接返回,而是会被阻塞直到元素获取成功。而阻塞以及唤醒的操作都由阻塞队列来管理!
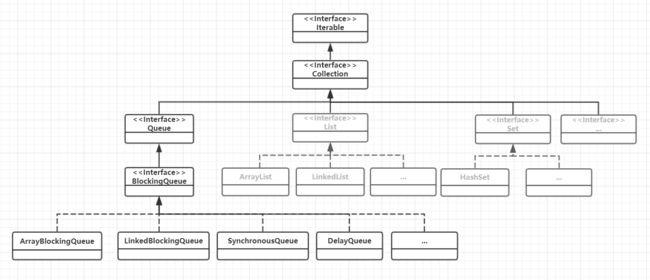
常用阻塞队列类图
我们先看在java中阻塞队列基本的继承关系图:
完整的继承关系要比这张图复杂一些,但为了清晰起见图中我只画了主要的类和关系。队列的基接口Queue与我们开发中经常用到的List、Set是兄弟关系,因此我这里也列出来了方便对比记忆!阻塞队列的基接口是继承自Queue接口的BlockingQueue接口,其他阻塞队列具体实现都继承BlockingQueue接口!
BlockingQueue常用方法
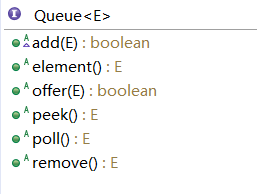
我们先看队列基接口Queue中的方法
这个接口一共6个方法,我们可以分为两组
1、“异常”组
1、add(e):将元素放到队列末尾,成功返回true,失败则抛异常。
2、remove():获取并移除队首元素,获取失败则抛异常。
3、element():获取队首元素,不移除,获取失败则抛异常。
2、“特殊值”组
1、offer(e):将元素放到队列末尾,成功返回true,失败返回false。
2、poll():获取并返回队首元素,获取失败则返回null。
3、peek():获取队首元素,不移除,获取失败则返回null。
“异常”组的3个方法在操作失败的时候会抛异常,因此叫“异常”组!
“特殊值”组3个方法与“异常”组的3个方法是一一对应的,功能都一样,只是在操作失败的时候不会抛异常而是返回一个特殊值,因此叫“特殊值组”。
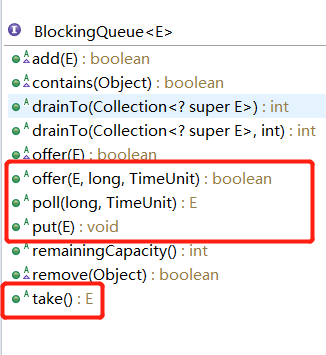
这两组方法都是在Queue接口中定义的,因此跟阻塞就没有什么关系了。那我们再看看BlockingQueue接口中的方法
这个接口我们重点关注标记出来的4个方法,这几个方法我们也可以分为两组
3、“阻塞”组
1、put(e):将元素放到队列末尾,如果队列满了,则等待。
2、take():获取并移除队首元素,如果队列为空,则等待。
4、“超时”组
1、offer(e,time,unit):将元素放到队列末尾,如果队列满了,则等待,当等待超过指定时间后仍添加元素失败,则返回false,否则返回true。
2、poll(time,unit):获取并返回队首元素,如果队列为空,则等待,当等待超过指定时间后仍获取失败则返回null,否则返回获取到的元素。
这两组方法都是在BlockingQueue接口中定义的,因此都是跟阻塞相关的!
“阻塞”组2个方法在操作不成功的时候会一直阻塞线程,直到能够操作成功,因此叫“阻塞”组!用一个成语形容就是“不见不散”!
“超时”组2个方法与“超时”组的2个方法是一一对应的,功能都一样,只是这2个方法不会一直阻塞,超过了指定的时间还没成功就停止阻塞并返回,因此叫“超时”组!用一个成语形容就是“过时不候”!
这四组方法合在一起就有了下面的一张表格:
| 方法功能 | 异常组 | 特殊值组 | 阻塞组 | 超时组 |
|---|---|---|---|---|
| 元素入队 | add(e) | offer(e) | put(e) | offer(e,time,unit) |
| 元素出队 | remove() | pool() | take() | poll(time,unit) |
| 检查元素 | element() | peek() | 无 | 无 |
源码分析常用阻塞队列
BlockingQueue的实现类有多个,但是如果每一个源码都进行分析那不仅很影响篇幅且没必要,因此我这里拿三个常用的阻塞队列源码进行分析!在源码中jdk的版本为1.8!
ArrayBlockingQueue
我们先看下ArrayBlockingQueue中的几个属性
 /** The queued items 使用数组存储元素 */
    final Object[] items;    /** items index for next take, poll, peek or remove 下一个出队元素索引 */
    int takeIndex;    /** items index for next put, offer, or add 下一个入队元素索引 */
    int putIndex;    /** Number of elements in the queue 队列元素个数 */
    int count;    /*
	 * ReentrantLock+Condition控制并发
     * Concurrency control uses the classic two-condition algorithm
     * found in any textbook.
     */

    /** Main lock guarding all access */
    final ReentrantLock lock;    /** Condition for waiting takes */
    private final Condition notEmpty;    /** Condition for waiting puts */
    private final Condition notFull;
1.object类型数组,也意味着ArrayBlockingQueue底层数据结构是数组。
2.ReentrantLock+Condition,如果看过我上一篇文章的应该很熟悉,这是用做来线程同步和线程通信的。
我们再看下ArrayBlockingQueue的构造函数。
  public ArrayBlockingQueue(int capacity) {        this(capacity, false);
    }	public ArrayBlockingQueue(int capacity, boolean fair) {        if (capacity <= 0)            throw new IllegalArgumentException();        this.items = new Object[capacity];
        lock = new ReentrantLock(fair);
        notEmpty = lock.newCondition();
        notFull =  lock.newCondition();
	}	public ArrayBlockingQueue(int capacity, boolean fair,
                              Collection c){        this(capacity, fair);		//初始化一个集合到队列
        ....
    }
这三个构造函数都必须传入一个int类型的capacity参数,这个参数也意味着ArrayBlockingQueue是一个有界的阻塞队列!
我们前面说过队列有常用的四组方法,而跟阻塞相关的是“阻塞”组和“超时”组的四个方法!我们以“阻塞”组的put()和take()方法为例,来窥探一下源码里面的奥秘:
 /**
     * Inserts the specified element at the tail of this queue, waiting
     * for space to become available if the queue is full.
     */
    public void put(E e) throws InterruptedException {
        checkNotNull(e);		//加锁操作
        final ReentrantLock lock = this.lock;
        lock.lockInterruptibly();        try {			//判断队列是否满足入队条件,如果队列已满,则阻塞等待一个“不满”的信号
            while (count == items.length)
                notFull.await();
			//满足条件,则进行入队操作
            enqueue(e);
        } finally {
            lock.unlock();
        }
    }    private void enqueue(E x) {        final Object[] items = this.items;
        items[putIndex] = x;
		// 下一个入队元素索引超过了数组的长度,则又从0开始。
        if (++putIndex == items.length)
            putIndex = 0;

        count++;
		//放入元素后,释放一个“不空”的信号。唤醒等待中的出队线程。
        notEmpty.signal();
    }
    public E take() throws InterruptedException {		//加锁操作
        final ReentrantLock lock = this.lock;
        lock.lockInterruptibly();        try {			//判断队列是否满足出队条件,如果队列为空,则阻塞等待一个“不空”的信号
            while (count == 0)
                notEmpty.await();
			//满足条件,则进行出队操作
            return dequeue();
        } finally {
            lock.unlock();
        }
    }    private E dequeue() {        final Object[] items = this.items;
        E x = (E) items[takeIndex];
        items[takeIndex] = null;//help GC

		// 下一个出队元素索引超过了数组的长度,则又从0开始。
        if (++takeIndex == items.length)
            takeIndex = 0;

        count--;        if (itrs != null)
            itrs.elementDequeued();//更新迭代器元素数据

		//取出元素后,释放一个“不满”的信号。唤醒等待中的入队线程。
        notFull.signal();        return x;
    }
ArrayBlockingQueue的入队出队代码还是很简单的,当我们往一个阻塞队列里面添加数据的时候,阻塞队列用一个固定长度的数据存储数据,如果数组的长度达到了最大容量,则添加数据的线程会被阻塞。当我们从阻塞队列获取数据的时候,如果队列为空,则获取数据的线程会被阻塞!相信代码上的注释已经足够理解这块的代码逻辑了!
LinkedBlockingQueue
我们先看下LinkedBlockingQueue中的几个属性
/** The capacity bound, or Integer.MAX_VALUE if none 队列容量 */private final int capacity;/** Current number of elements 队列元素个数 */private final AtomicInteger count = new AtomicInteger();/** * 队列头 * Head of linked list. * Invariant: head.item == null */transient Nodehead;/** * 队列尾 * Tail of linked list. * Invariant: last.next == null */private transient Node last; /** Lock held by take, poll, etc 出队操作用到的锁 */ private final ReentrantLock takeLock = new ReentrantLock(); /** Wait queue for waiting takes */ private final Condition notEmpty = takeLock.newCondition(); /** Lock held by put, offer, etc 入队操作用到的锁 */ private final ReentrantLock putLock = new ReentrantLock(); /** Wait queue for waiting puts */ private final Condition notFull = putLock.newCondition();
1.Node类型的变量head和last,这是链表常见操作,也意味着LinkedBlockingQueue底层数据结构是链表。
2.与ArrayBlockingQueue不同的是,这里有两个ReentrantLock对象,put操作个take操作的锁对象是分开的,这样做也是为了提高容器的并发能力。
再看下Node这个内部类
/** * Linked list node class */ static class Node{ E item; //指向下一个节点 Node next; Node(E x) { item = x; } }
只有next属性意味着这是一个单向链表!
再看下LinkedBlockingQueue的构造函数
                public LinkedBlockingQueue() {
        this(Integer.MAX_VALUE);
    }	public LinkedBlockingQueue(int capacity) {
        if (capacity <= 0) throw new IllegalArgumentException();
        this.capacity = capacity;
        last = head = new Node(null);
    }	public LinkedBlockingQueue(Collection c) {
        this(Integer.MAX_VALUE);
        ...
        }
1.当构造函数不传capacity参数的时候,LinkedBlockingQueue就是一个***阻塞队列(其实也并非***,不传默认值就是Integer.MAX_VALUE)。
2.当构造函数传入capacity参数的时候,LinkedBlockingQueue就是一个有界阻塞队列。
我们依然看看在LinkedBlockingQueue中“阻塞”组的两个方法put()和take()分别怎么实现的
/**
 * Inserts the specified element at the tail of this queue, waiting if
 * necessary for space to become available.
 */
 public void put(E e) throws InterruptedException {
     if (e == null) throw new NullPointerException();

	//存储队列元素数量
    int c = -1;

	//创建新节点
	Node node = new Node(e);

	//获取putLock
	final ReentrantLock putLock = this.putLock;

	//队列元素数量
    final AtomicInteger count = this.count;
    putLock.lockInterruptibly();
        try {
                //判断队列是否满足入队条件,如果队列已满,则阻塞等待一个“不满”的信号
        while (count.get() == capacity) {
            notFull.await();
        }

		//入队操作
        enqueue(node);

		//队列元素数量+1,执行完下面这句后,count是入队后的元素数量,而c的值还是入队前的元素数量。
        c = count.getAndIncrement();

		//当前入队操作成功后,如果元素数量还小于队列容量,则释放一个“不满”的信号
        if (c + 1 < capacity)
            notFull.signal();

    } finally {
        putLock.unlock();
    }
	//这里的c前面说了是元素入队前的数量,如果入队前元素数量为0(队列是空的),那可能会有出队线程在等待一个“不空”的信号,所以这里释放一个“不空”的信号。
    if (c == 0)
        signalNotEmpty();
}
private void signalNotEmpty() {
    final ReentrantLock takeLock = this.takeLock;
    takeLock.lock();
    try {
        notEmpty.signal();
    } finally {
        takeLock.unlock();
    }
}
public E take() throws InterruptedException {
	//出队元素
    E x;

	//存储队列元素数量
    int c = -1;

	//队列元素数量
    final AtomicInteger count = this.count;

	//获取takeLock
    final ReentrantLock takeLock = this.takeLock;
    takeLock.lockInterruptibly();

    try {
    		//判断队列是否满足出队条件,如果队列为空,则阻塞等待一个“不空”的信号
        while (count.get() == 0) {
            notEmpty.await();
        }

		//出队操作
        x = dequeue();

		//队列元素数量-1,执行完下面这句后,count是出队后的元素数量,而c的值还是出队前的元素数量。
		c = count.getAndDecrement();

		//当前出队操作成功前队列元素大于1,那当前出队操作成功后队列元素也就大于0,则释放一个“不空”的信号
        if (c > 1)
            notEmpty.signal();

    } finally {
        takeLock.unlock();
    }
	//这里的c前面说了是元素出队前的数量,如果出队前元素数量为总容量(队列是满的),那可能会有入队线程在等待一个“不满”的信号,所以这里释放一个“不满”的信号。
    if (c == capacity)
        signalNotFull();
    return x;
}
private void signalNotFull() {
    final ReentrantLock putLock = this.putLock;
    putLock.lock();
    try {
        notFull.signal();
    } finally {
        putLock.unlock();
    }
}
这里源码的同步逻辑比ArrayBlockingQueue中要稍微复杂一点,在ArrayBlockingQueue中每次入队都释放一个“不空”的信号,每次出队都释放一个“不满”的信号,而LinkedBlockingQueue则不同。
元素入队的时候
1.入队后还有空位,则释放一个“不满”的信号。
2.入队时队列为空,则释放一个“不空”的信号。
元素出队的时候
1.出队后队列还有元素,则释放一个“不空”的信号。
2.出队前队列是满的,则释放一个“不满”的信号。
SynchronousQueue
SynchronousQueue从名字看叫“同步队列”,怎么理解呢?虽然他也叫队列,但是他不提供空间存储元素!当一个线程往队列添加元素,需要匹配到有另外一个线程从队列取元素,否则线程阻塞!当一个线程从队列获取元素,需要匹配到有另外一个线程往队列添加元素,否则线程阻塞!所以这里的同步指的就是入队线程和出队线程需要同步!这里有点类似你妈妈对你说:“今年你再找不到女朋友,过年你就别回来了!”,于是你第二年就真的没回去过年!因为你是一个获取数据(找女朋友)的线程,数据没获取到则一直阻塞!
了解了大致概念,我们再来看看源码!
/**
     * Creates a {@code SynchronousQueue} with nonfair access policy.
     */
    public SynchronousQueue() {        this(false);
    }    /**
     * Creates a {@code SynchronousQueue} with the specified fairness policy.
     *
     * @param fair if true, waiting threads contend in FIFO order for
     *        access; otherwise the order is unspecified.
     */
    public SynchronousQueue(boolean fair) {
        transferer = fair ? new TransferQueue() : new TransferStack();
    }
  两个构造函数,fair参数指定公平策略,默认为false,因此是非公平模式!先看看put和take方法的实现:
	public void put(E e) throws InterruptedException {        if (e == null) throw new NullPointerException();        if (transferer.transfer(e, false, 0) == null) {
            Thread.interrupted();            throw new InterruptedException();
        }
    }    public E take() throws InterruptedException {
        E e = transferer.transfer(null, false, 0);        if (e != null)            return e;
        Thread.interrupted();        throw new InterruptedException();
    }
put和take方法很类似,都是调用transferer.transfer(...)方法,区别在于第一个参数!put方法在调用时候会参入入队的值,而take方法传入null。
上面说过有公平和非公平策略,今天将重点分析公平模式TransferQueue的源码!从名字能看出来这也是一个队列,我们先看TransferQueue的重点属性和构造方法:
	// 指向队列头部
    transient volatile QNode head;    // 指向队列尾部
    transient volatile QNode tail;

    TransferQueue() {        //初始化一个空
		//#1
        QNode h = new QNode(null, false); // initialize to dummy node.
        head = h;
        tail = h;
    }
一头一尾,链表的一贯操作!构造方法中,创建了一个QNode结点,并且将head和tail都指向这个结点!我们再看看QNode类的重要属性和构造方法:
volatile QNode next;          // 指向队列的下一个节点
volatile Object item;         // 节点存储的元素
volatile Thread waiter;       // 被阻塞的线程
final boolean isData;		  // 是否是“数据”结点(入队线程为true,出队线程为false)

QNode(Object item, boolean isData) {
   this.item = item;
   this.isData = isData;
   }
我们再回到上面提到的transferer.transfer(...)方法,也就是TransferQueue中的transfer(...)方法,核心逻辑都在这个方法中体现:
/**
 * “存”或者“取”一个元素
 */
 @SuppressWarnings("unchecked")
 E transfer(E e, boolean timed, long nanos) {
    QNode s = null; // constructed/reused as needed

    //当前操作类型,传非null的值则为生产线程,传null则为消费线程。
    boolean isData = (e != null);

    for (;;) {
        QNode t = tail;
        QNode h = head;
        //上面我们说过在构造方法中就创建了一个QNode结点,并且将head和tail都指向这个结点
        //因此这里t、h一般情况下不会为null
        if (t == null || h == null)         // saw uninitialized value
            continue;                       // spin

        //根据SynchronousQueue的特性,不同类型的操作会配对成功。
        //因此在阻塞队列中只会存在一种类型的阻塞节点,要么全是消费线程要么全是生产线程!
        //所以分三种情况:
        //1.h == t,这种情况下队列为空,需要将当前节点入队。
        //2.t.isData == isData尾部节点的操作类型与当前操作类型
        //       一致(尾部节点的操作类型代表着队列中所有节点的操作类型),需要将当前节点入队。
        //3.队列不为空且尾部节点的操作类型与当前操作类型不一致,
        //       需要从队列头部匹配一个节点并返回。
        //因此再看下面的代码,会根据上面3种情况走不同的分支。
        if (h == t || t.isData == isData) { // empty or same-mode

            //进入这个分支就是上面1、2的情况

            //获取尾部节点的next指向,正常情况下tn等于null
            QNode tn = t.next;

            //下面是判断是否出现并发导致尾节点被更改
            if (t != tail)                  // inconsistent read
                continue;
            if (tn != null) {               // lagging tail
                advanceTail(t, tn);
                continue;
            }
            //超时判断
            if (timed && nanos <= 0)        // can't wait
                return null;

            //将当前操作创建为新节点,传入数据值和操作类型。
            //#2
            if (s == null)
                s = new QNode(e, isData);

            //1、将阻塞队列中尾部节点的next指向新节点
            //2、将tail属性的指向设置为新节点
            //#3
            if (!t.casNext(null, s))        // failed to link in
                continue;
            advanceTail(t, s);              // swing tail and wait

            //在这个方法内部会进行自旋或者阻塞,直到配对成功。
            //建议这里先跳到下面这个方法内部看完逻辑再回来。
            Object x = awaitFulfill(s, e, timed, nanos);

            //只有在线程被中断的情况下会进入这个分支
            if (x == s) {                   // wait was cancelled
                clean(t, s);
                return null;
            }
            if (!s.isOffList()) {           // not already unlinked
                advanceHead(t, s);          // unlink if head
                if (x != null)              // and forget fields
                    s.item = s;
                s.waiter = null;
            }

            //如果为生产线程,则返回入队的值;如果为消费线程,则返回匹配到的生产线程的值。
            return (x != null) ? (E)x : e;

        } else {                            // complementary-mode

            //进入这个分支就是上面3的情况

            //找到头部节点的next指向
            //#4
            QNode m = h.next;               // node to fulfill
            if (t != tail || m == null || h != head)
                continue;                   // inconsistent read
            Object x = m.item;

            //m.casItem(x, e)方法很重要,会将匹配到的节点的item修改为当前操作的值。
            //这样awaitFulfill方法的x != e条件才能成立,被匹配的阻塞线程才能返回。
            //#5
            if (isData == (x != null) ||    // m already fulfilled
                x == m ||                   // m cancelled
                !m.casItem(x, e)) {         // lost CAS
                advanceHead(h, m);          // dequeue and retry
                continue;
            }

            //调整head属性的指向,这里建议这里先跳到下面这个方法内部看完逻辑再回来。
            advanceHead(h, m);              // successfully fulfilled

            //唤醒匹配到的阻塞线程
            LockSupport.unpark(m.waiter);

            //如果为生产线程,则返回入队的值;如果为消费线程,则返回匹配到的生产线程的值。
            return (x != null) ? (E)x : e;
        }
    }
}
Object awaitFulfill(QNode s, E e, boolean timed, long nanos) {
    /* Same idea as TransferStack.awaitFulfill */
    final long deadline = timed ? System.nanoTime() + nanos : 0L;
    Thread w = Thread.currentThread();

    //如果头节点的next指向当前的数据节点,也就是当前数据节点是下一个待匹配的节点,那就自旋等待一会儿。
    //如果设置了超时时间就少自旋一会儿,没有设置超时时间就多自旋一会儿。
    //可以看看maxTimedSpins和maxUntimedSpins两个属性的值设置,是与cpu数量相关的。
    int spins = ((head.next == s) ?
                 (timed ? maxTimedSpins : maxUntimedSpins) : 0);

    for (;;) {
        if (w.isInterrupted())
            s.tryCancel(e);
        Object x = s.item;
        // 第一次进来这里肯定是相等的,所以不会进入这个分支。
        // 当有其他的线程匹配到当前节点,这里的s.item的值会被更改(前面说到过的m.casItem(x, e)方法),所以方法返回。
        if (x != e)
            return x;
        if (timed) {
            nanos = deadline - System.nanoTime();
            if (nanos <= 0L) {
                s.tryCancel(e);
                continue;
            }
        }

        if (spins > 0)
            --spins;
        else if (s.waiter == null)
            s.waiter = w;
        else if (!timed)
            //这里线程会阻塞,如果有线程与当前线程匹配,则被唤醒进行下一次循环。
            LockSupport.park(this);
        else if (nanos > spinForTimeoutThreshold)
            LockSupport.parkNanos(this, nanos);
    }
}
void advanceHead(QNode h, QNode nh) {
    //这个方法做了两个操作
    //1、将head属性的指向调整为头节点的下一个结点
    //2、将原头节点的next指向原头节点本身
    //#6
    if (h == head &&
        UNSAFE.compareAndSwapObject(this, headOffset, h, nh))
        h.next = h; // forget old next
}
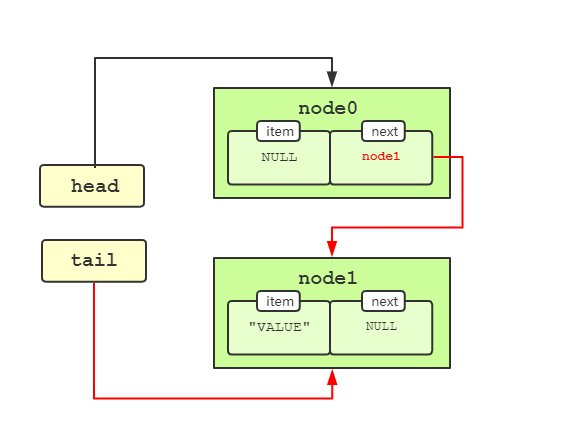
不知道看完上面的SynchronousQueue基于公平模式TransferQueue的源码有没有对SynchronousQueue有一个很好的了解!下面我模拟了一个场景,先有一个生产线程进入队列,然后一个消费线程进入队列。结合上面源码我画了几张节点变化的图例以便更好的理解上面整个过程,可以结合上面的源码一起看
//创建SynchronousQueue对象 SynchronousQueuesynchronousQueue = new SynchronousQueue<>(true); //生产线程new Thread(new Runnable() { @Override public void run() { try { synchronousQueue.put("VALUE"); } catch (InterruptedException e) { e.printStackTrace(); } } }).start(); Thread.sleep(1000); //消费线程new Thread(new Runnable() { @Override public void run() { try { synchronousQueue.take(); } catch (InterruptedException e) { e.printStackTrace(); } } }).start();
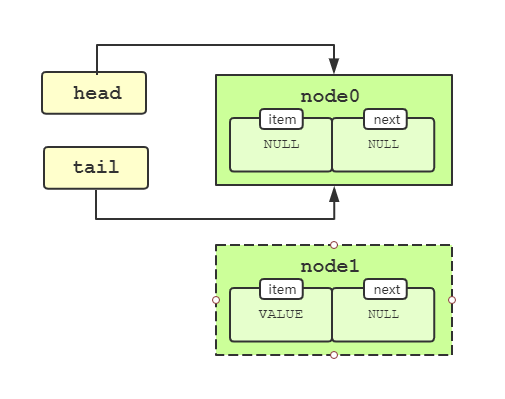
我们在创建SynchronousQueue对象时候会执行构造函数,也就是在源码#1处执行完后,会创建一个新的节点node,如下图所示,一头一尾都指向构造函数中创建出来的新节点node!
然后会执行synchronousQueue.put()的逻辑,也就是TransferQueue中的transfer(...)方法逻辑。按照我们之前的分析,会执行到源码#2处,执行完后新的节点node1会被创建,如下图所示。
接着在代码#3处执行完后,节点图示如下,注意红色箭头指向的调整。
到这里,生产线程会进入awaitFulfill方法自旋后阻塞!等待消费线程的唤醒!
然后执行synchronousQueue.take()的逻辑,也就是TransferQueue中的transfer(...)方法逻辑。按照我们之前的分析,会执行到源码#4处,执行完后就找到了我们需要匹配的节点node1,注意红色箭头指向。
执行到#5处的方法会改变匹配到节点的item属性值,注意node1节点item属性的变化,如下图所示。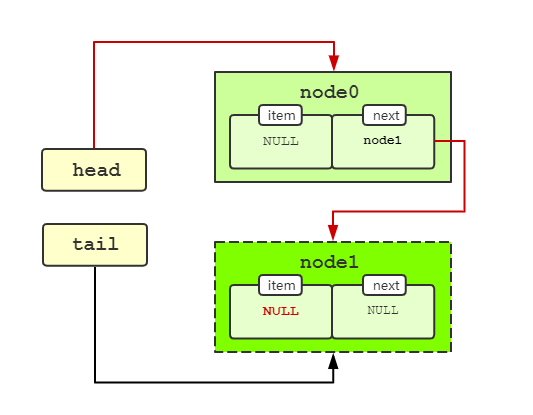
然后在代码#6处执行完后,节点图示如下,注意红色箭头指向的调整。
最后就是消费线程唤醒生产线程,消费线程返回,生产线程也返回,过程结束!
好了,源码分析就到这里结束了,你学会了吗?
