Python tkinter自定义消息窗口messagebox
tkinter模块python图形编程中常用的库,最近想要用tk中的messagebox实现一些简单的功能。
首先,我们看到tkinter中messagebox对像的使用。
from tkinter import messagebox
在pycharm中选中messagebox直接“ctrl+B"进入到messagebox文件,或者找到安装tkinter目录.\Lib\tkinter下的messagebox.py文件。翻到最下面,发现有几行测试代码:
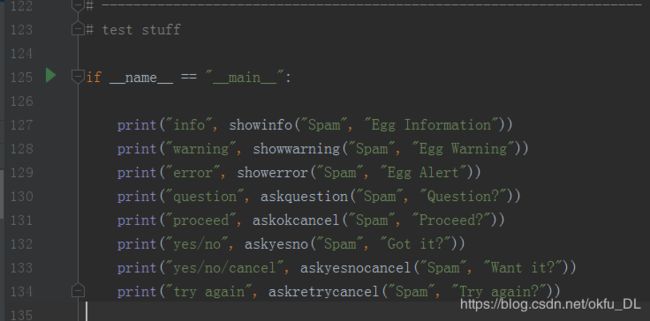
运行python message.py
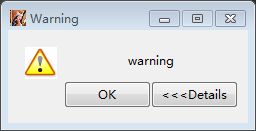
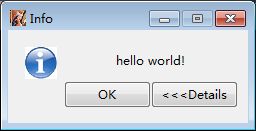
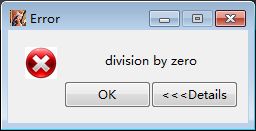
依次弹出
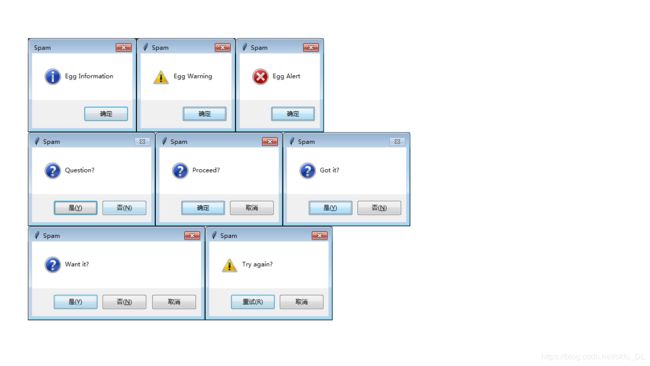
一共设计了七种常用窗口。来看看是如何实现的吧:
messagebox.py
通过看代码发现,这七个方法通过对 "_show" 这个函数传入不同的参数达到不同的显示效果。
def _show(title=None, message=None, _icon=None, _type=None, **options):
    if _icon and "icon" not in options:    options["icon"] = _icon
    if _type and "type" not in options:    options["type"] = _type
    if title:   options["title"] = title
    if message: options["message"] = message
    res = Message(**options).show()
    # In some Tcl installations, yes/no is converted into a boolean.
    if isinstance(res, bool):
        if res:
            return YES
        return NO
    # In others we get a Tcl_Obj.
    return str(res)
而负责显示的代码主要就一句:
res = Message(**options).show()
Message是这个文件的自定义类,理论上如果我们需要自定义一些功能只需要自定义一个类继承Message类,就可以增加自己的功能了,这个类就定义了一个command属性:
from tkinter.commondialog import Dialog
class Message(Dialog):
    "A message box"

    command  = "tk_messageBox"
于是我们去看父类Dialog的代码,
from tkinter import *

class Dialog:

    command  = None

    def __init__(self, master=None, **options):
        self.master  = master
        self.options = options
        if not master and options.get('parent'):
            self.master = options['parent']

    def _fixoptions(self):
        pass # hook

    def _fixresult(self, widget, result):
        return result # hook

    def show(self, **options):

        # update instance options
        for k, v in options.items():
            self.options[k] = v

        self._fixoptions()

        # we need a dummy widget to properly process the options
        # (at least as long as we use Tkinter 1.63)
        w = Frame(self.master)

        try:

            s = w.tk.call(self.command, *w._options(self.options))

            s = self._fixresult(w, s)

        finally:

            try:
                # get rid of the widget
                w.destroy()
            except:
                pass

        return s
找到show方法。找到用于显示的代码
w = Frame(self.master)
s = w.tk.call(self.command, *w._options(self.options))
发现似乎和想象的不一样,Dialog类自己并不用于显示,而是新建了一个Frame对象w,对这个调用了这个w.tk.call方法。
现在我想在消息窗口中增加一个倒计时功能,使窗口弹出后5秒钟自动关闭,我们自定义一个类:
from tkinter import messagebox
import threading
import time

class TimeMessage(messagebox.Message):

    def __init__(self, **options):
        super().__init__(**options)
        self.signal = True
        self.w = tk.Frame(self.master)
        t = threading.Thread(target=self.count_time)
        t.start()

    def count_time(self):

        _time = 5
        while _time:
            print(_time)
            if not self.signal:
                return
            time.sleep(1)
            _time -= 1
        self.w.destroy()

    def show(self, **options):

        # update instance options
        for k, v in options.items():
            self.options[k] = v

        self._fixoptions()

        # we need a dummy widget to properly process the options
        # (at least as long as we use Tkinter 1.63)

        try:

            s = self.w.tk.call(self.command, * self.w._options(self.options))
            s = self._fixresult(self.w, s)
            self.signal = False

        finally:

            try:
                # get rid of the widget
                self.w.destroy()
            except:
                pass

        return s
添加了一个计时的线程count_time(),一秒钟循环一次当时间减为0,则销毁w窗口,值得注意的是为了让计时函数使用w,这里将w写进init方法中,改为self.w。为了防止窗口点击关闭后,计时线程仍在运行,用一个信号量self.signal判断窗口是否已经关闭。
然后复制messagebox.py中的七个函数和"_show"函数,将res = Message(**options).show()改为res = TimeMessage(**options).show(),测试代码:
if __name__ == "__main__":
	showinfo(title="123", message="456")
运行

倒计时五秒后,报错。大概是说主进程不在主窗口循环中,也就是说,消息窗进入了阻塞状态,必须点击后,才能回到主窗口循环中。没办法,只能重头开始写了,其实Messagebox也就是一个普通的窗口,可贵在好看的图标和整齐的布局,这也不难,开始搞起吧。
效果图
下载图标
自定义类
class TimeMessage(tk.Tk):

    def __init__(self, **kwargs):
        tk.Tk.__init__(self)

        self._title = kwargs["title"]
        self.message = kwargs["message"]
        self.timing = kwargs["timing"]
        self.detail = kwargs["detail"]

        self.details_expanded = False
        self.d_signal = False
        # self.withdraw()

        self.height = 0
        self.width = 0
        self.textbox = None  # 详细文本
        self.scrollbar = None  # 滚动条
        self.pic_frame = None  # 图片区域
        self.top = None

    def show(self):

        if self.timing:
            count_thread = threading.Thread(target=self.count_time)
            count_thread.start()
        if not self.detail:
            self.detail = self.message
        self.top_window(self.detail)
这个类继承了tk.TK类
输入参数包括
title:标题
message:显示信息
timing:倒计时秒数,为0则无倒计时功能
detail:详细信息(增加了一个详细信息显示功能)
看到上面代码的中的show函数最后一行会渲染一个TopLevel类,用于消息显示。
    def top_window(self, detail):
        self.top = tk.Toplevel()
        self.top.title(self._title)

        self.top.resizable(False, False)

        self.top.rowconfigure(2, weight=1)
        self.top.columnconfigure(0, weight=1)

        self.pic_frame = tk.Frame(self.top)
        self.pic_frame.grid(row=0, column=0, sticky="nsew")

        text_frame = tk.Frame(self.top)
        text_frame.grid(row=0, column=1, columnspan=2, sticky="nsew", padx=(0, 10))
        text_frame.columnconfigure(0, weight=1)
        text_frame.columnconfigure(1, weight=1)
        ttk.Label(text_frame, text=self.message[:100]).grid(row=0, column=0, columnspan=2, pady=(20, 7))

        button_frame = tk.Frame(self.top)
        button_frame.grid(row=1, column=1, columnspan=2, sticky="nsew", padx=(0, 10))
        button_frame.columnconfigure(0, weight=1)

        ttk.Button(button_frame, text="OK", command=self.destroy).grid(row=0, column=1, sticky="e")
        ttk.Button(button_frame, text="<<, command=self.toggle_details).grid(row=0, column=2, sticky="w")

        detail_frame = tk.Frame(self.top)
        detail_frame.grid(row=2, column=0, columnspan=3, padx=(7, 7), pady=(7, 7), sticky="nsew")

        self.textbox = tk.Text(detail_frame, height=6)
        self.textbox.insert("1.0", detail)
        self.textbox.config(state="disabled")
        self.scrollbar = tk.Scrollbar(detail_frame, command=self.textbox.yview)

        self.top.protocol("WM_DELETE_WINDOW", self.destroy)
大部分代码都用于窗口的布局,这里采用的grid栅格布局的方法。包括左侧图片区域、文本区域、按钮区域,以及详细信息区域(新增)。

需要注意的是两个按钮,一个OK按钮绑定的是"窗口关闭事件"command=self.destory,另一个Details按钮绑定的是"弹出/隐藏详细信息事件"command=self.toggle_details下面我们码出这两个函数:
    def toggle_details(self):
        if not self.details_expanded:
            print(self.width)
            self.textbox["width"] = int((self.width-10)//7.7)
            self.textbox.grid(row=0, column=0)
            self.scrollbar.grid(row=0, column=1, sticky='nsew')
            self.top.geometry("{}x{}".format(self.width, self.height+105))
            self.details_expanded = True

        else:
            self.textbox.grid_forget()
            self.scrollbar.grid_forget()
            self.top.geometry("{}x{}".format(self.width, self.height))
            self.details_expanded = False

    def destroy(self):

        super().destroy()
        self.d_signal = True
由于destory是TK类的方法,所以重写该方法需要先调用父类的方法,然后将"计时线程的信号量"设置为True。然后toggle_details函数的主要原理是通过变量"self.details_expanded"判断详细信息是否弹出,设置窗口的大小达到显示/隐藏详细信息区域的目的。
加载图片
写到这里,你会有疑问,加载图片在哪里呢?别急,这里有一个bug,就是图片的加载必须要在类实例化后进行。很遗憾,由于笔者能力有限,没有发现这个bug的原因,(如果哪位大佬知道,请留言告诉我,不胜感激)。于是,只好吧这部分代码写入"_show"函数中:
def _show(title, message, detail, icon, timing, _type):

    if message is None:
        message = ""
    else:
        message = str(message)

    if title is None:
        title = _type
    window = TimeMessage(title=title, message=message, detail=detail, timing=timing)
    window.show()
    if icon:
        window.top.iconbitmap(icon)
    path = PATH[_type]
    img = Image.open(path)
    photo = ImageTk.PhotoImage(img)  # 在root实例化后创建,否则会报错
    label = tk.Label(window.pic_frame, image=photo)
    label.grid(row=0, column=0, pady=(15, 0), sticky="w", padx=(15, 5))

    window.top.update()
    window.height = window.top.winfo_height()
    window.width = window.top.winfo_width()

    window.mainloop()
可以看到,window就是实例化的TimeMessage类,调用"window.show()"函数后,Toplevel就渲染完成,这个时候再给显示区域铺上icon(左上角图标)和photo(左侧图片)。
注意下面有三行代码:
	window.top.update()
    window.height = window.top.winfo_height()
    window.width = window.top.winfo_width()
由于窗口没有设置固定大小,所以会根据文字多少自适应的窗口大小,而上面代码就是用来获取此时的窗口高宽的,来方便设置详细信息区域的宽度与初始宽度一致性。
好了,以上就是自定义消息窗口messagebox的全部内容了,觉得有用的话就点个赞吧。
代码放这里了:https://download.csdn.net/download/okfu_DL/12268051
